Mix 4 teaspoons of Grow More 20-20-20 per gallon of water, stir until fully dissolved, then water it into moist soil or spray it onto foliage. That one-gallon rate is the go-to for home gardeners and covers most situations, from potted houseplants to seedlings to container vegetables. The rest of this guide fills in every detail: what the numbers mean, when to use this fertilizer, how to adjust for plant type and growth stage, how often to feed, and what to do if something goes sideways.
Grow More 20-20-20 Instructions: Mix, Feed, Repeat Safely

Marcus Thornfield
15 Jun 2026
What the 20-20-20 numbers actually mean
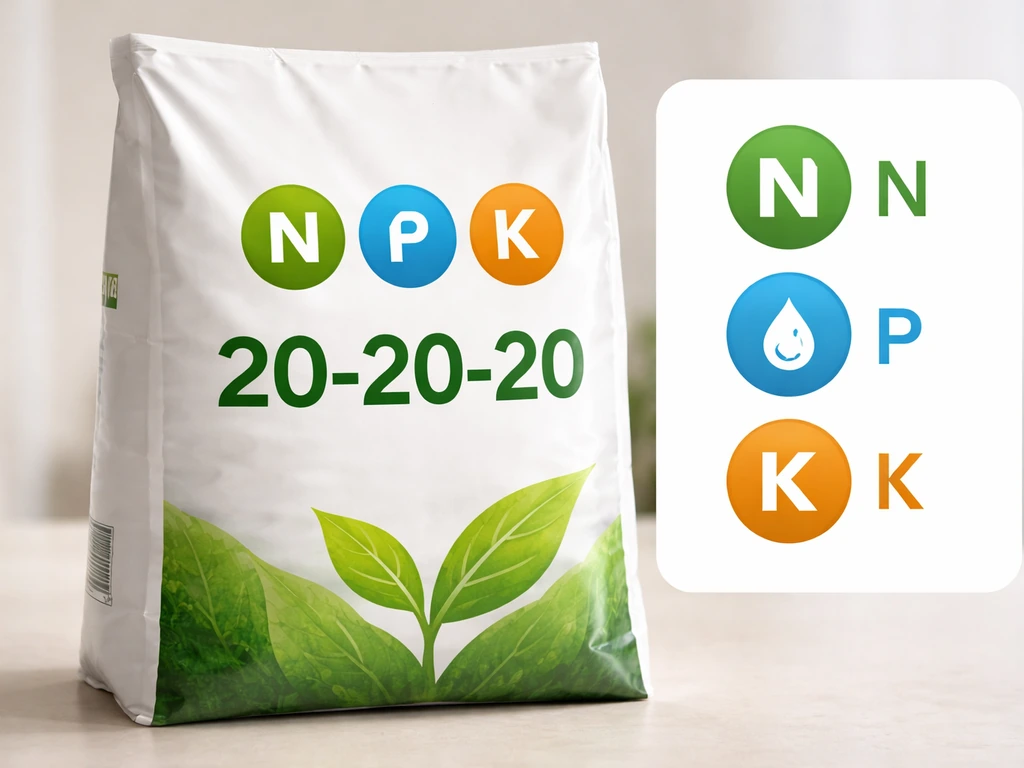
The three numbers on any fertilizer bag represent the percentage of nitrogen (N), phosphorus (P2O5), and potassium (K2O) in that order. Grow More 20-20-20 has exactly 20% of each, making it a perfectly balanced formula. That balance is useful when you want to support all aspects of plant growth at once: nitrogen drives leafy green growth, phosphorus supports root development and flowering, and potassium helps with overall plant strength and stress resistance.
On top of those three macronutrients, Grow More 20-20-20 includes chelated micronutrients, specifically iron, zinc, manganese, and copper. Chelated just means the micronutrients are chemically bonded in a way that keeps them available to plants even at different pH levels. You also get boron (0.02%), molybdenum (0.0005%), and a few others. For beginner growers, the key takeaway is that this fertilizer is more complete than many budget options.
Use this fertilizer when your plants need a general nutrition boost without you having to guess which nutrient is lacking. It works well during active growing seasons, for seedling establishment, and for any plant in a container or grow kit where nutrients wash out with every watering. It is not the best choice for boosting blooms specifically (a high-phosphorus formula would serve better there) or for plants that are dormant or stressed from heat, drought, or root damage.
What you need before you mix anything
Before you open the bag, get your supplies together and actually read the label. This sounds obvious, but the Grow More label has different rate tables for different uses, and it is easy to grab the wrong number by accident. For home use, ignore the commercial acreage rates. Focus on the backpack sprayer and foliar spray sections, which translate directly to gallon-by-gallon home use.
- Grow More 20-20-20 powder (check the bag is not clumped or damp before use)
- Measuring teaspoon or a small kitchen scale (a food scale accurate to 0.1 grams works well)
- Clean watering can or spray bottle with capacity marked in gallons or liters
- Room-temperature water (cold water slows dissolving, but the label confirms it will dissolve in cold water if you stir long enough)
- Stirring stick or a lid to shake the container
- Gloves if you have sensitive skin
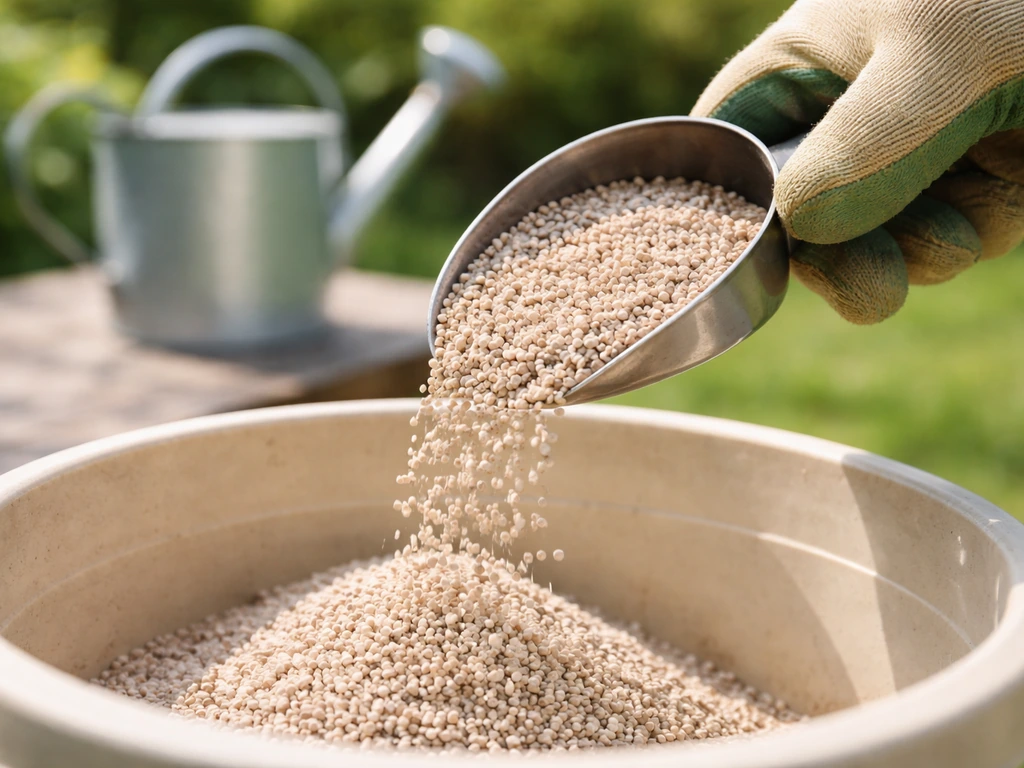
The product label lists 0.50 oz per gallon (about 4.5 grams per liter) as the standard backpack sprayer dose, which works out to roughly 4 teaspoons per gallon. Both measurements give you the same result. If you have a kitchen scale, weighing is more precise than measuring by volume since the powder can settle at different densities. Either way, do not eyeball it. A little too much in a small pot can cause real problems.
Also check whether your water is highly alkaline before you mix. The label specifically warns against mixing with alkaline compounds and recommends a compatibility test before tank mixing at scale. For home growers, this mostly means: if you have very hard tap water and notice a cloudy precipitate forming in your solution, try filtered or rainwater instead.
Step-by-step: how to mix and apply Grow More 20-20-20
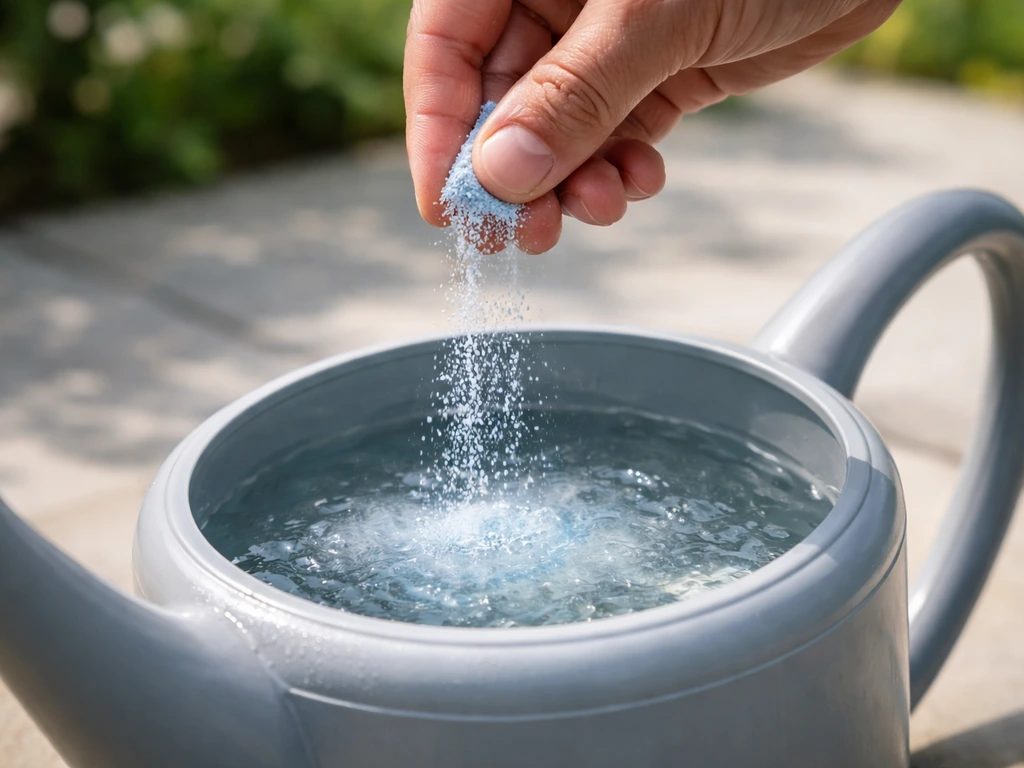
- Fill your watering can or sprayer with the desired amount of water first. Starting with water before adding powder prevents clumping and makes mixing easier.
- Measure 4 teaspoons (or 0.50 oz / 14 grams) of Grow More 20-20-20 per gallon of water. Scale up or down proportionally for smaller volumes: about 1 teaspoon per quart.
- Add the powder slowly to the water while stirring. Keep stirring for 30 to 60 seconds until the solution is completely clear. The label notes that agitation during mixing is important, especially when preparing a concentrated solution.
- If the solution looks cloudy after stirring, keep mixing. Grow More 20-20-20 is 100% water-soluble, so cloudiness usually means it just needs more agitation.
- Before applying, make sure the soil or growing medium is already moist. Never apply fertilizer solution to bone-dry soil or dry roots. Water your plants with plain water first, wait a few minutes, then apply the fertilizer solution.
- For soil application: pour the solution slowly around the base of the plant, avoiding the stem and crown. Apply enough to wet the root zone but stop before water runs out the bottom excessively.
- For foliar application: fill a spray bottle or garden sprayer with the mixed solution and spray leaves until they are lightly coated but not dripping. Spray in the early morning or evening, never in direct midday sun, to prevent the solution from concentrating on leaves as it evaporates.
After applying, rinse any fertilizer solution off leaves or stems you did not intend to spray. If you also need woombie grow with me instructions for a different stage or system, treat leaf rinsing and follow-up watering as the same kind of caution step before you move on to the next schedule. If you are feeding in containers, water lightly with plain water after your feeding session to help distribute the nutrients through the root zone without letting salts accumulate at the surface.
Adjusting for plant type and growth stage
Not every plant needs the same dose or timing, and growth stage matters more than most beginners realize. Here is how to think about it.
Seedlings and transplants
Go lighter with seedlings. Young plants have very limited root systems and are sensitive to salt concentration. The Grow More label includes a transplanting rate of 2 lbs per 100 gallons, which works out to a much more dilute solution than the standard foliar rate. A practical home equivalent is to cut your regular 4-teaspoon-per-gallon mix in half, using about 2 teaspoons per gallon, and apply about 1 cup of that diluted solution per seedling when hand-watering. The label specifically mentions 1 cup of mixed solution per plant for hand-set transplants, which is a good mental image for scale. Always water seedlings with plain water before applying any fertilizer solution.
Established container plants and houseplants
For established potted plants that are actively growing, the standard 4 teaspoons per gallon rate works fine for soil drenching. Container plants lose nutrients faster than in-ground plants because every watering flushes some nutrients out the drainage holes. That means they benefit from more frequent, lower-concentration feedings rather than occasional heavy doses. UMN Extension notes that container plants can lose nutrients through drainage, so more frequent fertilizer applications at a lower rate can help prevent nutrient loss more frequent, lower-concentration feedings. If you want to push faster results, peeps can also look up peep instructions for adjusting fertilizer strength by plant and growth stage more frequent, lower-concentration feedings. A half-strength solution applied every watering is often better than a full-strength solution every two weeks.
Outdoor garden beds and vegetables
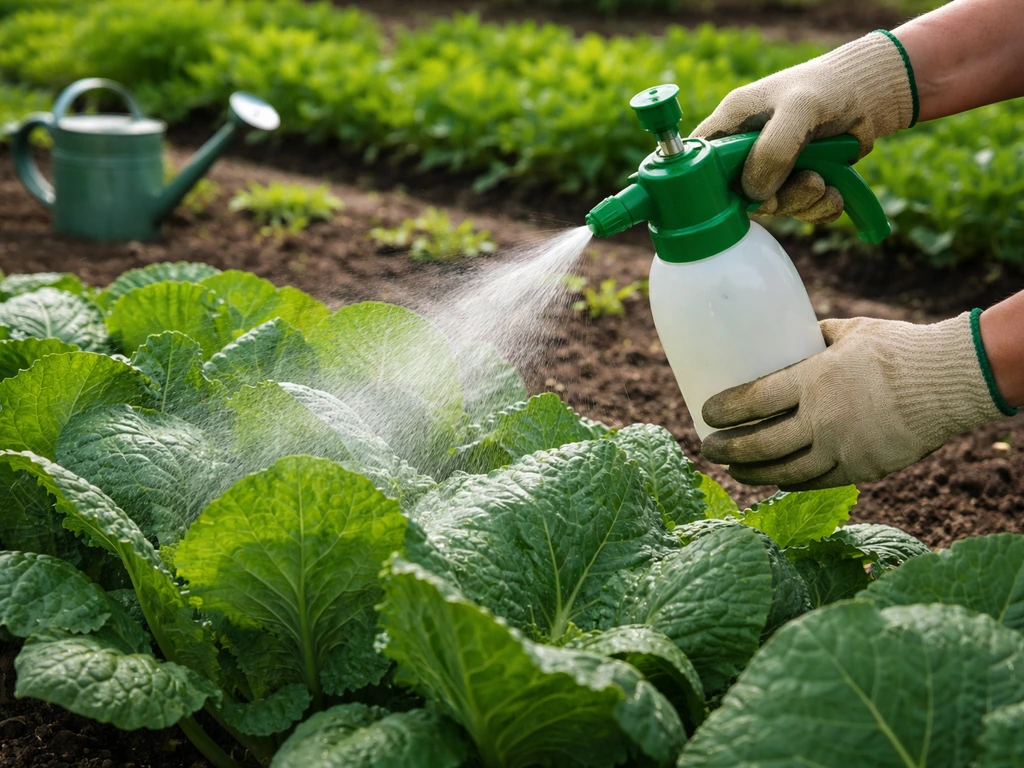
For in-ground vegetables and ornamentals, the full label rate of 4 teaspoons per gallon is appropriate for foliar spraying. Apply as a foliar feed every 7 to 10 days during active growth. Soil drench rates can follow the same dilution. Plants in the ground have more buffering capacity from natural soil, so the risk of salt damage is lower, but overfeeding is still a real possibility if you apply too frequently.
Foliage-heavy plants vs. fruiting or flowering plants
Because 20-20-20 is balanced, it is not the ideal formula to push heavy blooming or fruiting. It will do the job adequately, but if you are trying to maximize fruit set or flower production, you would eventually want to transition to a lower-nitrogen, higher-phosphorus formula. Use 20-20-20 during the vegetative stage and early establishment, then consider switching once plants are flowering or setting fruit.
How often to feed and when to back off
The Grow More label gives you two feeding modes used in professional greenhouse growing, and both translate well to home gardens. The first is intermittent feeding, roughly every two weeks at full strength. The second is constant feeding, meaning a diluted dose applied with every watering. For most home growers, something between those two extremes works best.
| Situation | Recommended Frequency | Dose per Gallon |
|---|---|---|
| Seedlings (first 2–4 weeks) | Every 2 weeks | 2 tsp (half strength) |
| Active houseplants (indoors) | Every 2 weeks at full strength, or every watering at half strength | 2–4 tsp |
| Outdoor container plants | Every 7–14 days | 4 tsp |
| Vegetable garden (foliar) | Every 7–10 days during active growth | 4 tsp |
| Transplants at planting time | Once at transplant, then resume regular schedule | 2 tsp (1 cup per plant) |
| Stressed or dormant plants | Hold off until recovery or growth resumes | None |
Flushing is one of the most useful tools in your rotation and most beginners skip it entirely. Every four to six weeks, water your containers thoroughly with plain water only, using enough to flush out of the drainage holes generously. This prevents salt buildup from accumulated fertilizer residue. If you see a white crust forming on the surface of your potting mix or on the sides of a clay pot, that is a sign that salts are building up and a flush is overdue. Containers lack the natural rainfall that leaches salts from garden beds, so the job falls to you.
Mistakes that cause more harm than good
Most problems with Grow More 20-20-20 come down to concentration errors and application timing. These are the ones I see come up most often.
- Applying to dry soil: this is probably the most common beginner mistake. Fertilizer solution hitting dry roots concentrates salts at the root zone and pulls moisture out of plant cells through osmotic pressure. Always pre-water first.
- Using commercial acreage rates for home pots: the label has rates listed in pounds per acre and pounds per 100 gallons for commercial operations. Those numbers are not meant for a 6-inch pot. Stick to the 4 teaspoons per gallon home rate.
- Spraying foliage in direct sun: water and fertilizer solution on leaves in direct midday sun can concentrate as it evaporates and scorch leaf tissue. Always spray in the early morning or evening.
- Overfeeding because the plant 'looks hungry': if you see yellowing, doubling the dose is rarely the right move. More fertilizer on a plant that is already stressed usually makes things worse. Diagnose first, feed second.
- Skipping the flush: salt accumulation in containers is a slow, invisible problem until it is not. Monthly or bi-monthly plain water flushes prevent the buildup from becoming a crisis.
- Mixing with alkaline products: the label flags this specifically. If you are combining Grow More 20-20-20 with other sprays or additives, do a small test batch first to check for precipitation or separation.
- Not stirring long enough: the powder dissolves completely in cold water, but it takes real agitation. A solution that looks slightly opaque still has undissolved particles that can clog sprayers or create localized concentration spots.
What to do when something looks wrong
Symptoms after fertilizing can be confusing because several different problems look similar. Here is how to read the most common signs and what to do about each one.
Yellow leaves (chlorosis)
Yellowing between the veins while veins stay green usually signals a micronutrient deficiency, often iron or manganese. Because Grow More 20-20-20 includes chelated iron and manganese, chlorosis can sometimes appear when the fertilizer has not been applied recently enough, when soil pH is locking out nutrients, or when the mix was too dilute. Because Grow More 20-20-20 includes chelated iron and manganese, chlorosis can sometimes appear when the fertilizer has not been applied recently enough, when soil pH is locking out nutrients, or when you are not following i grow can instructions closely enough. Try a fresh full-strength application. If the yellowing clears up within a week or two of regular feeding, the solution was the fix. If it persists, test your soil or water pH. Iron becomes unavailable above pH 6.5 to 7 in most soils.
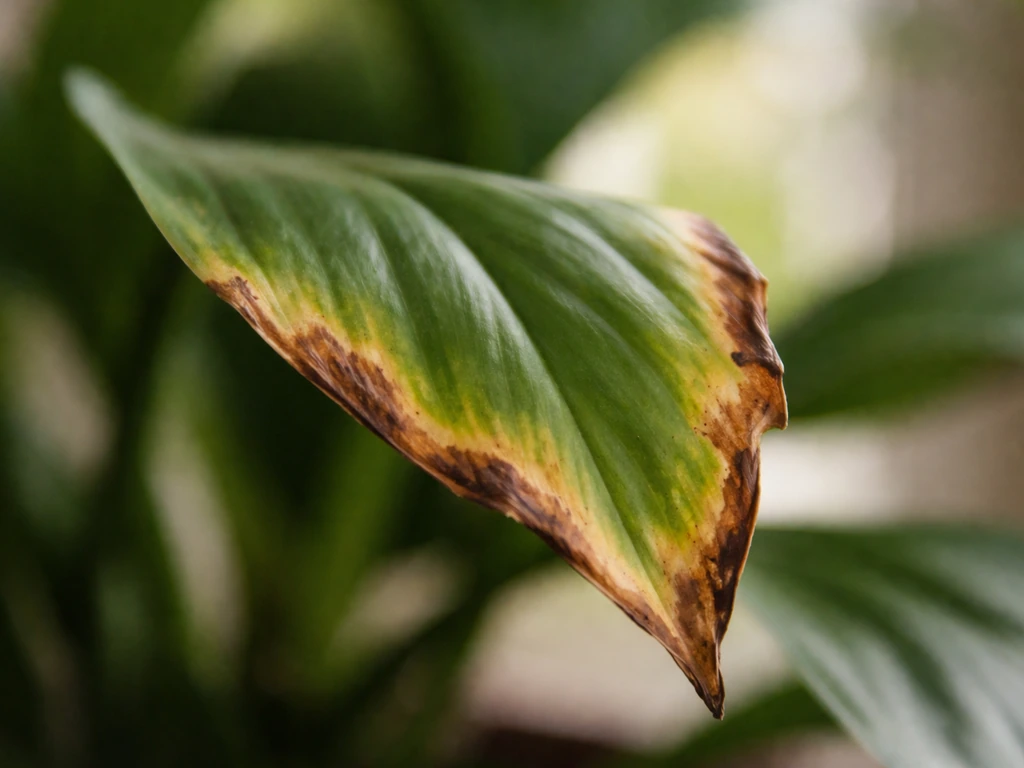
Burned or brown leaf tips
Brown, crispy leaf tips that appear within a day or two of fertilizing almost always indicate fertilizer burn from too-high salt concentration. This happens when the dose was too strong, the soil was too dry at application, or solution was applied in direct sun. Stop fertilizing immediately, flush the pot thoroughly with plain water, and do not fertilize again for at least two to three weeks. Trim off the burned leaf tips if they bother you. Once new growth comes in clean, resume at half strength and gradually work back up.
Slow or no growth despite regular feeding
If a plant is not responding to feeding, the fertilizer is probably not the issue. Check light levels, root space, watering frequency, and drainage first. A rootbound plant in a too-small pot will not respond well to more fertilizer because the roots have nowhere to grow. Similarly, a plant that is sitting in poor light is not growing quickly enough to use the nutrients you are delivering. Also consider whether salt buildup is the culprit: accumulated salts can block nutrient uptake even when there is plenty of fertilizer in the soil. Flush the container and see if that helps before adding more fertilizer.
Leaf scorch on outdoor plants
Leaf scorch on outdoor plants has several causes beyond fertilizer, including drought stress, root restriction, and heat. Before blaming your 20-20-20, check whether the plant has had consistent water and adequate root space. If the scorch pattern matches leaf edges evenly across the plant after a fertilizer application, overfertilization or foliar application in sun is the most likely culprit. If the scorch is uneven or patchy and not linked to a recent feeding, drought or root issues are more likely.
One final note: if you are using Grow More 20-20-20 with a kit-grown plant setup, whether a seed-starting system, hydroponic kit, or any other container-based growing system, the same core rules apply. Keep concentration consistent, pre-wet before feeding, flush regularly, and ease back on the dose for young seedlings. Grow kits often use smaller volumes of growing medium than traditional pots, which means salt accumulation can happen faster and at lower total fertilizer volumes. When in doubt, go lighter and feed more frequently rather than going heavy and feeding less often.
FAQ
Can I mix Grow More 20-20-20 into already mixed fertilizer or other products in the same sprayer tank?
Avoid tank-mixing unless the Grow More label compatibility section says it is safe. Even when two products are individually fine, mixing can cause precipitation, which wastes nutrients and can clog sprayer nozzles. For home use, do a small jar compatibility test (same concentrations you plan to use) and discard the mix if you see cloudiness or sediment.
Is it safe to apply 20-20-20 during very hot weather or full sun?
Foliar feeding is most risky in sun and heat. If you must spray outdoors, do it early morning or late afternoon, and make sure you do not spray onto drought-stressed plants. If you notice crisping within 24 to 48 hours, treat it as fertilizer burn and stop until you have flushed and given the plant time to recover.
What should I do if I accidentally used more than 4 teaspoons per gallon?
Immediately flush the container with plain water until you get generous runoff from the bottom (and discard any drainage). Then pause fertilizing for at least 2 to 3 weeks, and when you restart, use half strength for several feedings before moving back toward the full rate.
Should I pre-wet the soil before drenching with Grow More 20-20-20?
Yes, especially for seedlings, small pots, and dry potting mix. Apply after the medium is already evenly moist, not dry. Dry media plus fertilizer concentration is a common pathway to tip burn and leaf scorch.
How do I know whether I should use foliar spray or soil drench for my situation?
Use foliar spray for active growth and quick correction (especially outdoors), while soil drenching is usually safer for routine feeding in small containers. If the plant is stressed, newly repotted, or has damaged roots, prioritize soil feeding at a lighter rate and avoid leaf sprays until it resumes steady growth.
Why do I see yellowing even though Grow More includes chelated iron and manganese?
Chelated micronutrients can still be unavailable if pH is off or if the fertilizer was applied too rarely for your watering schedule. Yellowing between veins can also be slowed uptake from salt buildup. Check for crusting, flush the container, and then resume at half strength consistently; if the problem persists, test soil or water pH (iron often becomes less available above neutral to slightly acidic ranges).
How often should I flush containers, and what if my pot drains slowly?
Typical timing is every 4 to 6 weeks, but slow-draining pots may need earlier flushing because salts accumulate longer in the root zone. Make sure you flush with enough volume to reach clear runoff, and if drainage is sluggish, consider refreshing the potting mix instead of only adjusting fertilizer.
Can I use Grow More 20-20-20 on flowering or fruiting plants, or should I stop it?
You can keep feeding, but it is not ideal if your goal is maximum blooms or fruit set. Use it through vegetative growth and early establishment, then shift to a formula with relatively lower nitrogen and higher phosphorus once flowers are forming. If you keep using 20-20-20 during bloom, keep rates conservative to avoid excess leafy growth.
What if my plant is not growing at all after I fertilize, is the fertilizer failing?
More often the limiting factor is something else, like insufficient light, inadequate root space (rootbound), poor drainage, or inconsistent watering. Fertilizer cannot compensate for weak light or restricted roots. First correct light and watering habits, then consider flushing to rule out salt blockage before increasing fertilizer.
Is there a difference in dosing for hydroponic or kit-grown setups versus regular pots?
The same concentration logic applies, but kit media and smaller volumes can cause salt buildup faster. Use lighter strength, keep feeding consistent (often more frequent but weaker), pre-wet media before feeding when possible, and flush or reset the nutrient solution on the schedule your kit recommends to prevent accumulation.
Should I fertilize seedlings with the standard 4 teaspoons per gallon rate?
Usually no, seedlings need a gentler feed because their root systems are small and they are more sensitive to salt concentration. A common approach is halving the standard mix and giving a small measured amount per seedling, with plain water beforehand. Once they establish and show steady growth, you can gradually increase toward the full strength schedule.