The Hydrofarm Jump Start Smart Float grow tray (model JSEF55) is a 55-cell floating seed-starting system where a buoyant tray sits inside a water reservoir, wicking moisture up through the plugs at exactly the right height. To get it working: fill the reservoir to the marked line, drop in the float tray, load your 55 plugs, sow your seeds, and let the float self-regulate the water level. That's the core loop. Everything below shows you how to do each step correctly, check that the float is actually working, and fix it when something goes sideways.
Smart Float Grow Tray Instructions: Setup, Start-Up, Fixes

Marcus Thornfield
23 Jun 2026
Identify your Smart Float tray kit and what's in the box
The Jump Start Smart Float is blank" rel="noopener noreferrer">sold by Hydrofarm under the Jump Start brand. The standard kit is model JSEF55, which stands for Jump Start (JS), Expandable Float (EF), 55 cells. Hydrofarm’s indoor garden display document lists item code JSEF55 as the Smart Float Grow Tray with Plugs blank" rel="noopener noreferrer">item code JSEF55 as “Smart Float Grow Tray with Plugs”. If you see JSEF55 on the box, the bottom of the tray, or on a sticker inside the lid, you have the right product and these instructions apply directly. If your box just says "Smart Float" without a model code, check the cell count: 55 plug holes in a grid pattern confirms you have this version.
Your kit should include these main components. If anything is missing, contact Hydrofarm support before starting, because the float mechanism specifically will not work without all pieces present.
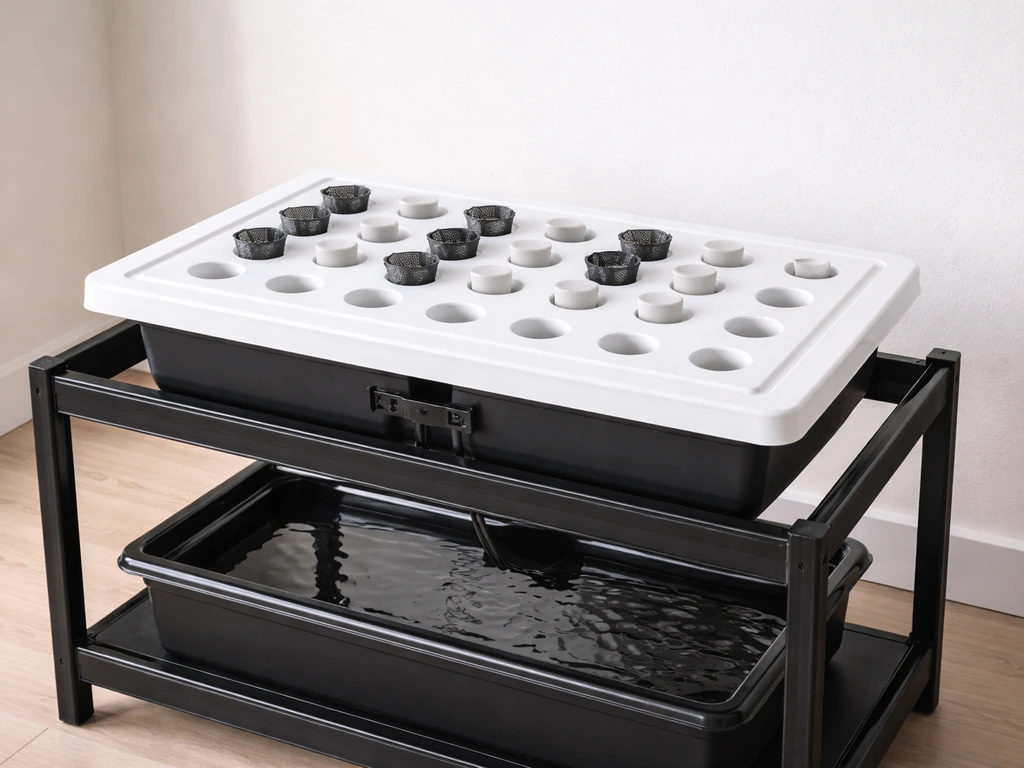
- Outer reservoir tray (the solid, watertight bottom shell)
- Inner float tray (the lighter, perforated cell tray that sits on the water surface)
- 55 pre-formed grow plugs (usually a peat or coir blend, sometimes foam)
- A clear or translucent dome lid
- Fill line markings on the reservoir (check the interior sidewall)
Some bundles include a heat mat, grow light bar, or a small packet of nutrients. Those are add-ons, not part of the float system itself. Keep them aside for now and focus on the tray assembly first.
Assemble the tray step by step
Assembly is simple but the order matters. Doing it out of sequence (like filling water after the float tray is already loaded with plugs) creates a mess and can waterlog your plugs before seeds are even in.
- Rinse both the reservoir tray and the float tray with clean water. Wipe dry. This removes any manufacturing dust that could clog the wicking surface on the plugs.
- Set the outer reservoir tray on a flat, stable surface. Check that it's level using a small bubble level or by pouring a tiny amount of water and watching where it pools. Even a small tilt will cause the float to list and create uneven wetting across the 55 cells.
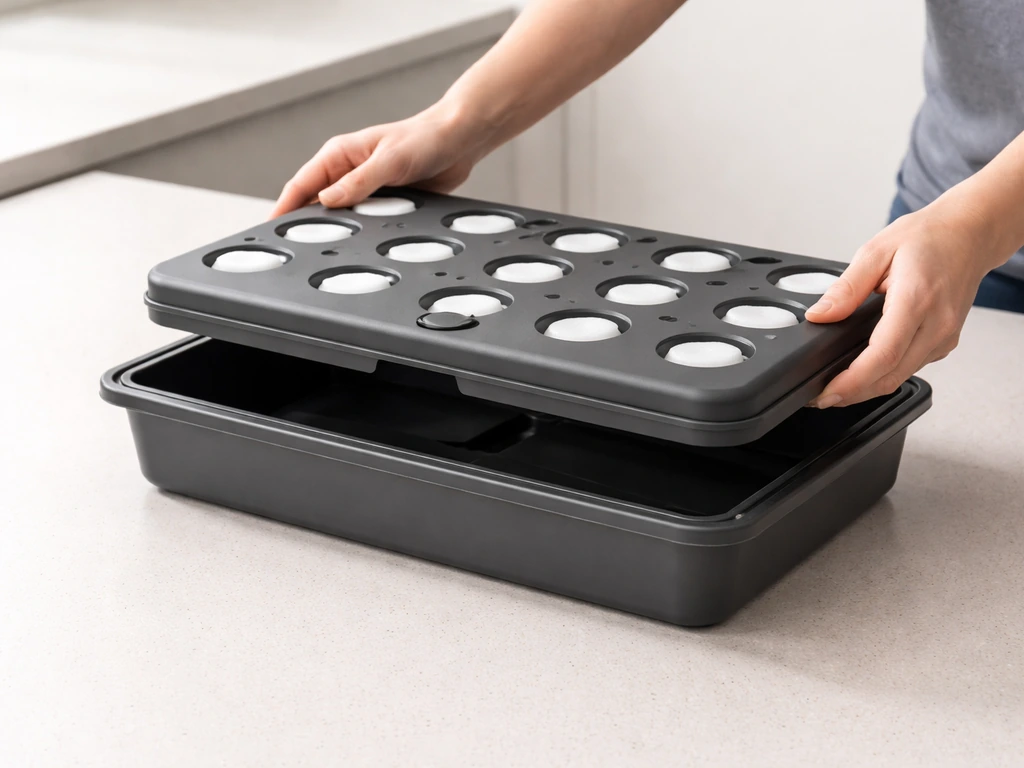
- Inspect the float tray before dropping it in. Flip it over and look at the underside: there should be no visible cracks, warped edges, or debris stuck in the cell holes. The float tray needs to sit flat and move freely up and down.
- Set the float tray into the reservoir tray WITHOUT adding water yet. Check that it sits flat and doesn't catch or snag on the reservoir walls. It should drop in easily and have a small gap (roughly 1/4 to 1/2 inch clearance) on each side.
- Now load your 55 grow plugs into the float tray cells, pressing each one gently until it sits flush with the top of the tray. Don't force them — if a plug won't seat, check for debris in the cell hole.
- Place the dome lid nearby but don't close it yet. You'll add it after seeding.
Fill the reservoir and check float operation
This is the most critical setup step. The Smart Float's entire value is in that ideal air-to-water ratio Hydrofarm describes: the float keeps the bottom of the plugs just kissing the water surface, so roots get moisture without drowning. If you are running an active aqua-style grow flow system, follow the active aqua grow flow instructions to match the same water and wicking timing. If you overfill, the plugs sit submerged and can rot. If you underfill, the float drops too low and the plugs dry out. Get this right and you won't need to babysit the tray constantly.
- Use room-temperature water. Cold tap water can shock seeds and slow germination. If your tap water is heavily chlorinated, let it sit in an open container for an hour before using, or use filtered water.
- Pour water slowly into the reservoir alongside the float tray, not over the plugs. Aim water at the gap between the float tray edge and the reservoir wall.
- Fill to the marked fill line on the reservoir interior wall. If you can't see a fill line, fill until the float tray rises approximately 1/4 to 3/8 inch above the reservoir rim lip. That lift confirms the float is active.
- Stop and watch for 30 seconds. The float tray should be visibly elevated above where it sat when the reservoir was empty. The plugs should not have standing water on top of them.
- Gently press one corner of the float tray down about half an inch, then release. It should bob back up smoothly. If it doesn't rise back, check for snags on the reservoir wall or warped tray edges.
- If you're adding a liquid nutrient solution instead of plain water, mix it in a separate container first, then pour it into the reservoir at the same fill line. Do not pour concentrate directly into the reservoir with the float tray in place.
Seed placement, plug setup, and first start
With the reservoir filled and the float confirmed working, you're ready to plant. The Smart Float is primarily a seed-starting system, though you can also use it to root cuttings in the plugs. If you are trying to open the Dr. Earth pump and grow system, follow the included steps and check that the water pathway is primed before you start feeding plants Dr. Earth pump and grow how to open.
- Pre-moisten the plugs before seeding by lightly misting the top surface of each plug with a spray bottle. You want them damp to the touch but not dripping. The float will handle ongoing moisture from below, but dry plugs on top can prevent germination in the first 24 hours.
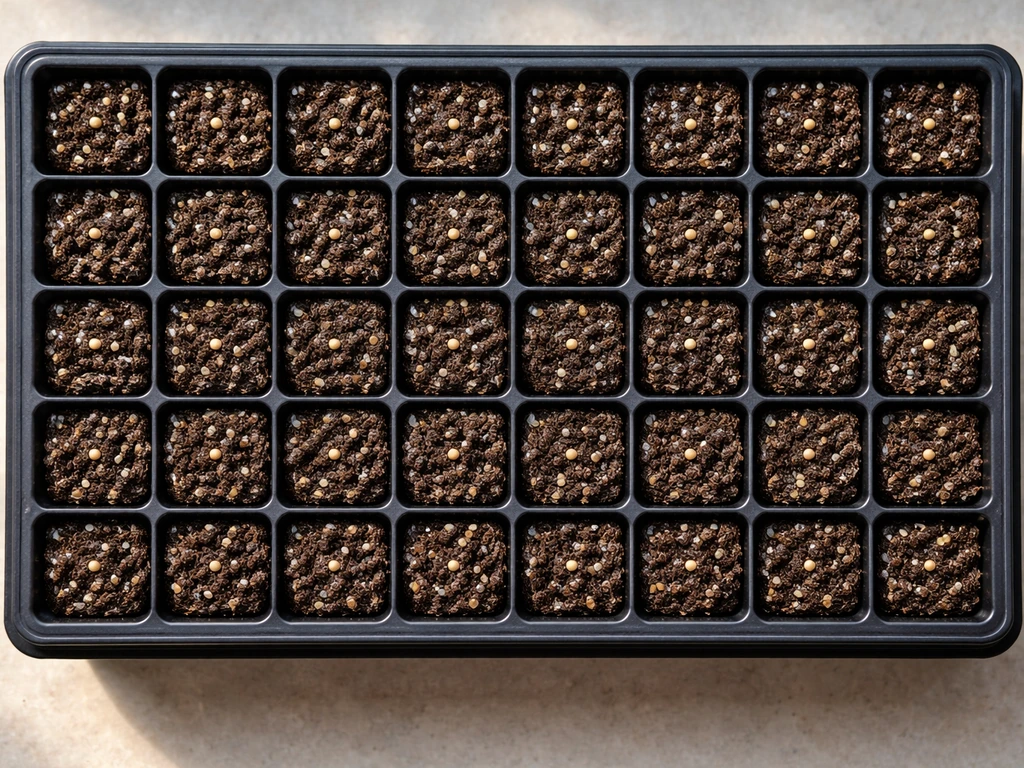
- Use a pencil, toothpick, or the tip of your finger to create a small divot in the center of each plug, roughly 1/4 inch deep for small seeds like herbs and lettuce, 1/2 inch for larger seeds like squash or cucumbers.
- Drop 1 to 2 seeds per cell. Using 2 seeds per plug is fine for small seeds since you'll thin to 1 seedling later. For large seeds, stick to 1 per plug.
- Cover each divot lightly by pinching the plug material over the seed, or simply leave it open if the seeds are very small (like basil or lettuce) since they need light to germinate.
- Place the dome lid on. The dome traps humidity and keeps the plug surface from drying out during germination, which typically takes 3 to 10 days depending on the crop.
- Set the whole unit under a grow light or on a windowsill with strong indirect light. If you're using a heat mat from a bundle kit, place the reservoir on the mat now. Bottom heat (75 to 80°F) speeds germination noticeably.
Once everything is in place, write down the date. Knowing your exact start date makes the 24 to 48 hour check (covered below) and the transplant window much easier to track.
Daily and weekly operation
The Smart Float system is designed to be low-maintenance, but low-maintenance isn't the same as no-maintenance. Here's the rhythm that keeps it running well.
Daily checks
- Glance at the float height. The float tray should still have that slight lift. If it looks flush with or below the reservoir rim, the water level is low and needs a top-off.
- Lift the dome lid for 5 to 10 minutes each day once seeds have germinated to prevent excessive condensation and reduce mold risk. Before germination, you can leave the dome on continuously.
- Mist the plug surface if any plugs look dry or pale on top. The float wets from below, but the surface can dry out in low-humidity environments or under strong lights.
Weekly checks
- Top off the reservoir to the fill line with fresh water or diluted nutrient solution. Don't let it drop more than halfway before refilling.
- Check the water clarity. Some cloudiness after a week is normal, but thick green (algae) or murky brown water needs a partial change: drain about half and replace with fresh solution.
- Inspect plugs for mold, especially white fuzzy growth on the surface. A tiny amount of white fuzz on the plug itself can be normal root development, but true surface mold has an irregular fuzzy texture. Remove affected plugs and increase airflow.
- If you're using a nutrient solution, do a full reservoir flush and refill every 2 weeks to prevent salt buildup that can block wicking.
Troubleshooting: float problems, water levels, leaks, and dry plugs
Most Smart Float problems fall into four categories. Work through the relevant one below before assuming the kit is defective.
Float isn't floating or sits too low
If the float tray sits flat on the reservoir bottom even with water added, first check the water level: it may simply not be high enough. Fill to the marked line. If it's already at the line and the tray still isn't lifting, check whether the float tray is catching on the reservoir walls. Run your hand along the gap between the two trays, remove the float tray, and look for warped plastic, debris, or a crack letting water into the float itself. A float tray that has absorbed water into a crack or air pocket will become heavy and stop floating. In that case, the tray needs to be replaced.
Water level drops too fast or too slow
Fast drops (reservoir needs topping off every day) usually mean your environment is warm and dry, or your grow light is close enough to evaporate surface moisture quickly. This isn't a malfunction, just increase your refill frequency. Slow or no drop (reservoir level stays the same for a week) is actually normal early on, but if seedlings look stunted after week two, it could mean the plugs aren't wicking properly. Check that the plug bottoms are making contact with the water surface or are close enough for capillary action. If the float is sitting too high, gently push it down slightly and see if moisture appears at the plug surface.
Leaks from the reservoir
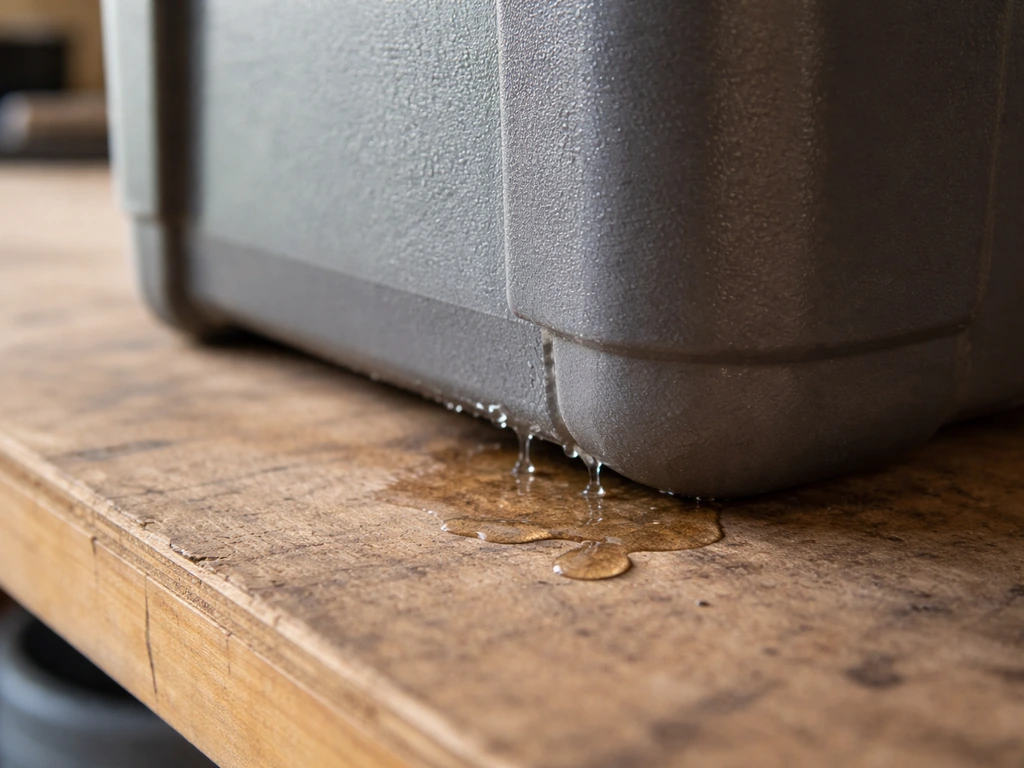
Slow leaks along the bottom or corners of the outer reservoir almost always come from assembly on an uneven surface (the tray flexes slightly and opens a micro-gap at a seam) or from an impact crack. Empty the reservoir, dry it, and run your finger along every seam and corner while holding it up to a light source. Hairline cracks catch light. For minor cracks, food-safe aquarium silicone sealant works well. For corner seam gaps caused by uneven surfaces, simply re-level your setup surface and the issue usually stops.
Plants drying out even with water in the reservoir
If plugs feel bone dry on top but there's water in the reservoir, the wicking chain is broken somewhere. First check float height: if the float is sitting too high (overfilled reservoir), the plug bottoms may not be reaching the water. Drain a small amount. Next, check whether the plugs are properly seated in the cell holes. A plug sitting slightly above the hole won't make contact with the float tray's wicking surface. Press each plug firmly down. Finally, in very dry rooms (below 30% relative humidity), top surface evaporation can outpace bottom wicking for fine seedlings. Mist the surface twice daily and keep the dome on longer.
Clogged cells or inconsistent wetting

If some plugs are consistently wetter than others, check that the float tray is level (goes back to your surface setup). Also check for mineral deposits or dried nutrient salts clogging the small drainage holes in the cell bottoms. If you can see white crusty buildup, remove those plugs, rinse the cell holes with warm water and a cotton swab, and do a fresh-water flush of the whole reservoir.
Algae buildup in the reservoir
Green algae grows when light reaches the water. For HydroFarm grow flow controller setup, follow the controller's instructions to match your reservoir and feed schedule HydroFarm grow flow controller instructions. The dome and float tray block most light, but gaps along the edges can let enough in. Block any visible gaps with black tape or a folded paper towel along the rim. Do a full reservoir drain and rinse with a 1:10 hydrogen peroxide to water solution (let it sit 10 minutes, then rinse thoroughly) to reset a heavily algae-fouled reservoir. Algae itself won't kill your seedlings quickly, but it competes for nutrients and makes water quality harder to manage.
Quick start checklist and what to verify after 24 to 48 hours
Use this checklist at setup and again after your first two days. Catching a problem at 48 hours is much easier than at 2 weeks.
At setup (Day 0)
- Tray surface is level (verified with a level or water test)
- Float tray drops in smoothly with clearance on all sides
- All 55 plugs seated flush in their cells
- Reservoir filled to fill line, not above or below
- Float tray visibly elevated (lifting off the reservoir bottom)
- Bob test passed: float tray pushed down and rebounds freely
- Seeds placed at correct depth per crop type
- Dome lid on and sealed around the perimeter
- Heat mat connected if using one, set to 75 to 80°F
- Grow light or sunlight position confirmed
At 24 to 48 hours
- Float still elevated (water level holding steady means no leaks)
- Plug surfaces feel moist to the touch, not soggy or dust-dry
- Dome has condensation on the interior (sign of proper humidity)
- No standing water on top of the plugs
- No visible cracks, drips, or puddles under the reservoir
- If seeds haven't sprouted yet, that's normal: give most crops 3 to 7 days before worrying
Your ongoing schedule at a glance
| Task | Frequency |
|---|---|
| Check float height and water level | Daily |
| Vent dome lid briefly | Daily after germination |
| Mist plug surface if needed | Daily in dry conditions |
| Top off reservoir to fill line | Every 3 to 7 days |
| Check water clarity and smell | Weekly |
| Full reservoir flush and refill | Every 2 weeks |
| Clean algae or mineral buildup | As needed, typically monthly |
Once seedlings have developed their first true leaves (the second set of leaves, which look like miniature versions of the adult plant), they're ready to transplant into a larger container or garden bed. At that point, the Smart Float's job is done. If you’re using the niwa grow hub manual for your overall grow setup, double-check that your Smart Float parameters match the guide’s settings. If you're exploring more advanced recirculating and ebb-and-flow systems for your next grow, setups like the Active Aqua Grow Flow and the Hydrofarm Grow Flow Controller handle larger-scale automatic water cycling in a similar float-and-reservoir logic, just scaled up considerably.
FAQ
Can I use tap water and does water temperature matter for smart float grow tray instructions?
Yes, but only use water that matches the temperature you plan to keep the seedlings in. If your room is warm or you are using a heat mat under the tray, start with water near room temperature, not cold tap water, to avoid stressing seeds and slowing early root emergence.
Should I add nutrients right away, or wait until after germination?
Don’t add nutrients to the reservoir unless you are running a specific feeding plan for the plugs. For most seed-starting timelines, start with clean, properly dosed water only, then begin any nutrient regimen after seedlings are established (for example, around the time true leaves appear), unless your nutrient add-on instructions say otherwise.
How do I verify wicking contact if the float looks like it’s working?
If the tray seems to float correctly but plugs still look dry, confirm contact on a few representative cells, not every plug. Pick several edge cells and several center cells, then look for moisture at the plug base level (where it meets the wicking surface). Uneven contact can happen if only part of the tray is sitting level.
My reservoir isn’t dropping much, but seedlings are shrinking. Could humidity cover or domes be the issue?
Relative humidity can affect whether top surfaces stay moist, especially with fine seeds. If you are not using a dome or you removed it early, consider leaving humidity cover on longer for the first week, and mist only the surface lightly so you do not create puddles that bypass wicking.
If I reseal a crack, how can I confirm the tray is safe to use before planting?
Yes. After sealing or replacing a cracked reservoir, let any sealant cure fully before water testing, then do a 24 hour check with empty plugs in place. Any seep should show up as a wet seam or damp outer wall before you load plugs with seeds.
Is it okay to keep pressing plugs down during operation if some cells aren’t wicking?
Avoid. Excessive pushing can pop plugs out of their seated position or introduce small gaps under the plug edge. Instead, press each plug firmly once during setup to ensure it sits flush, then only make small float-height adjustments if you later see widespread wet/dry imbalance.
Do I need to level the stand every time after loading plugs?
For consistent performance, place the setup on a stable, level surface, then re-check level after you load plugs. Even slight tilt changes how evenly the bottom of the tray meets the water surface, which is one common cause of some cells staying wetter.
Why does algae keep returning at the tray edges even after rinsing?
If algae is localized to edges or corners, gaps are usually the cause. Block any visible light paths around the rim consistently, then avoid raising lights so high that stray beams reach the water surface through perimeter openings.
How should I manage condensation on the dome for better seedling health?
A dome can be too dry or too wet depending on ventilation. If condensation is constant and drips onto plugs, crack the dome slightly for airflow. If condensation disappears quickly and seedlings look stressed, keep the dome on longer and mist the surface rather than soaking plugs.
What causes some plugs to be wetter than others even when the tray is level?
If plugs are inconsistently wet, mineral buildup is a frequent culprit. Look for white crust on plug bottoms or around the wicking contact points. In that case, remove the affected plugs, rinse cell holes with warm water, and do a full reservoir flush before reusing the system.