If you have a Midwest Grow Kit in front of you and the instructions feel like a maze, here is the short answer: find your exact kit model first (standard, drying, or mega), confirm everything is in the box, then follow the setup sequence that matches your kit. The steps are not complicated, but skipping the model-identification step is where most people get tripped up. This guide walks you through all three variants from unboxing to your first successful cycle, including the drying workflow and the blank" rel="noopener noreferrer">mega kit's incubator assembly.
Midwest Grow Kits Instructions: Setup, Drying, Mega Kit Guide

Marcus Thornfield
22 Apr 2026
First, figure out which Midwest kit you actually have
Midwest Grow Kits sells several different mushroom cultivation systems, and the setup process is different enough between them that you really do need to identify yours before you start. The three you are most likely dealing with are: the standard jar-method kit, the Ultimate Mushroom Growing and Incubator Kit, or the Mega Mushroom Growing and Incubator Kit. There is also the Easy Mushroom Drying Kit, which is a stand-alone add-on rather than a growing system on its own.
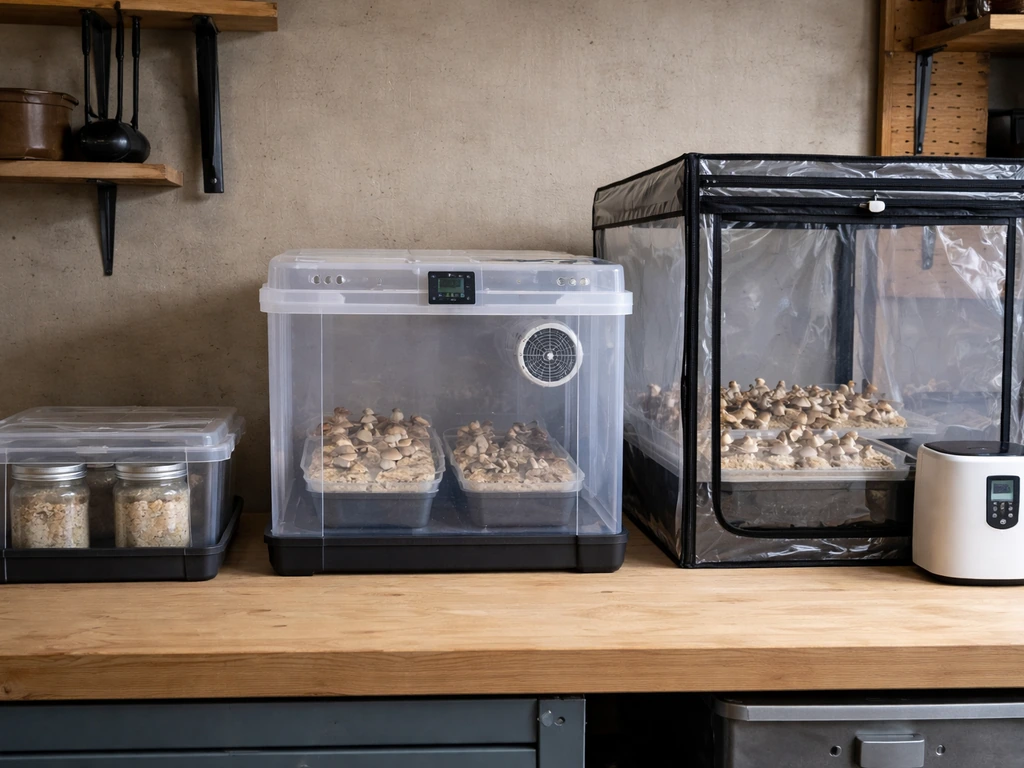
Check your box label, your packing slip, or the order confirmation email. The kit name is usually printed clearly on the outside of the box. If you bought the Mega Kit, you will know it immediately because the box is substantial: it contains 18 substrate jars, a 56-quart chamber, a heating mat, a humidifier, an air pump, grow light, timer, perlite, and more. The Ultimate Kit is similar in concept but uses a submersible aquarium heater instead of a heating mat, and it is designed as a single chamber for both incubation and fruiting. The standard kit is simpler and relies on the jar method outlined in Midwest's core Mushroom Grow Guide.
Midwest's own guides library confirms that the main Mushroom Grow Guide (sometimes called Revision 7.0) applies to every kit they sell, covering inoculation all the way through drying. On top of that, the Mega Kit and Ultimate Kit each have their own dedicated setup guides, which you should download from Midwest's website right now before you open anything else. If you are setting up an urban greens system, follow the kit-specific instructions step by step to avoid common setup mistakes urban greens grow kit instructions. For mckennaii grow kit instructions specific to your model, use the Mega Kit Setup Guide and follow its setup sequence exactly. For the exact total green holland grow kit instructions, download and follow the Mega Kit Setup Guide from Midwest before you start assembling. For step-by-step assistance specific to your model, use the total green grow kit instructions in the Mega Kit Setup Guide and follow it alongside the core workflow total green holland grow kit instructions. After checkout, you also get access to instant video guides, which are genuinely worth watching alongside the written steps.
Quick kit comparison at a glance
| Feature | Standard / Jar Method | Ultimate Kit | Mega Kit |
|---|---|---|---|
| Chamber size | Varies (no dedicated chamber) | Dual-function single chamber | 56 Qt (~3 cu ft) |
| Heating method | None included (ambient) | Submersible aquarium heater | Liquid-graphite heating mat + thermostat |
| Air exchange | Manual | HEPA-filtered positive pressure pump | HEPA-filtered silicone air hoses + pump |
| Grow light included | No | 900-lumen dual-spectrum LED | 900-lumen dual-spectrum LED (36-diode, 110V) |
| Timer included | No | Heavy-duty timer (48 cycles/day) | Heavy-duty timer (48 cycles/day) |
| Jars included | Varies | Varies | 18 Ultimate ½ pint jars (expandable to 30) |
| Setup time | Varies | ~20 minutes | ~20 minutes |
| Dedicated setup guide | Mushroom Grow Guide | Ultimate Kit Setup Guide | Mega Kit Setup Guide |
Unboxing, parts check, and a few safety basics
Before you plug anything in or open any jars, do a full parts check against the kit's included items list. This sounds obvious but it saves a lot of frustration later. Lay everything out on a clean, flat surface. Here is what to look for depending on your kit.
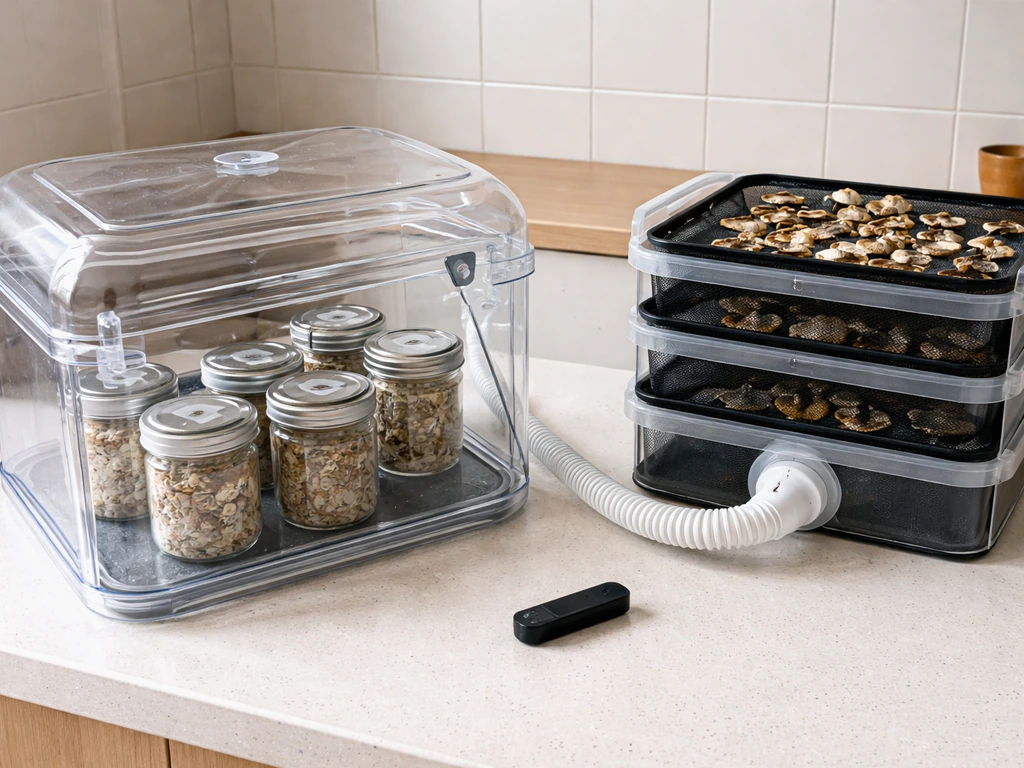
For the Mega Kit specifically, your box should contain: 18 substrate jars (½ pint each), the 56-quart growing chamber with lid, a liquid-graphite heating mat and adjustable thermostat, a digital thermometer and hygrometer combo unit, a hydroponic humidifier with Hydroton clay media, an ultra-quiet electric air pump, two silicone HEPA-filtered air hoses, a heavy-duty programmable timer, one dual-spectrum HP LED grow light (900 lumens, 36 diodes, 110V), two gallons of mixed-coarseness perlite, nitrile gloves, alcohol wipes, a full-color printed instruction manual, and your video guide access code. The two things Midwest specifically calls out as not included are water and extension cords, so have both on hand before you start.
One thing that trips up a lot of people right at unboxing: the jar lids loosen during shipping because of vibration. Midwest specifically flags this in their grow guide. As you pull each jar out of the box, tighten the lid before setting it down. Also, leave the foil cap on each jar until you are ready to inoculate. Do not remove it now.
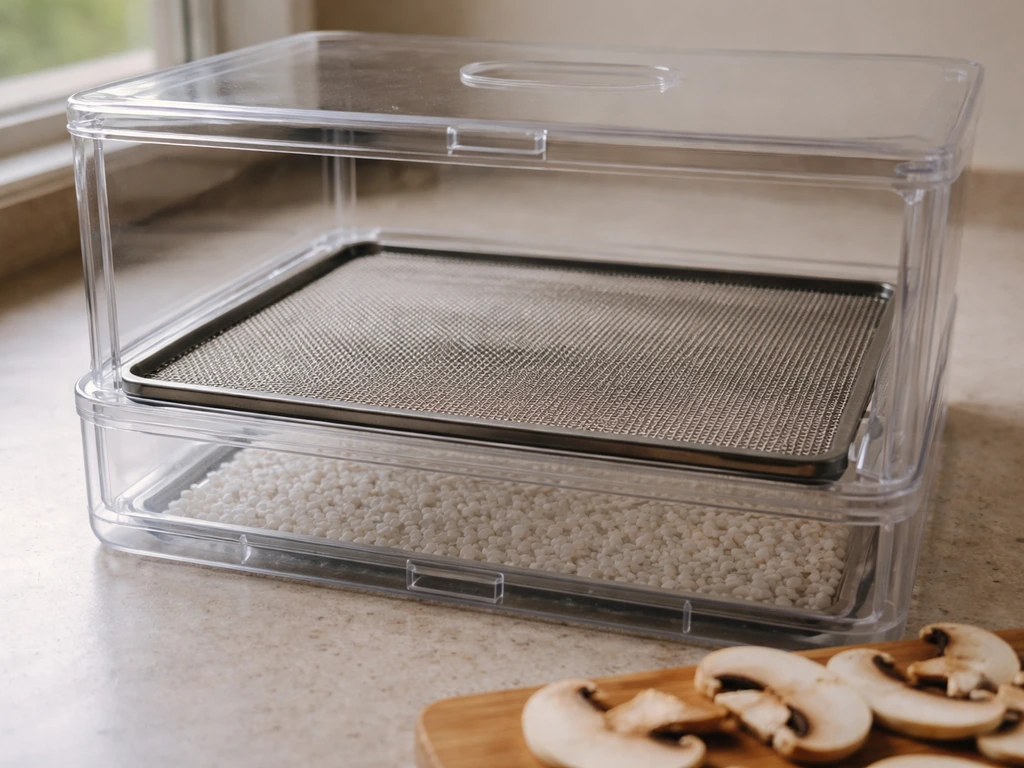
For the drying kit add-on, your box should include: a clear 6. Midwest describes the Easy Mushroom Drying Kit as using a reusable desiccant-based system with a clear 6.5-quart container and a 0.5 mm mesh separation screen For the drying kit add-on, your box should include: a clear 6.. 5-quart drying chamber, a 0.5 mm mesh separation screen, 4 oz of activated alumina desiccant, and 4 oz of silica gel desiccant with color-changing crystals, plus a printed instruction sheet. If anything is missing, contact Midwest's support before proceeding. Using an incomplete drying setup can leave moisture behind and ruin a harvest.
A few safety and placement basics apply to all kits. Keep your growing area clean and away from HVAC vents, open windows, or fans that blow directly on the setup. Wash your hands before handling any jars, even when just tightening lids. The nitrile gloves and alcohol wipes in your kit are not decoration: use them every time you open a jar or handle inoculated substrate. For electrical components (heating mat, air pump, timer, grow light), use a surge-protected power strip, especially if you are running the full Mega kit setup.
General step-by-step setup for a Midwest grow kit
This section covers the core workflow that applies across all Midwest kits, based on the Mushroom Grow Guide that Midwest says applies to every kit they sell. If you have the Mega or Ultimate kit, you will still follow this general flow and then add the kit-specific incubator setup steps described in the sections below.
- Download and read your kit-specific guide first. Midwest's guides library has the main Mushroom Grow Guide (jar method), the Mega Kit Setup Guide, and the Ultimate Kit Setup Guide. Get the right one for your kit and keep it open while you work.
- Confirm your spore syringe is ready. Midwest's guide specifies that you must use a spore syringe, not a spore print, with their jars and bags. Spore prints will not work. Store your syringe at room temperature in a dark, dry spot; it stays viable for up to 12 months or longer when stored correctly.
- Use your jars within the right timeframe. Midwest ships jars and spawn bags fresh and says they should be used within 4 to 6 weeks of arrival. If you need more time, refrigerate them. Never freeze them.
- Prepare your workspace. Wipe down your work surface with isopropyl alcohol, put on nitrile gloves, and have your alcohol prep pads within reach. If you have a Sterile Spore Injection Pack, you get 5 Luer Lock syringe needles (16 gauge, 1.5 inch), 10 alcohol prep pads, and a pair of nitrile gloves included.
- Inoculate your jars. Flame-sterilize your needle, wipe the injection port with an alcohol pad, and inject your spore solution through the self-healing injection port on each jar lid. Use consistent technique: slow, steady pressure. Replace your needle between jars if it touches anything non-sterile.
- Move jars to your incubation space. This is where the Mega Kit or Ultimate Kit takes over with a controlled environment. For a basic setup without an incubator, find a warm, dark spot in your home that stays between 74 and 78°F.
- Monitor colonization. Watch for white mycelium spreading through the substrate. This is normal and good. Any green, black, or pink coloration is contamination: remove that jar immediately and away from your clean jars.
- Transition to fruiting conditions. Once jars are fully colonized, follow your kit's fruiting instructions for humidity, light, and fresh air exchange. This is where the grow light and humidifier in the Mega and Ultimate kits come into play.
How to set up and run the Midwest drying kit
The Easy Mushroom Drying Kit is a standalone desiccant-based drying system, meaning it dries without any heat. This is actually the preferred method for preserving quality because heat can degrade the final product. The color-changing silica gel crystals are your real-time indicator of how much moisture is left in the desiccant, which takes the guesswork out of the process.
- Set up the drying chamber. Place the 0.5 mm mesh separation screen inside the 6.5-quart clear chamber. This screen sits between the desiccant layer on the bottom and your harvest on top so that moisture can pass down into the desiccant without direct contact.
- Add both desiccants below the screen. Pour the 4 oz of activated alumina and the 4 oz of silica gel desiccant into the bottom of the chamber. Spread them out evenly.
- Pre-dry your harvest before placing it in the drying chamber. Pat your mushrooms dry with a paper towel or let them sit on a wire rack for 30 to 60 minutes first. Putting dripping-wet material straight into the chamber overloads the desiccant faster.
- Lay your harvest on the mesh screen in a single layer. Avoid stacking. Better airflow between pieces means faster, more even drying.
- Seal the chamber and store it in a cool, dark spot. Check progress every 12 to 24 hours. When the product feels cracker-dry and snaps rather than bends, it is done.
- Watch the silica gel crystals. When the color-changing crystals shift from blue or orange (depending on the brand formulation) to a spent color (usually pink or clear), the desiccant is saturated and needs to be recharged before it can do any more work.
- Recharge your desiccants. Spread both desiccants on a baking sheet and bake at 250°F for 60 minutes. Let them cool completely before putting them back in the chamber. Do not rush the cooling step, as warm desiccant will not absorb moisture effectively.
One common mistake is reusing the desiccants before they have fully cooled. They feel dry after baking but they need to drop back to room temperature to reactivate properly. Another issue is not pre-drying your harvest, which burns through the desiccant capacity quickly and extends your drying time significantly.
Mega kit assembly: what is different from the standard setup
The Mega Kit is Midwest's most feature-complete system, and the assembly is more involved than the basic jar method. The key thing to know upfront: you should have already inoculated your spore jars before you set up the Mega kit for incubation. The incubator is for after inoculation, not during it. Midwest's own Mega Kit Setup Guide makes this explicit.
The setup takes about 20 minutes once you have everything laid out. Here is how the assembly sequence works:
- Place the liquid-graphite heating mat on a flat, stable surface. Position it where you want your incubator to live permanently, because moving it once set up is annoying.
- Lay a thick towel on top of the heating mat. This is a step from Midwest's own setup guide and it is important: it buffers the heat so it distributes evenly under the chamber rather than creating hot spots directly under the container.
- Set the 56-quart growing chamber on top of the towel. Make sure it is centered.
- Place your inoculated jars inside the chamber.
- Put the digital thermometer and hygrometer sensor inside the chamber before you close the lid, so you can monitor conditions without opening it constantly.
- Connect the air pump to the silicone HEPA-filtered air hoses and run the hoses into the chamber ports. These maintain air exchange and keep contaminants out thanks to the HEPA filters.
- Set up the hydroponic humidifier with Hydroton media inside the chamber according to its own instructions, and connect it to the timer.
- Mount or position the dual-spectrum LED grow light above the chamber. At 900 lumens and 36 diodes it is enough light for a 56-quart footprint.
- Plug the heating mat, humidifier, air pump, and grow light into the heavy-duty timer. The timer supports up to 48 on/off cycles per day, so you can dial in very precise light and humidity schedules.
- Dial in your incubation temperature. Turn the heating mat's black knob to its highest setting, wait a few minutes to confirm it is running, then dial back to about 50% power as a starting baseline. Close the lid, wait about an hour, then check the thermometer. Adjust the thermostat knob until the chamber holds 74 to 78°F consistently.
The Mega Kit is expandable: it comes with 18 half-pint substrate jars but the chamber can support up to 30. If you want to scale up, you can add more jars in a later run. Just note that adding more jars will affect your temperature and humidity dynamics slightly, so re-check your readings after any expansion.
Compared to the Ultimate Kit, the main practical differences are the heating source (heating mat vs. submersible aquarium heater) and the chamber size. The Ultimate Kit is a single-chamber design that handles both incubation and fruiting in one space, while the Mega Kit gives you a bit more physical separation and control. If you are wondering which setup to add or upgrade to, that comparison is worth exploring in the context of the Ultimate Kit Setup Guide, which Midwest provides alongside the Mega guide.
Your first run: getting started and fixing what goes wrong
Once everything is assembled and your inoculated jars are inside the incubator, here is what to do and what to watch for in the first 24 to 72 hours.
Activation checklist
- Confirm the heating mat is warming up (touch the surface lightly after 5 minutes, it should feel warm not hot)
- Confirm the air pump is running and you can see or feel slight air movement from the hoses
- Confirm the digital thermometer is reading inside the chamber, not outside it
- Set your timer schedules for the humidifier and grow light before you walk away
- Check back in one hour to verify temperature is climbing toward the 74 to 78°F target range
Temperature not reaching 74 to 78°F

If after an hour the chamber is only at 68°F, increase the thermostat knob gradually and wait another 30 minutes before adjusting again. Rapid adjustments make it hard to find a stable setting. If the room itself is cold (below 65°F), the heating mat will struggle. Moving the whole setup to a warmer room is more effective than maxing out the thermostat. If the chamber is consistently running hot above 80°F, back the thermostat down and make sure the towel layer under the mat is thick enough to buffer heat.
No visible growth after a week
First, check that your jars were inoculated correctly: the injection port should be sealed, and you should see no liquid leaking or unusual discoloration at the injection site. Second, confirm your spore syringe was not stored incorrectly (if it was frozen at any point, the spores may be dead). Third, verify temperature has been consistent. Fluctuating between 65°F and 80°F stresses mycelium and slows or stops growth. Mycelium can take 1 to 3 weeks to show visible colonization depending on the strain and conditions, so do not panic at day 7, but do verify your environment is dialed in.
Contamination spots (green, black, or pink patches)
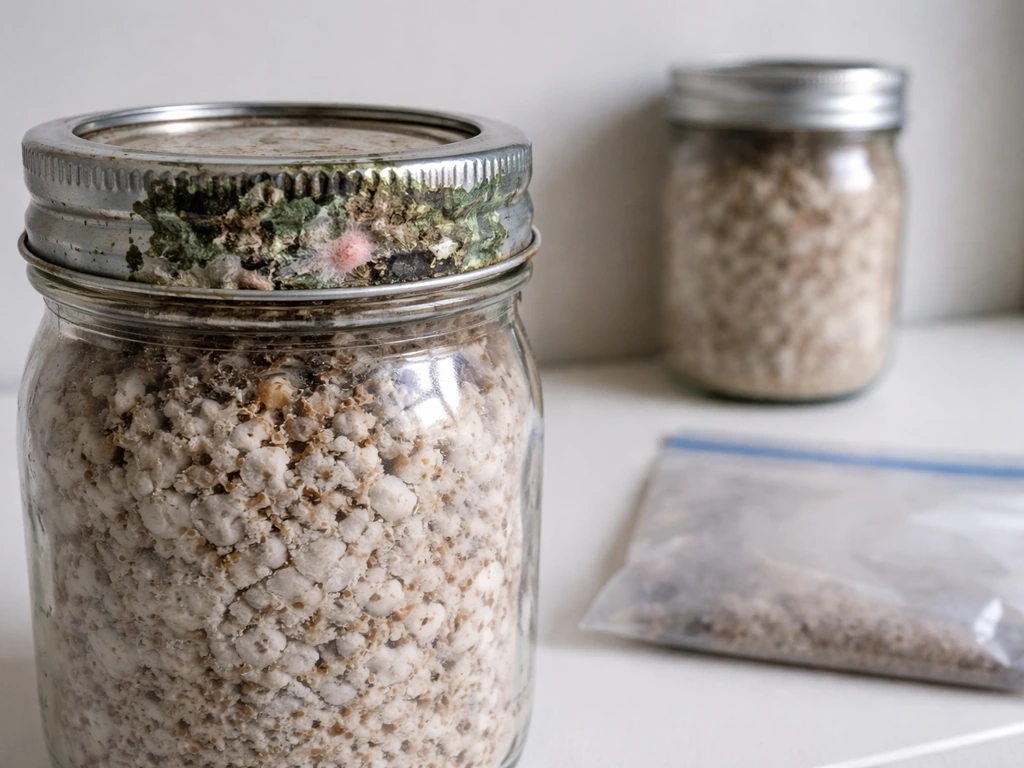
Remove the contaminated jar from the incubator immediately. Do not open it inside the grow space. Contamination spreads fast and can cross-infect neighboring jars. Seal the jar in a plastic bag before disposal. Then assess: if only one jar is contaminated and it was the first jar you inoculated that day (when your technique may have been less clean), that is usually an inoculation error rather than an environmental problem. If multiple jars show contamination, review your sterile technique and clean the incubator interior with alcohol wipes before adding any new jars.
Humidifier or air pump not working as expected
Make sure the humidifier has water and that the Hydroton clay media is properly saturated before first use. Dry Hydroton will not wick moisture effectively. For the air pump, check that the silicone hoses are not kinked or pinched by the chamber lid. The HEPA filters on the hose ends can also clog over time: inspect them and replace if you notice significantly reduced airflow. Also confirm the timer is actually cycling the way you programmed it. A common mistake is programming AM and PM settings incorrectly on 24-hour timer wheels.
Jars or equipment not matching the parts list
If you are missing a component, contact Midwest's support directly with your order number before you try to substitute anything. Using the wrong heating element, for example, can create hot spots or humidity imbalances that are hard to diagnose later. Midwest is generally responsive, and most missing-part issues get resolved quickly. In the meantime, do not inoculate your jars until the full setup is confirmed, because you need the incubator running and stable before the jars go in.
Poor fruiting performance after a good colonization
If colonization looked great but fruiting is sparse, the most common culprits are insufficient fresh air exchange, humidity too low during the fruiting stage, or not enough light cues. The grow light in the Mega and Ultimate kits provides the light trigger mushrooms need to initiate pinning. Make sure it is on a consistent schedule (12 hours on, 12 hours off is a common starting point). Also check that you have transitioned your environment from incubation settings to fruiting settings: fruiting generally wants slightly lower temps (around 70 to 75°F), higher humidity (above 85%), and more frequent fresh air exchange than incubation.
Once you have your first flush harvested and you are ready to dry, the drying kit workflow described above picks up right where the grow cycle leaves off. Getting that step right protects everything you just spent weeks growing. And if you are eyeing a bulk substrate approach for future grows to get bigger yields, the bulk casing method is a natural next step after you have your standard jar runs dialed in. If you are planning a bulk casing approach, this Midwest grow kit bulk casing guide will walk you through the process and what to watch for bulk casing method.
FAQ
Can I assemble the Mega kit before I inoculate the jars, or do I need to inoculate first?
Yes, but only if you match the kit’s intended workflow. The Mega and Ultimate kits are for use after inoculation, so do the incubator assembly first but keep the spore-inoculated jars for later, once the chamber reaches a stable target temperature. This prevents you from “waiting on temperature” with jars that are already at an elevated, inconsistent environment.
How do I avoid timer and lighting scheduling mistakes with the Mega kit?
Use the timer’s programmed cycle as the source of truth, and avoid AM/PM errors by setting it once to a known pattern and then confirming it switches on and off when you’re present. If your chamber is drifting, re-check the timer wheel orientation and confirm your 12-hour light schedule is consistent day to day, not just “set and forget.”
What should I do if my jars’ lids loosen during shipping, or if a jar sits for a minute with the lid not fully tightened?
Tighten lids before setting jars down and do not remove the foil caps until you are ready to inoculate. If a lid is loose after you tightened it once, stop and reseal again, because jars that sit even briefly with loose lids can pick up contamination before the incubator ever stabilizes.
Can I reuse the drying desiccants immediately after baking, or do they need time to cool?
For the Easy Mushroom Drying Kit, wait for desiccants to cool to room temperature before reusing or recharging them. Drying “feels complete” after baking, but moisture re-equilibrates as the material cools, so reactivation can be incomplete if you pack it back into the drying chamber while still warm.
What is the safest way to handle a contaminated jar once it shows up in the incubator?
Do not remove contaminated jars inside your grow space, because spores and aerosols can spread during handling. Seal the bad jar in a plastic bag for disposal, then clean the chamber interior before adding any replacement jars, and keep gloves and alcohol wipes ready for the next sterile step.
What should I verify first if my chamber humidity looks too low?
Check the humidifier setup before diagnosing “humidity problems.” If the Hydroton clay is dry, it will not wick water into the humidifier correctly, and you can end up with low effective humidity even if the humidifier is technically running. Also confirm the water level is maintained through the first long incubation-to-fruiting transition.
My chamber is slow to warm up. Should I keep increasing the thermostat, or change something else?
If the chamber stays near 68°F after an hour, adjust the thermostat gradually and wait 30 minutes after each change, because the system needs time to stabilize. If the room is below about 65°F, moving the entire setup to a warmer location usually fixes the issue more reliably than turning the thermostat up aggressively.
If the Mega kit supports more jars than the included amount, can I scale up immediately without recalibrating anything?
Not exactly. The Mega kit chamber can support more jars, but increasing jar count changes how temperature and humidity behave in practice. After adding jars, re-check thermometer and hygrometer readings for stability before continuing, since a larger load can cause higher humidity demand and slightly different heat distribution.
What if I’m missing parts, can I substitute a different heater or hose to keep going?
Don’t substitute core components like heating elements, because mismatched parts can create hot spots or humidity imbalances that look like “growth problems.” If anything is missing, contact Midwest support with your order number first, and keep inoculation paused until you confirm the correct setup is installed and running stably.
My jars colonized, but pins are scarce. What are the most likely causes and the first checks?
If fruiting is sparse, first ensure the environment is actually in fruiting mode, not just “incubating with more light.” Fruiting typically wants slightly cooler temperatures than incubation, higher humidity (above 85%), and more fresh air exchange, plus a consistent light cue schedule (commonly 12 hours on, 12 hours off to start).
How can I tell if slow or failed colonization is from spore viability versus an equipment or inoculation issue?
If spores were exposed to freezing at any point, viability can drop, which may show up as poor or slow colonization even with correct temperature and cleanliness. As a diagnostic step, confirm storage history of the syringe, then verify your inoculation port seal and check for leaks or unusual discoloration at the injection site.
Do I need to worry about nearby fans or HVAC vents even if the setup is in a closed chamber?
Keep the grow area away from direct airflow from HVAC vents, open windows, or fans. Even strong, brief drafts can shift humidity and temperature enough to stress mycelium, which can show up as slowed growth or inconsistent development.
Is a surge-protected power strip actually necessary for these kits?
Use surge protection for the Mega kit’s electrical components, especially the heater, pump, timer, and grow light. Power dips or brief outages can interrupt heating and humidity control and cause environmental swings that are difficult to notice in the first hours.