
To use Spray-N-Grow (also written as Spray N Grow or Spray and Grow), mix 2 teaspoons of concentrate per quart of water (or 2 tablespoons per gallon), add the wetting agent Coco-Wet first, then the Spray-N-Grow, let the mixture sit about 15 minutes to confirm a color change, and apply with a fine-mist hand sprayer directly to plant foliage every 1 to 3 weeks. That's the manufacturer's published starting point. The rest of this guide walks you through every step in plain language, including how to check your own product label for exact dosages, how to stay safe, and how to get good results across different grow kit setups.
How to Use Spray-N-Grow: A Practical Guide for Gardeners

Marcus Thornfield
8 Aug 2026
What this guide covers and who it's for
If you've picked up a bottle of Spray-N-Grow (the brand is officially Spray-N-Grow, Inc., based in Rockport, TX, though you'll see it spelled Spray N Grow or Spray and Grow all over the internet), you probably already know it's a liquid micronutrient supplement you spray onto leaves. What you might not have is a clear, step-by-step walkthrough that actually makes sense. Manufacturer labels can be frustratingly short on detail, especially if you're new to foliar feeding or you're working with a grow kit rather than a full garden bed. This guide is for DIY gardeners, hobbyists, and beginners using hydroponic systems, seed-starting kits, potted soil setups, and similar consumer grow kits. It covers how to read the label and Safety Data Sheet (SDS), mix and apply safely, time your applications, and troubleshoot when things go sideways. Exact dosages always come from your product label, because formulations can vary and the label is the legal document you must follow.
Is Spray-N-Grow right for your grow kit?
Spray-N-Grow is a foliar micronutrient product, meaning it delivers trace minerals (including iron and zinc) through plant leaves rather than through roots or a growing medium. That makes it a good fit for some kits and a poor fit for others. Here's a quick breakdown by kit type.
Where it tends to work well
- Soil-based or coco-coir seed-starting kits where you can spray directly onto seedling leaves once they've developed their first true leaves (not cotyledons)
- Potted herb and vegetable kits with established foliage where you can achieve even leaf coverage
- Hydroponic systems where you spray onto the canopy above the growing deck rather than adding product to the reservoir (see the hydroponics section below)
- General container-grown plants in a hobby or indoor garden setup
Where you should pause and check first
- Seedlings with only cotyledons (seed leaves): foliar applications on very young seedlings can cause leaf burn — wait until true leaves appear and test a small area first
- Mushroom cultivation kits: mushroom fruiting bodies absorb moisture through their surfaces and are highly sensitive to any chemical contact — do not apply Spray-N-Grow or any foliar chemical to a mushroom kit unless the mushroom kit manufacturer explicitly says it's safe
- Water-based terrarium toys and aquatic setups: any added chemical can disrupt water chemistry or harm aquatic organisms — this product is not designed for submersed or aquatic use
- Closed terrarium systems: poor ventilation combined with a chemical spray can create moisture and residue buildup that harms delicate plants
If you're unsure whether your specific kit is compatible, reach out to Spray-N-Grow, Inc. directly (contact details are on their website) or to your kit's manufacturer before applying. It's a five-minute check that can save you a dead crop.
How to read your product label and Safety Data Sheet
Before you open the bottle, spend a few minutes with two documents: the product label (printed on the bottle) and the Safety Data Sheet, often called the SDS or MSDS. The SDS is available on the Spray-N-Grow website or by contacting the company. These are not optional reading, the label is the legal use document and the SDS is your safety reference. Here's what to look for in each.
On the product label
- Active or guaranteed analysis: the label should list micronutrients and their percentages — the SDS notes the formula includes approximately 0.10% iron (from iron sulfate) and 0.05% zinc (from zinc chloride), but confirm what's on your bottle
- Mixing rate and directions: look for the exact teaspoon-per-quart or tablespoon-per-gallon rate for your formulation
- Application timing and frequency: the label will tell you how often to apply and whether there are restrictions close to harvest
- Equipment restrictions: the manufacturer FAQ explicitly states the product cannot be used in a hose-end sprayer — only a fine-mist hand sprayer
- Crop or plant restrictions: check whether your specific plant type is listed and whether there are any 'do not apply to' warnings
- Pre-harvest interval: Spray-N-Grow is stated as safe to use up to the day of harvest per the manufacturer FAQ, but always verify this on your specific bottle's label
On the Safety Data Sheet (SDS)
- Section 2 (Hazard Identification): understand what hazard categories apply — the Coco-Wet SDS notes eye irritation potential
- Section 4 (First Aid): if eye contact occurs, the SDS instructs irrigating eyes for at least 5 minutes — memorize this before you spray
- Section 8 (PPE and Exposure Controls): the SDS recommends safety glasses or chemical goggles, avoiding prolonged skin contact, and using an approved air-purifying respirator if respiratory irritation occurs
- Section 7 (Handling and Storage): keep products below 120°F and away from prolonged heat
- Section 13 (Disposal): triple-rinse empty containers, then offer for recycling or follow local disposal rules
Tools, PPE, and setting up a safe workspace
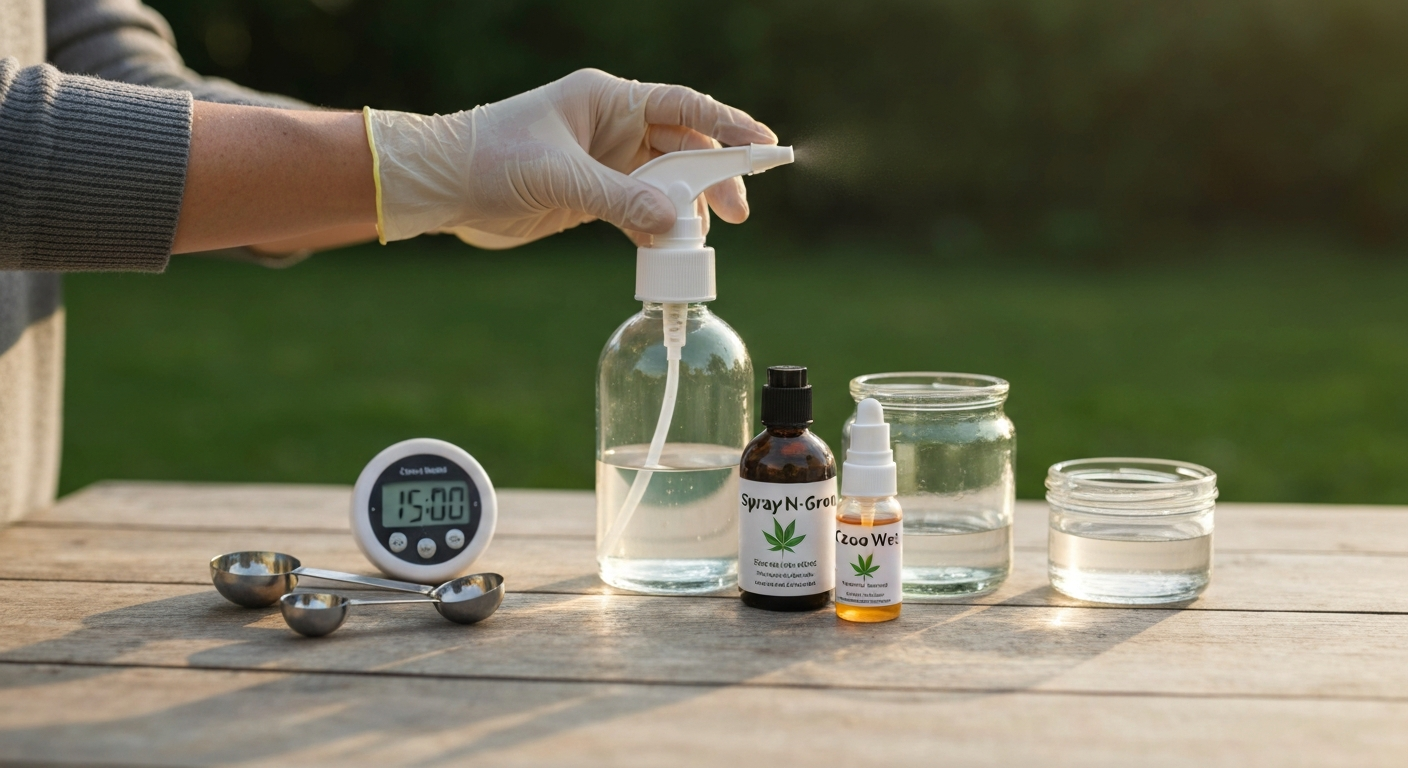
You don't need a lot of equipment, but getting set up properly before you mix makes the whole process smoother and keeps you safe. Go through this checklist before you start.
Equipment checklist
- A clean, calibrated fine-mist hand sprayer (not a hose-end sprayer — that's off the table per the manufacturer)
- A clean measuring cup or measuring spoons (dedicated to garden use, not kitchen use)
- A clean mixing container or use the sprayer bottle directly if its opening allows accurate measuring
- Warm water (room temperature or slightly warm — this helps the product dissolve and mix properly)
- The Spray-N-Grow concentrate and Coco-Wet wetting agent (if using the manufacturer's recommended two-product system)
- A timer or clock for the 15-minute activation wait
- Paper towels or a clean cloth for spill cleanup
- A small, clear jar for a compatibility test if mixing with other products (more on this below)
PPE checklist
- Safety glasses or chemical goggles (the SDS recommends eye protection — this is non-negotiable when mixing or spraying any liquid concentrate)
- Chemical-resistant or nitrile gloves to avoid prolonged skin contact
- Old clothing or a garden apron you don't mind getting mist on
- An approved air-purifying respirator if you're spraying in an enclosed space with poor airflow, or if you notice any respiratory irritation during application
Workspace setup
- Work in a well-ventilated area — outdoors is ideal, or indoors with windows open and a fan moving air away from you
- Lay down newspaper or a plastic sheet under your mixing area to catch drips
- Keep pets and children out of the application area until the spray has dried on leaves
- Have clean water nearby for rinsing skin or eyes if needed
- Don't mix near open flames or heat sources above 120°F
Step-by-step mixing procedure
The order you add ingredients matters. Adding things in the wrong sequence can cause the product to gel, separate, or lose effectiveness. The manufacturer's published guidance specifies a specific order, and extension sources on adjuvant mixing confirm that water temperature and order of addition both affect how well ingredients combine. Follow these steps carefully, and always use your specific product label for exact dosage amounts, the rates below reflect the manufacturer's published general guidance, but your bottle may differ.
- Put on your PPE: gloves and eye protection before you open any bottle
- Fill your sprayer or mixing container with the measured amount of warm water first — warm water improves mixing
- Add Coco-Wet (the wetting agent) to the water according to the label rate for Coco-Wet, and swirl gently to combine
- Add Spray-N-Grow concentrate at the rate on your label (the manufacturer's published general rate is 2 teaspoons per quart or 2 tablespoons per gallon — verify against your label)
- Gently swirl or cap and invert the sprayer a few times — do not shake vigorously
- Let the mixture sit for approximately 15 minutes: the manufacturer notes you should observe a color change during this period, which confirms proper activation. If no color change occurs, your water may be hard or the pH may be off — check the manufacturer FAQ for troubleshooting steps on water hardness
- If you plan to mix with any other product (such as a fertilizer like Bill's Perfect Fertilizer, which the manufacturer references), perform a jar test first: mix proportionate amounts in a small clear jar using the same water, invert several times, and wait 15 to 30 minutes watching for flakes, gels, or separation. Only proceed if the mixture stays clear and uniform
- Once activated, use the mixture promptly — do not store a pre-mixed solution
A quick note on coverage: the manufacturer states that one mixed quart treats approximately 125 to 250 square feet, and the concentrate bottle makes around 64 quarts. That's useful for planning how much to mix for your grow kit's footprint.
Step-by-step spray application procedure
Mixing the product correctly is only half the job. How you apply it determines whether your plants get even coverage or end up with concentrated drips on some leaves and nothing on others. Here's the process I use.
- Prime the sprayer: pump the trigger several times before pointing it at plants, until the nozzle produces a consistent fine mist rather than a drip or an uneven stream
- Do a test spray: point the primed sprayer at a piece of paper or cardboard to confirm the mist pattern is even and fine, not coarse or drippy
- Test on a small plant area first: on a single branch or a few leaves, apply the spray and wait 24 to 72 hours before treating the whole kit. This is standard extension practice for any new foliar product — it lets you spot phytotoxicity (leaf burn or discoloration) before it spreads
- If no damage appears after 24 to 72 hours, proceed to the full application
- Hold the sprayer 6 to 12 inches from the leaf surface and use a slow, sweeping motion to coat both the tops and undersides of leaves — undersides have more stomata (the tiny pores that absorb foliar feeds) so don't skip them
- Apply until leaves are evenly misted but not dripping — runoff wastes product and can carry concentrated solution down into the growing medium or reservoir
- Work systematically across your grow kit area so you don't miss sections or double-spray others
- After application, leave plants undisturbed and keep them out of direct harsh sunlight until the spray has dried on the leaves
- Clean the sprayer immediately after use: rinse with clean water, spray the rinse water through the nozzle, and repeat at least twice. Store the clean, empty sprayer with the nozzle open so it dries fully
Timing and frequency: when and how often to spray
When you spray matters almost as much as how you spray. Foliar applications on hot, dry, or windy days increase the risk of leaf burn because solution concentrates faster on stressed leaf surfaces. Extension sources and university vegetable handbooks consistently advise applying foliar sprays in the cooler hours of the day. See the Southeastern Vegetable Handbook (foliar spray timing and cautions) for university-extension guidance to apply foliar sprays in cooler hours and avoid hot, dry, or windy conditions to reduce phytotoxicity risk. The manufacturer's guidance says to apply every 1 to 3 weeks, but the right interval within that range depends on your growth stage and how your plants are responding. Here's a timing reference to help you decide.
| Growth Stage / Situation | Suggested Frequency | Best Time of Day | Notes |
|---|---|---|---|
| Seedlings (first true leaves present) | Once every 2 to 3 weeks | Early morning | Test on a small area first; young leaves are more sensitive |
| Vegetative growth (active leafy growth) | Once every 1 to 2 weeks | Early morning or late evening | Good stage to establish a regular foliar routine |
| Pre-flowering / flowering | Once every 1 to 3 weeks | Early morning | Avoid spraying open flowers directly if possible; check label for flower-stage guidance |
| Fruiting / harvest approach | Follow label pre-harvest interval | Early morning | Label states safe up to day of harvest — verify on your bottle |
| Hot, dry, or windy conditions (any stage) | Postpone application | N/A — skip the session | Reschedule to a cooler, calmer time to avoid leaf burn |
| After a heavy rain or when leaves are already wet | Postpone application | N/A — wait for dry leaves | Wet leaves dilute the product and reduce effectiveness |
If you're using Spray-N-Grow alongside a fertilizer program (the manufacturer references pairing it with Bill's Perfect Fertilizer), always confirm timing compatibility on both product labels. Stacking too many foliar applications in a short window can overwhelm plant leaves and increase burn risk.
Using Spray-N-Grow with hydroponic systems
Hydroponic grow kits need a bit of extra care here. The most important rule: do not add Spray-N-Grow directly to your nutrient reservoir unless the product label specifically says you can. This product is formulated for foliar application, not as a reservoir additive. Adding it to your reservoir untested can shift your electrical conductivity (EC) and pH readings in ways that are difficult to predict and correct, and could interfere with your existing nutrient solution.
The right approach for hydroponics is to spray the canopy above the growing deck, just as you would with any soil-based kit. Keep the mister aimed at the leaf surfaces and use the same fine-mist, sweeping technique described above. If your hydroponic system has an open reservoir or exposed water surface below the canopy, shield it with a piece of cardboard or a towel during application to prevent overspray from dripping in. After spraying, remove the shield and check that no product has entered the reservoir.
- Check EC and pH readings before and after any foliar session — if you notice unexpected changes, investigate whether overspray reached the reservoir
- In NFT (nutrient film technique) or DWC (deep water culture) systems where the canopy sits close to the water surface, extra care with overspray is essential
- In systems with recirculating pumps and exposed grow sites, consider temporarily pausing the pump during application to reduce the chance of mist being drawn into the water
- If you're also managing reservoir nutrients with a separate product, check out how different brands handle foliar vs. reservoir supplementation — the approach varies significantly between systems
Kit-specific adjustments
Seed-starting kits
Wait until seedlings have developed their first set of true leaves before applying any foliar product. The cotyledons (the first, rounded seed leaves) are fragile and not the right target. Once true leaves are present, do your 24 to 72 hour patch test on one or two plants before treating the whole tray. Keep applications light, young seedlings don't need heavy coverage, and a fine mist is all you're going for.
Potted and soil-based kits
These are the most forgiving setup for foliar feeding. The main gotcha is runoff: if you over-apply and solution drips into the potting medium, you may alter soil pH or salt levels over time. Spray to a light, even mist and stop before you see runoff. If you're using a drip tray, empty it after application.
Mushroom kits
Do not apply Spray-N-Grow to mushroom fruiting kits. Mushroom fruiting bodies (the actual mushrooms) absorb moisture directly and are extremely sensitive to chemical contact. Even a diluted foliar spray can damage or contaminate your fruiting block. Stick to the plain water misting your mushroom kit instructions specify.
Terrarium and aquatic grow toys
Water-based terrariums and aquatic kits are not appropriate environments for this product. Any chemical additive can disrupt water chemistry and harm plants or organisms living in the water. Skip Spray-N-Grow entirely for these kits.
Common mistakes, phytotoxicity signs, and troubleshooting
Even with a good process, things can go wrong. Here are the most common problems and what to do about them.
| Problem | Likely Cause | What to Do |
|---|---|---|
| Leaf tip burn or brown edges after application | Phytotoxicity from over-concentration, spraying in heat, or sensitive species | Rinse affected leaves with clean water; reduce frequency or concentration; test on small area before full application next time |
| No color change in the mixed solution after 15 minutes | Hard water or high pH water preventing proper activation | Check manufacturer FAQ for water pH adjustment guidance; try using filtered or distilled water |
| Uneven coverage (dry patches on leaves) | Nozzle not producing fine enough mist, or application too fast | Re-prime the sprayer; slow your sweeping motion; check nozzle for clogging |
| Mixture appears to gel or separate | Incompatible tank mix or incorrect order of addition | Discard the batch; re-mix in the correct order (water, Coco-Wet, then Spray-N-Grow); perform a jar test before mixing with additional products |
| Yellow leaves after repeated applications | Possible over-application or nutrient imbalance; foliar feeding alone doesn't replace root feeding | Reduce application frequency; review your overall fertilizer program; consider whether roots are also receiving adequate nutrition |
| Sprayer clogs after use | Residue drying in the nozzle | Rinse the sprayer immediately after every use; if already clogged, soak the nozzle in warm water to dissolve residue |
If you see widespread leaf damage and can't identify the cause, take a photo and contact Spray-N-Grow, Inc. directly, their contact information is on the company website. They're a small company and in my experience small manufacturers are often more responsive to specific product questions than you'd expect.
Safe storage and disposal
Store Spray-N-Grow and Coco-Wet concentrates below 120°F, away from direct sunlight and heat sources. Don't leave bottles in a hot car or a greenhouse in summer. Keep products in their original, labeled containers with caps tightly closed and out of reach of children and pets.
For empty containers, the SDS recommends triple-rinsing (fill with a small amount of water, seal, shake, empty, repeat three times) and then offering the container for recycling or following your local container disposal rules. Don't pour unused mixed solution down a storm drain, check your municipality's guidelines for disposing of diluted fertilizer solutions, or use it up on non-sensitive outdoor plants at the same application rate.
Environmental and regulatory notes
Spray-N-Grow is registered as a micronutrient fertilizer product (it appears in Washington State's fertilizer database as a registered micronutrient product, for example) rather than as a pesticide. That means it's regulated under fertilizer law, not under EPA's Worker Protection Standard (WPS) for pesticides. In practical terms for a hobbyist: you don't face the same formal WPS compliance requirements you would with a pesticide label, but you're still responsible for following the product label directions and SDS guidance on PPE and disposal. For authoritative respirator and PPE selection guidance, consult NIOSH, Pocket Guide / respirator selection guidance (intro) NIOSH — Pocket Guide / respirator selection guidance (intro). Keep applications away from water bodies, storm drains, and areas where runoff could reach streams or ponds.
Where to go from here
Once you've got your Spray-N-Grow routine dialed in, you may find yourself curious about how other supplemental feeding products work across different kit types. If you're running a brand-specific grow kit with its own refill or nutrient instructions, the process often looks different from a generic foliar feed routine. For example, seed-pod systems from brands like Click and Grow use a self-contained substrate and refill approach that's quite different from open foliar feeding. For a detailed walkthrough and troubleshooting specific to that system, see dansand no grow instructions. For Click and Grow refill instructions, consult Click and Grow's official refill and pod-replacement guidance. Similarly, if you're working with a Maxsea-based grow program, that product's mixing and application logic is worth understanding on its own terms. See the Maxsea grow instructions for that product's specific mixing and application guidance. And if you're comparing foliar micronutrient options more broadly, products like LA Colors Mega Grow serve a different niche entirely. Each of those has its own label logic, timing requirements, and compatibility considerations, treat each one as its own process rather than assuming the steps are interchangeable.
The core habit that applies across all of them is the same one that makes Spray-N-Grow work well: read the label before you open the bottle, do a small test application before treating your whole kit, and keep notes on what you observe. A quick log of application dates, concentrations, and plant responses will save you a lot of guesswork the next time something unexpected happens. Small wins stack up fast once you've got a consistent routine.
FAQ
When is Spray‑N‑Grow appropriate to use in my DIY grow kit?
Spray‑N‑Grow is a foliar micronutrient/adjuvant product intended to supply trace elements to plants via spray application. It’s appropriate when: you want to correct or prevent micronutrient deficiencies that are documented by plant symptoms or tissue tests; you plan to apply a foliar micronutrient rather than a soil‑only treatment; and the product label or your kit manufacturer permits foliar sprays on that crop. Do not use it as a pesticide or substitute for required products on kits that prohibit foliar sprays (always check your kit documentation). If you’re uncertain whether your plant problem is a micronutrient deficiency, get a soil or tissue test or consult the kit maker or a local extension agent first.
How do I read the product label and Safety Data Sheet (SDS) for Spray‑N‑Grow?
Read both documents before using the product. Key things to find on the label: approved crops or a general food‑crop statement, mixing/dilution instructions and coverage, application equipment restrictions (for example, the manufacturer states it cannot be used in a hose‑end sprayer), timing or preharvest statements, and any mandatory PPE. Key things to find on the SDS: active ingredients and concentrations, first‑aid steps for eye/skin/ingestion, recommended PPE (eye protection, gloves, respirator guidance if irritation occurs), storage temperature limits, and container disposal instructions. Keep the label and SDS accessible during mixing and application and follow the SDS for emergency treatment.
What personal protective equipment (PPE) should I use?
Follow the SDS and label. For Spray‑N‑Grow and its Coco‑Wet adjuvant, recommended PPE includes chemical safety glasses or goggles and gloves to avoid prolonged skin contact. If you experience respiratory irritation or are using fine sprays in enclosed spaces, use an appropriate NIOSH‑approved respirator and follow OSHA/NIOSH guidance for selection and fit testing. Wash hands and exposed skin promptly after use and avoid eating or smoking during mixing or application.
What general, manufacturer‑agnostic mixing procedure should I follow?
Use this stepwise, label‑first approach: 1) Read the product label and SDS for exact sequence and dilution. 2) Perform a jar test for compatibility when mixing multiple products (use the same water and proportions in a clear jar, invert and inspect 15–30 minutes for flakes or separation). 3) Use clean equipment and warm water if instructed. 4) Add adjuvants/wetters as the label or FAQ indicates (manufacturer FAQ suggests adding Coco‑Wet before Spray‑N‑Grow). 5) Add Spray‑N‑Grow and allow the mixture to sit per label/FAQ (manufacturer guidance suggests ~15 minutes to observe color change). 6) If tank‑mixing other fertilizers or pesticides, follow each label’s order and compatibility guidance; if unsure, contact the manufacturer. 7) Strain the mixed solution into the sprayer if particulates are present and label allows. Always follow the exact order and amounts on your label for concentrations.
How do I choose the right sprayer and nozzle?
Use a sprayer that produces a fine mist and is compatible with foliar nutrient solutions. The manufacturer warns against hose‑end sprayers for Spray‑N‑Grow. For indoor or hobbyist use, handheld or battery‑powered pump sprayers with an adjustable fine‑mist nozzle work well. For better coverage, choose a nozzle and pressure that produce the desired droplet size—finer droplets improve leaf coverage but can drift more and increase inhalation risk. Consult extension guidance (nozzle reviews) if you need more technical detail.
What are the recommended application timing and frequency practices?
Follow the label for exact frequency. General extension best practices: apply foliar sprays in cooler hours (early morning or late evening) to reduce leaf temperature and evaporation and to limit phytotoxicity risk. Avoid spraying in hot, sunny, or windy conditions. Test a small area first and wait 24–72 hours to check for adverse effects before full coverage. If the product label lists a frequency (the manufacturer example lists application every 1–3 weeks), follow that. Adjust frequency based on plant response and any tissue/soil test results.