If you searched for 'Root and Grow instructions,' you most likely have one of two things: a seed-starting grow kit that uses that name on its packaging, or a bottle of Root and Grow rooting concentrate (commonly made by Bonide) that you're trying to mix and apply correctly. USDA Forest Service extension materials describe the liquid rooting hormone “quick dip” approach as a propagation method, which helps explain dip and duration concepts when using liquid hormone. This guide covers both, but leans hard into the grow kit side since that's where most of the confusion lives. Either way, you're in the right place, and by the end of this walkthrough you'll know exactly what to do with what's in front of you.
Root and Grow Instructions: Setup, Use, and Troubleshooting

Marcus Thornfield
24 Apr 2026
Which Root and Grow kit do you actually have?
Here's the honest truth: 'Root and Grow' isn't a single tightly defined product line with one universal instruction set. The name appears on several different products, and the steps you follow depend entirely on what's in the box. Before you do anything else, figure out which version you have.
| Version | What it looks like | Key components |
|---|---|---|
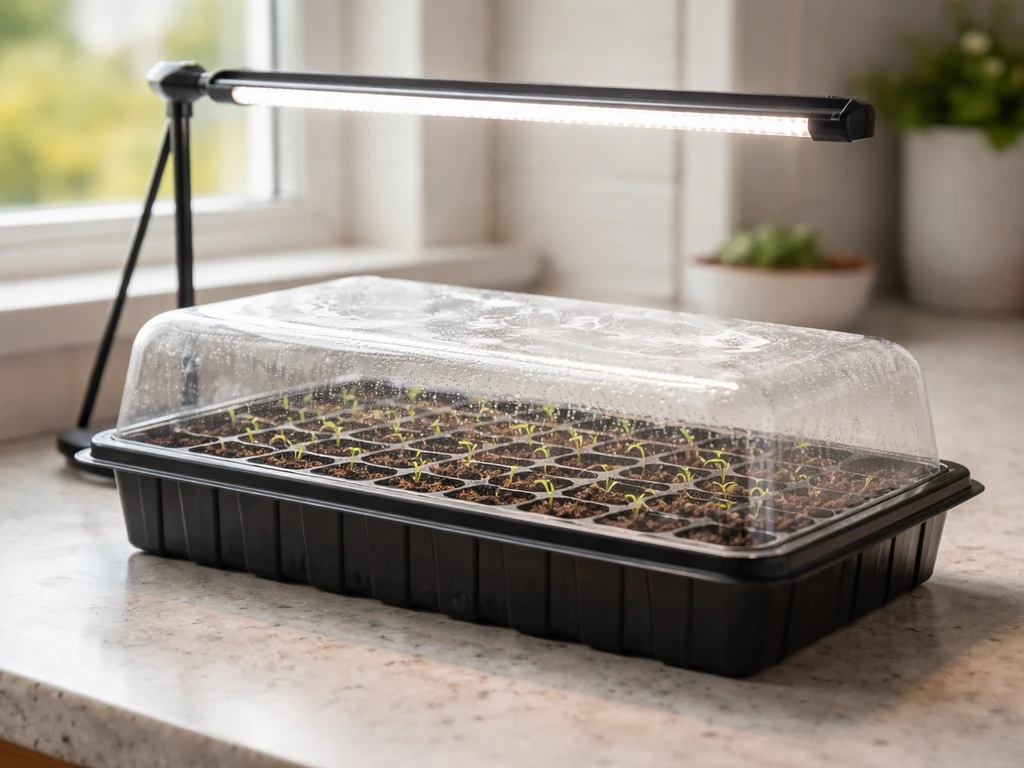
| Seed-starting grow kit (tray-based) | Flat plastic tray, coir or peat pucks, clear humidity dome | Cell tray, growing media pucks, dome lid, sometimes a water reservoir base |
| Hydroponic grow kit (water-based) | Reservoir tank, net pots or foam plugs, possibly a small pump or wicking mat | Reservoir, net cups, growing media (rockwool or hydroton), nutrient solution packet |
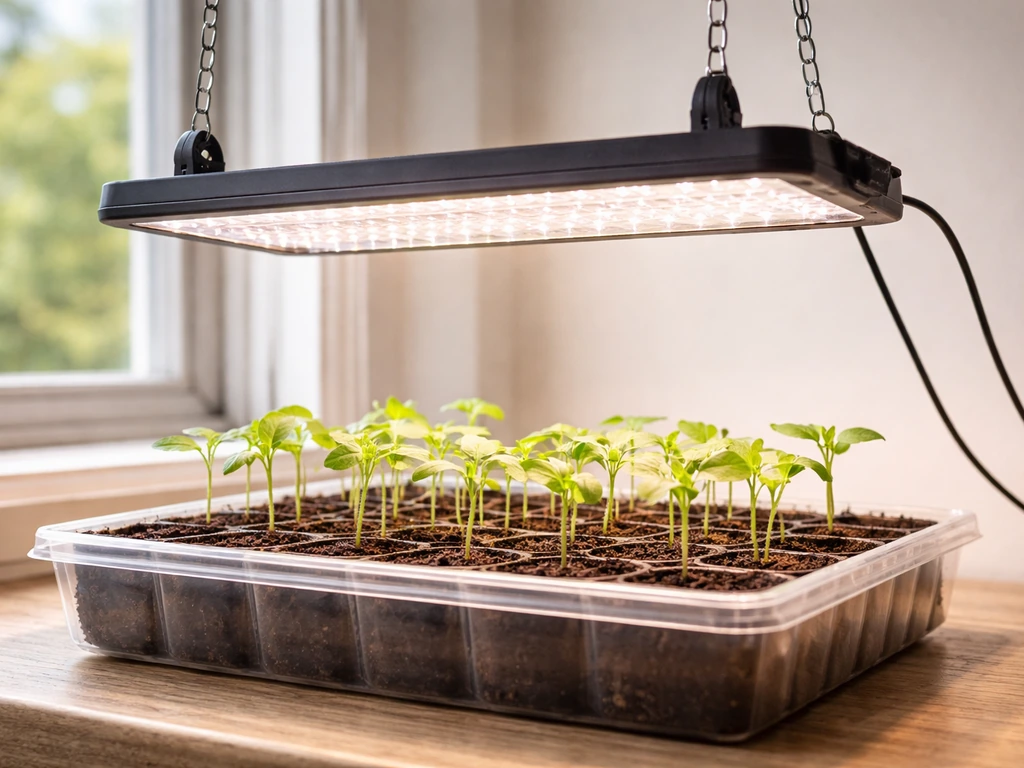
| Kit with integrated light | All of the above plus a clip-on or overhead LED grow light and timer | Everything above, plus LED panel, power cord, and timer dial or app |
| Root and Grow concentrate (Bonide) | Small brown or green bottle, liquid or powder rooting hormone | Concentrate bottle, measuring instructions on label — no tray or dome included |
To confirm your model, check the box bottom or the instruction sheet for a model number, SKU, or version name. If you see words like 'reservoir,' 'net pot,' or 'pump,' you have a hydroponic kit. If you see 'puck,' 'dome,' or 'cell tray,' it's a soil or coir-based seed starter. If you have just a bottle with a dropper or measuring cap, that's the Bonide-style rooting concentrate covered in more detail in the Garden Rich Root and Grow instructions and root stimulator instructions resources on this site. If you have the Bonide-style rooting concentrate, match your application timing to the Garden Rich Root and Grow instructions so you don't overdo it before planting Garden Rich Root and Grow instructions and root stimulator instructions. If you have just a bottle with a dropper or measuring cap, that's the Bonide-style rooting concentrate covered in more detail in the Garden Rich Root and Grow instructions and root stimulator instructions resources on this site. If you also need Garden Rich Root and Grow instructions for your exact kit or product version, follow the matching steps on that guide to apply it correctly.
Quick-start setup checklist

Run through this before you plant anything. Skipping even one step here is usually why things go wrong later.
- Unbox everything and lay it out. Account for: tray(s), dome or lid, growing media (pucks, plugs, or loose coir), nutrient packet or bottle if included, light unit and power cord if included, pump or wicking mat if included, and any timer or instruction card.
- Check for damage. Look for cracked trays, torn pucks, and bent light arms. A cracked reservoir will leak onto your shelf — swap it before you start.
- Rinse non-media parts. Give trays, net pots, and reservoir tanks a quick rinse with clean water. No soap. Soap residue kills seedlings.
- Pre-soak your growing media. Coir pucks need 1–2 cups of room-temperature water each to expand fully (about 5–10 minutes). Rockwool cubes should soak in pH-adjusted water (pH 5.5–6.5) for at least an hour. Do not skip this — dry media draws moisture away from seeds.
- Assemble the tray system. Set the cell tray inside the water-reservoir base (if there is one), or place net pots into the reservoir lid. Make sure any drain holes align correctly.
- Set up your light if included. Position it 2–4 inches above the dome for germination. If you have a timer, set it to 16 hours on / 8 hours off for most seeds.
- Fill the reservoir or bottom tray with plain water first. Do not add nutrients yet — seedlings don't need them until after the first true leaves appear.
Planting and germination: the right way to sow seeds in your kit
Once your media is fully expanded and moist (not dripping), you're ready to plant. This is where most first-timers over-think it, but the process is straightforward.
Seeding depth and spacing
The general rule is to plant seeds at a depth of about twice their diameter. Tiny seeds like basil or lettuce go barely under the surface, maybe 1/8 inch. Larger seeds like peas or beans go about 1/2 to 1 inch deep. If your kit came with pre-formed pucks, press a small divot into the center of each puck with a pencil tip, don't dig, just dimple. Drop 2–3 seeds per cell or puck for insurance, then cover lightly with a pinch of the loose coir or growing media that came with the kit. Space doesn't matter much yet since you'll be thinning later.
First watering and dome placement
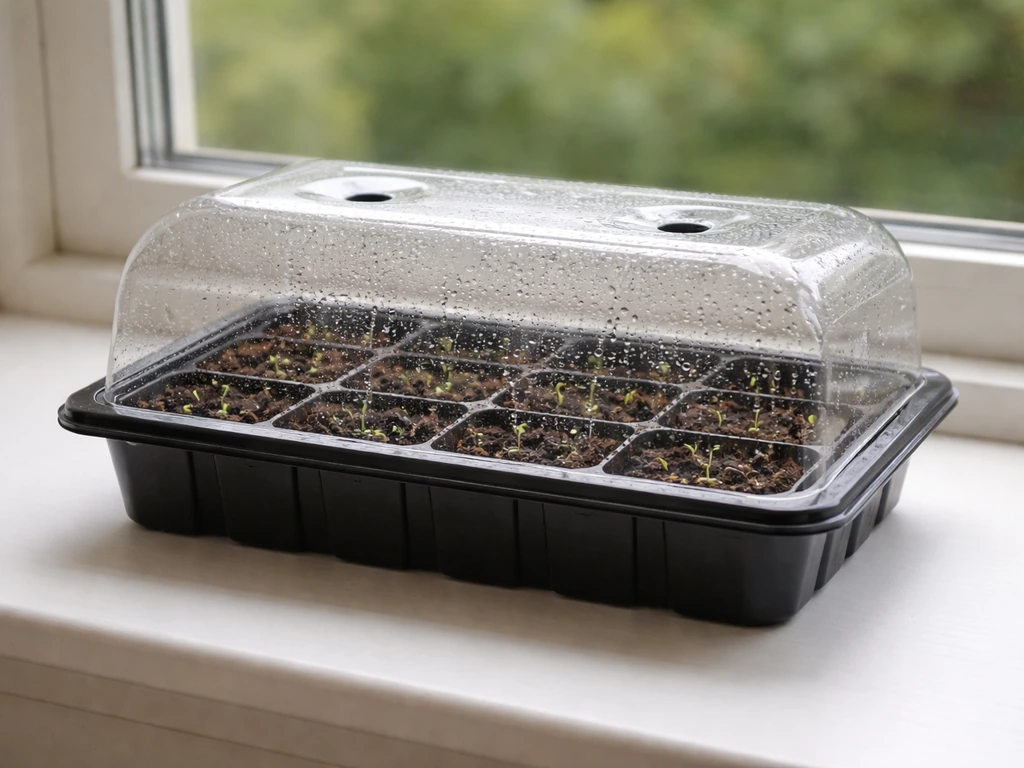
After planting, mist the surface lightly with a spray bottle, just enough to settle the seeds, not enough to wash them out. Then place the clear dome over the tray. The dome traps humidity and warmth, which is what kicks germination off. Do not water from the top again until you see sprouts. If your kit has a reservoir base, keep about 1/4 inch of plain water in it during germination. This bottom-wicking method keeps media moist without soaking seeds. Check the reservoir every day and top it off as needed, it will dry out faster than you expect in a heated room.
Most seeds in a quality grow kit will show their first sprout within 3–10 days at room temperature. Herbs and lettuce tend to pop in 3–5 days. Tomatoes, peppers, and eggplants take 7–14 days and really want warmth (70–80°F). If your kit includes a heat mat, use it, germination rates jump noticeably when soil temperature stays consistently above 68°F.
Day-to-day care: watering, light, temperature, and nutrients
Watering schedule
Once seeds sprout and you remove the dome, shift to a bottom-watering rhythm. Pour water into the reservoir base or tray, never pour directly onto the seedlings. Seedlings with wet stems and leaves are an invitation for mold. Check the reservoir every 1–2 days and refill when it drops below 1/4 inch. Let it dry slightly between refills rather than keeping it constantly flooded. The media should feel like a wrung-out sponge: moist but not saturated. If you squeeze a pinch and water drips freely, it's too wet.
Light requirements
If your kit includes a grow light, keep it 2–4 inches above the tops of seedlings during the first two weeks. As plants grow, raise the light to maintain that gap. Run the light 16 hours on, 8 hours off. Seedlings do not benefit from 24-hour light and actually need the dark period for healthy cell development. If you're using a windowsill instead of the included light, south-facing is best, and even then most kitchens don't get enough direct sun in spring to keep seedlings compact. Supplemental light makes a real difference.
Temperature
Most seedlings are happiest between 65°F and 75°F after germination. Cold drafts from windows slow growth significantly. Keep the kit away from air conditioning vents and outside-facing walls in colder months. If you see growth stall without obvious reason, temperature is the first thing to check.
Nutrient and solution schedule
Hold off on nutrients until your seedlings have their first set of true leaves, those are the second set of leaves that look more like the adult plant, not the small round seed leaves (cotyledons) that appear first. At that point, mix the included nutrient packet or liquid concentrate according to the instructions on the packet. If no specific ratio is given, a safe starting point is half the recommended strength for the first two weeks of feeding. Mix nutrients with room-temperature water, never hot. For hydroponic kits, change the nutrient solution in the reservoir completely every 7–10 days to prevent salt buildup and bacterial growth. For soil or coir-based kits, feed with the nutrient solution once a week in place of plain water, then alternate back to plain water.
Routine maintenance and keeping mold away
Mold and algae are the two most common disasters with any enclosed grow kit, and both are almost entirely preventable with a simple weekly routine.
- Lift the dome for 15–30 minutes every day after germination to let fresh air circulate. High humidity under a sealed dome invites fungal problems fast.
- Wipe the inside of the dome with a damp cloth if you see condensation droplets sitting on the surface for more than a few hours.
- Empty and rinse the reservoir every 7–10 days in hydroponic systems. Stagnant water grows algae, which competes with roots and smells bad.
- Keep the outside of your light clean — dust on the lens reduces output by more than you'd think.
- If your kit has a pump, check that the tubing isn't kinked and that the pump intake isn't clogged with debris every week.
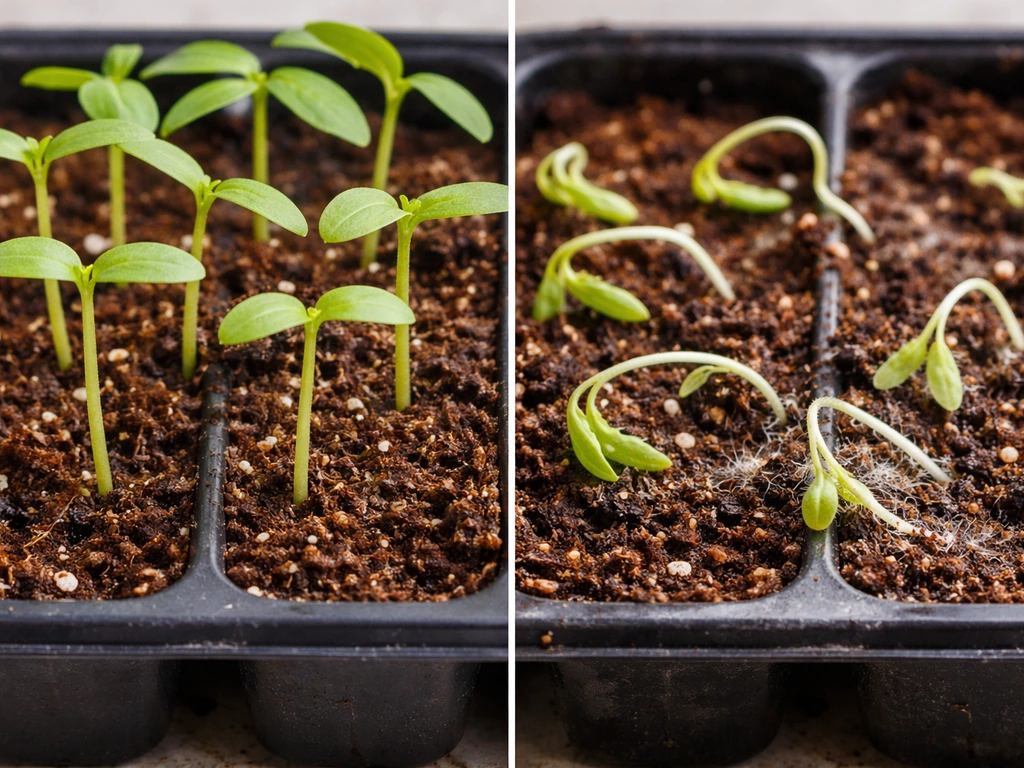
- Thin seedlings early. Overcrowded plants touching each other create still, damp microclimates that are perfect for damping-off fungus. If two seedlings sprouted in the same cell, snip the weaker one at the base with scissors — don't pull it out, which disturbs roots.
If you do see green algae coating the inside of a clear reservoir, empty it completely, scrub with a 1:10 bleach-to-water solution (rinse thoroughly), and refill with fresh solution. Cover the reservoir sides with black tape or a sleeve to block light, algae can only grow where light hits water.
Troubleshooting the most common problems
Seeds not sprouting after 10+ days
First check temperature, if the growing space is under 60°F, many seeds simply won't germinate. Second, check moisture: media that dried out completely after planting often causes seeds to abort germination mid-process. Re-moisten from the bottom and add warmth. Third, check seed age, old seeds have lower germination rates, and kits that sat in a warehouse or store for over a year may have compromised seed viability. If none of those apply, try pressing lightly on the puck surface to feel if it's firm and expanded or still hard and dry in the center.
Mold on the surface of media
White fuzzy mold on the surface of coir or soil is almost always caused by too much moisture sitting on the surface combined with low airflow. Remove the dome, let the surface dry out for a few hours, then resume normal care with the dome propped slightly open. A small fan nearby set to low can help a lot. If mold keeps coming back, reduce how much water you're adding to the reservoir and increase venting time.
Damping-off (seedlings falling over at the base)
Damping-off is a fungal disease that rots seedling stems right at soil level, causing them to collapse suddenly. It's caused by overwatering, poor airflow, or contaminated media. Unfortunately, once a seedling damps off, it's gone, you can't save it. But you can stop it from spreading. Remove affected seedlings immediately, reduce watering, increase airflow, and consider applying a very light dusting of cinnamon (yes, regular cinnamon from your spice cabinet) to the soil surface, which has mild antifungal properties. Going forward, let the reservoir nearly empty before refilling rather than keeping it constantly topped up.
Leggy, stretched seedlings
Leggy seedlings, tall, thin, floppy stems reaching upward, almost always mean not enough light. Move the grow light closer (aim for 2–3 inches above the canopy) or increase daily light hours up to 18. Windowsill-only setups in spring frequently produce leggy seedlings. This isn't fatal, but leggy seedlings are weaker and harder to transplant successfully. If it's already happened, you can bury the stem a bit deeper when you transplant to give it more support.
Yellowing leaves
Yellow leaves on seedlings usually point to one of three things: overwatering (most common), nutrient deficiency (especially if yellowing starts on older lower leaves after the first couple of weeks), or pH issues in hydroponic systems. If you're in a hydroponic kit, test the water pH, it should be between 5.5 and 6.5. Outside that range, plants can't absorb nutrients even if they're present in the water. pH test strips or a cheap digital pH meter (under $15) will tell you immediately.
No flow, pump not working, or uneven wicking
If your kit has a pump and it's silent or producing no flow, check: is the power cord fully plugged in? Is the pump intake submerged? Is the tubing kinked? Small pumps in starter kits can also air-lock, unplug, submerge fully, then replug to reset. If wicking seems uneven (some pucks dry, some saturated), the wicking mat may not be sitting flat against the tray base. Lift the tray, smooth out the mat, and re-seat it.
Wrong nutrient solution strength
Too-strong nutrient solution causes leaf tip burn and wilting even in moist media, the salt concentration pulls water out of roots instead of letting roots absorb it. If you see crispy brown leaf tips, flush the reservoir or media with plain pH-adjusted water and start fresh at half the recommended nutrient dose. It's always safer to under-feed and gradually increase than to burn your seedlings with a full-strength solution too early. If you want to use an Umberto Giannini Grow Mask, follow the product label for mixing and application timing so you don't overdo it how to use umberto giannini grow mask.
Moving seedlings out: transplanting without killing them
Seedlings are ready to transplant when they have 2–4 true leaves and roots that are visibly emerging from the bottom of the cell or puck. Don't rush this, seedlings transplanted too early struggle to establish. For most herbs and vegetables, that's about 3–5 weeks after germination.
How to transplant without shocking the roots
- Water your kit 12–24 hours before transplanting so roots are plump and media holds together.
- Prepare your destination pot or garden bed first. Use fresh potting mix, not garden soil from outside (too dense, often carries pathogens).
- Gently squeeze the cell tray from below to push the puck or plug upward. Don't pull by the stem — ever. If roots have grown into a wicking mat, trim them with scissors at the mat line rather than yanking.
- Dig a hole in the new pot slightly larger than the puck. Place the entire puck in — you don't need to remove the coir or growing media from around the roots. It will integrate into the surrounding soil.
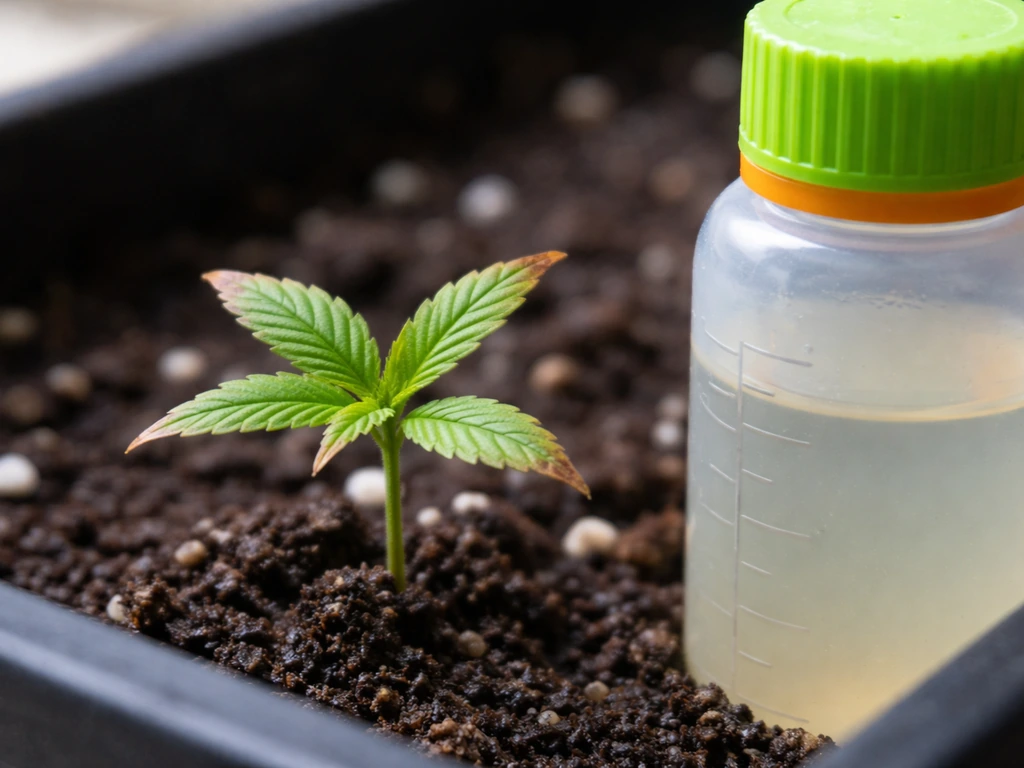
- Fill in around the puck, firm gently, and water in with plain water or a diluted transplant solution. If you have a rooting hormone product (like a Root and Grow concentrate or root stimulator), this is exactly when to use it — a diluted drench at transplant time helps roots establish faster in the new environment.
- Keep transplanted seedlings out of direct harsh sunlight for 2–3 days while they adjust. Partial shade or filtered light reduces transplant stress.
After transplanting, expect a brief stall in visible growth, that's normal. The plant is investing energy into root expansion underground. Within a week, you should see new leaf growth picking up again. If a transplanted seedling wilts severely and doesn't recover after a day in gentler light, it may have lost too much root mass during the move. Keep it moist (not wet), be patient, and it often bounces back.
Once you've got the hang of this process, you'll find that most issues with Root and Grow kits come down to three recurring culprits: too much water, too little light, and starting nutrients too early. Nail those three things and the rest of the grow tends to sort itself out. If you’re using the Roots Organic Uprising Grow product specifically, follow the label directions on mixing, application, and timing for best results how to use roots organic uprising grow.
FAQ
Can I reuse leftover Root and Grow nutrient concentrate or reservoir solution later?
If you have a hydroponic reservoir, never reuse old nutrient solution after weeks of germination. Change the solution fully on a 7–10 day schedule and always top with the correct mix (water alone can dilute nutrients and shift pH). For soil or coir kits, topping with nutrients instead of weekly watering is a common mistake, follow the “feed weekly, plain water on the off weeks” rhythm to avoid salt buildup in the media.
What water should I add when the reservoir drops below the 1/4 inch mark, and do I need to pH it?
No. “Plain water” for reservoir-based kits should be plain water that you have pH-adjusted (since pH drift affects nutrient uptake). If you do a correction flush, use room-temperature water and refill only after the reservoir level is cleaned out, then resume bottom-wicking so seedlings are not left with saturated stems.
My seeds are not sprouting, how do I tell if it is depth, moisture, or temperature?
Seeds can fail without obvious mold when they are too deep or when the media surface dries out before roots connect. Re-check two things first, depth (about twice the seed diameter) and surface moisture right after planting (lightly mist only to settle). If you suspect depth, do not dig up seeds once you see any sprouting, instead improve bottom moisture and warmth.
Algae is forming in the reservoir, what is the best way to prevent it going forward?
If you see algae on the reservoir walls, the fastest fix is to block light to the water, then correct the light cycle around the kit. Clear reservoirs exposed to light are more likely to develop algae even if you are watering correctly, so black tape or a sleeve helps most. Also avoid leaving domes cracked open during germination, you want humidity early, venting later for mold prevention.
Should I thin seedlings before transplanting, and if so, when and how?
Choose a thinner now, not later. Leaving extra seedlings in one cell forces competition and can tangle roots, making separation at transplant time harder. When thinning, snip the weaker seedlings at the soil line instead of pulling, this reduces root disturbance for the strongest seedling.
What causes yellow leaves in seedlings if I already followed the watering schedule?
Yes, it can happen if you keep feeding before true leaves or if the solution is too strong. Yellowing at older lower leaves after the first couple weeks often suggests nutrient imbalance rather than simple overwatering, confirm by checking your feeding schedule and (for hydroponics) pH range. If the yellowing is sudden plus stems look soft, it is more likely overwatering, adjust bottom-watering and let the media dry slightly between refills.
My hydroponic kit wets some cells but not others, what should I troubleshoot first?
If the pump is running but you get uneven wicking, the intake and the wick path matter. Make sure the pump intake is fully submerged, tubing is not kinked, and the wicking mat is flat with full contact to the tray base. Also check that the tray level sits correctly in the base, uneven seating can create “dry corners” even with the pump on.
How do I fix leggy seedlings without stressing them too much?
Leggy seedlings are usually a light-distance and light-duration issue. Adjust the light height to stay about 2 to 3 inches above the canopy, and aim for 16 hours on and 8 hours off. If you are using only a windowsill, expect inconsistent intensity, rotating the tray daily helps, but you may still need supplemental light to keep seedlings compact.
I think I am seeing damping-off, what is the fastest response that prevents it from spreading?
For damping-off, removing affected seedlings is the immediate priority, you cannot cure collapsed seedlings. Then improve airflow and reduce how wet the surface stays. A practical next step is to remove the dome earlier for a short period once sprouts are visible, prop it slightly for venting, and avoid topping the reservoir aggressively, let it drop closer to nearly empty before refilling.
When exactly should I transplant, can I go by day count instead of true leaves and root visibility?
In general, wait until seedlings have 2 to 4 true leaves and visible roots emerging from the bottom. If you transplant earlier, root systems are still developing and the “brief stall” can turn into a prolonged struggle. A good rule of thumb is to transplant after your germination window plus a few extra days, not on a calendar date alone, especially for tomatoes, peppers, and eggplants.
What should I do if the nutrient solution seems too strong and seedlings show leaf tip burn?
If you want to correct an overfed situation, flush with room-temperature pH-adjusted water rather than adding more nutrients. After flushing, restart at half strength for the next feeding cycle, then step up gradually only if growth looks healthy. Do not combine a flush with other additives at the same time, give seedlings a clean baseline first.