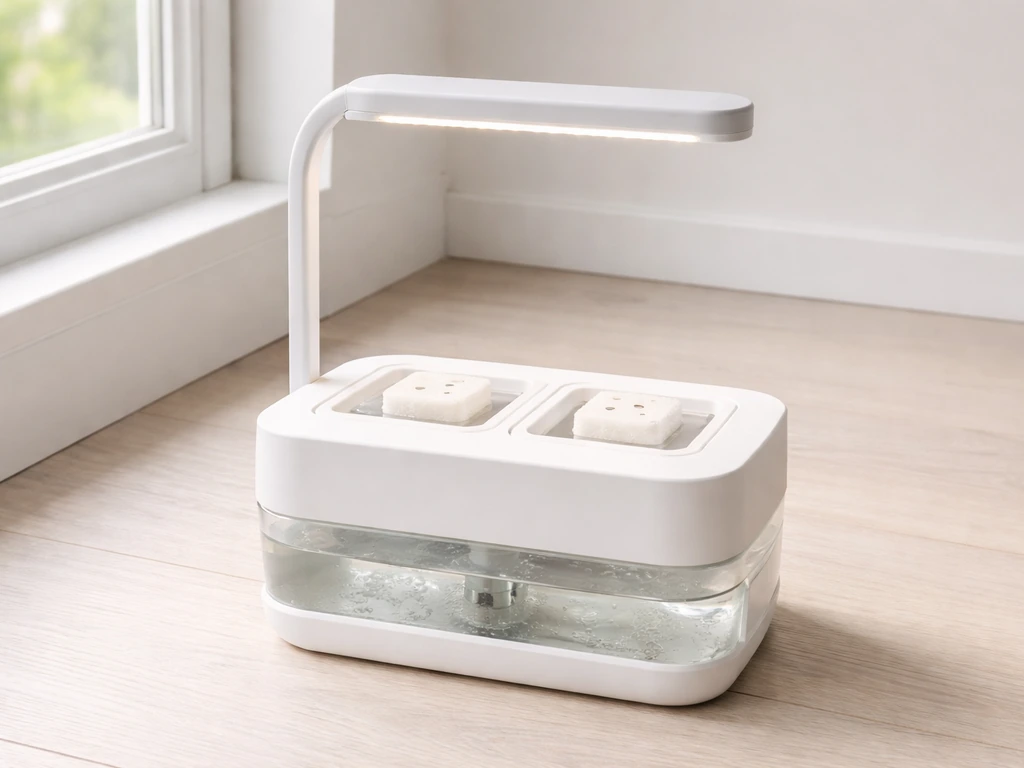
Setting up a Back to the Roots hydroponic grow kit takes about 15 minutes from unboxing to seeds in the water. Drop a pre-dosed plant food sachet into the reservoir, fill to the marked line, insert the seed sponges into the grow pots, place the germination domes on top, and set the whole thing somewhere that stays around 70°F. The wick system handles the watering automatically from there. This guide walks you through every step, explains how to confirm the self-watering mechanism is actually working, and covers the most common issues people run into during that first grow cycle.
Back to the Roots Hydroponic Grow Kit Instructions

Marcus Thornfield
15 May 2026
Quick-start checklist: do these things first
Before you dig into the full instructions, run through this list. It covers the steps most people either skip or do out of order, which is exactly where problems start.
- Identify your exact kit model (33009, 33007, 50025, or the succulent/cactus self-watering version) before you do anything else — the reservoir size and light hardware differ between versions.
- Download the official HydroKit Grow Guide PDF from the Back to the Roots website if your kit didn't include a printed copy or if it got wet/lost.
- Rinse your LECA pebbles (the clay pebble grow medium) under lukewarm water before placing them in the grow pots — they arrive dusty and the residue can clog the wick.
- Check that the wicking rope is seated all the way into the grow pot and reaches down into the reservoir opening. A loose wick is the single most common reason the self-watering system fails silently.
- Tear open one pre-dosed plant food sachet and sprinkle it directly into the reservoir before adding water — not after.
- Fill the reservoir to the marked water line, not above it. Overfilling can waterlog the wick and suffocate seeds.
- Place the germination domes over each pod immediately after seeding — they hold humidity and are critical for germination within the first 3 days.
- Set a reminder to check moisture and water level at 3 days — if nothing has sprouted and the medium looks dry, that's your first troubleshooting checkpoint.
Identify your exact Back to the Roots kit version and parts
Back to the Roots sells several different grow kits and the name 'hydroponic grow kit' gets applied to more than one of them. Getting the wrong instructions for your specific version is a real frustration, so let's nail this down before you touch anything.
The two most common hydroponic versions sold at major retailers are Model 33009 (LED hydroponic grow kit, 3-pod system with organic seeds included, available at Home Depot) and Model 33007 (3-Pod White Matte Hydroponic Grow Kit, also at Home Depot). Both are 3-pod systems, but 33009 includes the LED lighting arm while 33007 may come without it or with a different light configuration. Check the model number on the bottom of the base or on the side of the box.
If you bought from Lowe's, you may have Model 50025, which is marketed as a windowsill grow kit and includes a grow light, self-watering planters, and a 'Garden in a Can' set. Lowe’s product listing for the Back to the Roots 50025 windowsill grow kit with grow light also describes self-watering tomato and chili pepper planters, a “Garden in a Can” set, and includes a grow light Model 50025 windowsill grow kit. This version has a slightly different setup because it blends the self-watering planter concept with a hydroponic reservoir, so don't assume the reservoir fill instructions from the 3-pod kit apply directly.
There's also the Self-Watering Grow Kit for succulents and cacti, which is a different product entirely. It uses the same wick system concept but is not a hydroponic food-growing kit. If you're setting up that one, the planting instructions below won't apply.
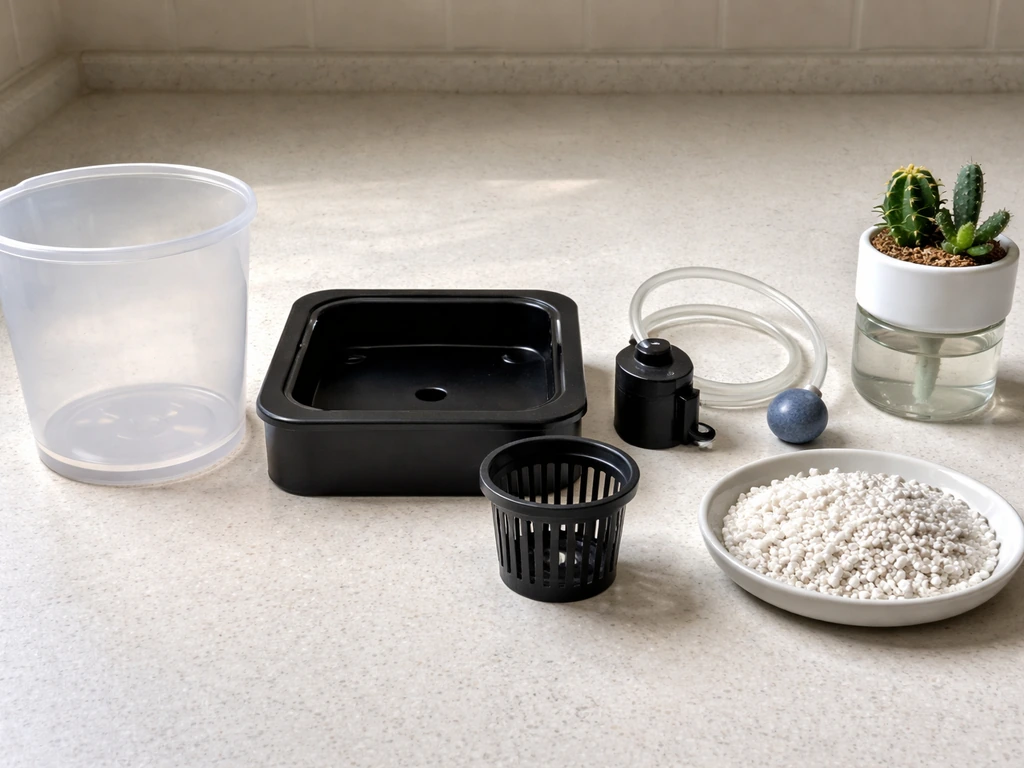
The standard parts list for the 3-pod hydroponic kit (33009/33007) looks like this:
- Base unit with integrated water reservoir
- 3 grow pods/pots that sit in the reservoir lid
- LECA (Lightweight Expanded Clay Aggregate) pebbles as grow medium
- Wicking rope(s) — one per pod, threaded through the bottom of each grow pot
- 6 seed sponges (2 per pod)
- 3 reusable germination domes
- 24 pre-dosed plant food sachets (enough for multiple grow cycles)
- Grow pot stickers (labels)
- LED light on a telescoping pole (on versions that include lighting)
- Organic seed packets
- Grow Guide (printed or downloadable)
If anything from that list is missing, check the Back to the Roots website for a replacement Grow Guide PDF and contact their support for missing parts before starting. The seed sponges and germination domes in particular are not optional, trying to germinate without them leads to the dry-seed failure that shows up in almost every negative review.
Step-by-step assembly and setup (including the self-watering reservoir)
Here's the full setup sequence. It's faster than you'd expect, but the order matters.
Assemble the base and grow pods
- Unbox everything and lay it out on a flat surface. Don't toss the packaging until you've confirmed every part is present.
- Rinse the LECA pebbles in a colander under cool water until the water runs mostly clear. This removes the clay dust that can block capillary flow in the wick.
- Thread the wicking rope through the hole in the bottom of each grow pot if it isn't pre-threaded. The rope should hang below the pot by at least 1.5 to 2 inches so it can reach the water in the reservoir.
- Add a small layer of rinsed LECA to the bottom of each grow pot — just enough to cover the base.
- Place one or two seed sponges into each grow pot on top of the LECA layer.
- Top the seed sponges with a little more LECA so they're nestled in but not buried.
Fill the reservoir and add plant food
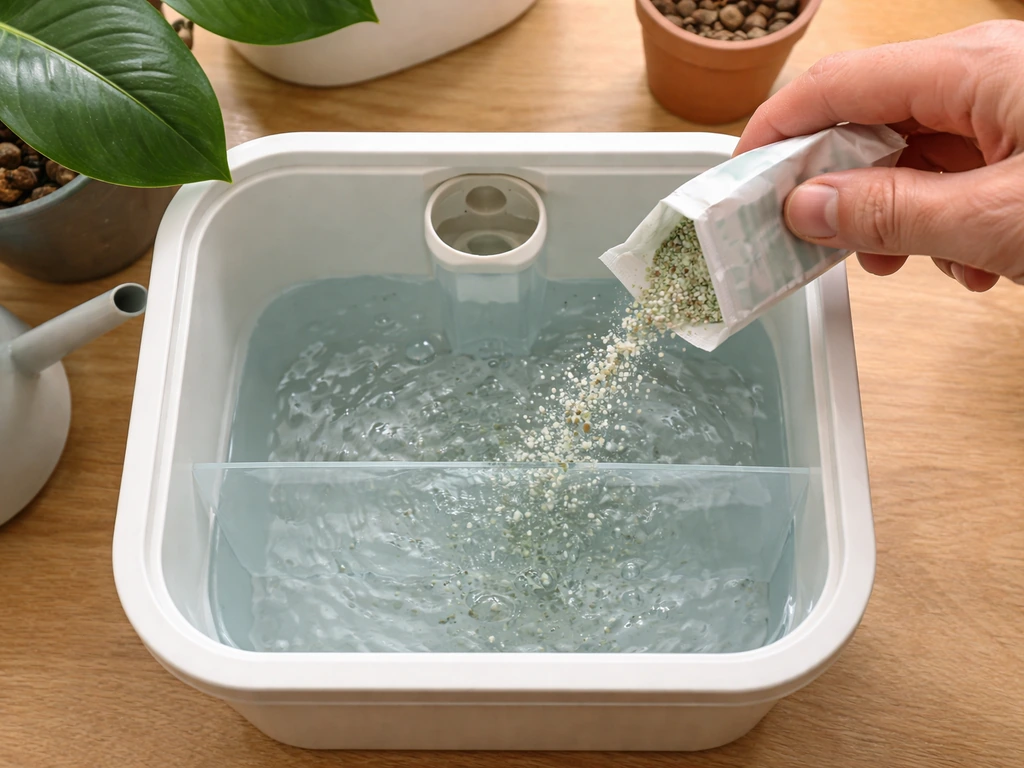
- Before placing the grow pods, tear open one pre-dosed plant food sachet and sprinkle the contents directly into the empty reservoir.
- Add water to the reservoir up to the marked fill line. Room-temperature water works best — very cold water slows germination.
- Set the reservoir lid (with grow pod holes) onto the base, then press each grow pod down into its slot. The wicking rope should now hang into the water below.
- Gently tug each wick from below if you can access it, or wiggle the pod slightly, to confirm the rope is touching the water. If the wick isn't in contact with the water, the self-watering system won't activate.
Confirm the self-watering system is working
The self-watering mechanism is capillary action: the wicking rope draws water upward from the reservoir into the LECA and seed sponge as the grow medium dries out. It's passive, which is why you don't see any pump or motor in this kit (and why some users go looking for an on/off switch that doesn't exist on the wick-based models). To confirm it's working, check the LECA in each pod about 2 hours after setup. The pebbles should feel damp to the touch. If they're still dry, lift the pod and look at the wick, either it's not reaching the water or the rope slipped out of the hole. Re-thread it and check again.
Set up the LED light (if your kit includes one)
- Attach the telescoping light pole to the base according to the diagram in your Grow Guide.
- Set the LED arm to its lowest height position for the germination phase — seedlings need light close, usually 2 to 4 inches above the dome.
- Plug in the light. Most kit versions use an automatic timer or a simple on/off switch on the cord. Aim for 14 to 16 hours of light per day during the grow phase.
- Raise the light arm as plants grow to maintain that 2 to 4 inch gap between bulb and canopy.
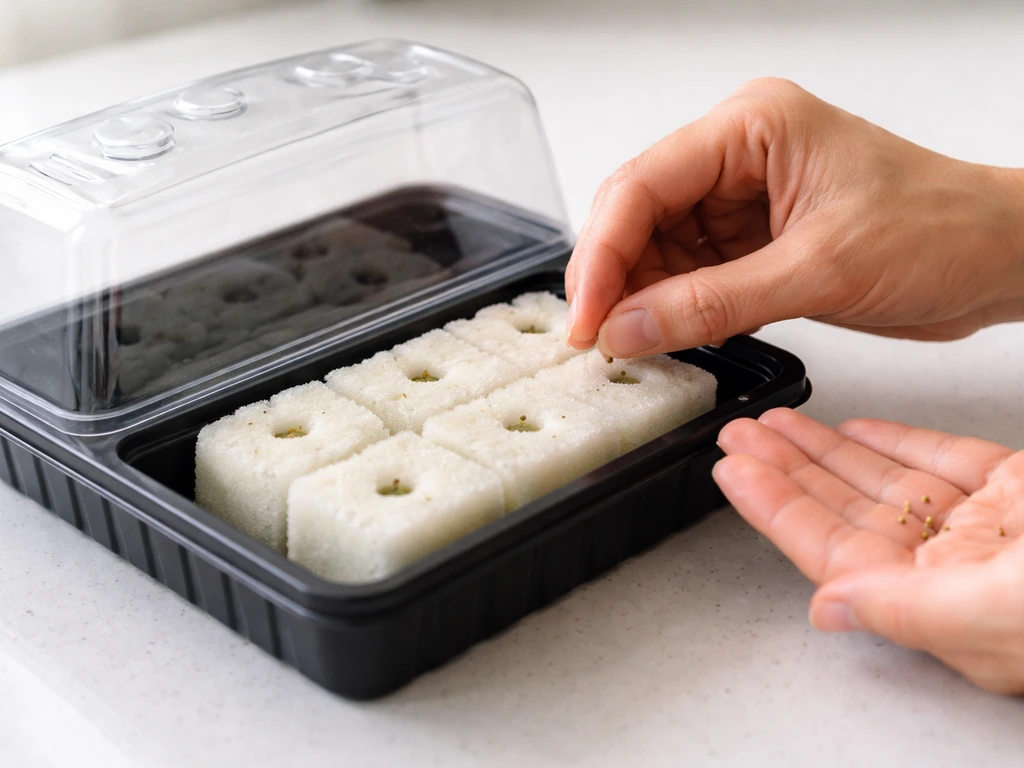
Planting seeds and getting through the first week
Once the reservoir is filled and the wick system is confirmed working, you're ready to plant.
- Place 2 to 3 seeds into the hole or depression on the top of each seed sponge. Don't bury them deep — just nestle them into the sponge surface.
- Place a germination dome over each grow pod. These are not decorative. They trap humidity around the seeds, which is what triggers germination. Don't skip this.
- Write or stick a label on each pod so you remember what you planted where.
- Place the kit in a location that stays around 70°F. Avoid windowsills with cold drafts or direct harsh afternoon sun if you're not using the kit's LED — fluctuating temperature is the main reason germination stalls.
- At the 3-day mark, lift one dome and check the seed sponge. It should feel moist and you may already see tiny sprouts or a cracked seed casing. If the sponge is dry, add a small amount of water directly to the pod and check that the wick is still in contact with the reservoir.
- Once seedlings reach the top of the germination dome (usually 5 to 10 days for most herbs), remove the domes. At this point the plants are growing and the self-watering wick takes over full-time.
Water, nutrients, light, and your weekly care routine
Water and nutrient solution
The reservoir is the heart of the whole system. Once a week, check the water level through the fill port or by lifting the reservoir lid slightly. Top it off to the marked line as needed. Every time you refill, add one pre-dosed plant food sachet (just tear and sprinkle into the reservoir before adding water). The sachets are pre-measured so there's no guessing about concentration, that's one of the genuinely useful design choices in this kit. Don't double-dose. One sachet per refill, regardless of how much water you're adding.
Avoid using distilled or reverse-osmosis water exclusively, those strip out trace minerals that the nutrient sachets don't fully replace. Regular tap water that's been left out for an hour to off-gas chlorine works well. If your tap water is heavily chlorinated, filtered water is a good alternative.
Light schedule
If you have the LED version (33009 or similar), 14 to 16 hours of light per day is the target for most herbs and leafy greens. If you're relying on a window, south or east-facing exposure works best. This kit wasn't designed for low-light north-facing windows, if that's your situation, consider adding a small supplemental grow bulb. Leggy, pale stems after two weeks is almost always a light problem, not a nutrient or water problem.
Daily and weekly care summary
| Task | Frequency | Notes |
|---|---|---|
| Check germination dome moisture | Daily (first 7 days) | Sponge should feel damp; add a few drops of water if dry |
| Remove germination domes | Once seedlings reach dome top | Usually day 5 to 10 depending on plant variety |
| Check reservoir water level | Weekly | Top off to marked fill line |
| Add plant food sachet | Every refill | One sachet per refill, tear and sprinkle before adding water |
| Raise LED light arm | As plants grow | Maintain 2 to 4 inch gap between light and canopy |
| Rinse/flush reservoir | Every 4 to 6 weeks | Prevents salt buildup from nutrient sachets |
| Harvest outer leaves | Ongoing once plants mature | Cut outer leaves first to encourage continued growth |
What to expect: honest Back to the Roots kit review
The Back to the Roots hydroponic kit is genuinely one of the more beginner-friendly indoor garden kits on the market, mostly because the pre-dosed sachets remove the part that trips up new hydro gardeners most: nutrient ratios. If you want the exact week-by-week targets, nutrient handling, and troubleshooting notes, also check the grow up hydrogarden manual for a related comparison to this Back to the Roots approach Grow Guide. The wick-based self-watering system is also simple and quiet (no pumps, no timers to program). For herbs like basil, mint, and cilantro, this kit performs well when set up correctly.
That said, it has real limitations. The 3-pod capacity is small, great for a kitchen counter, but don't expect to supply your whole household with greens. The telescoping light arm on the LED versions works, but it's not adjustable sideways, so taller plants can crowd the light unevenly. And the wick system, while clever, requires that initial setup to be done correctly or it fails silently (the grow medium just slowly dries out while the reservoir stays full).
Pros and cons at a glance
| Pros | Cons |
|---|---|
| Pre-dosed sachets remove nutrient guesswork | Only 3 pods — limited growing capacity |
| Passive wick system: no pump, no noise | Wick setup must be precise or system fails quietly |
| LECA grow medium is reusable and rinse-friendly | Included seeds are limited to specific varieties per kit |
| Germination domes included (many kits skip these) | LED arm doesn't adjust laterally, can cause uneven light |
| Refill packs available for ongoing grows | Some users report no on/off switch on the circulator (wick models don't have one by design) |
| Compact footprint — fits kitchen counter | Window versions (50025) need good natural light to perform well |
If you're comparing this to something like the Modern Sprout hydroponic grow kit or similar compact herb gardens, the Back to the Roots kit sits in roughly the same category but leans a bit more beginner-friendly due to the pre-dosed sachets and included domes. Larger systems like the VIVOSUN hydroponic kits offer more pods and more control, but come with a steeper learning curve on nutrient management. If you're comparing other brands, double-check the VIVOSUN hydroponic grow kit instructions for similar reservoir, wick, and nutrient-management steps. If you are using a VIVOSUN grow hub controller, follow the controller manual for the exact settings and wiring for your model VIVOSUN grow hub controller manual.
Troubleshooting: when setup doesn't go the way it should
Seeds aren't germinating after 3 to 5 days
First, check the temperature. Below 65°F slows germination significantly, and below 60°F stalls it almost completely. The ideal is around 70°F. Second, check the seed sponge moisture. Lift the germination dome and press the sponge gently, it should feel like a wrung-out sponge, not dusty dry. If it's dry, the wick isn't delivering water. Re-check that the rope is in contact with water in the reservoir. Third, make sure the dome is actually seated on the pod. A slightly lifted dome lets humidity escape, which is enough to prevent germination.
Seeds are getting moldy
Mold on seeds is almost always caused by the grow medium being too wet combined with poor air circulation. If the wick is drawing too much water (which can happen if the reservoir is overfilled), the sponge stays waterlogged. Keep the reservoir at the marked fill line, not above it. Once germination domes come off, airflow improves and mold risk drops significantly. If you see white fuzzy growth on the LECA, remove affected material, rinse the pebbles, and let the area dry slightly before re-wetting.
The self-watering system doesn't seem to be working
The wick relies entirely on the rope being in continuous contact with the water. Check three things: (1) Is the reservoir actually filled? It empties faster than you'd expect in a warm, well-lit room, sometimes in under a week. (2) Is the wick rope threaded through the grow pot and hanging into the water below? If the rope bunched up inside the pot or slipped out of the bottom hole, capillary action can't happen. (3) Is the LECA too dry to absorb? Very dry LECA can resist initial wicking. Try adding a small amount of water directly to the grow pot to kick-start absorption, then let the wick maintain it from there.
Plants are growing leggy and pale
Leggy growth (tall, thin stems reaching upward) almost always means not enough light. If you're using the LED version, lower the arm so it's closer to the canopy. If you're relying on window light, try moving the kit to a brighter spot or supplementing with a grow bulb. This isn't a nutrient problem, don't add extra sachets trying to fix it. More light, not more food.
Water level drops too fast or the reservoir leaks
Fast water drop is usually evaporation combined with plant uptake, especially under warm LED lights. This is normal, just refill weekly with a new sachet. If you're seeing actual water pooling under the kit, check that the grow pods are seated firmly in their lid slots and that the reservoir lid is fully closed. A slightly misaligned pod can create a drip path around the grow pod opening. Reseat all three pods and check again after 24 hours.
I can't find the on/off switch for the water circulator
Some user reviews mention looking for an on/off switch for a water circulator and not finding one. Some user review snippets on the Back to the Roots refill pack report cilantro seeds not growing and also describe issues like moldy seeds and a weak water-circulation experience on/off switch for a water circulator. Here's why: the wicking-rope versions of this kit don't have a water circulator or pump. The self-watering system is entirely passive, the rope does the work, no electricity required for the water delivery. The only powered component is the LED light (on versions that include it). If your kit's instructions mention a switch and you can't find one, double-check your model number against the Back to the Roots website to confirm which version you have, and download the correct Grow Guide for your specific model.
Starting a second grow cycle
Once your first cycle is done, rinse the LECA pebbles thoroughly, clean out the reservoir with warm water (no soap residue), and replace the seed sponges with new ones from the refill pack. The refill pack (sold separately) includes 24 plant food sachets, 3 germination domes, 6 seed sponges, and a Grow Guide, everything you need to keep the same kit running for multiple cycles. The LECA and the kit hardware are reusable indefinitely as long as you rinse them properly between cycles.
FAQ
Can I use different grow medium (for example, potting mix or coco) instead of the included LECA and seed sponges?
If your grow kit has LECA pebbles and seed sponges, use the LECA plus wick-based setup, and do not swap in soil or potting mix. For the initial moisture “kick-start,” only add a small amount of water to the grow pot if the LECA feels resistant and very dry, then rely on the wick for ongoing watering. Using too much extra water can increase mold risk in the dome phase.
What happens if I run short on the recommended light hours, or turn the LED off early?
Unplugging the LED light during the day is fine if you still keep the kit near the target temperature, but the bigger issue is light duration. For most herbs and leafy greens, aim for 14 to 16 hours of light daily on LED versions, consistent each day. If you reduce light a lot, expect slower growth and leggy stems even if water and nutrients are correct.
How do I adjust nutrients if my plants look pale or I think the dose is too strong?
Do not add fertilizer “on top” of the sachets. The sachets are pre-measured, one per reservoir refill, regardless of how much water you pour in. If you want to adjust strength, do it by changing refill frequency or using exactly the same sachet count per refill, not by adding partial sachets or extra doses between refills.
My reservoir was overfilled and now I’m seeing waterlogged LECA and mold. What should I do next?
If you overfilled and notice persistent waterlogging or continuing mold, stop adding until the level returns to the marked line, then resume the normal weekly refill schedule. Also confirm the dome is seated properly and, once domes come off, provide gentle airflow around the pods to reduce excess moisture. Replacing the seed sponges is often the fastest fix if the sponge stayed wet through germination.
Can I move the kit outdoors or near a window on sunny days?
Yes, but temperature swings matter. If you move the kit outside in daytime, bring it back before it cools below about 65°F, and avoid direct hot sun that can push temperatures above your target. Consistent warmth around 70°F supports steady germination and reduces the chance of uneven seedling vigor.
Do I ever need to water the pods manually, or should the wick system handle everything?
You should not need to manually water frequently once the wick is functioning. The system is designed for weekly reservoir refills, and the capillary action handles pod-level watering. If you find you must pour water into the pods every day, that usually indicates the wick rope is not reaching the reservoir water (or slipped out of the bottom hole).
My plants are drying out even though I refilled once. How do I diagnose a slow or broken wick situation?
If the pebbles are damp about 2 hours after setup but later stay dry, check two things first: reservoir water level and wick contact. The reservoir can empty faster than you expect in warm, well-lit rooms, and very dry LECA can resist initial wicking. Verify the reservoir is at the fill line, then lift one pod and inspect the wick path before adding extra fertilizer.
How can I reduce mold after the domes come off, without overwatering?
Once you remove germination domes, airflow increases and mold risk drops, but you should still avoid letting the kit sit in stagnant, very humid air (like an unventilated bathroom corner). Use normal room ventilation and keep pods fully seated so moisture can equilibrate. If you see white fuzzy growth, remove affected LECA, rinse, let it dry slightly, then re-wet per the reservoir refill routine.
My seedlings are leggy and pale. What adjustment should I make first, light or nutrients?
For troubleshooting, avoid changing multiple variables at once. For example, do not both add more nutrients and increase light if you suspect leggy growth. Leggy, pale stems usually require more light, not extra sachets, so adjust lighting first (move closer to the LED canopy or to a brighter window/supplement). Then reassess over 3 to 5 days.
Why doesn’t my kit have a water circulator switch, and how can I confirm I have the wick-based model?
The most common reason for a “water pump” expectation is confusion between wick-based self-watering versions and systems that actually include a pump. If you cannot find an on/off switch, confirm your model number, then download the correct Grow Guide for that exact model. Your wick-based system should work without any motor, only the LED light (if included) is powered.
Can I reuse the LECA and seed sponges for a second planting cycle?
If you want to restart another cycle, the kit hardware is reusable if rinsed well between cycles. Rinse LECA thoroughly, clean the reservoir with warm water (avoid soap residue), and replace seed sponges with new ones from the refill pack. Hardware reuse without replacing sponges helps reduce recurring mold risk because the sponge holds residual moisture and can harbor issues from the prior cycle.
My reservoir water drops faster than in other reviews. How do I tell normal evaporation from a seating or wick problem?
If you see fast water drops, it is often evaporation plus plant uptake under warm LED lighting, but you should confirm there is no drip path. Check that pods sit firmly in their lid slots and the reservoir lid is fully closed. If the water level drops much faster than expected, reseat all pods and inspect the wick routing to ensure capillary contact is consistent.