The AeroGarden Grow Anything kit lets you grow almost any seed or cutting hydroponically, without soil, using the same base unit you'd use for AeroGarden's pre-made herb pods. You fill the reservoir to the marked line, drop your seeds into the grow sponges, set the lamp hood to its lowest position, add liquid nutrients, and hit Reset. That's the core of it. The full walkthrough below covers every step from unboxing to harvesting, plus fixes for the problems that trip people up most often.
Aerogarden Grow Anything Kit Instructions and Grow Guide

Marcus Thornfield
19 Jun 2026
What the Grow Anything kit is (and what it can't do)
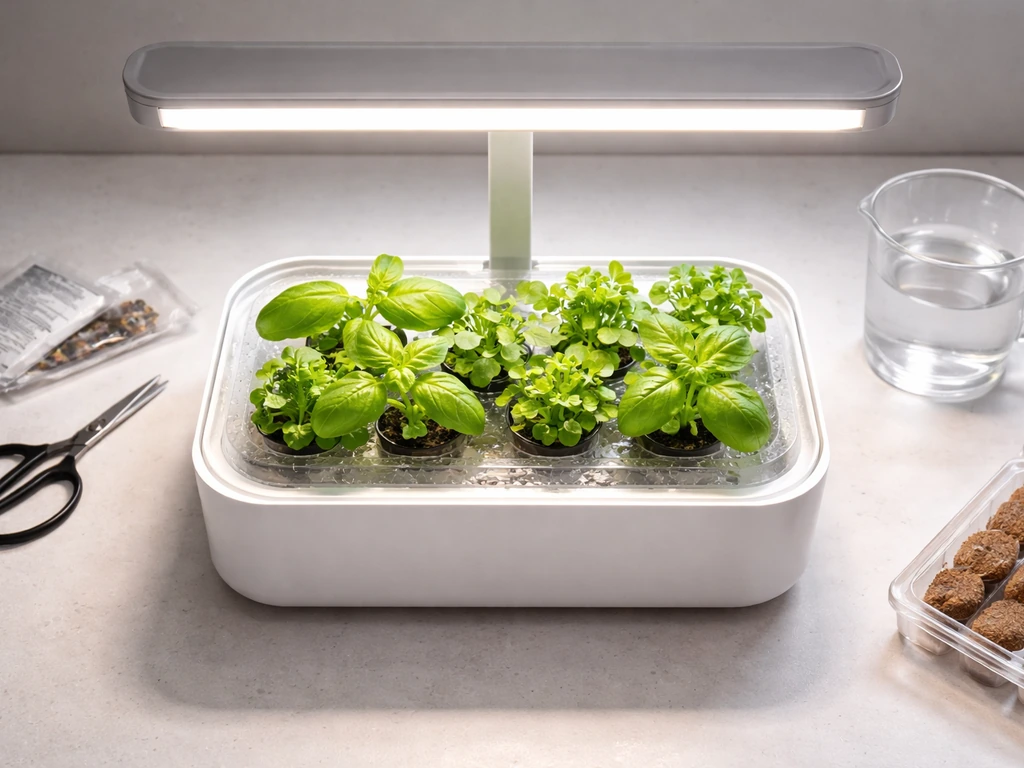
The Grow Anything Seed Pod Kit is AeroGarden's blank-slate version of their standard pod kit. Instead of pre-seeded pods, you get empty grow sponges, grow baskets, pod labels, bio-domes, and a bottle of AeroGarden Liquid Plant Food. You supply the seeds or cuttings. The whole system is soil-free and hydroponic, meaning the sponge holds your seed in place while nutrient-enriched water does the actual feeding.
It comes in four sizes: 3-Pod, 6-Pod, 9-Pod, and 50-Pod. The pod count just tells you how many plants you can run at once. Herbs, leafy greens, flowers, strawberries, peppers, and even succulents (as cuttings) all work well. Dwarf and miniature varieties tend to thrive because they stay within the lamp's reach.
Here's what won't work well: root vegetables like carrots, beets, potatoes, and peanuts. You can technically germinate them, but they need soil to develop their edible roots, so hydroponics only gets you so far. Large vining plants like squash and melons are also a bad match. AeroGarden's kit FAQ says almost any seed can work, but it advises avoiding root vegetables and large vining plants like squash and melons because of space limits Large vining plants like squash and melons are also a bad match.. They grow too big for the enclosed space, shade out everything else, and end up fighting the lamp. Stick to plants that can be kept under the lamp height for your specific model, or choose varieties you can prune to stay in bounds.
Unboxing and identifying your exact kit
Before you do anything, confirm which kit and AeroGarden base unit you have. The Grow Anything pod kit is sold separately from the AeroGarden unit itself, so the number of pods in your kit needs to match the number of openings on your grow surface. Check your AeroGarden model name, which is printed on the base or in the original box. The Harvest models (Harvest, Harvest Elite, Harvest Slim) each have slightly different reservoir shapes, lamp arm heights, and light schedules, so if you ever need model-specific guidance, that model name is what you'll search for.
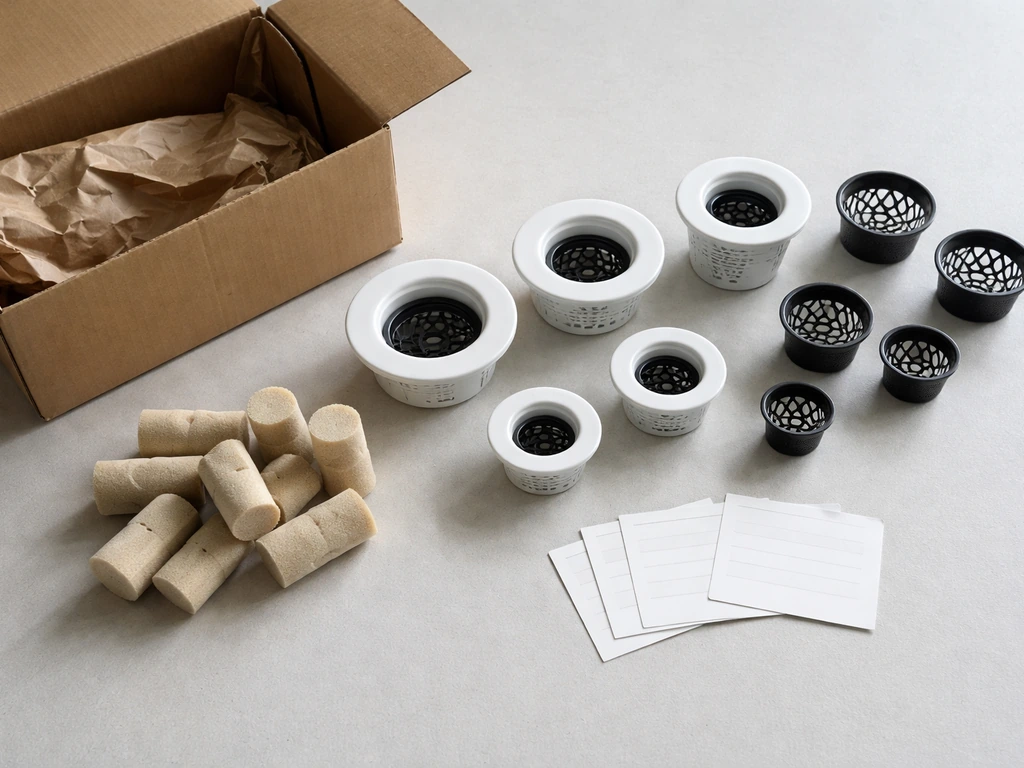
When you open the Grow Anything kit, you should find these components:
- Grow Sponges (one per pod slot, sometimes extras)
- Grow Baskets (the plastic cage that holds each sponge)
- Seed Pod Labels (round stickers you write on with permanent marker)
- Bio-Domes (clear plastic humidity domes that sit over each basket at startup)
- AeroGarden Liquid Plant Food (one bottle)
- A growing guide insert
Note: seeds are not included. That's the whole point of the kit. If anything from that list is missing, contact AeroGarden support before you start. Running the system without bio-domes or pod labels creates real problems down the line (more on that in the troubleshooting section).
Step-by-step setup: base, reservoir, lights, and timer
- Place your AeroGarden unit on a flat, stable surface near an outlet. Keep it out of direct sunlight, which competes with the grow light and can encourage algae.
- Fill the reservoir (called the Bowl in the kit instructions) with cool tap water or distilled water. Fill it exactly to the 'Fill to Here' indicator marked inside the bowl. Do not use well water or softened water. Well water has unpredictable mineral levels that interfere with hydroponic nutrients, and softened water contains sodium that can damage roots.
- Shake the Liquid Plant Food bottle well, then pour in the amount specified on the bottle for your pod count. Pour it directly into the bowl.
- Press and release the Reset button on your unit. This starts the nutrient timer so the unit knows when to remind you to feed again.
- Set the Lamp Hood to the lowest position on the Lamp Arm. This puts the light as close as possible to your seeds during germination, which is exactly what you want at startup.
- Plug in the unit and set your desired light-on time. On Harvest models, the lights run for 15 hours once you set the on time. The unit handles the rest automatically.
Planting seeds and starting cuttings
Starting from seeds
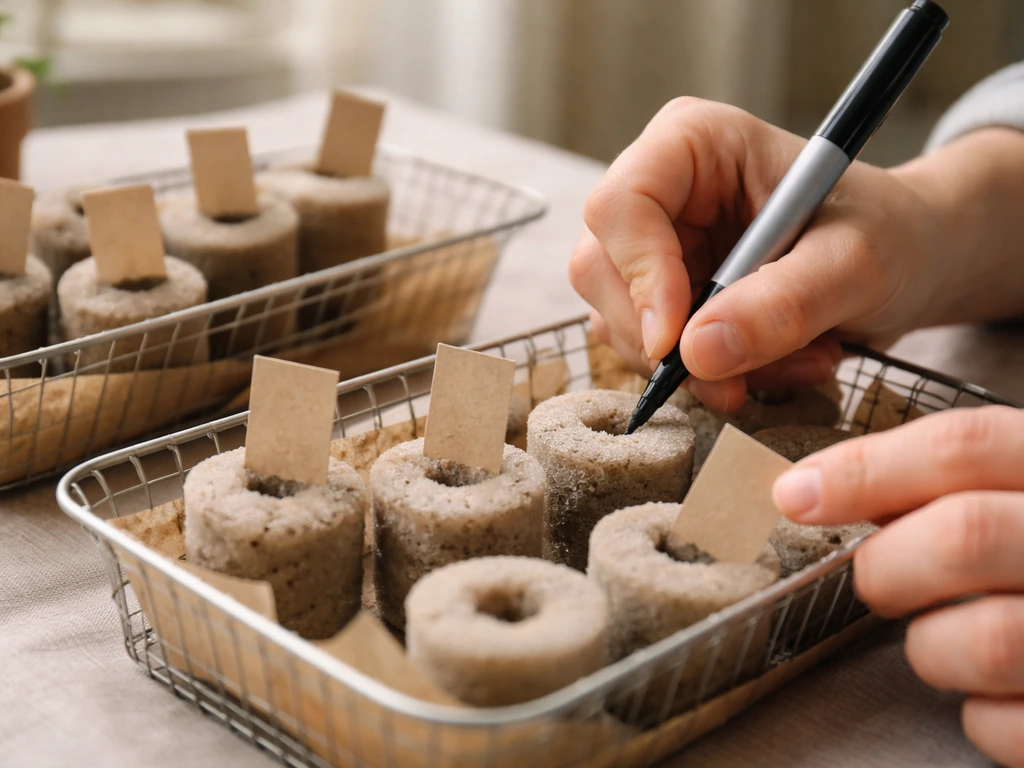
Write the plant name on each Seed Pod Label using permanent marker before you plant anything. Trust me, you will forget which pod is which if you wait. Stick the label onto the top of each grow basket. The label does two jobs: it identifies your plant, and it blocks light from reaching the water through the pod opening, which helps prevent algae.
Now, seed quantity matters. For smaller seeds (most herbs, flowers, lettuces), plant 2 to 3 seeds per grow sponge. Push them gently into the opening in the center of the sponge using your fingertips or tweezers. For large seeds like peas or beans, use scissors to cut the sponge opening about half an inch deep and insert just 1 to 2 seeds. Don't overstuff it. The sponge needs to hold the seed snugly without crushing it.
Once seeded, push the grow sponge into its grow basket, then insert the assembled grow pod into a grow surface opening. Set a bio-dome over each basket. These domes trap humidity around the seed, which dramatically improves germination rates. Leave them on until your sprouts nearly touch the top of the dome, then remove them. The domes are reusable, so rinse and keep them for your next cycle. If you're growing aloe in one of these hydro setups, follow the aloe hydro grow kit instructions for the right light, nutrients, and watering schedule.
Expect to see tiny sprouts anywhere from 2 days to 3 weeks after planting, depending on seed variety. Slower-germinating seeds like peppers and some flowers take longer. Don't panic if one pod sprouts before another. Once multiple seeds germinate in the same pod, thin them down to the single strongest seedling by snipping the extras at the sponge surface with scissors. Don't pull them out. Pulling disturbs the roots of the seedling you're keeping.
Starting from cuttings
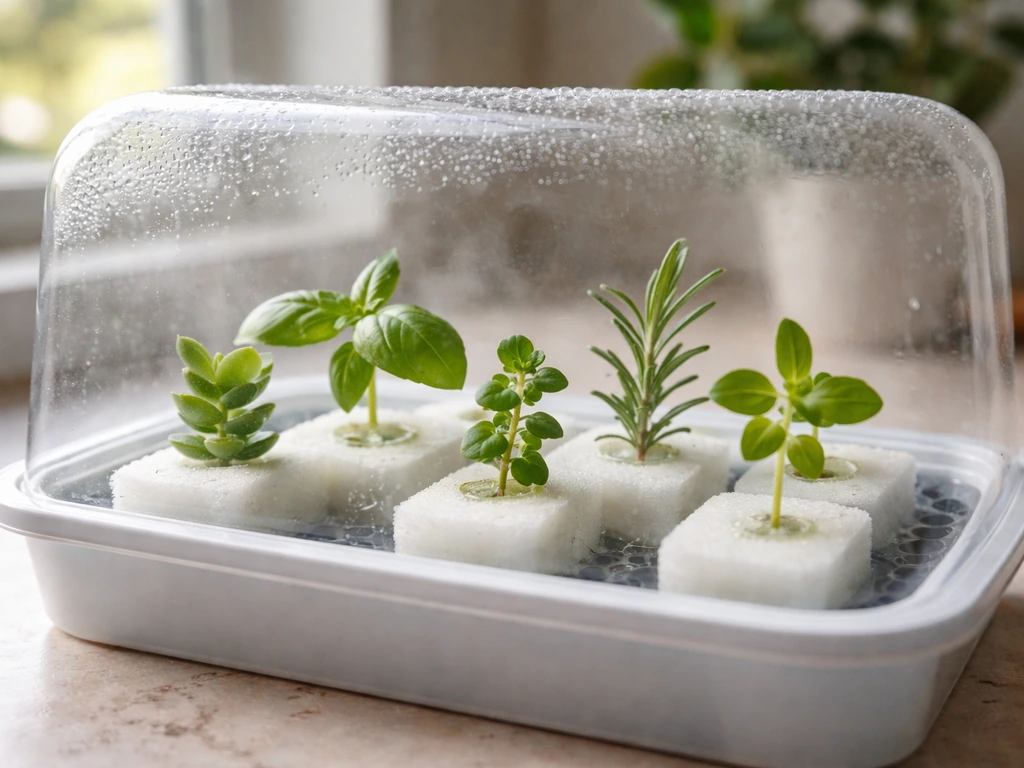
The Grow Anything kit works really well for propagating cuttings, including succulents, herbs, and other houseplants. The method is slightly different from seed starting. Saturate the grow sponge with water first, then cut it open lengthwise (not all the way through). Place the cutting's stem inside, close the sponge around it, and push the whole assembly through the pod label and into the grow basket. Then insert it into the grow surface just like a seed pod.
Cuttings need high humidity while they're developing roots. Mist them daily and cover each cutting with a small clear plastic container to trap moisture if you're not seeing the bio-dome keep up. Some difficult species respond better if you dip the cut end in a root-promoting compound before placing it in the sponge. Be patient: some cuttings take several weeks to show any root development at all. That's normal.
Daily care: water, nutrients, and light
Once your system is running, the daily routine is genuinely low-maintenance. Here's what to actually pay attention to:
- Water level: Check it frequently, especially in the first few weeks when young roots are drinking a lot. Keep the bowl topped up to the Fill to Here line at all times. Letting it run too low exposes roots to air and stunts growth fast.
- Nutrients: The green plant food indicator on your unit flashes every 14 days as a reminder. When it flashes, shake the nutrient bottle, add the correct amount for your model, and press Reset to restart the timer. Always top off water to the fill line when you add nutrients.
- Light schedule: Your AeroGarden handles this automatically once you set the on time. Resist the urge to add more light hours. The built-in schedule is calibrated for healthy growth.
- Reservoir refresh: Every 4 to 6 weeks, dump the old water and refill with fresh water plus nutrients. AeroGarden's own testing shows noticeably better plant growth when you do this regularly. It flushes out salt buildup from the nutrients.
- Lamp height: As your plants grow, raise the lamp hood up the arm to maintain a few inches of clearance between the light and the tallest plant. If the light is pressing into your plants, they'll bleach and stress.
For plant crowding, aim to keep all your plants within about 2 inches of each other in height. When one plant races ahead, it shades the others. Prune taller plants back, trim side leaves that are blocking light from shorter neighbors, and harvest regularly. The rule of thumb: never remove more than one-third of any plant at a time. Prune a little, often, rather than a lot all at once.
Troubleshooting common problems
Seeds not sprouting
First, check your seed viability. Old seeds or improperly stored seeds germinate poorly. If you're past the 3-week mark with nothing happening, try fresh seeds. Also confirm your bio-domes are seated properly and the reservoir is full to the line. Seeds sitting in too-dry sponges won't sprout. If you are growing aloe, follow the modern Sprout Aloe Grow Kit instructions to get the right setup for sprouting. If the water level is correct but the sponge still feels dry to the touch when you lift a dome, your roots haven't reached the water yet. A quick fix is to use a dropper to moisten the sponge directly for the first few days.
Algae (green slime) in the reservoir
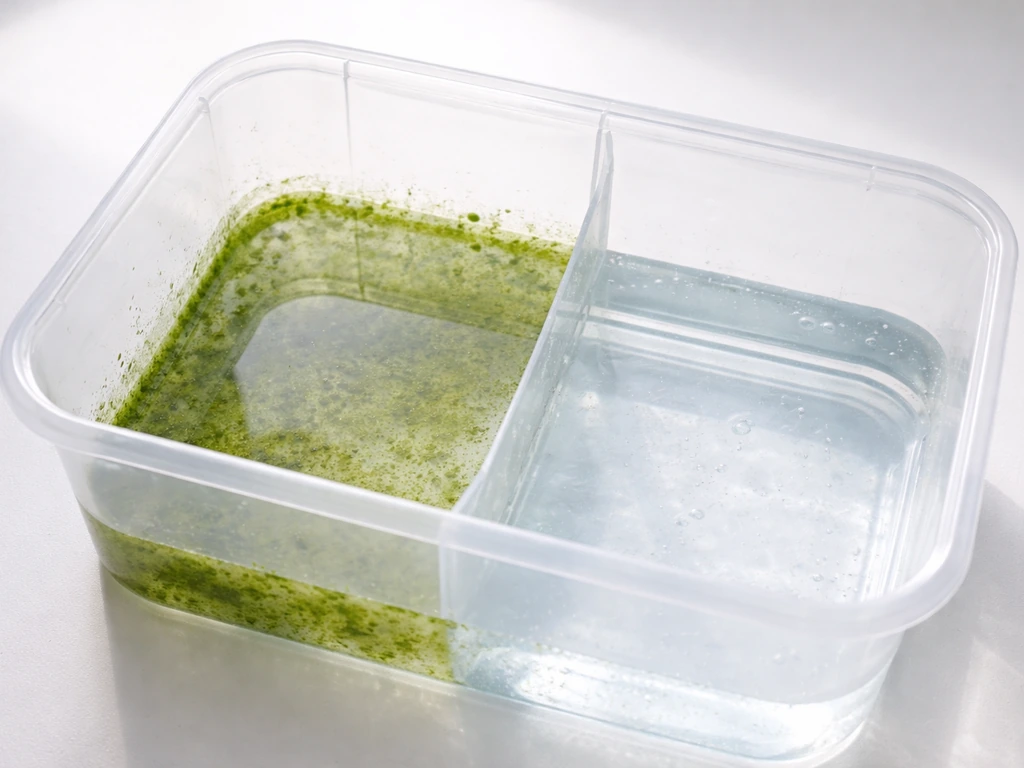
Algae needs two things: light and water. If light is getting into your reservoir, algae will grow. For more aloe grow kit instructions, focus on keeping the reservoir clean and controlling light exposure to prevent algae algae will grow. The most common causes are: missing or misaligned pod labels (they're supposed to cover the pod openings), placing the unit in direct sunlight, or leaving unfilled pod slots uncovered. Keep all pod labels in place even after germination, because they block light from the water below. Cover any empty slots with the included labels or foil. If you already have algae, do a full rinse-and-refill, scrub the bowl with warm water, and make sure the unit is out of direct sun going forward.
Wrong water level alerts
AeroGarden uses a float sensor to detect water level. If you're getting a low-water alert when the bowl is clearly full, the float is probably stuck. Remove the float sensor tube, clean it, and reattach it to the base. You can use a small magnet to free a stuck float inside the tube. Once reseated, the alert should clear. If it doesn't, press Reset and give it a few minutes.
Slow or uneven growth
Uneven growth is almost always a light or crowding issue. Plants closest to the center of the lamp grow faster than those on the edges. Rotate your grow surface if your model allows, or proactively prune the faster growers to give edge plants a chance. If all plants are growing slowly across the board, check your nutrient schedule. Missed feedings, or feeding with old/unmixed nutrients, stunts everything equally. Shake that bottle before every pour.
Pests
If you spot pests, start by spraying water under the leaves. Most common hydroponic pests (fungus gnats, spider mites, aphids) hide on the undersides of leaves and hate direct water pressure. Repeat daily. For persistent infestations, a light application of insecticidal soap spray is safe to use on most edible herbs and greens. Avoid chemical pesticides on anything you're going to eat.
Clogs or pump issues
If you notice the water circulation seems sluggish or stopped, check for root growth that's crept into the pump intake. This is more common in older, well-established pods. Remove pods, gently trim any roots blocking the pump, and rinse the bowl. Running a rinse-and-refill cycle at this point is a good idea anyway.
Harvesting, replanting, and cleaning for the next cycle
Harvesting
Start harvesting early and keep at it. For herbs, you can begin snipping once a plant has at least 3 to 4 sets of leaves. Never take more than one-third of the plant in a single harvest. Regular harvesting actually encourages bushier, more productive growth. For lettuce and greens, harvest outer leaves first and let the center keep producing. For flowers, deadhead spent blooms to encourage more flowering. For an amaryllis red lion, follow the same harvest and replanting timing so the bulb can rest and send up strong new growth.
Resetting for the next cycle
When a plant finishes or you're ready to start fresh, pull the used pod out of the grow surface. Discard the old sponge and spent roots, then clean the grow basket thoroughly before reusing it. The bio-domes and baskets are designed to be reused across multiple cycles. Just rinse them well.
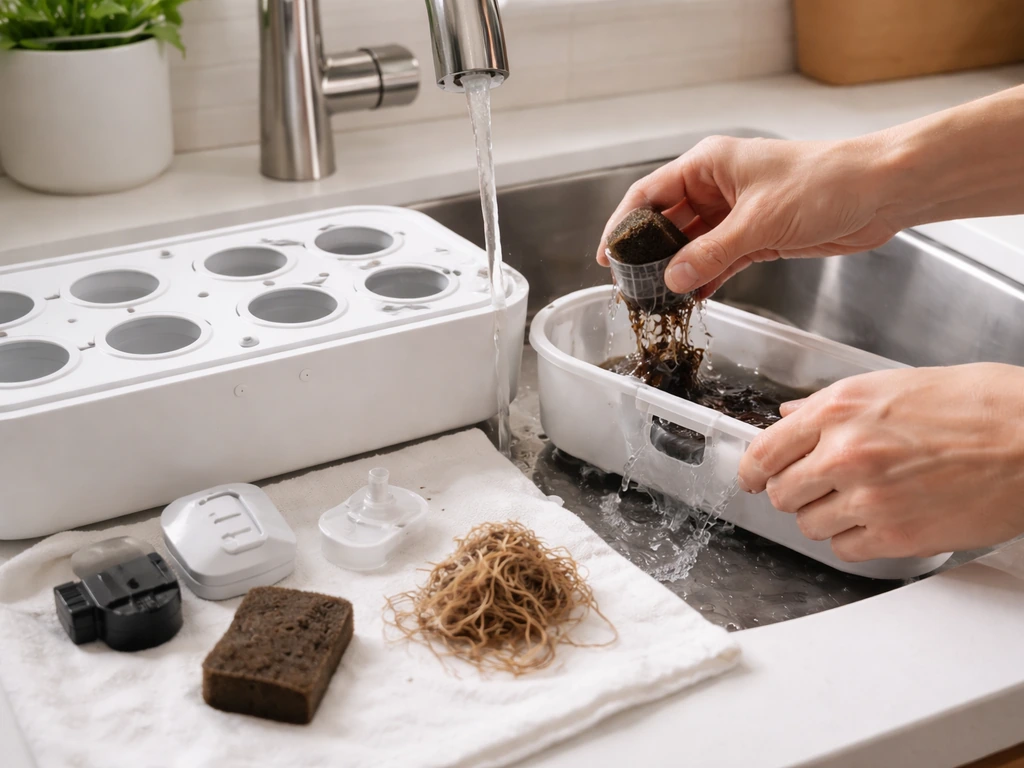
Cleaning the unit between cycles
A proper cleaning between cycles prevents root rot pathogens from carrying over and killing your next crop before it gets started. ScottsMiracle-Gro also emphasizes removing old roots first, then cleaning and sanitizing the hydroponics system to help prevent root pathogens from destroying live plants prevents root rot pathogens from carrying over. Here's the process:
- Unplug the unit and remove all pods and the grow surface.
- Drain the reservoir completely.
- Remove any remaining root material from inside the bowl. This is the most important step. Old roots left behind harbor bacteria and pathogens.
- Wash the bowl, grow surface, baskets, and bio-domes with warm water and a mild dish soap or a diluted bleach solution (1 tablespoon bleach per gallon of water). Rinse everything thoroughly.
- Wipe down the lamp hood and arm with a damp cloth.
- Let everything air dry completely before reassembling.
- Refill to the line with fresh water, add fresh nutrients, press Reset, and you're ready for a new round.
Taking the time to clean properly between cycles makes a genuine difference in how your next round performs. It's a 20-minute investment that protects weeks of growing effort. If you're planning to skip straight from one cycle to another, at minimum do a full rinse-and-refill and remove all old root material before replanting.
A few final tips before you start
The Grow Anything kit rewards a little patience and observation more than any technical skill. Check your water level every couple of days at first, especially with fast-drinking seedlings. Keep the pod labels in place. Don't skip the reservoir refresh every 4 to 6 weeks. And pick plants suited to your specific AeroGarden's height clearance. Compact herbs, flowers, leafy greens, and dwarf varieties are your best bets. If you're interested in branching out into propagating succulents or other unusual cuttings, the same kit handles those beautifully with the sponge-splitting method described above. The system is more versatile than it looks on the box.
FAQ
Do I have to start seeds in the bio-domes, or can I germinate without them?
You can try without bio-domes, but germination is less consistent because the enclosed dome keeps humidity high around the sponge. If you skip them, compensate by misting more frequently and keep the domes off only after sprouts are clearly established and not drying out.
How do I know the nutrient amount is right for my kit and not over- or under-fed?
Use the measurement line and mix instructions on the nutrient bottle for the specific AeroGarden reservoir, then avoid “topping off” with extra food between refreshes. If growth looks pale or slow, mix a fresh batch rather than adding more concentrate to an old reservoir.
My seeds sprout, but seedlings suddenly wilt or look limp after a week. What’s most likely?
The most common causes are sponge dryness (roots not yet reaching the water) and temperature or airflow swings. Lift one dome and gently check if the sponge feels damp underneath, then moisturize the top with a dropper for the first few days until roots reach the reservoir.
Can I grow multiple types of plants in the same AeroGarden, or do I need separate schedules?
You can mix plants, but try to select varieties with similar growth rates and pruning needs. For very different crops, the shared light schedule and nutrient routine may lead to some plants getting harvested sooner or outgrowing the others, so plan to thin and prune regularly.
What should I do if only one seed germinates in a pod and the plant is much smaller than the others?
Don’t assume it is a nutrient problem right away. First verify the pod label alignment (it should cover the opening to prevent algae and light leaks) and confirm all domes were removed at similar growth stages. If the sponge was drier early on, that often leads to uneven early vigor.
How long can I keep using the same bio-domes and grow baskets before replacing anything?
Bio-domes and baskets are reusable across many cycles if you rinse and scrub them thoroughly between harvests. Replace components only if you see cracks, warped parts, or persistent buildup that won’t come off with warm water cleaning.
Is there a best way to thin multiple seedlings in the same sponge?
Yes, use scissors to snip the weaker seedlings at the sponge surface. Avoid pulling, because the remaining seedling’s roots are still entangled in the sponge structure and pulling can damage the one you want to keep.
What is the safest way to handle root trimming if roots block the pump intake?
Remove pods and trim only the roots that are directly obstructing the intake. After trimming, rinse the bowl and reassemble carefully, then run a reset if the system seems confused. Don’t remove large root masses unless you are already switching cycles.
How do I prevent algae without accidentally starving the plants?
Prevent algae by keeping pod labels fully covering the openings, avoiding direct sunlight on the base unit, and not leaving unused pod slots exposed. If you need a quick fix after algae appears, do a full rinse-and-refill, then focus on light control rather than skipping reservoir refreshes.
Can I use tap water, or do I need special water treatment?
Tap water is often fine, but quality varies by region. If you notice persistent issues like stunted growth or frequent sensor errors, consider using filtered water and always use fresh nutrient mixing instead of reusing partially old solution.
What should I do if my water level alert keeps triggering even though I filled to the line?
Inspect the float sensor tube and clean it, then reseat it firmly on the base. If it still alarms, press reset and wait a few minutes, because trapped air or debris can make the float read low briefly after refilling.
When is the right time to harvest, and can I cut repeatedly without slowing everything down?
For herbs, wait until there are at least 3 to 4 sets of leaves, then harvest in small batches. Repeated light harvesting supports bushier growth, but if you remove more than about one-third at a time, plants can stall and take longer to regrow.
Can I replant the same pod after harvesting, or do I need to discard the sponge every time?
Plan on discarding the used sponge and spent roots after each crop. Reusing the sponge without sterilizing increases the risk of root rot carryover, so the safest approach is to clean baskets thoroughly and install new sponges for the next planting.