Set up your prickly pear cactus hydro grow kit by first identifying whether it's an active system (with a pump, reservoir, and tubing) or a passive wicking system (no pump, just a wick and water chamber). Then sanitize all parts, let your prickly pear pad callus for 1–2 weeks before it ever touches moisture, place it so the cut end is near but not submerged in the nutrient solution, and keep water levels low enough that the pad tissue stays dry. That sequence, in that exact order, is what separates a thriving cactus from a rotted one.
Prickly Pear Cactus Hydro Grow Kit Instructions: Setup to Care

Marcus Thornfield
4 Jun 2026
First things first: figure out which kit you actually have
The phrase 'prickly pear cactus hydro grow kit' covers at least two very different product designs, and the setup steps are not interchangeable. Getting this wrong is the number-one reason people end up with a soggy, rotted pad after week one.
| Kit Type | Key Components | Water Delivery | Pump/Electricity? |
|---|---|---|---|
| Active hydroponic (DWC or drip) | Reservoir bucket, net pot, air pump, air stone, tubing, drip ring or manifold | Pump circulates nutrient solution; air stone oxygenates | Yes — pump required |
| Passive wicking / terrarium-style | Outer water reservoir, inner grow chamber, cotton or nylon wick, grow media | Capillary action pulls water upward through wick | No — fully passive |
| Hybrid (wicking + aeration) | Reservoir, wick, small air pump and air stone only (no drip ring) | Wick plus air stone to prevent stagnation | Yes — air pump only |
Check your box for an air pump, air stone, or any tubing with a fitting that connects to a power source. If you find those, you have an active system. If all you have is a fabric or rope wick and a two-chamber vessel, you have a passive wicking system. The steps below are organized so you can follow the right path for your kit. (If you're also setting up an aloe kit alongside this one, the kit-identification step is identical, the same passive vs. active distinction applies there too.)
Unbox, sanitize, and assemble your kit
Before anything living goes near this kit, clean every surface. Hydroponic and water-based grow vessels ship with residue, dust, and manufacturing oils that will seed algae and biofilm the moment water hits them. Use a weak bleach solution: about 1 tablespoon of unscented household bleach (5–6% sodium hypochlorite) per gallon of water. That puts you in the 150–200 ppm range, which is enough to kill pathogens without damaging plastic components. Scrub the inside of the reservoir, the net pot, the grow chamber walls, and any tubing with a sponge or soft brush, then rinse thoroughly with plain water. Let everything air dry completely before assembly.
Assembling an active (pump-based) kit
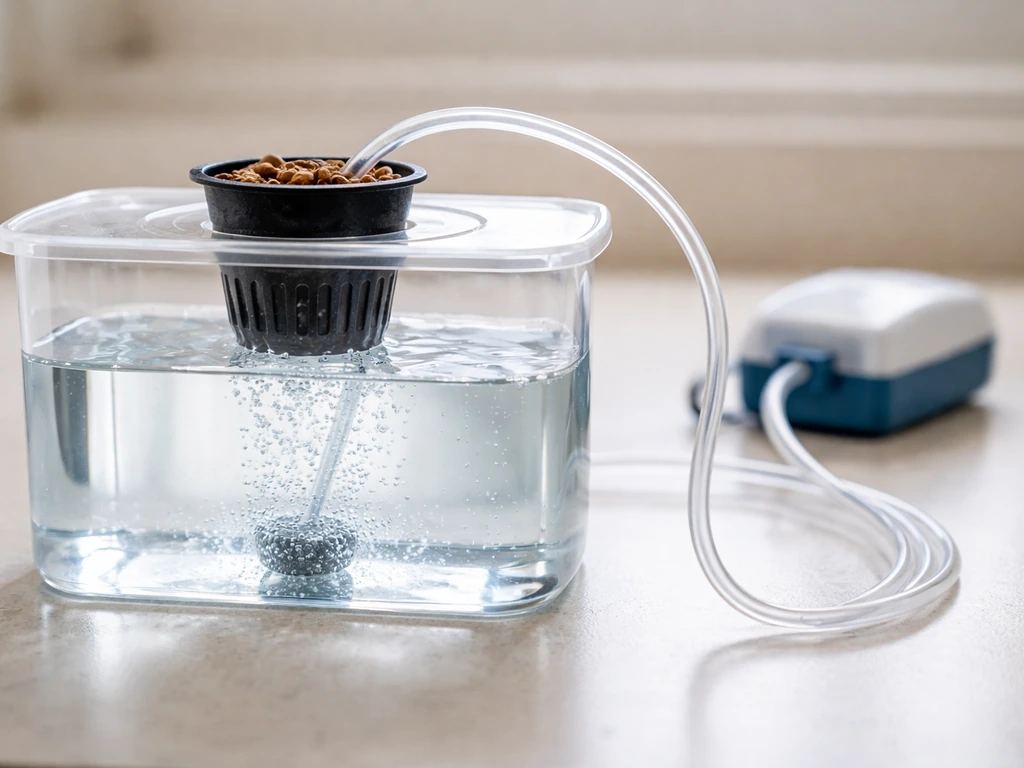
- Place the reservoir on a stable, level surface where it won't be knocked.
- Insert the net pot or grow chamber into the top of the reservoir.
- Route the air tubing from the air pump (kept outside and above the reservoir, not submerged) down through the designated opening and connect it to the air stone inside the reservoir. The air pump must stay outside the water at all times.
- If your kit includes a drip ring or irrigation manifold, thread its tubing through the grow chamber lid and position the ring so it circles the grow media.
- Connect the water pump (if separate from the air pump) to the drip ring tubing. Some kits use a single submersible pump in the reservoir; others use a separate external pump.
- Fill the reservoir with water and any included nutrients (see the nutrient section below for amounts). Do not turn the pump on yet.
- Run a 10-minute test with no plant in place: check all connection points for drips, confirm the drip ring is distributing evenly, and verify the air stone is bubbling. Fix any leaks before adding a plant.
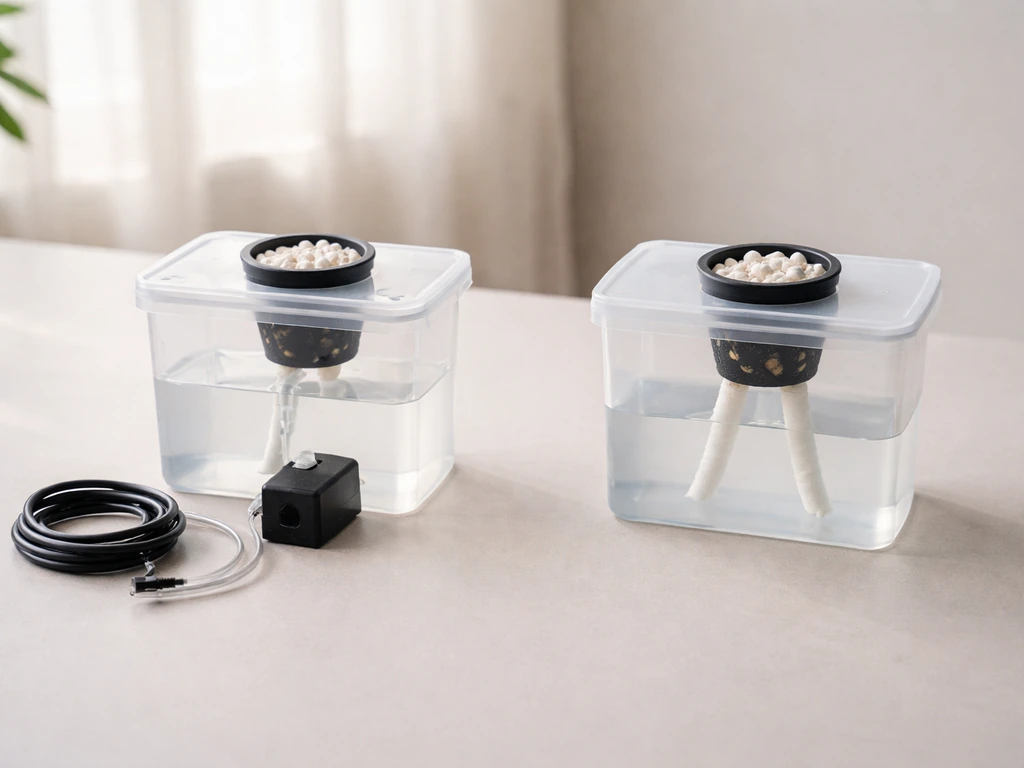
Assembling a passive wicking kit
- Thread the wick material (cotton rope or fabric strip) through the hole in the bottom of the inner grow chamber before adding any media.
- Let at least 2–3 inches of wick hang below the chamber so it reaches into the reservoir water.
- Add your grow media (usually perlite, lava rock, or coarse pumice if included) to the inner chamber.
- Set the inner chamber into the outer reservoir so the wick hangs into the water. The bottom of the inner chamber should sit above the waterline, not touch it.
- Fill the outer reservoir to the indicated fill line with water and nutrients.
- Check that the wick feels damp within 15–20 minutes, which confirms capillary action is working.
Preparing your prickly pear: pads vs. seeds, and why callusing is non-negotiable
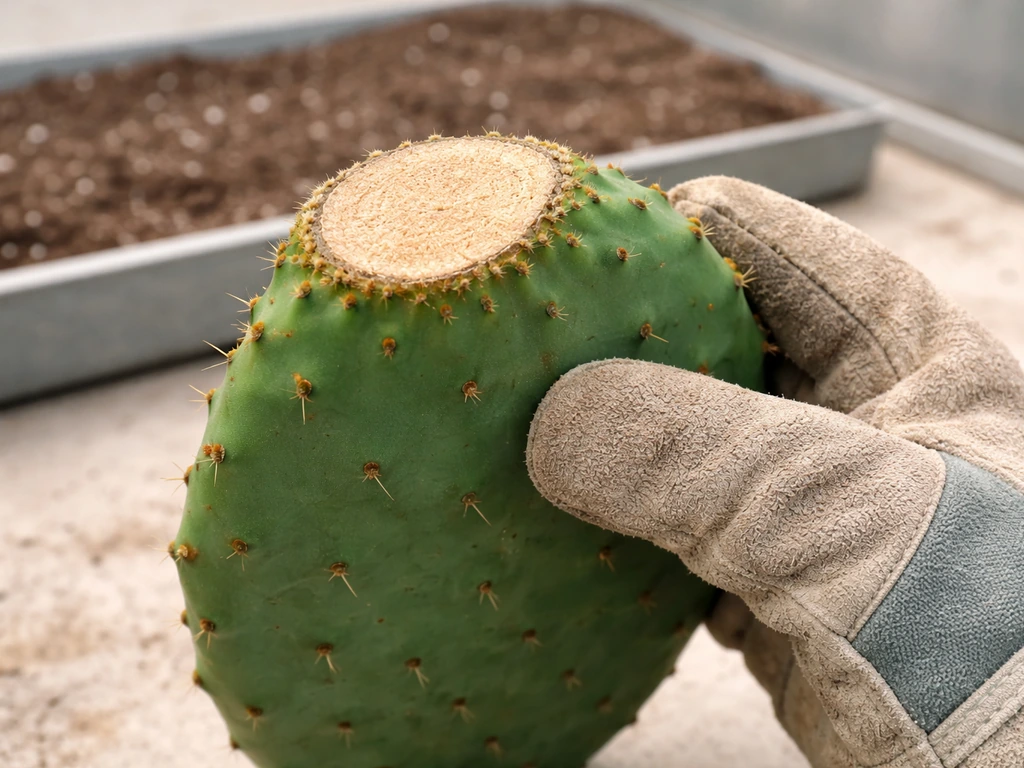
Most prickly pear hydro kits ship with a pad cutting rather than seeds, because pads root faster and are more reliable. If yours includes seeds instead, skip to the seed section below. If you received a pad (or are sourcing one yourself), the callusing step is the single most important thing you will do. A pad planted before its cut wound seals will rot, not root. The Missouri Botanical Garden fact sheet also advises letting cactus and succulent cut wounds air dry for about 2 days at room temperature so they callus before potting cut wound seals. Every time. This is not a maybe.
Callusing a prickly pear pad (1–2 weeks)
- Use thick gloves or folded newspaper to handle the pad — the tiny hair-like glochids are harder to remove than the larger spines.
- If the pad was freshly cut, let the cut surface face open air in a dry, shaded spot at room temperature. Do not put it in water, media, or direct sun yet.
- Leave it undisturbed for at least 7 days, ideally 10–14 days. The wound edge should dry and form a firm, slightly leathery callus. If it still looks moist or soft after a week, give it more time.
- Once callused, the pad is ready to place in your kit. The Missouri Botanical Garden recommends a minimum of 2 days of air drying for general cactus cuttings, but for a water-adjacent hydro setup, 1–2 full weeks is the safer target.
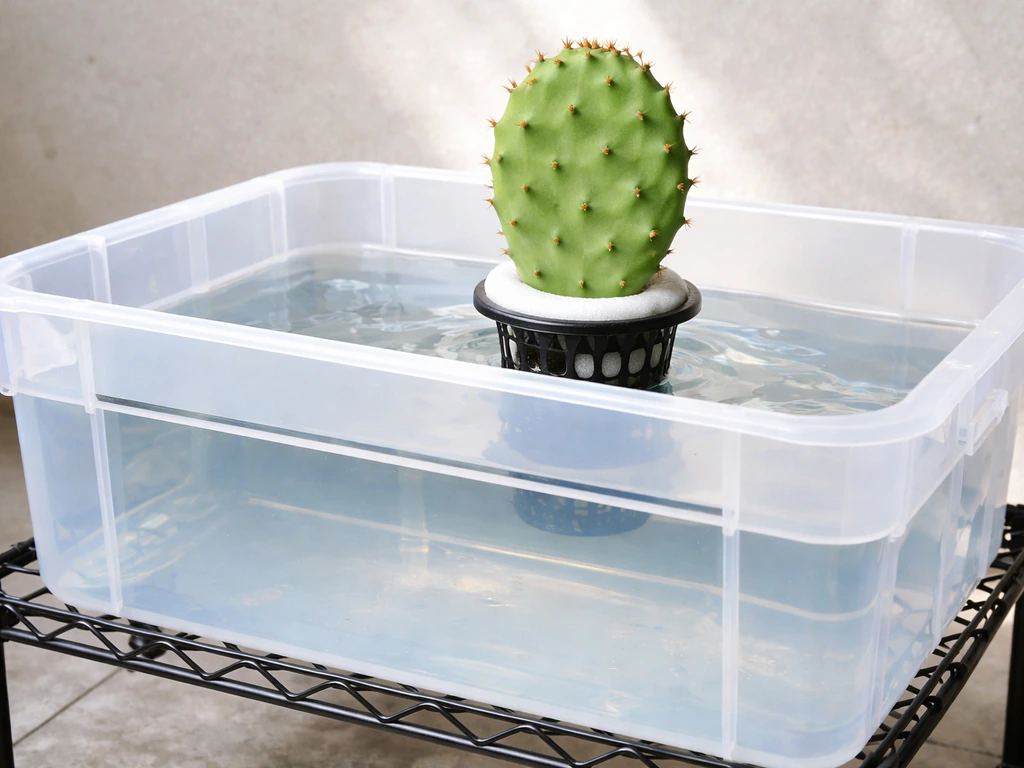
Placing the pad in the kit
Stand the callused pad upright in the grow media with the cut end pointing downward into the media, not submerged in the nutrient solution. The goal is for the cut end to be within the moist media zone, close enough to absorb moisture through the growing root tips, but never sitting in standing water. Pack coarse perlite or pumice loosely around the base to hold the pad upright without burying it more than about an inch. Do not water the media for at least 3–5 more days after planting. The pad has moisture reserves and doesn't need irrigation yet.
Starting from seeds (if your kit includes them)
Opuntia seeds germinate best in warm conditions. Research on Opuntia germination shows the strongest responses at temperatures around 30–35°C (86–95°F), so a heat mat under the reservoir is genuinely useful for seed starts. Sow seeds about 1/4 inch deep in moist (not wet) grow media and keep the surface barely damp. Light exposure helps germination, so place the kit under your grow light from the start. Expect germination in 2–4 weeks at warm temperatures. Seedlings are tiny and slow-growing, so be patient and resist the urge to increase moisture.
Water level, drainage, and keeping rot away
This is where most hydro prickly pear setups fail. The instinct to give a plant more water is the enemy here. Prickly pear cactus needs far less water contact than any other plant you'd typically grow in a hydroponic kit. Follow these rules tightly for the first 6 weeks.
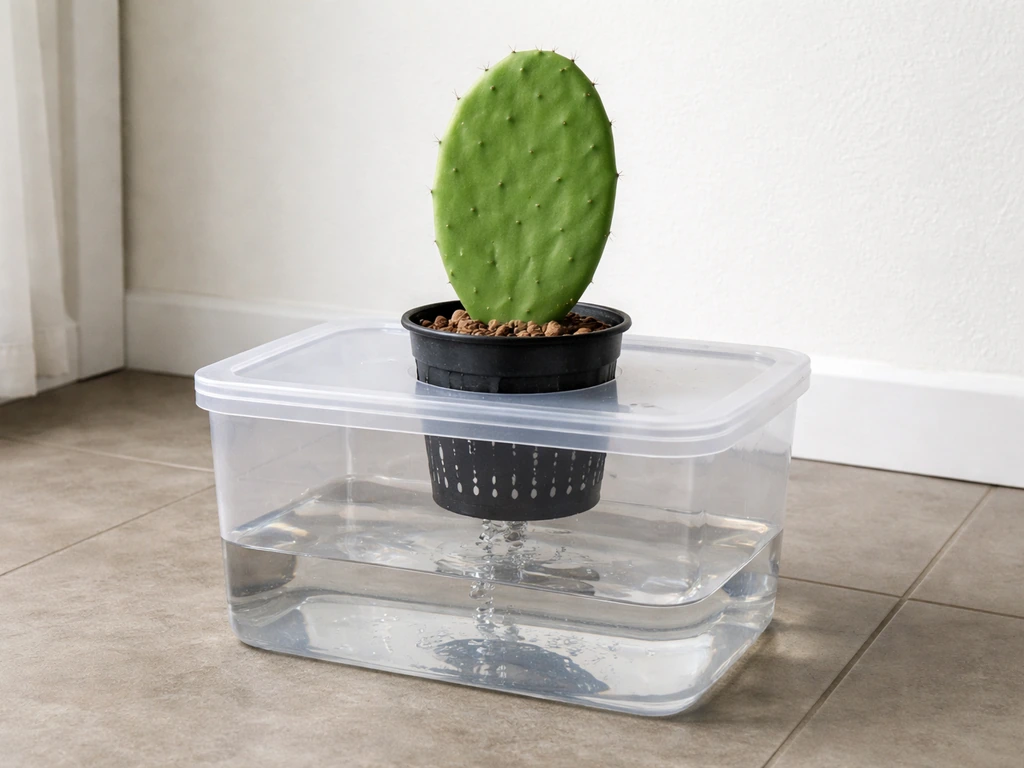
- In an active DWC or drip kit: keep the nutrient solution level at least 1–2 inches below the bottom of the net pot. The roots will grow down toward the water, but the pad base and stem should never sit in solution.
- In a passive wicking kit: fill the outer reservoir only to the lower fill line (about half full). The wick will carry just enough moisture upward. Overfilling accelerates rot almost immediately.
- Never let the grow media stay soggy. If you squeeze a handful and water drips out freely, it's too wet.
- If your active kit has an automatic pump shutoff (some systems stop pumping every 2 minutes to prevent overflow), that's a feature, not a malfunction. It's working as designed.
- After the first watering or nutrient top-off, wait until the media is almost completely dry before adding more. For prickly pear, that usually means 5–7 days between top-offs indoors.
- Ensure your kit has a drainage hole or overflow port so excess solution can exit. If it doesn't, you'll need to manually check and adjust the water level every few days.
Light, temperature, and airflow: hitting the right environment
Prickly pear is a full-sun desert plant. It wants at least 6 hours of direct or intense light per day. In an indoor hydro kit setup, a standard low-wattage grow light (like the 9-watt LED that some small-bucket kits include) will not be enough on its own for a healthy prickly pear. If you're switching to an amaryllis Red Lion indoor grow kit, follow its specific instructions for light distance, water level, and nutrient timing amaryllis red lion indoor grow kit instructions. Plan to supplement with a window that gets direct afternoon sun, or upgrade to a higher-output grow light positioned 6–12 inches above the pad.
| Factor | Target Range | Notes |
|---|---|---|
| Light | 6+ hours of direct or bright grow-light intensity | South-facing window or supplemental grow light; 16 µmol/s LED is a minimum baseline |
| Temperature | 70–95°F (21–35°C) during the day | Warmer temps (85–95°F) speed rooting; avoid dropping below 50°F at night |
| Humidity | Below 40–50% relative humidity | High humidity + slow airflow = mold on pads |
| Airflow | Gentle air circulation around the pad | A small fan on low setting prevents condensation on pad surfaces |
| Darkness | 8–10 hours dark per night | Don't run a grow light 24/7; plants benefit from a dark period |
If your grow area is humid (above 50% RH), a small USB fan pointed near but not directly at the pad will reduce your rot risk significantly. Don't skip this. Wet, warm, still air is the exact condition that rots cactus tissue fastest.
Your maintenance routine for the first 6 weeks
Keep your schedule simple and err toward doing less rather than more. Prickly pear in a hydro kit is a slow, low-maintenance grow once it's dialed in.
Weekly tasks
- Check the reservoir or outer chamber water level. Top off with plain pH-adjusted water (target pH 5.8–6.5 for cacti) only when the level drops below the minimum fill line.
- Inspect the pad for soft spots, discoloration, or unusual odor. A healthy pad feels firm and is a consistent green or blue-green. Yellowing or soft patches are early rot warnings.
- Check tubing and connections on active kits for drips, kinks, or disconnections.
- Look at the media surface and reservoir walls for green tinting (algae) or fuzzy growth (mold).
Nutrients: if your kit includes plant food
Many prickly pear grow kits include a small nutrient packet. During the rooting phase (first 4–6 weeks), use nutrients at half the recommended dose or skip entirely. Prickly pear doesn't need much fertilizer to root, and overfeeding at this stage causes nutrient burn before roots even form. Once you see clear root growth (white, firm tips extending into the reservoir), you can gradually increase to the full recommended strength. Monitor electrical conductivity (EC) if your kit includes a meter: for prickly pear, stay in the low range of 0.8–1.5 mS/cm during establishment. High alkalinity in your tap water can push pH upward over time, so recheck pH every 7–10 days and adjust with a pH-down solution if needed.
Full reservoir cleaning (every 3–4 weeks)
Empty the reservoir completely, scrub the inside with a sponge and a mild bleach solution (about 1 tablespoon per gallon), rinse twice with clean water, then refill with fresh nutrient solution. This prevents biofilm and algae from getting a foothold. On active kits, also flush the drip tubing and check the pump intake for buildup.
Troubleshooting common problems
The pad is soft, slimy, or smells bad (rot)
This is the most common failure. Remove the pad immediately, cut back to firm green tissue with a clean blade, and let it callus again in a dry location for 1–2 weeks before retrying. Trace the cause: water level was too high, media was too wet, or the pad wasn't callused long enough before planting. Fix the underlying condition before replanting.
Green algae coating the reservoir walls or media
Algae needs light to grow. If your reservoir is clear plastic and exposed to light, cover it with dark tape, a cloth sleeve, or a wraparound cover. Drain the reservoir, scrub with dilute bleach solution, rinse well, and refill. On active kits, run the flushed system for 10 minutes before reintroducing the plant. Going forward, keep the reservoir light-proof.
No roots forming after 4+ weeks
First, confirm the pad is still firm and healthy. No-root situations usually come down to one of three things: the media is too dry (raise water level slightly or reduce the distance between the pad base and the moisture zone), the environment is too cold (below 65°F slows rooting significantly), or the pad wasn't fully callused when planted and is in silent rot at the base. Gently lift the pad and inspect the cut end. If it's dry and firm, replant and wait. If it's mushy, treat it as rot (see above).
Leaks from the reservoir or tubing
On active kits, leaks almost always come from a loose fitting or a tubing connection that wasn't fully seated. Empty the reservoir, dry the connection points, and re-press tubing fittings firmly. Check rubber grommets where tubing passes through the reservoir lid. If the reservoir itself is cracked, contact the kit manufacturer for a replacement part before continuing.
Pump not running or no bubbles from air stone
Check that the air pump is plugged in and that the tubing has no kinks. Disconnect the tubing from the air stone and blow gently into it to confirm airflow from the pump end. If the pump runs but produces no bubbles, the air stone may be clogged: soak it in a 50/50 white vinegar and water solution for 30 minutes, rinse, and reinstall. blank" rel="noopener noreferrer">Some kits have a built-in 2-minute pump shutoff cycle to prevent overflow, so wait a full cycle before concluding the pump is broken. If you are working through aerogarden grow anything kit instructions, the same airflow troubleshooting steps help when an air stone stops producing bubbles.
Yellowing or shriveled pad (light or nutrient issue)
A yellowing pad with firm texture usually means too little light. Move the kit closer to your light source or add a supplemental window. A shriveling pad that feels slightly deflated but is still firm often means the moisture in the media is too low. Slightly raise the reservoir level and reassess in 5 days. Avoid the reflex to flood the media, a small adjustment is all it takes.
White crust on media or inside reservoir (nutrient buildup)
White mineral deposits mean either your nutrient concentration is too high (EC too high) or your water is very hard. Flush the reservoir with plain pH-adjusted water for one cycle, then refill with nutrients at half strength. Check EC with a meter if you have one and target 0.8–1.5 mS/cm.
Your 2–6 week checklist and what comes next
Here's a practical week-by-week framework. Treat this as a living checklist, not a rigid schedule, because every kit and environment is slightly different.
| Timeframe | What to Do | What to Look For |
|---|---|---|
| Week 0 (before kit assembly) | Callus pad for 7–14 days in dry, shaded spot | Firm, leathery, dry wound edge |
| Week 1 (planting day) | Sanitize kit, assemble, fill reservoir at low level, plant callused pad | No leaks, wick is damp (passive) or drip ring distributes evenly (active) |
| Week 1–2 | Do not water or top off. Check water level only. Monitor pad for softness. | Pad stays firm, no odor, no soft spots |
| Week 2–3 | First reservoir top-off if needed (nutrients at half dose if included). Check pH. | Media slightly moist in lower zone only; pad remains upright and firm |
| Week 3–4 | Look for early root development. Inspect reservoir for algae. | White root tips visible in media or reaching toward reservoir |
| Week 4–5 | If roots confirmed, increase nutrients to full dose. Clean reservoir if due. | Firm root growth, pad color stable or deepening green |
| Week 5–6 | Full maintenance rhythm established. Begin regular clean cycles. | Consistent growth, no rot, pH and EC in range |
Safety notes for working with prickly pear
- Always handle pads with thick leather gloves or folded layers of newspaper. The glochids (tiny hair-like bristles) are far more irritating than the large spines and are nearly invisible once embedded in skin.
- If glochids get into your skin, use white glue (school glue), spread it over the area, let it dry, and peel it off. Tweezers often push them deeper.
- Never grip the pad directly with bare hands when adjusting its position in the kit. Use tongs or folded cardboard.
- Keep the kit out of reach of children and pets. Prickly pear glochids at eye level are a serious hazard.
Where to go from here
Once your prickly pear has a solid root system established (usually by weeks 5–8), you can begin treating it more like a standard hydroponic plant: regular nutrient top-offs, full lighting, and monthly clean cycles. At that point, you might also start thinking about transitioning it to a larger vessel or even an outdoor container for summer. If you're enjoying the hydro grow kit format and want to try something a little more forgiving for your next project, succulent-style kits for aloe are a great companion grow, the setup is similar but aloe tolerates moisture more readily than prickly pear, which makes it a gentler learning curve while you keep your cactus kit running. If you are looking for modern sprout aloe grow kit instructions, use the same general setup workflow but pay closer attention to keeping the container clean and moisture balanced for aloe aloe grow kits for aloe. Aloe grow kit instructions follow the same general setup logic as this hydroponic approach, but focus on aloe's higher tolerance for moisture. If you are using an aloe kit, look up the healing aloe hydro grow kit instructions so you can match the moisture and callusing approach to aloe's needs succulent-style kits for aloe.
FAQ
How long can my prickly pear pad sit in the kit before I should worry about rooting?
In most prickly pear hydro kits, “no roots yet” is normal during the first month, but the pad should still stay firm and dry at the cut end. If the pad base becomes mushy or develops a sour smell, treat it as rot immediately and re-callus in a dry area before retrying. Letting it sit in the reservoir while already soft usually guarantees failure.
What should I do if the media stays too wet during seed germination?
For seedlings, keep the surface barely damp and avoid soaking. If you see the media surface staying wet for days, reduce water contact by lowering the reservoir level (active kits) or reducing wick exposure (passive kits). Wet top layers often lead to damping-off, even if the reservoir itself looks controlled.
My pad looks pale, but I’m already running a grow light, what else should I check?
Light requirements are not just about brightness, they are about intensity and timing. If you cannot provide at least about 6 hours of strong light, prioritize distance and duration, not nutrients. A higher-output light closer to the pad (within the safe range for your LED) can fix color and firmness issues faster than any feeding change.
When is it safe to start using the full nutrient dose after planting?
Do not switch from half-strength or no nutrients to full strength until you see active white root tips extending into the reservoir and the plant stays firm and growing. If you want a rule of thumb, increase gradually over 1 to 2 weeks, and stop increasing if you see browning or a crusty salt film at the media surface.
How do I manage pH drift if my water is hard or alkaline?
If your tap water is very alkaline, pH drift can happen even when EC looks normal, and high pH can lock up nutrients. Check pH every 7 to 10 days as the article recommends, but also adjust only the reservoir, not the media, and mix solutions with good agitation so the reading matches what the roots experience.
My EC is in range sometimes, but the plant keeps stalling. What could cause that?
A good target is not just the EC number, it is stability. If EC rises quickly, it usually means water is evaporating faster than you are topping off, or the reservoir is being disturbed by splashing. Keep topping consistent and avoid skipping reservoir changes, because salt buildup can stress the pad even at “acceptable” EC.
Can I use a fan on a passive wicking kit, and will it change rooting conditions?
Yes, but do it carefully: if you add a fan, keep it near but not blasting the pad directly. Also avoid creating drafts that warm the reservoir unevenly, since temperature swings can slow rooting. For passive systems, a little airflow still helps because it reduces standing moisture around the cut end.
What should I do if my cut end is accidentally submerged?
Do not move the pad into the nutrient zone deeper. If the cut end is being submerged, it may rot even if the rest of the setup is clean. Re-position so the cut end sits only in the moist media zone, and if needed pack perlite or pumice more loosely so it holds the pad upright without burying it.
How much can I change the water level once roots are established?
For established plants (after roots are clearly present), it’s usually best to keep a consistent reservoir height and only make small adjustments. If you raise levels too fast, you increase wet contact and risk base rot. Raise in increments and reassess in about 5 days, because prickly pear responds slowly.
My kit keeps developing mineral deposits, how do I decide if it is EC, hardness, or cleaning interval?
Hard water residue (white crust) can come from salts evaporating on the reservoir surface or from over-concentrated nutrients. First flush with plain pH-adjusted water once, then refill at half strength and monitor EC. If the crust keeps returning quickly, consider longer intervals between refills only if you can maintain EC and pH, otherwise stick to your scheduled clean cycles.
What are the most common reasons an active kit has weak bubbling even after cleaning?
If you see no bubbles on an active kit, first check power and kinks, then confirm airflow direction by testing from the pump to the air stone as described. If bubbles are extremely fine but weak, the air stone may be aging or partially clogged, vinegar soaking can help once, but if performance does not recover after re-install, replace the air stone rather than repeatedly reusing a compromised one.
How can I tell whether yellowing is from too little light or too much moisture contact?
A yellowing pad with a firm texture is usually light deficiency, but if it also feels wet or squishy at the base, it is not “just” light. For mixed symptoms, do a two-step check: confirm cut-end firmness and moisture contact first, then correct light intensity. Fixing moisture while leaving light weak (or vice versa) often delays recovery.
If I accidentally used full nutrients in the first month, what should I do now?
Overfeeding is a bigger risk early than many people expect. If you suspect you fed too soon, stop increasing nutrients, flush with pH-adjusted water once, and restart at half strength only after new firm growth shows. Salt stress can sometimes look like slowed growth before any obvious burn.