TotalGreen grow kits follow a consistent setup pattern across their lineup: expand the included grow mix disk or pellet with lukewarm water, fill the provided tray or planter to about blank" rel="noopener noreferrer">90-95% full, sprinkle or lightly cover your seeds, and place everything in a warm spot around 68°F (20°C) with good indirect sunlight. If you are following Midwest grow kits instructions, use these same core setup steps as your starting point and adjust based on your specific kit model. The exact water volume and timing differ by kit model, so the first thing to do is identify exactly which TotalGreen kit you have. Everything else flows from there.
TotalGreen Grow Kit Instructions: Setup and Troubleshooting

Marcus Thornfield
24 May 2026
Identify your exact TotalGreen kit and what's in the box
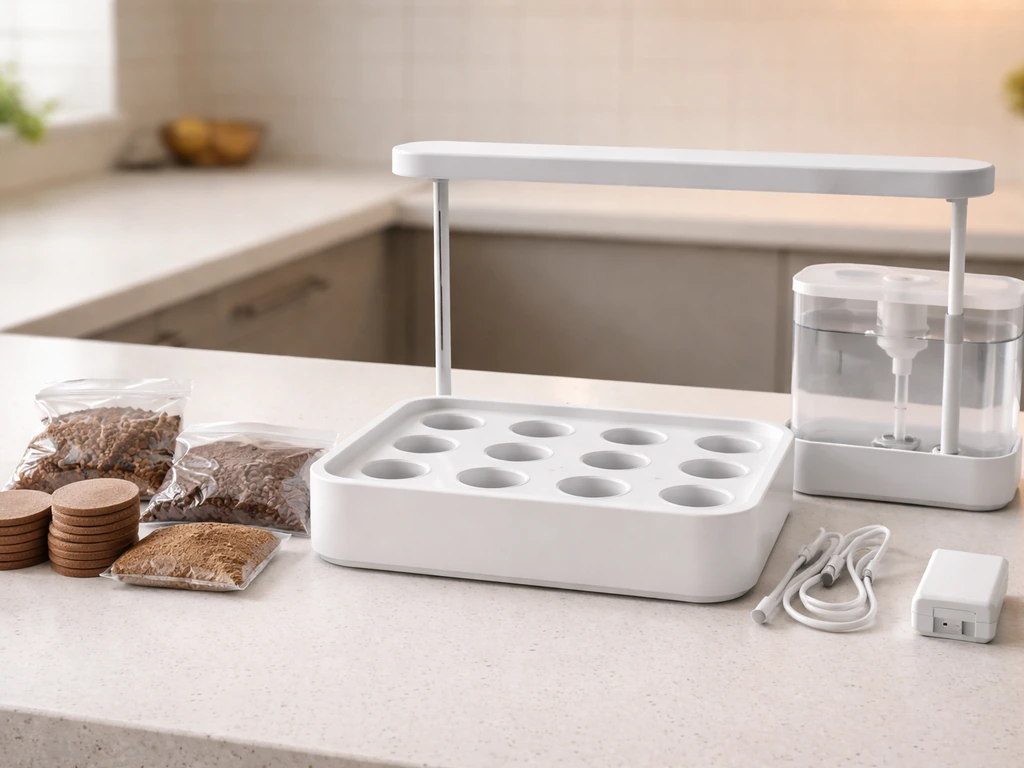
TotalGreen Holland makes several distinct grow kits under similar-looking branding, and mixing up the instructions between models is one of the most common reasons people run into problems. Before you open anything, check the product name printed on the box or the sticker on the packaging. The main kits you're likely to have are:
- Microgreens Grow Kit: includes a compostable grow tray, a Grow Mix Disk (compressed), a seed packet, and a nebulizer/spray bottle
- Kitchen Tea Trio (Lemon, Chamomile, Mint): includes three small planters with a holder, grow mix pellets, and seed packets for three herb varieties
- Kitchen Trio Veggie Kit (Tomato, Cucumber, Mini Tomato): includes the same planter-and-holder system as the Tea Trio with veggie seeds
- Strawberry Grow Kit in Pot: includes a pot, a larger compressed grow mix pellet, and strawberry seeds
Once you've confirmed your kit name, check that all parts are accounted for. If your box didn't include a printed instruction sheet, that's actually a known issue TotalGreen acknowledges in their FAQ.
In that case, head directly to TotalGreen Holland's website and look up your kit by name, or contact their support team to get the correct instructions. If your TotalGreen kit instructions are missing or unclear, you can also compare with mckennaii grow kit instructions for an adjacent step-by-step approach before you proceed. You can also use the total green holland grow kit instructions to match your exact model and avoid common setup problems TotalGreen Holland's website.
Do this before starting, because the water volumes and seed-covering methods vary enough between kits to matter.
One more thing to check before panicking: if a seed packet looks empty, shake it gently and check the corners and edges of the packaging. Seeds, especially small herb or microgreen seeds, often get stuck along the seams. TotalGreen's FAQ calls this out specifically, so give the packet a good squeeze around the edges before assuming you're missing seeds.
Step-by-step setup from unboxing to first planting
The setup process is straightforward once you know which kit you have. Here's how it works for each main TotalGreen model, starting with the steps they all share and then the specifics.
Microgreens Grow Kit setup
- Remove the instruction insert from the box and set it nearby for reference.
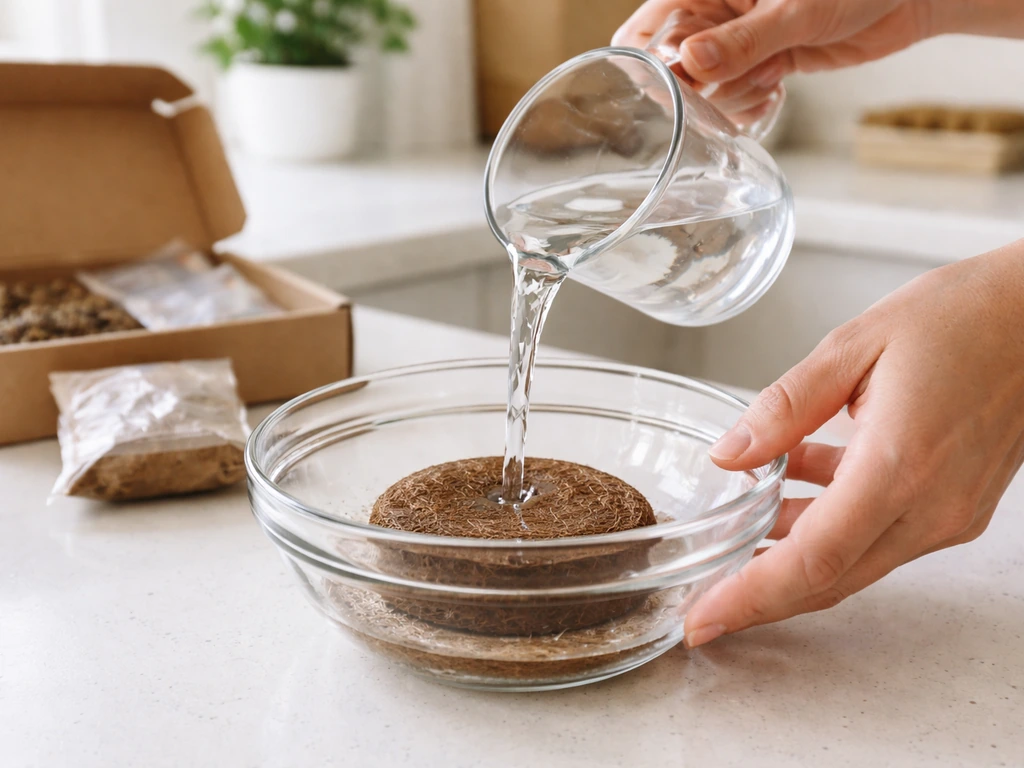
- Place the Grow Mix Disk in a bowl and pour 3/4 cup (6 fluid ounces) of lukewarm water over it. Stir as it expands. This takes a few minutes.
- Once fully expanded and saturated, spoon the grow mix into the compostable tray. Fill it evenly.
- Open your seed packet and sprinkle the seeds as evenly as possible across the surface of the grow mix. Don't bury them.
- Place the tray in a warm, sunny spot where it will get at least 6 hours of indirect sunlight per day.
- Mist or add water daily as needed (up to 3 to 5 tablespoons), keeping the mix moist but not soggy.
Kitchen Tea Trio and Veggie Trio setup
- Open the box and locate the planters holder. Tear or cut along the dotted line printed on the holder.
- Flip the holder and insert it into the recesses in the packaging so it sits stably. This turns the box into a self-contained display and holder.
- Expand each grow mix pellet separately using 1/2 cup (4 fluid ounces) of lukewarm water per planter. Stir until fully expanded.
- Fill each planter to about 90-95% full with the expanded grow mix.
- For the Tea Trio: place seeds on top with just a light coating of grow mix over them. Seeds still need some light access to germinate.
- For the Veggie Trio: cover seeds with about 1/6 inch (0.5 cm) of grow mix. Unlike the herb seeds, veggie seeds in this kit do NOT need light to germinate, so the light covering is fine.
- Place the whole setup in a warm spot around 68°F (20°C). Rotate the planters daily so each side gets even light exposure.
Strawberry Grow Kit in Pot setup
- Fill a separate bucket or pot with 2.5 cups (about 20 fluid ounces or 0.6 liters) of lukewarm water.
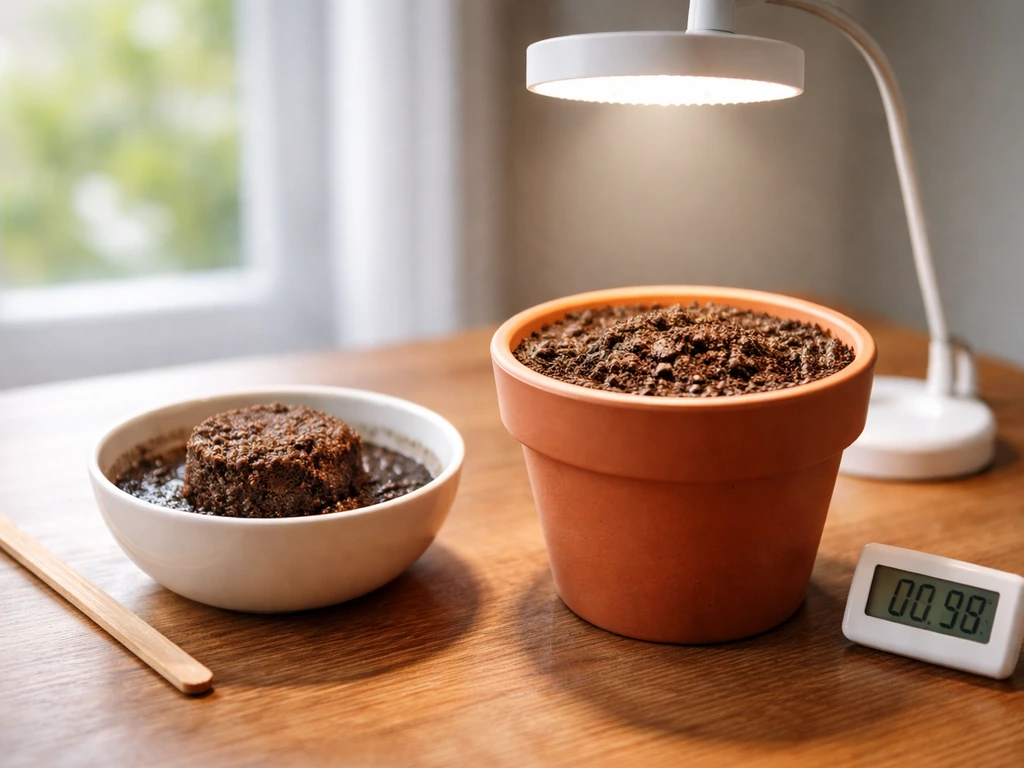
- Drop in the compressed grow mix pellet and stir until it has fully expanded. For best results, let it sit overnight so the water absorbs completely, then loosen the mix with a fork.
- Add the expanded grow mix to the included pot.
- Place strawberry seeds on top of the grow mix with only a very light coating over them. Strawberry seeds need sunlight access to germinate, so don't bury them.
- Set the pot in a warm spot around 68°F (20°C). Keep the mix moist using a spray bottle rather than direct pouring.
- Be patient: strawberry seeds can take up to 5 weeks to sprout. That's not a malfunction, it's just how strawberries work.
Light, temperature, water, and daily schedule
Getting these four variables right is the difference between a thriving kit and one that stalls out after a week. Here's what TotalGreen's kits actually need across all models.
| Setting | Microgreens Kit | Tea Trio / Veggie Trio | Strawberry Kit |
|---|---|---|---|
| Target temperature | Warm room, ~68°F (20°C) | ±68°F (20°C) | ±68°F (20°C) |
| Light requirement | Min. 6 hours indirect sunlight | Sunlight access needed; rotate daily | Sunlight access needed (seeds need light) |
| Initial water volume | 3/4 cup (6 fl oz) for grow disk | 1/2 cup (4 fl oz) per pellet | 2.5 cups (20 fl oz) in separate container |
| Ongoing watering method | Nebulizer/spray; 3-5 tbsp/day max | Spraying preferred; keep moist, not soaked | Spraying preferred; keep moist, not soaked |
| Expected germination time | 7-14 days to harvest | Varies by plant; weeks | Up to 5 weeks to sprout |
A few things worth emphasizing: 'indirect sunlight' doesn't mean a dim corner. It means bright light that isn't scorching direct afternoon sun. A windowsill that gets morning light is ideal for most of these kits. If your space is genuinely dark, a basic grow light on a timer set to 12-16 hours per day works as a substitute. Temperature matters more than most people expect. Rooms that dip below 60°F (15°C) at night will significantly slow or stop germination, especially for herbs and strawberries. If your home runs cool, a heat mat designed for seedlings can help.
For watering, the rule across all TotalGreen kits is the same: moist but never soaked. If you are scaling up with bulk casings or using a Midwest grow kit bulk casing guide, the same moist but never soaked approach still applies. The grow mix should feel like a wrung-out sponge. If you press your finger into it and water pools or the surface shines, it's too wet.
If it crumbles and feels dry an inch below the surface, add a little water. A spray bottle or nebulizer gives you much better control than pouring directly from a glass. There are no liquid nutrients called for in TotalGreen's soil-based kits; the grow mix already contains what the plants need for their first growing cycle.
Common setup mistakes and how to fix them
These are the problems that come up most often, usually in the first week. Most of them are easy to fix once you know what you're looking at.
No germination or nothing sprouting
This is almost always caused by one of three things: too cold, too dry, or seeds buried too deep. Check your room temperature first. If it's below 65°F (18°C), move the kit somewhere warmer or add a heat mat underneath. Then press a finger into the grow mix. If it's dry more than a half-inch down, mist it until moist. If you covered your seeds too deeply (more than 1/6 inch for the veggie or herb kits, or any real burial for strawberry or microgreen seeds), gently brush the excess mix aside to expose them a little more. Also remember: strawberry seeds genuinely take up to 5 weeks, so if you're at week two with nothing showing, that's normal.
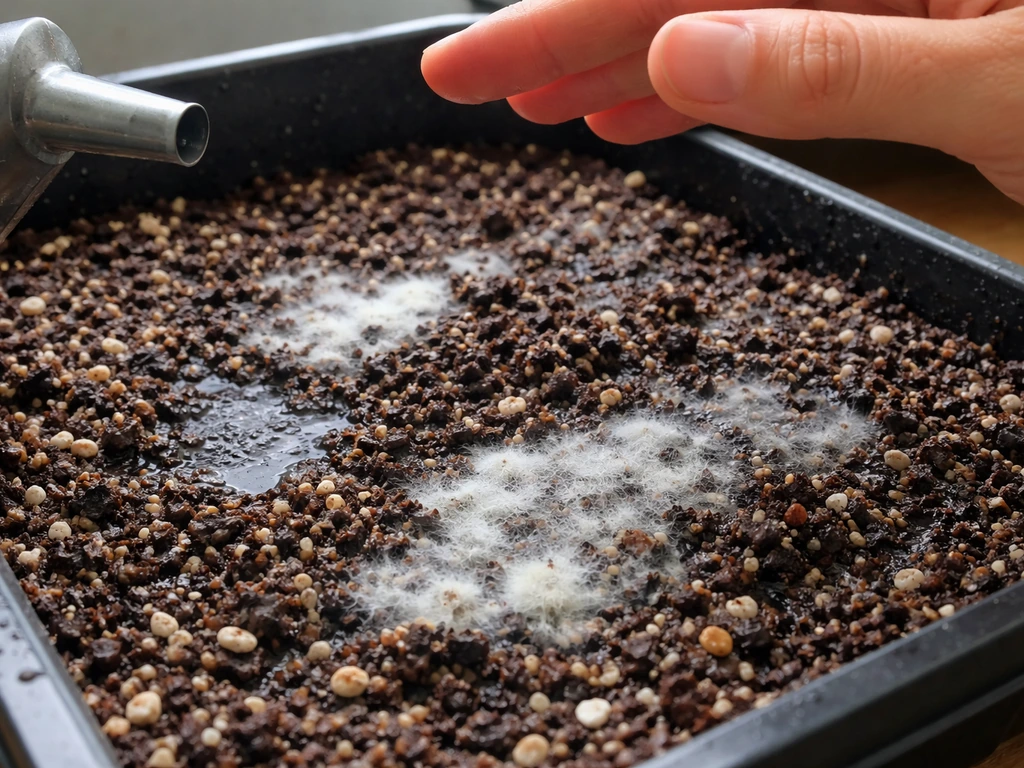
Moldy smell or white fuzz on the grow mix
This is overwatering. The grow mix is staying too wet for too long, which creates the perfect environment for mold. Stop watering for a day or two and let the surface dry out slightly. Going forward, switch to a spray bottle if you're not already using one, and only water when the top layer starts to look and feel dry. Make sure the tray or planter isn't sitting in standing water. A little surface mold in the early stages isn't always fatal to the seeds, but persistent mold usually means you need to dial back your watering frequency.
Grow mix not expanding properly
If your pellet or disk isn't expanding fully, the water is probably too cold, or you're not using enough of it. Following the right urban greens grow kit instructions helps you avoid stalls like dry, cold, or improperly covered seeds water volumes. Use lukewarm water, not cold tap water, and make sure you're using the correct volume for your specific kit. For the strawberry kit in particular, the overnight soak method makes a real difference. After soaking, use a fork to break up and loosen any dense clumps before adding the mix to your pot. A fully expanded mix should be fluffy and light, not dense or clumped.
Leggy, weak, or pale seedlings
Seedlings that grow tall and spindly instead of short and sturdy are reaching for light. Move the kit closer to a window, or if you're using artificial light, lower the light source closer to the plants. For the Trio kits, make sure you're rotating the planters daily so all sides get even exposure. Pale or yellowing seedlings that are also leggy often mean both low light and slightly too much water. Improve light first and see if that corrects the color within a few days.
Seeds fell to one side or washed away
This happens when you water with too much force or pour directly onto the seeds. Switch to a spray bottle or nebulizer immediately. If seeds have already moved, gently redistribute them with a toothpick or your fingertip while the mix is moist enough to be workable. For microgreens especially, even coverage matters a lot, so take your time when seeding and use a light hand.
Ongoing maintenance and care
Once your seedlings are up and growing, the job becomes consistency rather than problem-solving. Here's what a good ongoing routine looks like.
Daily and weekly checklist
- Check moisture daily: press a finger into the grow mix. Water only if it's dry below the surface.
- For the Trio kits, rotate planters daily for even light distribution.
- Check for mold, pests, or unusual discoloration on leaves or the grow mix surface.
- Ensure the kit is still in its target temperature range, especially at night.
- Look at the growth rate: healthy seedlings should show visible progress every 2-3 days.
Harvesting microgreens
Microgreens are ready to harvest when they reach about 2 inches tall and you can see the first set of true leaves forming after the seed leaves. This typically happens between 7 and 14 days after planting. Use clean scissors to cut just above the grow mix surface, then rinse the harvested greens with cold water before eating. You don't replant microgreens in the same tray; each grow is a single cycle. The compostable tray and used grow mix can go straight into a compost bin.
Caring for herbs and veggies as they grow
The herb and veggie kits are designed for a longer growing arc than microgreens. Once your plants are a few inches tall and well-established, you can begin light harvesting by snipping outer leaves or stems. For herbs like mint and chamomile, regular snipping actually encourages bushier growth. Avoid taking more than a third of the plant at once. The grow mix in these kits doesn't need additional fertilizer for the first several weeks, but if you plan to grow beyond what the kit supports, you can transition larger plants into a regular potting mix with a light balanced fertilizer at that point.
Cleaning the tray or planter between growing cycles is simple: rinse with warm water, let it air dry completely, and it's ready for a new disk or pellet. The compostable microgreens tray is a single-use item, but the ceramic or plastic pots in the Trio and strawberry kits are reusable.
How to set yourself up for long-term success
The kits that succeed long-term are the ones where the grower builds a small but consistent habit around checking in daily. It really is just a minute or two. The biggest mistake people make after the first successful germination is neglecting the kit because 'it's growing fine.' Moisture levels can shift quickly depending on your home's humidity and temperature, especially with the seasons changing.
If you want to keep growing microgreens cycle after cycle, keep a note of when you started each tray and what your typical harvest date was. After a few cycles, you'll dial in the timing for your exact environment. If you're growing herbs or strawberries and you're happy with how they turned out, take cuttings or save seeds for your next round before the plant finishes. Mint in particular can be propagated from stem cuttings placed in water, which makes it essentially free to keep going indefinitely.
If you're interested in other TotalGreen-style kits or want to compare setups, it's worth noting that some sibling kits like the Total Green Holland series follow very similar grow mix and pellet expansion steps, so the core skills transfer. Mushroom grow kits and hydroponic setups from other brands use different logic entirely, so don't cross-apply those instructions to your TotalGreen soil-based kit. Do Midwest grow kits typically come with spores, or are the spores sold separately depending on the kit type mushroom grow kits.
When to contact TotalGreen support or use your warranty
Try these steps in order before reaching out to TotalGreen support:
- Confirm you have the right instructions for your exact kit model name (not just 'TotalGreen kit').
- Check that your setup matched the correct water volume, temperature, and seed-covering depth for your kit.
- Give it the full expected germination window: 7-14 days for microgreens, up to 5 weeks for strawberries.
- If you suspect a defective product (e.g., the grow mix disk won't expand even with correct water volume and temperature, or the seed packet was genuinely empty after checking the edges carefully), gather the kit name, purchase date, and retailer info before contacting support.
TotalGreen Holland's FAQ is a good first stop for common issues, and their support team can help with missing instructions or product defects. If your kit was purchased through a retailer, check whether the retailer has their own return or exchange policy as well, since that's sometimes faster than going through the manufacturer. Keep your receipt or order confirmation handy either way.
FAQ
Do TotalGreen grow kits need fertilizer or liquid nutrients during germination and early growth?
It depends on the kit type. TotalGreen soil-based kits generally do not require added liquid nutrients for the initial growing cycle, so you should not add fertilizer unless the article suggests switching to potting mix later for extended grows. If you see persistent pale leaves after you correct light and watering, do not guess with nutrients right away, instead extend the “moist but never soaked” watering control first, then consider only a light balanced fertilizer after you transition to a larger potting mix when the kit’s cycle is done.
What should I do if my room is warm during the day but gets cold at night?
Temperature swings matter most at night. A room that sits around 68°F (20°C) during the day but drops below 60°F (15°C) at night can delay or stall germination, so the practical fix is to stabilize the overnight environment (for example, place the kit away from exterior doors and drafty windows, or use a seedling heat mat under the tray if you keep it within the manufacturer’s safe range for seedlings).
Can I pre-soak or rehydrate the disk or pellet beyond the standard instructions if it seems under-expanded?
Yes, but do it carefully. If you are removing dense clumps after an overnight soak (especially for the strawberry kit), use a fork to break them up so the mix expands evenly and does not create dry pockets. After expansion, avoid pressing the mix down hard in the tray, since that can lead to uneven moisture and germination.
My seedlings look fine but I notice mold on the surface. How do I adjust watering without overcorrecting?
If you suspect the mix is staying too wet, the goal is to dry the top layer without letting it become bone dry. Let the surface dry slightly for a day or two, then switch to misting with a spray bottle, watering only when the top layer looks and feels dry. Also confirm the tray is not sitting in standing water, since that can keep the entire mix saturated even if you water lightly.
How often should I rotate or reposition the kit if it is near a window or using a grow light?
Rotate the kit based on light intensity, not just calendar timing. If you use a window, rotating daily helps keep stems from leaning, especially with the Trio planters. If you use a grow light, also check the distance, because changing bulb height can matter as much as rotation for preventing leggy growth.
What are the best “first checks” if nothing is sprouting after a week?
If seeds are not germinating by the expected timeline, first verify two things before changing multiple variables: correct seed depth and consistent moisture. The article notes common depth issues (deeper than about 1/6 inch for some veggie or herb kits, and any real burial for microgreens and strawberry seeds), so gently brush excess mix aside only enough to expose them slightly, then maintain moist but not soaked conditions and keep temperature stable. For strawberries specifically, lack of visible growth by week two can still be normal because germination can take much longer.
I think my seed packet is missing seeds. Should I add more seeds anyway or contact support?
If a seed packet looks empty, check the edges and seams, then shake and squeeze gently before opening. If you open and still find no seeds, document it for support and do not keep guessing with extra planting because wrong seed density can cause uneven spacing and mold. If your kit is missing an instruction sheet, the article advises contacting support or looking up your model online, since different kits can require different water volumes and coverage methods.
How do I water without washing seeds away, especially for microgreens?
Switching between “pouring” and “spraying” is not only about avoiding seed displacement, it also affects how quickly the surface crust forms. Use a spray bottle or nebulizer to apply moisture gently, and if seeds have already shifted, redistribute them only while the mix is workable and moist, then stop aggressive watering for the next day to prevent additional movement and wash-out.
Can I reuse the same tray for microgreens after harvest, and what harvesting hygiene matters most?
Yes, but manage contamination risk. After harvesting microgreens, the article recommends cutting with clean scissors and rinsing with cold water before eating, and it also says you should not replant microgreens in the same tray because each cycle is single-use. For herbs and veggies, you can keep growing in the same kit, but avoid taking more than about one third of the plant at once to prevent stress and slow regrowth.
If my home is dark, what is the safest way to use a grow light and adjust based on seedling response?
In very low-light spaces, you can compensate with a basic grow light on a timer, typically 12 to 16 hours per day, but you should still watch seedling color and height. If seedlings turn pale or yellow and get leggy, increase effective light first (move closer or adjust light height) and avoid adding nutrients. Overwatering at the same time can worsen both mold risk and leggy growth, so make only one major change at a time.
What should I do when my TotalGreen setup still fails even after following the basic steps?
Start with the simplest, most reversible steps: confirm the correct kit model name, verify you used lukewarm water and the right volume for that model, then reassess seed depth and moisture feel. If your instruction sheet is missing or unclear, use the manufacturer’s website by kit name or contact support before making additional changes, because water volumes and coverage methods vary enough that “best guesses” can create problems.