Most lavender grow kits work the same way: fill the container with the provided medium, sow seeds about 1/4 inch deep, keep things warm and moist until sprouts appear (expect 14–28 days), then give those seedlings as much light as possible. If you are growing cherry blossoms, you can use the same idea behind grow kits, but follow cherry blossom grow kit instructions for species-specific timing, light, and chilling needs.
Lavender Grow Kit Instructions: Step by Step Guide

Marcus Thornfield
7 May 2026
Mini sunflower grow kit instructions can help you tailor the steps for a different plant, even if the general kit workflow feels familiar. Target strawberry grow kit instructions may differ from lavender kits, so check your kit’s specific label for sowing, watering, and light details Most lavender grow kits work the same way.
That core routine applies whether you bought a Burpee seed-starting kit, a Modern Sprout ceramic planter kit, a Back to the Roots set, or a simple seeds-in-a-cup style kit. The details differ by kit, but the lavender's needs don't change.
First: Figure Out What's Actually in Your Kit
Before you do anything, lay out every item in your kit and match it to the list below. If you’re using a Trowel and Sprout organic grow kit, follow the included instructions for germination, placement, and watering since kits can vary slightly Trowel and Sprout organic grow kit instructions. Lavender kits fall into a few distinct categories, and knowing which type you have changes how you set it up.
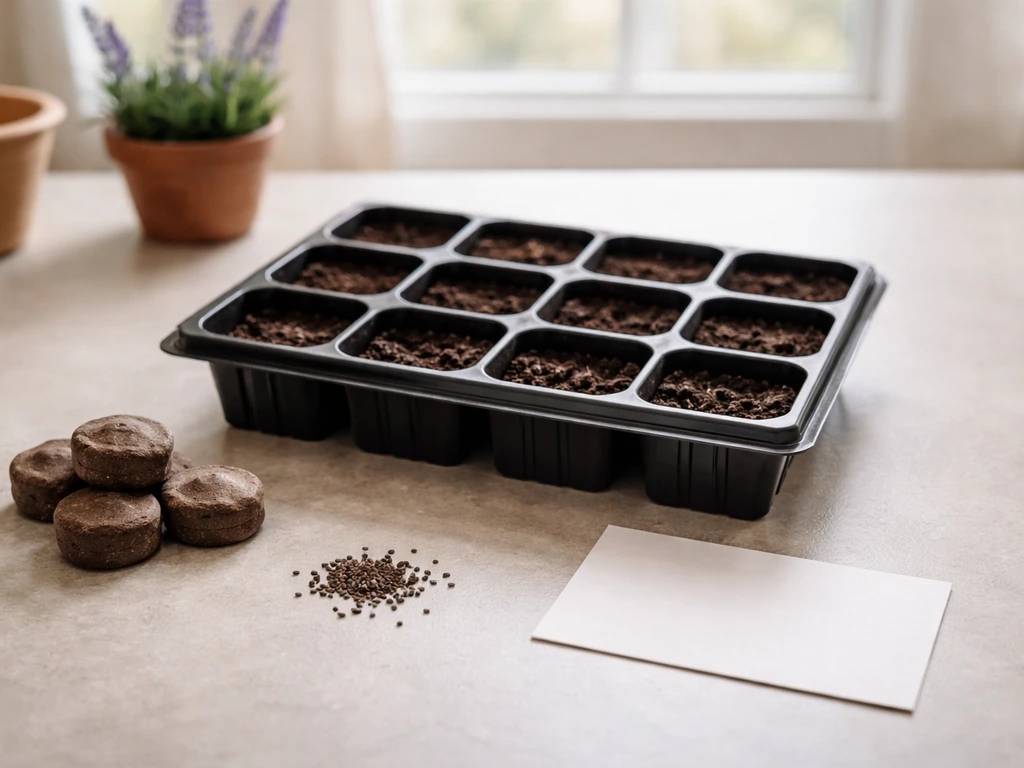
| Kit Type | Typical Contents | Key Difference |
|---|---|---|
| Seed-starting tray kit (e.g., Burpee) | Plastic tray, cell inserts, peat or coco pellets, seed packet, humidity dome | Seeds go into cells; dome holds humidity during germination |
| Ceramic or decorative planter kit (e.g., Modern Sprout) | Glazed pot, coco coir disk or bag, seed packet, sometimes a grow light or marker | Single container; no dome; drainage hole may or may not be included |
| Pod-based system (e.g., Click & Grow) | Smart Garden pod, pre-seeded plant pod, proprietary soil mixture | No loose seeds; pod is pre-loaded; follow app or light schedule |
| Seeds-in-a-cup / novelty kit | Small cup or tin, soil disk or peat pellet, seed packet or embedded seeds | Minimal drainage; watch for overwatering; often geared toward gifting |
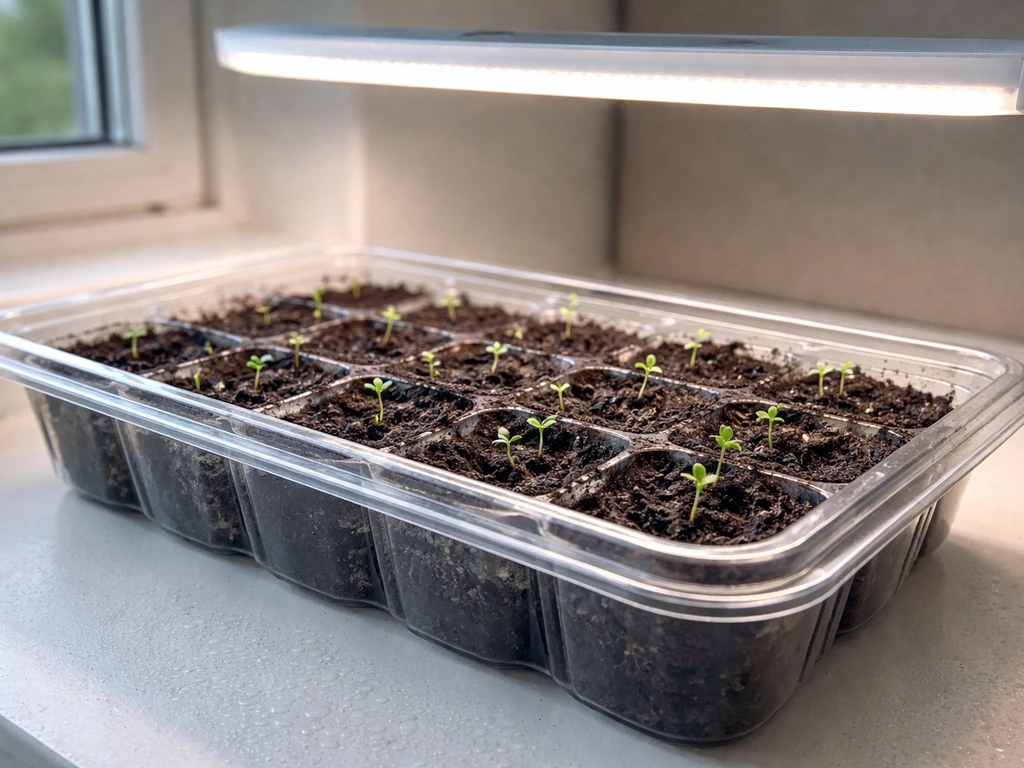
If your kit has a humidity dome, that's a plastic cover that sits over the tray to trap warmth and moisture during germination. You'll remove it once about half your seeds have sprouted. If your kit includes a heat mat, same rule: pull it once germination is underway. If you have a pod-based system like Click & Grow, the setup process is simpler since the pod does the work, but transplanting later is still something to plan for.
Setting Up Your Kit the Right Way
Prepping the container and growing medium
If your kit includes compressed peat or coco pellets, add warm water slowly and let them expand fully before planting. This usually takes 5–10 minutes. Don't rush it. Squeeze out any excess water so the medium is damp but not dripping. If you're using a loose mix, fill your cells or container to about 1/2 inch from the top and tap it gently to settle air pockets.
Drainage is non-negotiable with lavender. If your kit tray or decorative pot doesn't have drainage holes, you have a problem. For tray kits, the bottom tray catches runoff, which is fine. For ceramic or novelty pots with no hole, add a 1-inch layer of gravel or perlite at the bottom to create a reservoir that keeps roots from sitting in water. This isn't perfect, but it helps.
Sowing the seeds
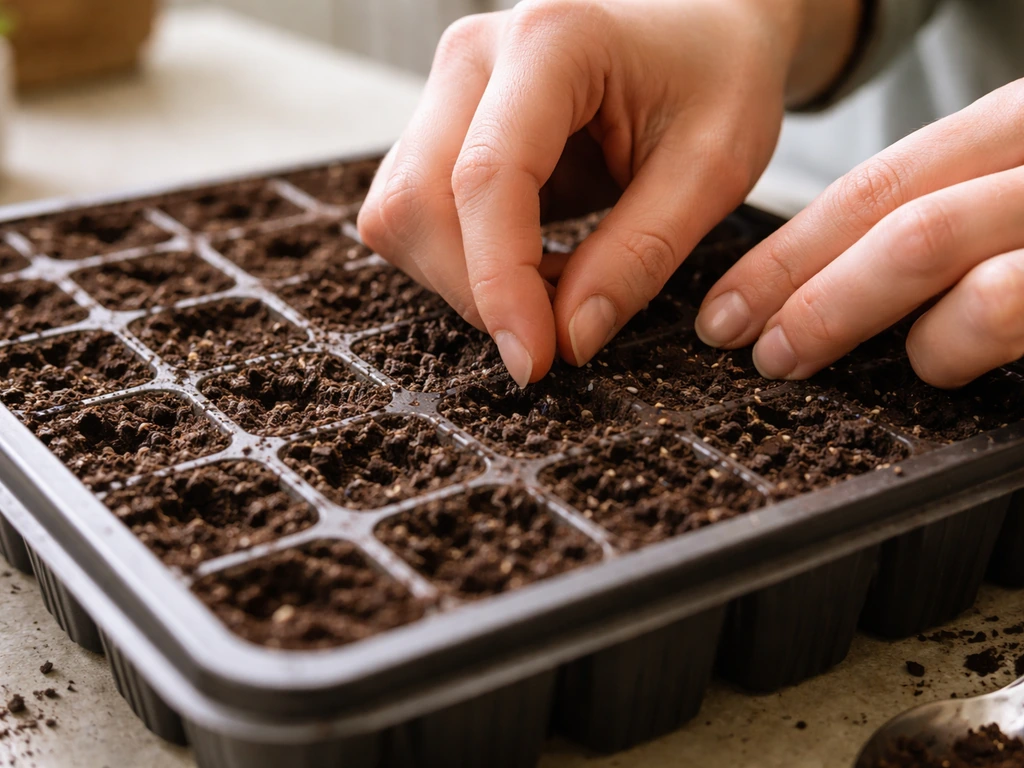
Lavender seeds are small and slow, so don't over-sow and expect fast results. Plant 2–3 seeds per cell (or cluster them loosely if using a single pot), pressing them about 1/4 inch into the medium. Following your Back to the Roots lavender grow kit instructions can help you confirm the exact depth and timing for your specific kit 1/4 inch. Cover lightly and press down gently. Lavender seeds need some light to germinate, so don't bury them deep. If your kit provides a seed-sowing tool or marker, use it to keep depth consistent.
Placement before germination
Put your kit somewhere warm, ideally 65–80°F. A spot on top of the refrigerator, near a water heater, or on a heat mat works well. You don't need bright light yet, just warmth. If your kit came with a humidity dome, put it on now. If not, loosely drape clear plastic wrap over the top to hold in moisture. Check daily and mist lightly if the surface looks dry.
When to Expect Sprouts (and What Affects It)
Lavender germination is notoriously slow and uneven. Under good conditions (65–80°F, consistent moisture, no direct harsh light), you'll see the first sprouts in 14–28 days. Don't panic if some cells stay empty while others sprout. Lavender seeds have variable germination rates even from good seed packets, and some batches are just slower than others.
If you're starting your kit indoors with plans to move plants outside eventually, time your sowing 6–10 weeks before your last expected frost date. For most of the US, that means starting indoors in January through March. If you're growing purely as a houseplant or countertop setup, timing matters less, but cooler winter windowsills can slow germination significantly.
Once about 50% of your seeds have germinated and you can see tiny green shoots, remove the humidity dome and heat mat if you're using them. Leaving them on too long after sprouting encourages mold and leggy, weak growth.
Light, Water, Temperature, and Airflow: The Four Rules
Light
This is where most indoor lavender kits fail. Lavender is a full-sun Mediterranean plant, and a typical indoor windowsill rarely gives it enough. After germination, move your kit to the brightest spot you have, ideally a south-facing window. If you have a grow light (some kits include one, many don't), position it 3–4 inches above the seedlings and run it on a 16-hours-on, 8-hours-off schedule. If your kit did not include target grow kit instructions for lighting, use a grow light schedule like this to keep seedlings strong. Don't run it 24 hours; lavender needs a dark period.
If you only have a north-facing window or low light, your seedlings will grow but will be pale and leggy. Getting a basic LED grow light panel (they're inexpensive) is the single biggest upgrade you can make to a budget lavender kit.
Watering
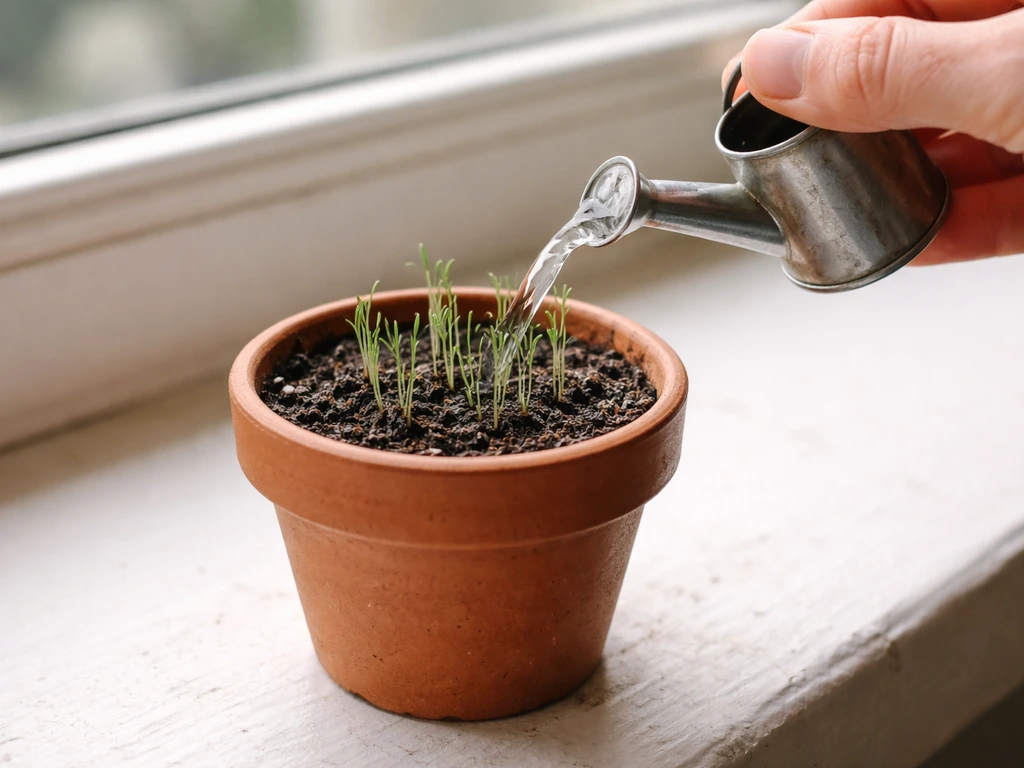
Lavender hates wet feet. Once seeds have germinated, let the top layer of the medium dry out slightly between waterings. When you do water, water thoroughly so moisture reaches the roots, then don't water again until the surface feels dry to the touch. Bottom watering (pouring water into the bottom tray and letting the medium soak it up) works really well here because it keeps the surface drier and reduces mold risk.
Temperature
Established lavender seedlings prefer 60–70°F during the day and can handle slightly cooler nights. Avoid placing the kit near heating vents, which dry out the air too fast, or near cold drafty windows in winter, which can stress seedlings. Room temperature in most homes is fine once germination is complete.
Airflow
Lavender is prone to mold and fungal issues in still, humid air. Once the dome is off, make sure there's some air circulation around your kit. A small fan set on low nearby, running a few hours a day, makes a real difference. It also strengthens stems by mimicking a light outdoor breeze, which is good for the plant's long-term structure.
What to Do Once Your Lavender Is Established
Thinning seedlings
If multiple seeds sprouted in one cell or one spot, thin down to the strongest single seedling once they're about an inch tall. Use scissors to snip the weaker ones at the base instead of pulling them, which could disturb the roots of the keeper. Crowded seedlings compete for light and nutrients, and lavender won't tolerate that well.
Fertilizing
Don't fertilize right away. Wait until seedlings are 3–4 weeks old and showing steady growth. Then use a complete liquid houseplant fertilizer diluted to half strength. Over-fertilizing lavender, especially with high-nitrogen feeds, pushes leafy green growth at the expense of the aromatic oils that make lavender worth growing. Less is more.
Transplanting
Most lavender grow kits are starter systems, not forever homes. Mini rose grow kit instructions follow a similar routine: prepare the medium, sow at the right depth, and keep consistent moisture while watching for germination. Once your seedlings are 3–4 inches tall with a few sets of leaves, they're ready to move up. Transplant into a 6–8 inch pot with fast-draining potting mix (add extra perlite if it feels heavy) or into an outdoor garden bed if your climate allows. Lavender is hardy in USDA zones 5–9 depending on variety, so check what type came with your kit before moving it outside permanently.
Pruning
Once your plant has several inches of growth, pinch back the tips lightly to encourage branching. Don't cut into woody stems on young plants. blank" rel="noopener noreferrer">Prune after flowering in late summer or early fall, and avoid cutting down into old woody stems because old wood may not reliably produce new green growth again. blank" rel="noopener noreferrer">A light trim in early summer after the first bloom keeps the plant compact and encourages a second flush of flowers. Avoid cutting back hard in fall; lavender stressed going into winter rarely bounces back well.
Troubleshooting: When Things Go Wrong
No germination after 4+ weeks
Check your temperature first. If your kit is sitting below 65°F, seeds may just be sitting dormant. Move it somewhere warmer or add a heat mat. Also check moisture levels: if the medium dried out completely even once during the waiting period, seeds may have failed. Re-sow with fresh seeds if you're past 5 weeks with nothing happening.
Slow or spotty sprouting
This is actually normal for lavender. Germination rates can be uneven even with good seeds. Give it more time before giving up. If only a few cells sprouted, you can re-sow empty cells while the sprouted ones keep growing.
Leggy, floppy seedlings
This is almost always a light problem. Seedlings stretching toward the light or flopping over need more intensity or a closer light source. Move grow lights to 3–4 inches above seedlings or relocate the kit to a sunnier window immediately. You can gently support floppy stems with a small stick or toothpick temporarily, but better light is the real fix.
Mold on the soil surface

White fuzzy mold on the surface means too much moisture and not enough airflow. Remove the humidity dome if still on, water less frequently, and add a small fan nearby. You can scrape off surface mold and dust lightly with cinnamon, which is a natural antifungal. If mold is severe or spreading to stems, it's time to re-sow in fresh medium.
Yellowing leaves or root rot
Yellow lower leaves on young lavender almost always mean overwatering or poor drainage. Check the drainage situation in your kit right away. If roots look brown and mushy when you gently tip the plant out, root rot has set in. Trim off affected roots, let them air dry briefly, and repot into fresh dry medium. Going forward, water only when the top of the medium feels dry.
Pests
Lavender is relatively pest-resistant outdoors, but indoor seedlings can attract fungus gnats (tiny flies near the soil) if the medium stays too wet. Let the medium dry out more between waterings to break the gnat life cycle. For spider mites or aphids, which show up as tiny bugs or white webbing on leaves, wipe leaves with a damp cloth or spray with diluted neem oil. Act early before populations build up.
Harvesting Your Lavender and Making It Last
When and how to harvest
Harvest lavender when about one-third of the flowers on a stem are open and the rest are still in bud. This is when essential oil content is highest and the fragrance is strongest. Cut stems in the morning after dew has dried but before afternoon heat. Use clean scissors or pruning shears and cut stems down to just above the lowest set of leaves on each stem.
Drying and using it
Bundle 10–15 stems together, secure with a rubber band, and hang upside down in a dry, dark, well-ventilated spot for 2–3 weeks. Dried lavender holds its fragrance for months and is easy to use in sachets, pillow stuffing, homemade bath salts, or as a culinary herb. Culinary use calls for English lavender varieties (like Hidcote or Vera) rather than French or Spanish types, which are more bitter. Check what variety came in your kit before cooking with it.
Keeping your plant going long-term
A healthy lavender plant can live 10–15 years outdoors or 3–5 years as a container plant with good care. The biggest long-term mistakes are overwatering, skipping the annual post-bloom prune, and leaving it in a pot that's too small. Repot every 1–2 years as the plant grows, always into well-draining mix. In winter, indoor plants need a cooler rest period (around 50–60°F) and reduced watering to mimic their natural cycle.
If you started with a novelty kit or a simple seeds-in-a-cup setup and your plant is thriving, consider transplanting it into a proper terracotta pot or outdoor raised bed. The kit got you started, but lavender really shows what it can do once it has room, sun, and good drainage. That transition from starter kit to established garden plant is the most rewarding part of the whole process.
FAQ
My lavender grow kit came with pellets, should I seed right away or after they expand?
If your kit uses paper-thin peat or coco pellets, always wait for full expansion before adding seeds. Partially expanded pellets can leave uneven depth, which is a common reason for slow or spotty germination.
I might have covered the seeds too deeply, will they still germinate?
Lavender seeds are light-sensitive to germinate, so avoid covering with more than a light press of medium. If you accidentally buried them deeper, you can still try, but germination will likely be delayed or fail.
When exactly should I remove the humidity dome after sprouting?
Humidity domes should come off around the time seedlings are visible on about half the cells. Leaving it on after sprouting increases mold risk and often leads to taller, weaker seedlings.
How do I know when to water after the dome comes off?
Use the medium as your moisture indicator, not the top of the dome or the tray feel. After germination, water only when the top layer dries slightly, then water thoroughly (bottom watering helps keep the surface drier).
My home is warm, but my kit sits near a cold window. Could that affect germination?
Cold windowsills can slow lavender dramatically even if you are misting correctly. Move the kit away from drafts, or insulate the pot bottom from the window with a towel or tray spacer so the root zone stays warm.
Can I leave my grow light on all day for faster lavender growth?
For indoor light, the “dark period” matters. Running lights 24 hours often causes stress and weak growth, so keep a schedule with a daily off window (for example, 8 hours off) and ensure the light is close enough to prevent stretching.
If multiple seeds sprouted in one cell, when should I thin them, and how?
Yes. Thinning with scissors is safer once seedlings are about an inch tall, but do it promptly so the strongest plant gets full access to light and airflow. Waiting too long keeps competition high and can stunt development.
What should I do if germination has stalled because the medium dried out once?
If seeds have been dry enough to stop germination, rehydrating occasionally might not fix it. In that situation, the most reliable approach is to re-sow fresh seeds rather than repeatedly misting a stalled batch for weeks.
I see fungus gnats. Is my watering schedule the only issue?
Fungus gnats usually point to consistently moist top layers. Let the top surface dry more between waterings, and consider letting the tray approach dry before bottom soaking again, so the larvae do not keep thriving.
Are yellow lower leaves always overwatering, or can it be normal?
Yellowing lower leaves can also be normal after early sprouting, especially if only a couple leaves are affected. If the leaves yellow are paired with soggy medium, mold, or mushy roots, treat it as overwatering or drainage trouble.
How do I tell when mold is mild and manageable versus a sign to restart?
If you have mold, check both moisture and airflow. A fan helps, but if you have widespread mold growth or stems are affected, the safest option is to restart in fresh medium because spores can keep reappearing.
When I move seedlings outside, do I need to acclimate them, or can I transplant straight away?
If the kit started in the cold season, move outdoors only when nights are reliably warm and the plants can handle full sun gradually. A sudden transition from dome warmth indoors to hot outdoor sun can stress seedlings even if they were germinating well.
Seedlings look pale and leggy. Should I fertilize or change something else first?
If your seedlings are pale or very stretched, adjust light first before adjusting fertilizer. Applying half-strength fertilizer early can worsen leggy growth because weak plants take up nutrients unevenly under low light conditions.
My lavender is not getting bigger. Could the grow kit be too small, and when should I transplant?
Check the kit type. Starter kits with small cells often require earlier transplanting to a larger pot or faster root growth slows down. If roots circle the container or the plant stays small despite good light, plan to up-pot sooner.
Can I rely on cinnamon to solve mold, or should I change my setup?
No, skip cinnamon as the only remedy. It can help with minor surface mold, but the root causes are excess moisture and still air. Combine any surface treatment with a drier, more ventilated setup, or you will likely see it return.
How do I know when my lavender is ready to harvest, especially if it’s not blooming evenly?
For harvest, the key timing is flower opening stage, not calendar date. If your stems have buds that are still mostly closed, wait until about one-third of flowers are open for best fragrance.