
The Grow Buddha Bonsai Kit gets you from sealed box to sprouting seedlings in under an hour. You soak the compressed soil discs for 5 to 10 minutes, plant your seeds a quarter inch deep, keep everything warm, and wait. That is genuinely the whole setup process. The tricky parts come later: knowing which seeds need cold stratification, when to transplant, how to water without drowning tiny roots, and what to expect over a timeline measured in years rather than weeks. This guide walks you through every step in plain language, from checking the box contents to your first bonsai styling session. For a concise step-by-step checklist and practical bonsai grow kit instructions, see the detailed walkthrough below.
Grow Buddha Bonsai Kit Instructions: Complete Setup & Care

Marcus Thornfield
12 Aug 2026
Who this guide is for and what you will get out of it
If you bought the Grow Buddha Bonsai Starter Kit, received one as a gift, or are still deciding whether to order, this walkthrough is written for you. I am assuming you have no bonsai experience and maybe no gardening experience either. The manufacturer's 20-page PDF instruction guide is helpful, but it covers a lot of ground quickly and glosses over the steps where most beginners run into trouble. This article translates those instructions into a slower, more practical walkthrough, adds troubleshooting steps the PDF skips, and gives you an honest verdict on what the kit actually delivers versus what the packaging implies.
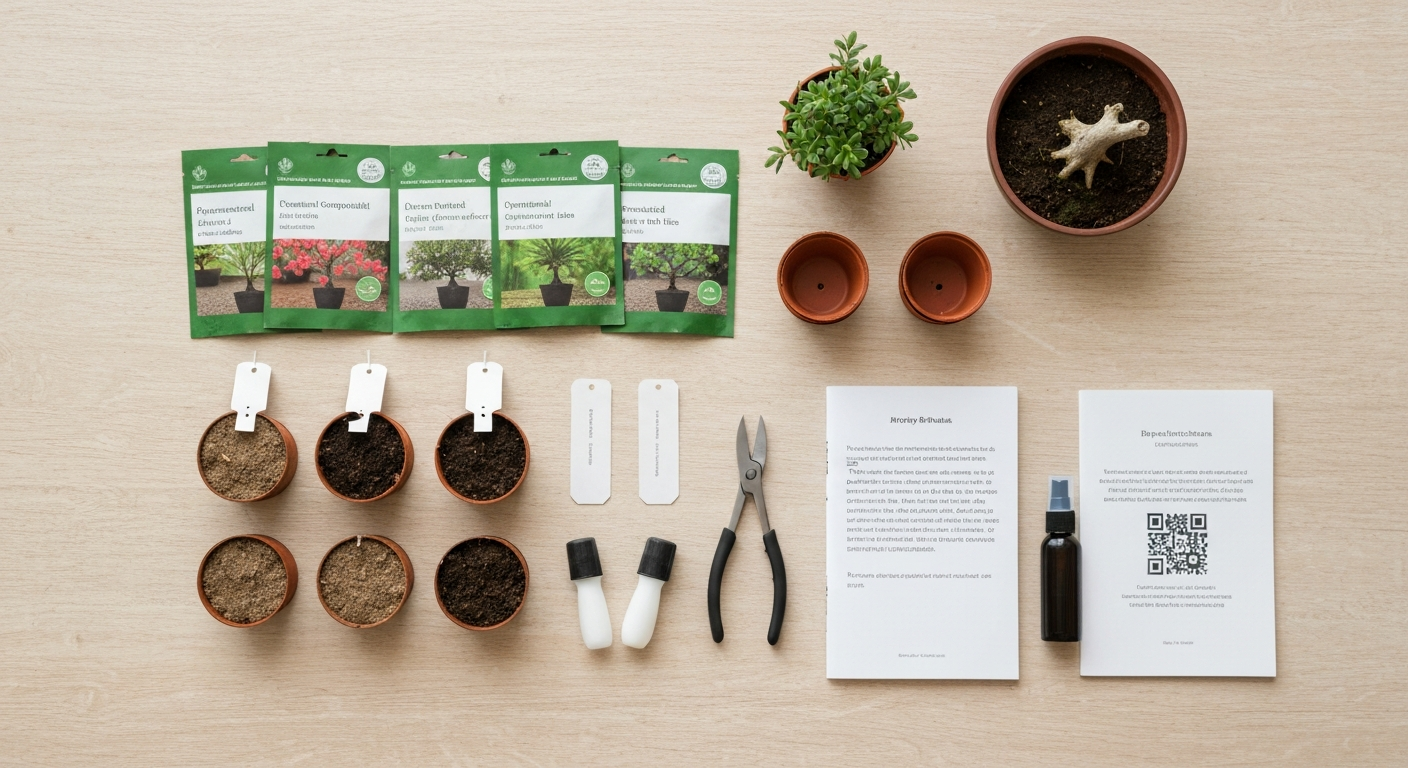
One important note before you start: Grow Buddha sells multiple kit variants. The standard Grow Your Own Bonsai Starter Kit includes four types of bonsai seeds plus two bonus seeds, one premium plastic pot, four biodegradable pots, four expandable soil discs, five plant tags, a pair of clippers, a paperback manual, an e-book, and access to video tutorials. A separate 8-seed variant also exists. Always count your seed packets and cross-check the species names against the SKU you ordered, because contents vary between product versions and sometimes between production batches.
Unboxing checklist: verify everything before you plant
Before you touch the soil or seeds, spend five minutes doing a condition check. Damaged packaging, missing components, or a non-functional QR code are much easier to resolve before you start than after your seeds are in the ground. These videos can be used to double-check what should be in your kit and how items are arranged in the package User and product unboxing videos such as Grow Your Own Bonsai Kit by Grow Buddha - YouTube visually confirm actual included components, packaging sizes, and how accessories are packed inside the box.. I have seen Trustpilot reviews mentioning QR code issues with Grow Buddha, so confirm the scan destination works immediately.
- Count the seed packets. The standard kit should have 4 labeled species plus 2 bonus seeds. Write down the species name printed on each packet now, before anything gets mixed up.
- Check each seed packet for tears, moisture, or signs that seeds have already broken dormancy.
- Locate the 4 compressed soil discs. They should feel dry and firm, roughly puck-shaped. Give each one a squeeze to confirm they are solid with no crumbling.
- Examine the premium plastic pot for drainage holes. Flip it over and confirm there is at least one hole at the base. No drainage hole is a serious problem for bonsai roots.
- Check the 4 biodegradable pots for damage. They are fragile when wet, so handle them gently.
- Find the 5 plant tags. You will need all of them to label each species separately.
- Inspect the mini pruning clippers. Open and close them to confirm the hinge moves freely and the blades are not bent.
- Locate the paperback manual and flip through it to confirm all pages are present.
- Scan the QR code on the packaging or manual right now and confirm it loads the e-book or video tutorial page. Note the URL in case the code becomes unreadable later.
- Check for any moisture or mold inside the box, especially under the soil discs.
If anything is missing or damaged, contact Grow Buddha customer support before planting. Trying to grow with a cracked pot or a bad soil disc will cause problems that are easy to blame on your technique but are actually a kit defect.
What the kit does not include and how to set up a safe workspace
The Grow Buddha kit is self-contained enough for basic germination, but there are a few things it leaves out that will noticeably improve your results. If you're also exploring other hobby grow kits, see our concise shiitake grow kit instructions for a quick comparison of setup and care requirements.
Things you will actually need
- A small watering can or spray bottle with a fine mist setting. Heavy pouring from a cup will dislodge seeds and compact the expanded soil.
- A clear plastic bag or a small humidity dome. The kit does not include a cover, but trapping moisture during germination dramatically improves results.
- A warm surface or heat mat. Many of the species in the kit germinate best at 65 to 75 degrees Fahrenheit (18 to 24 degrees Celsius). A consistently warm spot above a refrigerator or near a heat vent works if you do not have a mat.
- Grow light or a south-facing window. Once seedlings emerge, they need bright light immediately. If your windows are weak, a simple LED grow light placed 2 to 4 inches above seedlings makes a real difference.
- Refrigerator space. Several species included in the kit (such as Blue Spruce and Wisteria) require cold stratification of 8 to 12 weeks in the fridge before they will germinate. Plan for this.
- Small labels or a permanent marker for the plant tags. The tags themselves are included, but a waterproof marker ensures the labels survive regular watering.
Optional extras worth considering
- A small digital thermometer and hygrometer to monitor temperature and humidity near your seedling tray.
- pH test strips if you want to verify the expanded soil is in the correct range for your species (most bonsai species prefer slightly acidic to neutral pH, roughly 6.0 to 7.0).
- Bonsai-specific liquid fertilizer for use after the seedlings are established (more on this in the care schedule section below).
- Additional bonsai training wire for initial shaping, which you will need once trees are a few years old.
For your workspace, pick a clean, flat surface with good light and easy access to water. Lay down a plastic tray or some newspaper because expanded soil is messy. Keep the area at room temperature and away from cold drafts, direct air conditioning vents, or heating vents that blast dry hot air directly onto the pots.
Before you plant: species notes, stratification, and a few honest expectations
The Grow Buddha instruction PDF covers several species depending on which kit variant you have. Common species across their kits include Silk Tree (Albizia julibrissin), Flame Tree (Delonix regia), Pomegranate (Punica granatum), Blue Spruce (Picea pungens), Jacaranda (Jacaranda mimosifolia), Eucalyptus, Wisteria (Wisteria sinensis), and Japanese Black Pine (Pinus thunbergii). Your exact seeds will depend on your specific SKU, so check the individual seed packets against the species list in the included manual.
Here is the most important thing to understand before you start: some of these species cannot germinate without cold stratification first. Cold stratification mimics winter. You wrap the seeds in a slightly damp paper towel, seal them in a small plastic bag, and put them in the refrigerator for 8 to 12 weeks. RHS 'How to Sow Seeds Indoors' recommends pre-treating seeds (cold stratification) when required and following packet-specific instructions for timing and moisture. Blue Spruce and Wisteria are classic examples. If you skip this step, those seeds will likely just sit there and do nothing no matter how warm or moist you keep them. Check the species-specific notes in the Grow Buddha PDF for each packet you have.
A second thing worth saying out loud: bonsai from seed is slow. The Grow Buddha manual is honest about this, noting that most species need 2 to 3 years before initial bonsai training begins. Authoritative bonsai education sources like Bonsai Empire go further, pointing out that a display-quality trained bonsai typically takes many years, sometimes a decade or more depending on species. This kit is a starting point, not a shortcut. If you want a styled bonsai tree faster, nursery stock is the practical path. But if you enjoy watching something grow from nothing, seed starting is deeply satisfying when you go in with realistic expectations.
Step-by-step setup and assembly
The Grow Buddha kit is designed around a soil-based indoor germination process. There is no hydroponic component in this kit. The setup is the same for all included species, with the exception of any seeds that need to go into cold stratification first (set those aside and follow the refrigerator process described above before completing these steps for them).
Setting up the germination pots
- Fill a small bowl or cup with room-temperature water. Drop one compressed soil disc into the water. Set a timer for 5 to 10 minutes.
- Watch the disc expand. It will absorb water and expand to roughly 3 to 4 times its original height, forming a loose, moist soil plug. Do not rush this. Fully expanded soil is airy and well-draining; under-expanded soil stays compacted and drains poorly.
- Once fully expanded, gently fluff the soil with a fork or chopstick to break up any dense clumps. It should feel light and crumbly, not packed.
- Transfer the expanded soil into one biodegradable pot. Fill it to about half an inch below the rim so water does not overflow when you mist.
- Repeat steps 1 to 4 for each of the four biodegradable pots.
- Label each pot with a plant tag and your permanent marker before you plant anything. Species look identical as seedlings and you will forget which is which.
Organizing your workspace
Set all four filled pots on a plastic tray or plate. This serves two purposes: it catches drainage water so your surface stays clean, and it lets you move all the pots at once when you need to relocate them. Keep your spray bottle, plant tags, and seed packets all on the same tray so nothing gets lost during planting.
Exact planting and germination walkthrough
Planting the seeds
- Open one seed packet at a time. Keep all others sealed so seeds do not get mixed.
- Use a pencil, chopstick, or your finger to make a small hole in the center of the prepared soil. The depth should be approximately 1/4 inch, which is about 6 millimeters. This is the depth specified in the Grow Buddha instruction PDF and it is consistent with general seed-starting guidance for small tree seeds.
- Drop one or two seeds into the hole. Planting two seeds per pot increases your odds of germination. If both sprout, you will thin to the strongest seedling later.
- Gently push the surrounding soil over the hole to cover the seeds. Do not press hard. A light tamp with one finger is enough to ensure good soil contact without compacting the medium.
- Mist the surface gently with your spray bottle until the top layer of soil is visibly moist but not waterlogged. Water should not be pooling on the surface.
- Cover each pot loosely with a clear plastic bag or place a humidity dome over the tray. Leave a small gap for air circulation to reduce the risk of fungal issues.
- Place the covered pots in a warm location (65 to 75 degrees Fahrenheit, 18 to 24 degrees Celsius). Consistent warmth is more important than maximum warmth. Avoid fluctuating temperatures.
- Check moisture daily. The surface should stay consistently moist, not wet. If it starts to dry out, mist again. If you see condensation collecting heavily inside the bag, open it briefly to let fresh air in.
What to expect during germination
The Grow Buddha manual states that many species germinate within 2 to 3 weeks, but in practice germination times vary considerably by species. Faster-germinating tropical species like Flame Tree and Jacaranda may sprout within one to two weeks in good conditions. Cold-climate species like Blue Spruce can take much longer even after proper stratification. Do not assume a seed has failed in the first month. Continue keeping the soil moist and warm, and check for any tiny green shoots emerging from the soil surface.
The most common germination failure I see with kits like this is overwatering during the waiting period. If the soil stays waterlogged, the seeds rot before they sprout. This is especially true with the compact biodegradable pots, which hold moisture well. When you check daily, poke the soil surface with a finger. If it still feels moist, skip watering that day. Only mist again when the top layer feels dry to the touch.
Transplanting seedlings into the bonsai pot and initial shaping
The Grow Buddha PDF recommends transplanting when seedlings reach approximately 5 to 10 centimeters (about 2 to 4 inches) tall. At that point the root system is established enough to handle the move without collapsing. Do not rush this. A seedling that is too small will struggle in the larger pot, and its roots will not fill the space, leaving excess moist soil that invites rot.
The transplant process
- Water your seedling a few hours before transplanting. Moist soil holds together better around the roots during the move.
- Prepare the premium plastic pot from the kit. Confirm the drainage hole is clear. If you are using additional bonsai soil or grit, add a small layer to the bottom of the pot first to improve drainage.
- Carefully squeeze the biodegradable pot from the sides to loosen it, then gently tip the seedling and soil plug out. Try to keep the root ball intact. The biodegradable pot material can be planted directly if it is breaking down naturally, or it can be peeled away.
- Position the seedling in the center of the bonsai pot at roughly the same depth it was growing before. Do not bury the stem deeper than it was.
- Fill in around the roots with additional moist soil, pressing gently to eliminate air pockets. Firm the surface lightly.
- Water gently but thoroughly until water runs from the drainage hole.
- Place the newly transplanted seedling back in its bright, warm spot and avoid moving it for a few weeks while it adjusts.
Your first shaping decisions
At the transplant stage, your tree is still a seedling. This is not the time to wire or dramatically prune. The one thing you can do now is begin thinking about the tree's future shape by removing any obviously weak or crossing branches using the included clippers. Keep cuts clean and avoid cutting more than about a third of the foliage at once. Think of this as tidying rather than styling. Real bonsai training, including wiring and significant pruning, comes after the tree has been growing for at least two to three years and has developed a trunk with some thickness and character.
Daily and weekly care: the beginner-friendly routine
Once your seedling is in its bonsai pot, the care routine becomes your main job. Bonsai in small containers dry out faster than plants in garden beds, so consistency matters more than any single action.
Watering
Check the soil daily by pressing a finger about half an inch into the soil surface. If it feels dry at that depth, water gently until the water drains from the bottom of the pot. If it still feels moist, wait. The bonsai pot from the kit is relatively small, so in warm or sunny conditions you may need to water every day or two. In cooler, low-light conditions you might water every three to four days. Never follow a rigid every-X-days schedule with bonsai. Always check first and water based on what the soil actually tells you.
Light
Most bonsai species in this kit want several hours of bright light per day. A south-facing window that receives direct sun for at least four to six hours is a good minimum indoors. If your windows are weaker than that, a simple LED grow light helps significantly. Extension research from Purdue and the University of Minnesota suggests seedlings benefit from light in the 100 to 300 micromoles per square meter per second range (PPFD), which most basic grow lights achieve at a distance of 2 to 6 inches. Raise the light as the seedlings grow taller so the canopy stays within the useful light zone without getting scorched.
Temperature and humidity
Typical indoor temperatures of 60 to 75 degrees Fahrenheit (15 to 24 degrees Celsius) work for most species in this kit during the growing season. Avoid placing trees next to cold windows in winter or directly under air conditioning vents. Humidity around 40 to 60 percent is comfortable for most species. If your home is very dry, a small pebble tray filled with water placed under (but not touching) the pot adds ambient humidity without wetting the roots.
Feeding
Do not fertilize seedlings for at least the first 6 to 8 weeks after germination. The expanded soil discs provide some initial nutrients and young seedlings are sensitive to fertilizer burn. Once the seedlings are well-established and growing actively, switch to a balanced, diluted liquid fertilizer at half the recommended strength. During the growing season (spring through late summer), feed every two weeks. Reduce to once a month in autumn and stop feeding altogether in winter when growth slows.
| Task | Frequency | Key rule |
|---|---|---|
| Check soil moisture | Daily | Finger test: water only when dry at 0.5 inch depth |
| Watering | Every 1 to 4 days (soil-dependent) | Water until it drains from the bottom; never let roots sit in standing water |
| Light exposure | Daily | 4 to 6 hours minimum bright light; supplement with grow light if needed |
| Rotate pot | Weekly | Quarter-turn to encourage even growth on all sides |
| Check for pests or disease | Weekly | Look under leaves for insects; check soil surface for mold |
| Fertilize (once established) | Every 2 weeks in growing season | Half-strength balanced liquid fertilizer; stop in winter |
| Light pruning | As needed | Remove dead or crossing branches; never more than one-third at once |
| Clean debris from soil surface | Monthly | Prevents fungal buildup on the soil surface |
Pruning and styling basics
The included clippers are fine for light maintenance work at the seedling stage. For the first two to three years your focus should be on keeping the tree healthy rather than achieving a particular style. That said, a few simple practices now will make shaping easier later.
- Pinch or snip back the growing tip of the main trunk once it reaches a height you are happy with. This encourages side branching rather than upward growth and starts building taper.
- Remove any branches that cross over the center of the tree, grow directly downward, or are noticeably weaker than the others.
- Always cut just above a leaf node (the point where a leaf meets the branch) at a slight angle so water runs off the cut rather than sitting on it.
- Bonsai training wire can be used once the trunk is at least pencil-thick and the bark is somewhat firm. Wrap wire at a 45-degree angle and remove it before it cuts into the bark, typically after one growing season.
- Clean the clippers with rubbing alcohol between trees if you are working on multiple plants. This prevents spreading any fungal or bacterial issues.
Troubleshooting the most common problems
Seeds not germinating
If you are past four weeks with no sprouts, check three things: temperature, moisture, and whether the species needed cold stratification first. Seeds that need stratification will not germinate without it. For species that do not require stratification, the most common causes of failure are soil that is too dry, soil that is constantly waterlogged, or temperatures that are too cold. Try moving the pots somewhere warmer. It is also worth planting multiple seeds per pot because germination rates for commercially packaged tree seeds are often variable, and even well-managed kits can have individual seeds that do not sprout.
Seedlings collapsing at the base (damping-off)
Damping-off is a fungal disease where seedlings appear healthy one day and then collapse at the soil line the next. It is caused by overwatering, poor drainage, lack of airflow, or contaminated growing media. The Grow Buddha soil discs are designed to be sterile, but if your environment is very humid and you are keeping a plastic bag over the pots continuously, you are creating ideal fungal conditions. Prevention: remove the humidity dome once seeds have sprouted, improve airflow, water from below if possible, and avoid letting the surface of the soil stay wet for extended periods. Once a seedling has damped-off there is unfortunately no saving it, but you can prevent it from spreading to neighboring pots by removing the affected seedling and its soil immediately and treating the remaining pots with a diluted solution of hydrogen peroxide in water (1 part 3 percent hydrogen peroxide to 9 parts water) applied to the soil surface.
Yellowing leaves
Yellow leaves are usually a watering or light problem. Overwatered roots cannot take up nutrients effectively, causing leaves to yellow even when the soil looks moist. Let the soil dry out more between waterings and check that the drainage hole is not blocked. If the soil is appropriately moist but light levels are very low, the tree is not photosynthesizing efficiently and will slowly decline. Move it to a brighter spot or add a grow light.
Leggy, stretched-out seedlings
If seedlings are growing very tall and thin with wide spacing between leaves, they are searching for more light. This is called etiolation, and it produces weak, unattractive growth that is hard to correct later. Move the seedling to the brightest available location immediately and consider adding a grow light if the problem persists.
Mold on the soil surface
A thin white or gray film on the soil surface is usually surface mold from a combination of high moisture and low airflow. Scrape the top layer off, allow the surface to dry more between waterings, and improve air circulation around the pots. This is cosmetic in most cases and will not kill established seedlings, but it can be a warning sign that conditions favor damping-off.
Realistic timeline: what to expect and when
| Stage | Approximate timeframe | What to expect |
|---|---|---|
| Soil expansion and planting | Day 1 | Discs fully expand in 5 to 10 minutes; seeds planted at 1/4 inch depth |
| First germination (fast species) | 1 to 4 weeks | Flame Tree, Jacaranda, and Pomegranate often sprout first; others slower |
| Stratified species germination | 8 to 14 weeks (after cold treatment) | Blue Spruce, Wisteria, and similar species emerge after cold period ends |
| Transplant to bonsai pot | When seedlings reach 5 to 10 cm (about 2 to 4 months) | Roots established enough to survive the move |
| Active growth, building trunk | Year 1 to 2 | Focus on health, light, and watering; minimal styling |
| First bonsai training possible | Year 2 to 3 | Light pruning and initial wiring as trunk thickens |
| Recognizable bonsai form | Year 3 to 5+ | Depends heavily on species and your training decisions |
| Display-quality bonsai | 5 to 10+ years | Realistic benchmark for patient growers; varies significantly by species |
This timeline can feel discouraging when the packaging shows beautiful styled trees. The honest reality, backed by established bonsai cultivation guidance, is that seed-grown bonsai require years of patient work. The kit gives you a genuine, enjoyable starting point. Just do not expect a styled tree by next spring.
How the Grow Buddha Kit compares to similar bonsai kits
The bonsai kit market is full of options at similar price points, and the differences between them matter for choosing the right one. Here is how the Grow Buddha kit stacks up against some comparable options.
| Feature | Grow Buddha Kit | Jonsteen Company Kit | Generic mass-market kits |
|---|---|---|---|
| Seed variety | 4 to 8 species depending on SKU | Typically single species, higher quality seeds | Variable; often unspecified species |
| Soil included | Expandable compressed discs | Seed-starting mix or similar | Often compressed pellets or basic mix |
| Instruction quality | 20-page PDF plus video tutorials | Detailed species-specific guide | Minimal; often translated poorly |
| Pot quality | Plastic bonsai pot plus biodegradable pots | Small ceramic or plastic pot | Basic plastic; often no drainage |
| Price range | Budget to mid-range | Mid-range | Budget |
| Best for | Beginners wanting variety and guidance | Beginners wanting focused, reliable germination | Gift buyers; lower germination expectations |
If you want more focused, species-specific guidance with higher individual seed quality, the Jonsteen Company kit takes a different approach worth reading about alongside this one. For detailed, species-specific steps, see the Jonsteen Company bonsai grow kit instructions. For users comparing hydroponic bonsai setups, the Desert Rose Bonsai Hydro Grow Kit follows a completely different setup process involving water-based cultivation rather than soil discs, so the steps in this guide do not apply to that variant.
Honest review: pros, cons, and who should buy this kit
What works well
- The setup is genuinely beginner-friendly. Expanding the soil discs is satisfying and the planting steps are simple to follow.
- The variety of included species means you get to experiment with multiple trees from one purchase, which increases the chance that at least some will germinate well.
- The PDF instruction guide and video tutorials are a meaningful addition over bare-bones kits that only include a printed card.
- The included clippers are a practical touch that most competing kits at this price do not include.
- The biodegradable pots simplify transplanting because the root system can be moved with minimal disturbance.
Where it falls short
- Germination rates for individually packaged tree seeds in mass-market kits are inherently variable. User reviews on Reddit and product pages frequently mention seeds that did not sprout despite following instructions correctly. This is a category-wide issue, not unique to Grow Buddha, but it is worth being prepared for.
- The kit does not include a humidity dome or cover, which is a meaningful omission given how much germination success depends on consistent moisture. You will need to improvise one.
- The low seed count per species means you have limited attempts per type. Planting two seeds per pot as the manual suggests is wise, but if neither germinates you cannot retry that species without buying more seeds.
- Some user feedback on Trustpilot mentions QR code access issues. Scan the code immediately after unboxing and save the URL.
- The packaging implies bonsai results faster than the biology actually delivers, which can lead to disappointment if you are not aware of the realistic multi-year timeline.
Who should buy this kit
The Grow Buddha Bonsai Kit is a good fit for curious beginners who want a structured, low-cost entry into bonsai cultivation and are genuinely excited about growing from seed over the long term. It also works well as a gift for someone with patience and interest in houseplants or nature projects. It is not the right choice if you want a styled bonsai tree within a year, or if you need guaranteed germination on every species included. For that kind of reliability, single-species kits with vetted seed sources are a better bet.
FAQ
What must I research to write an accurate, model‑specific unboxing and kit‑contents checklist for the Grow Buddha Bonsai kit?
Count and identify every physical component (seed packets with printed species, premium plastic pot, biodegradable pots, compressed/expandable soil discs, plant tags, clippers, paperback manual, e‑book/video QR codes). Cross‑check against multiple authoritative sources: Grow Buddha product page(s) and SKU pages, the downloadable instruction PDF, third‑party retailer listings and unboxing videos to spot packaging/batch differences, and recent customer reviews for missing/damaged items. Evidence/verification steps: photograph contents, measure pot/tray dimensions, verify drainage holes, and confirm QR links/URLs resolve to the stated e‑guide or videos.
Which manufacturer documents should I consult to reproduce exact, model‑specific setup and planting steps?
Primary sources: Grow Buddha’s official product page and their downloadable INSTRUCTIONS GUIDE (the 20‑page PDF) for the kit’s stated soak times, seed sowing depths (≈1/4 inch/6 mm), stratification notes, germination windows, and transplant height (≈5–10 cm). Also check SKU variant pages (8‑seed vs 4‑seed kits) to ensure the instructions match the specific seed mix in your box. Verify video tutorial content listed on the product page/QR code against the PDF and actual practice during a hands‑on trial.
What horticultural references should I use to validate and expand the kit’s seed‑starting parameters (soak, depth, temperature, and stratification)?
Authoritative horticulture sources: Royal Horticultural Society (RHS) sowing guidance, university extension seed‑starting factsheets (e.g., UConn, Cornell, local extensions), and species‑specific propagation pages. These provide validated sowing depths, pre‑treatments (scarification/stratification), recommended germination temperatures, and timelines to cross‑check Grow Buddha’s claims and to produce conservative, evidence‑based alternatives when the kit’s instructions are generic.
Which sources are required to produce precise indoor lighting and placement guidance for kit users?
Controlled‑environment and extension lighting guides (Purdue HO‑249‑W, UMN Extension lighting notes) to translate PPFD/DLI targets into practical lamp heights and photoperiods. Supplement with hobby bonsai/light‑for‑seedlings guides and manufacturer specs for common home grow LEDs (to estimate µmol·m⁻²·s⁻¹ vs lux). Use these to give exact recommendations for distance from seedlings, daily light hours, and when to transition to brighter light after germination.
What research questions and sources should I consult for watering, media, and nutrient recommendations?
Research questions: composition, drainage, and expansion behavior of the supplied compressed soil discs; ideal moisture regime to avoid damping‑off; when to begin feeding and what fertilizer strength to use. Sources to consult: Grow Buddha instructions (for their baseline), university extension disease‑prevention fact sheets (damping‑off control), and general seedling fertilization guides from trusted horticulture sources. Because manufacturer does not provide a soil analysis, plan to test medium pH with strips and describe practical tests (expansion volume, drainage observation) and reasonable amendments or alternative potting mixes for long‑term growth.
Which references are needed to write a safe, practical pruning, wiring and styling basics section for beginners using this kit?
Bonsai education authorities: Bonsai Empire, Bonsai Garden, and reputable how‑to bonsai texts for seedling‑stage pruning timelines, basic wiring safety (when and how to wire without girdling), and species‑specific cautions. Use these to recommend when initial root pruning/transplanting and first formal training are appropriate (often several years for many species) and to create safe, step‑by‑step starter pruning actions for seedlings and young saplings from the kit.