Most water-based grow toys work the same basic way: you add a measured amount of clean water to a tray, mat, or container, place the kit near a bright window, and wait 3 to 12 days for seeds or a novelty figure to sprout or expand. The exact water amount matters more than people expect, and getting that right from the start is what separates a kit that works beautifully from one that sits on your counter growing mold instead of plants.
Grow Toys in Water Instructions: Step-by-Step Setup

Marcus Thornfield
17 May 2026
What 'grow toys in water' usually means
The phrase covers a pretty wide range of kits, so it helps to know which type you're actually holding. The most common categories you'll find in stores and online are:
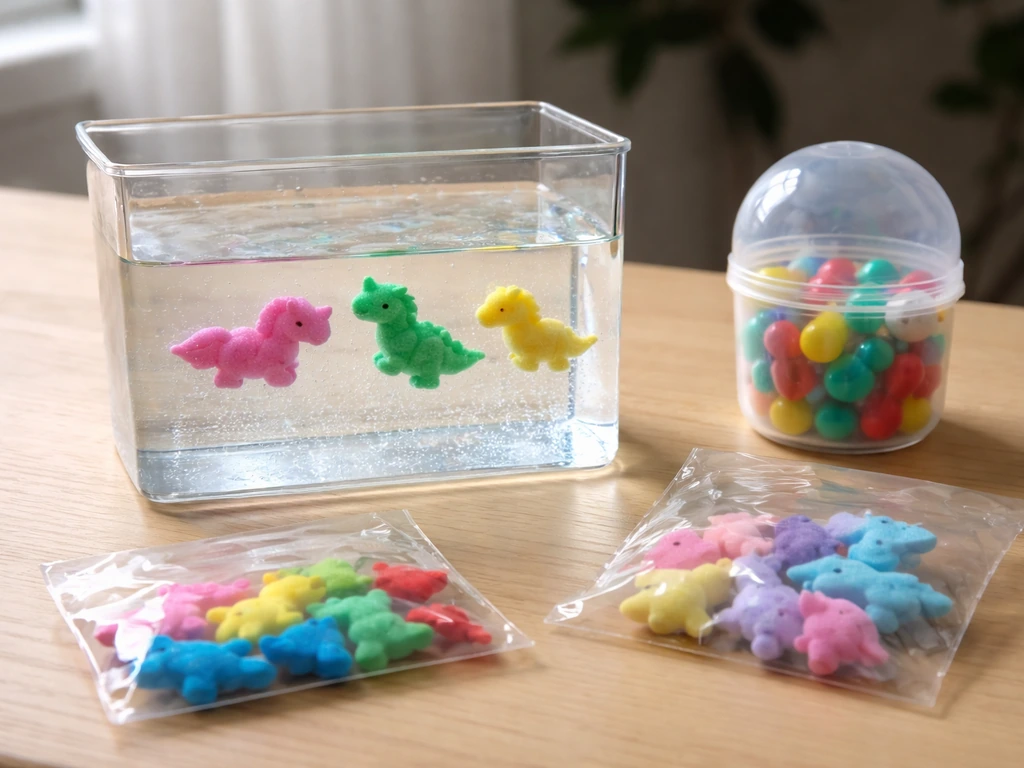
- Novelty expansion toys: foam or polymer figures (dinosaurs, unicorns, yetis, and similar characters) that physically swell when submerged in water. These don't grow plants at all — they just absorb water and expand over 24 to 72 hours.
- Seed-starting or microgreens grow kits: trays, pods, or mats that come with pre-seeded media or loose seeds. You add water to the tray or mat, and actual seeds germinate and sprout — microgreens kits like Micropod-style trays are the most common here.
- Terrarium-style novelty kits: lidded containers (sometimes glow-in-the-dark) where you layer gravel, soil, and seeds, then mist to create a mini self-contained growing environment. The Creativity for Kids Grow and Glow Terrarium is a well-known example.
- Hydroponic novelty kits: simplified hydroponic setups where roots grow directly in water, often in a small decorative container with a net cup or sponge holding the plant above the water line.
- Substrate activation kits: kits (like mushroom grow bags) that require an initial water-soaking step to activate the growing medium before the real growth phase begins.
If your kit came with a foam or polymer character figure, you're working with the expansion toy style, which is simpler, just submerge it in a bowl of cool water and let it swell. The rest of this guide focuses on kits that actually sprout or grow plants in water, since those require more precision. If you're specifically working with a dinosaur, unicorn, or yeti expansion toy, those have their own quirks worth knowing about.
Materials, setup, and safety basics
Most kits come with the core components included, but you'll almost always need a few things from home. Before you start, check your kit for these:
- The grow tray, pod, bag, or container (usually included)
- A grow mat, seedmat, growmat, or substrate block (included in most kits)
- Seeds or spores (included, sometimes in a separate packet)
- A lid or dome for humidity (included in terrarium and microgreens kits)
- A measuring cup or kitchen scale — seriously, don't skip this
- Clean drinking water (tap water is usually fine; if yours is heavily chlorinated, let it sit uncovered for 30 minutes before using)
- A spray bottle for misting kits that need it
- A clean workspace and clean hands
For safety, always use drinkable water in any kit where the grow medium gets submerged or soaked, this reduces contamination risk. Keep kits away from raw food prep areas, and wash your hands before handling seeds or substrate. If you're doing a kit with young kids, check the packaging for any small parts that could be a choking hazard, and make sure the kit isn't using any fertilizer or growing medium that shouldn't be touched without gloves (most novelty kits are safe, but it's worth a quick check).
Temperature matters more than most instructions let on. The sweet spot for most seed-starting and hydroponic grow toys is 20 to 27°C (68 to 80°F). Substrate-style kits like mushroom grow bags are more specific: blank" rel="noopener noreferrer">aim for 23 to 27°C and don't let them exceed 27°C, or you risk killing the growing material before it even starts. blank" rel="noopener noreferrer">A windowsill is often the right spot for light, but avoid direct midday sun blazing through glass, which can cook a small tray fast.
Step-by-step: how to actually set up and start your grow toy

These steps cover the most common kit types. Read through all of them first, then follow the path that matches your kit. Grow-unicorn-in-water instructions are usually one of these paths, so make sure you match the exact kit type before you start grow unicorn in water instructions. If you’re using a Crayola Grow-With-Me Easel, follow the specific my first crayola grow-with me easel instructions that came with your box so your timing and water level match that exact kit.
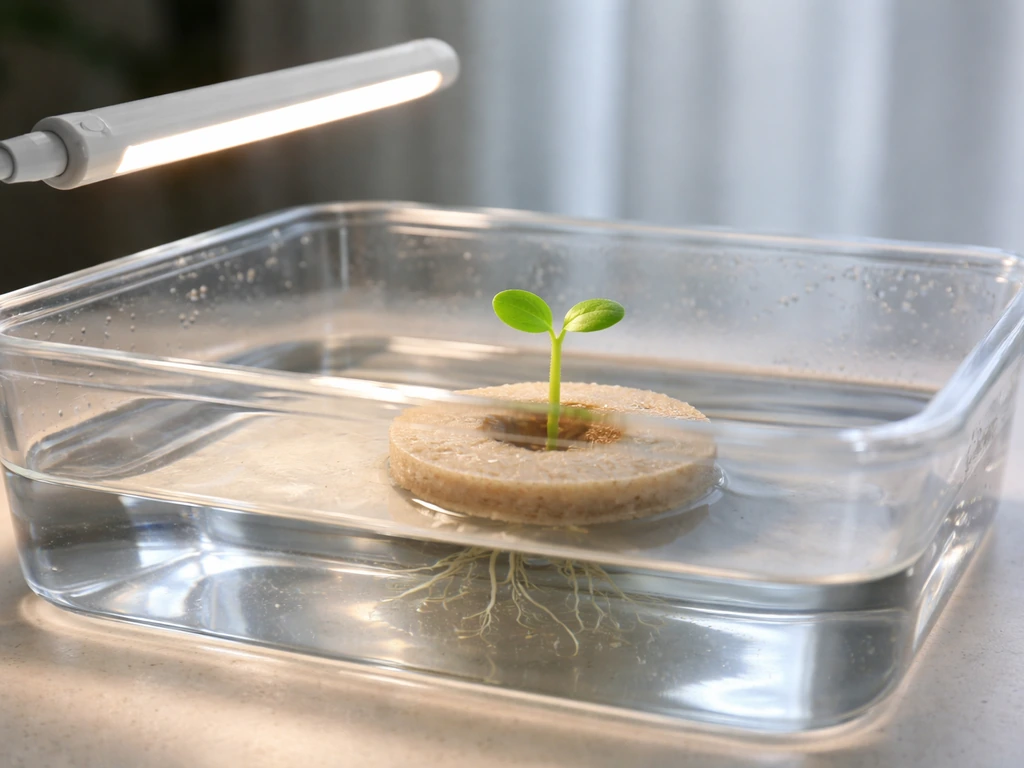
For microgreens-style tray kits (Micropod and similar)
- Measure your water precisely. Micropod-style kits specify exact amounts by tray size: Mini Starter Kit uses 280 mL, the Starter Kit uses 550 mL, the Continuous Grow Kit uses 280 mL per pod, and the Micro Garden Kit uses 850 mL. If your kit has different sizing, check the manual — but if you're missing instructions, 280 to 550 mL for a small-to-medium tray is a solid starting point.
- Pour the measured water into the base tray, not on top of the mat or seeds.
- Place the honeycomb grill or platform over the water (if your kit includes one), then lay the grow mat flat on top of it. The mat should sit above the water, not sitting in it — the water wicks up from below to keep the mat moist.
- Spread your seeds evenly across the surface of the mat. Don't pile them up. Even coverage means even germination.
- Place the lid or dome on top. This traps humidity and kickstarts germination.
- Put the tray on a windowsill with good natural light — a spot that gets a few hours of indirect or gentle direct light each day works best. Avoid dark corners or rooms with no windows.
- Wait 2 to 4 days for the first sprouts to appear. Full harvest for microgreens kits is typically 7 to 12 days from setup.
For terrarium-style kits (Grow and Glow and similar)
- Layer the materials in the container in the order shown in your kit's diagram — usually gravel or pebbles first, then soil or growing medium, then seeds on top.
- Mist the surface with water until the top layer is damp but not waterlogged. You're looking for moisture, not puddles.
- Add a small amount of water to the base if your kit has a gravel drainage layer — just enough to sit at the very bottom without saturating the soil above.
- Place the lid on the container to create a humid environment. Many terrarium kits are semi-sealed and mostly self-watering once set up.
- Place in indirect light — terrarium kits with lids can overheat in direct sun, so a bright spot away from the window is often better.
- Expect first sprouts in 3 to 5 days if the moisture and temperature are right.
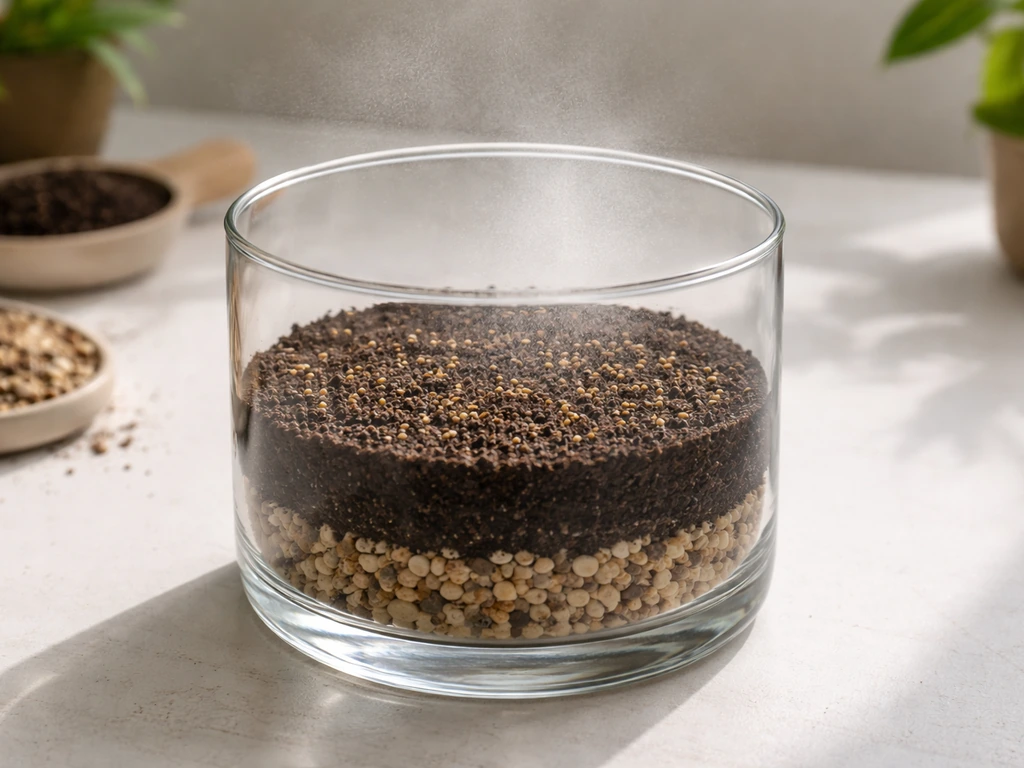
For substrate activation kits (mushroom grow bags and similar)
- Before doing anything, inspect the bag or block. If you see green, black, red, or pink colors in the substrate, stop — that's contamination. Safe colors are white or yellowish-white only.
- Fill a clean container with drinkable water. Submerge the sealed grow bag in the water and refrigerate for 9 to 24 hours. This is the cold-shock activation step.
- After soaking, remove the bag from the fridge, drain off the excess water, then add approximately 150 mL of fresh drinkable water directly into the grow bag as directed.
- Seal or fold the bag as instructed and move it to a spot with the right temperature: 23 to 27°C. Keep it away from direct heat sources, drafts, or anywhere that could push it above 27°C.
- First visible growth typically appears within a few days to a couple of weeks depending on the kit type.
Troubleshooting: when things aren't growing right
This is where most people end up searching for help, so let's go through the most common problems and what's actually causing them.
No growth or very slow growth
The most common cause is too little water or too much, the mat or substrate dried out or got waterlogged. Check whether the grow mat or soil feels moist when you press it lightly. If it's bone dry, add water in small amounts (50 mL at a time for small kits) and re-dome the lid. If it's soggy and waterlogged, remove the lid for a few hours to let it breathe, then drain any pooled water. Temperature is the second thing to check: a cold room (below 18°C) will massively slow germination. Move the kit somewhere warmer and give it another 2 to 3 days before deciding it's failed.
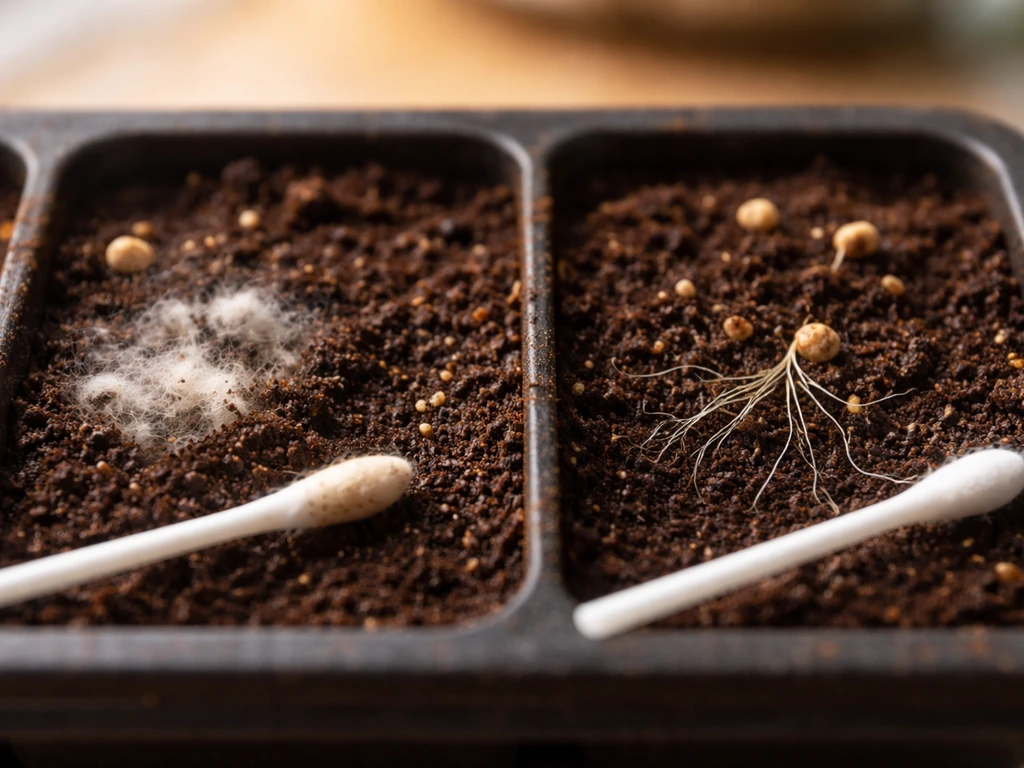
Mold on seeds or growing medium
A tiny bit of fuzzy white growth on seeds is normal, it can be root hairs rather than mold. The test: if it wipes off easily and the seeds underneath look healthy, it's probably fine. True mold is usually greenish, grayish, or black, and it smells musty. Fix it by increasing airflow (crack the lid or remove it entirely for a couple of hours each day), reducing water, and making sure the tray isn't sitting in standing water. If mold has spread across most of the surface, that grow is unfortunately done, clean the tray thoroughly and start fresh.
Algae, cloudy water, or green slime
Algae grows when water is exposed to too much light. If you're seeing green tint in the water reservoir or slimy green buildup on the tray walls, move the kit out of direct sunlight. For hydroponic-style kits where roots sit in water, covering the reservoir with foil or an opaque material to block light from the water helps a lot. Change the water completely, rinse the container, and get the kit back to a spot with indirect light rather than direct sun.
Bad smell
A sour or rotten smell usually means stagnant water and bacterial growth, often paired with overwatering. Drain the water completely, rinse the tray or container with clean water (no soap unless you rinse extremely thoroughly afterward, since soap residue kills seedlings), and refill with fresh water at the correct measured amount. Going forward, change the water on a regular schedule rather than just topping it up.
Wrong texture, slimy sprouts, or collapsed growth
Slimy or mushy sprouts almost always mean too much moisture sitting on the plant material itself, combined with poor airflow. This is common when the dome lid is left on too long past the germination stage. Once sprouts are a centimeter or two tall, most kits benefit from the lid being propped open or removed entirely. If the sprouts are tall and thin (leggy), they need more light, move the kit closer to a window.
Overheating or cold stress
A windowsill in summer can get surprisingly hot behind glass. If the tray or container feels warm to the touch, move it back from the glass or choose a different spot. Cold stress shows up as seeds that simply refuse to germinate despite having the right water level, check room temperature and aim for at least 20°C for most seed-starting kits.
Contamination in substrate kits
For mushroom grow bags and similar substrate kits, contamination is a hard stop. If you see green, black, red, or pink patches in what should be white substrate, don't try to salvage it. Seal the bag tightly and dispose of it. Green contamination in particular (usually Trichoderma) spreads fast and can't be reversed. The good news is that contamination usually means a faulty batch, and most reputable kit companies will replace it if you reach out with a photo.
Keeping the water clean and healthy during growth
For kits with a water reservoir (microgreens trays, hydroponic novelty kits), the goal is to keep the water fresh enough that it's not becoming a bacterial soup. Here's what that looks like in practice:
- Change the water every 2 to 3 days for hydroponic-style kits where roots are submerged. Don't just top it up — dump the old water, give the reservoir a quick rinse, and refill with fresh measured water.
- For microgreens mat-style kits, top up the tray water to the original measured amount every day or two rather than doing full water changes, since the mat acts as a buffer.
- Keep the kit away from direct sunlight on the water reservoir. Light exposure is what triggers algae growth, so blocking the reservoir from light while keeping the plant canopy well-lit is the balance you're looking for.
- Don't use fertilizer additives unless your specific kit instructions call for it. Most novelty grow kits are designed to work with plain water only, and adding fertilizer can burn seedlings or encourage bacterial growth.
- Wipe down the inside walls of the container or tray if you see any slime or residue building up — a clean cloth dampened with water is enough.
- Maintain room temperature in the 20 to 27°C range throughout the grow cycle, not just at the start. A sudden cold night can set growth back by several days.
For terrarium kits with lids, water management is simpler: the closed environment mostly takes care of itself. If condensation is heavy on the lid (to the point of dripping back down and waterlogging the soil), crack the lid slightly to let some moisture escape. If the soil looks dry and there's no condensation at all, mist lightly with a spray bottle and close it back up.
What happens at the end: harvesting, finishing, and what to do next
When and how to harvest microgreens kits
Microgreens are ready when they're 2 to 5 cm tall and the first set of true leaves has appeared (the second set of leaves after the initial seed leaves). For most kits, that's 7 to 12 days after setup. Use clean scissors to snip them just above the mat surface. Don't pull them out, cutting keeps the mat intact and, in continuous-grow kits, allows a second flush to grow from the same mat. Rinse the harvested greens under cool water before eating.
What to do when a terrarium kit is done
Most terrarium-style grow toys eventually reach a point where the plants outgrow the container or stop thriving. At that point, you can compost the soil and plant material (it's all biodegradable), clean the glass or plastic container, and either replant with new seeds or repurpose the container as a small decorative terrarium with succulent cuttings. The container itself is often the most reusable part of the kit.
When to call it and start over
If it's been 14 days with zero visible growth, the kit has almost certainly failed. Check whether the problem was water level, temperature, or contamination, then decide whether to try again. Most seed-starting grow toy kits are inexpensive enough that starting fresh with corrected setup conditions is the most practical move. These Dino World Megga Grow instructions can help you troubleshoot slow or failed growth, too. Some kit brands include replacement seed packs or offer them separately, which is worth looking into before tossing the whole tray.
Disposal and reuse options
| Kit type | End-of-grow disposal | Reuse potential |
|---|---|---|
| Microgreens tray kit | Compost used grow mat and root mass; rinse tray | High — tray and grill last many cycles with new mats |
| Terrarium-style kit | Compost soil and plant material | Medium — container can be repurposed for new seeds or succulents |
| Hydroponic novelty kit | Dispose of used growing sponge; clean container | High — refill with new sponge and seeds for another cycle |
| Substrate grow bag (mushroom) | Compost spent substrate block or use as garden mulch | Low — bag is single-use; block can sometimes produce a second flush |
| Expansion foam/polymer toy | Not compostable; dispose in regular trash | Low — novelty item, no replanting function |
The grow toy category is broader than it looks at first glance, which is why instructions can feel confusing when your kit doesn't quite match the generic advice you find online. If you want grow-your-own unicorn instructions, start by matching your kit type to the right water method, since the same advice does not apply to every style. Whether you're growing microgreens in a Micropod-style tray, tending a glow terrarium, or watching a novelty dinosaur or unicorn figure swell in a bowl of water, the core principles are the same: right water amount, right temperature, right light, and clean conditions throughout. Get those four things right and most kits will do exactly what they promise.
FAQ
Can I use tap water to grow toys in water instructions recommend drinkable water instead, what’s the risk?
Tap water is fine only if it is not heavily treated or mineral-rich. If your tap tastes or smells strongly (chlorine, sulfur), use filtered water instead, and let it sit for a few hours so any chlorine can dissipate. The main risk of questionable water is faster bacteria and algae growth, which shows up as sour smell, slimy trays, or fuzzy contamination.
What should the water level look like during the grow toys in water instructions period?
For reservoir-based kits, the water should cover the intended wicking area or reservoir fill line, not float the whole mat. For mat-style kits, the mat should feel evenly moist, not dripping. If you need to add water, top up in small measured amounts, then recheck after 1 to 2 hours because the mat can keep absorbing.
How often should I change or refresh the water in hydroponic or reservoir grow toys?
If the kit uses a reservoir, plan on replacing the water on a regular schedule instead of repeatedly topping up, especially in warm rooms. A practical approach is to refresh every 1 to 3 days depending on temperature and whether you notice cloudiness. If the kit has a covered or opaque reservoir, you can stretch the interval slightly, but any sour odor means immediate drain and refill.
Is fuzzy white growth on seeds always mold, or can it be root hairs?
Fuzzy white growth is often root hairs or normal early seed activity, especially if it wipes off easily and the seeds look healthy underneath. Mold is more likely when it has a musty smell, spreads quickly, or changes color toward gray, green, black, or pink. If you are unsure, increase airflow and reduce moisture first, then observe for 24 hours.
My sprouts look slimy or mushy, but the water level seems correct. What else could be wrong?
Sliminess usually comes from plant material staying wet with poor airflow, not just from the measured water amount. Check whether the dome or lid is staying closed too long after germination. Once sprouts reach about 1 to 2 cm, propping the lid open or removing it usually improves airflow and prevents mushy tissue.
Can I add fertilizer or plant food to make growth faster in grow toys in water instructions?
Generally no, only use what the kit provides, because many novelty grow toys are designed without extra nutrients. Added fertilizer can raise bacterial growth and contaminate the reservoir, leading to algae or sour smells. If the kit specifies a safe additive, measure exactly as instructed, otherwise skip it and focus on light, temperature, and correct water level.
Do I need to rotate the tray or container for even growth?
Rotating helps when the kit is near a window and light comes mostly from one direction. Turn the container a quarter turn daily or every other day to reduce leggy, uneven growth. Avoid exposing the kit to direct harsh midday sun during rotation, since sudden heat spikes can stall growth.
What’s the safest way to clean the container and reuse it after a failed attempt?
Clean the tray and container thoroughly with clean water first, then use mild soap only if the kit instructions require it. If you used soap, rinse extremely well because residue can harm seedlings. After cleaning, let everything dry completely before restarting, then re-measure the water amount rather than guessing.
When I harvest microgreens, should I rinse with warm or cold water and do I need to dry them?
Rinse with cool water to avoid wilting and then drain thoroughly. Excess water clinging to greens can shorten shelf life and encourage spoilage. After rinsing, blot gently with a clean towel or allow them to air-drain until surfaces are not dripping before storing or eating.
Can I restart the same kit after 14 days with no growth, or should I replace everything?
If the issue was likely water level, temperature, or airflow, starting fresh with corrected conditions is usually the best move. If you suspect contamination, especially colored patches, don’t reuse the same substrate or mat, because the spores can persist. For refill-friendly kits that include replacement seed packs, use the new seeds after cleaning to avoid repeating a weak batch.
How do I tell if algae is only in water tint versus a bigger contamination issue?
Algae usually shows as green tint in the reservoir or slimy green buildup on tray walls, and it often improves quickly after reducing light to the water. If you see distinct colored spots spreading across substrate (especially green, pink, red, or black) plus a musty or sour smell beyond algae, treat it as contamination and discard according to the kit guidance.