The Buzzy Cactus Grow Kit works well when you follow one key rule: be patient and stay dry. Cactus seeds take 1 to 3 months to germinate, and the single biggest mistake people make is overwatering while they wait. If you hydrate the growing medium correctly at the start, cover it with plastic wrap to hold humidity, keep it somewhere warm and bright (70°F to 80°F is the sweet spot), and resist the urge to water again and again, you'll get seedlings. Here's exactly how to do all of that, step by step.
Buzzy Cactus Grow Kit Instructions: Step-by-Step Guide

Marcus Thornfield
23 May 2026
What's in the kit and who it's really for
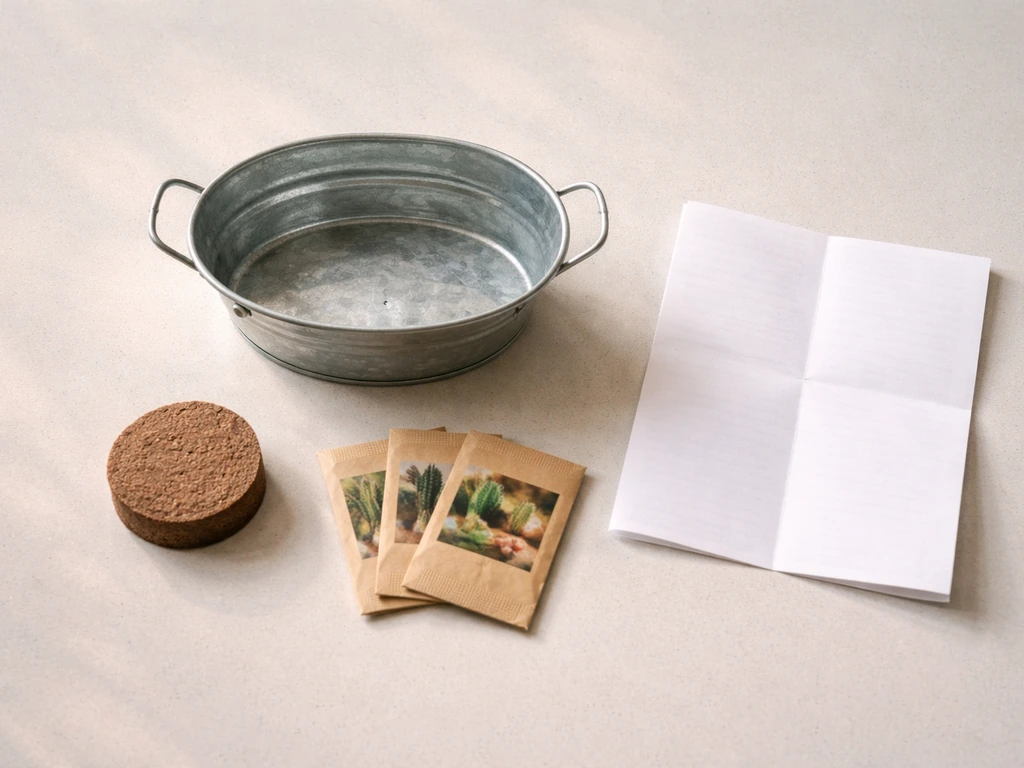
The Buzzy Cactus Grow Kit is an all-in-one starter setup. This kit is listed as “all-in-one” and includes cactus mix seeds, a galvanized mini basin, growing medium, and easy-to-follow growing instructions all-in-one starter setup. Depending on which version you picked up, you'll find a small decorative container (often a galvanized mini basin), a compressed growing medium pellet or disc that expands when you add water, one or more cactus seed packets (the Desert Trio version includes a mix of cactus varieties), a plastic cover or instructions for making one, and a printed instruction sheet. That's genuinely everything you need to get started, which is the whole point.
This kit is designed for beginners, desk gardeners, and people who want a low-effort, high-reward project. It's especially popular as a gift, and it doubles as a decorative piece while the seeds do their thing. If you've killed every plant you've ever owned, cacti are a forgiving reboot. If you're already an experienced grower, the kit is a tidy way to start a few seedlings without hunting down specialty cactus mix and tiny containers separately. It's a bit smaller than what a serious collector might prefer, but it does the job.
Compared to something like the Buzzy Succulent Grow Kit, the cactus kit demands even more restraint with watering once seeds are in the ground. The germination timeline is also longer than you'd see with the Buzzy Tomato or Buzzy Lavender kits, so go in knowing this is a slow burn, not a quick win. If you want faster results and more specific start-to-finish timing, the buzzy tomato grow kit instructions follow a similar process but with a shorter germination window. If you are comparing to the buzzy lavender grow kit instructions, the same general waiting game applies, but the exact germination timing may vary by variety Buzzy Lavender kits.
Before you plant: what to gather and where to set up
You don't need much beyond what's in the box, but a few things will make the process easier. Grab a measuring cup (you'll need 3/4 cup of water to hydrate the growing medium pellet), a fork or spoon for fluffing the expanded medium, a piece of plastic wrap or a resealable plastic bag to create a humidity dome, and a spray bottle if you want to mist the surface without flooding it. That's it.
Location matters more than most people expect. You want a spot that gets bright, indirect light for most of the day. A south- or east-facing windowsill is ideal. Avoid a spot that gets blasted by harsh afternoon sun through glass during germination, because that can dry out the medium too fast and cook tiny seedlings. Once you've got seedlings, direct sun becomes your friend, but during the germination phase, bright and warm beats scorching hot.
Do a quick safety check before you start: make sure the basin or pot has some way for excess water to drain or evaporate (the mini basin is small enough that the growing medium will dry out naturally between sessions). Keep the kit away from drafts, air conditioning vents, and heaters that blow dry air. Stable warmth is what cactus seeds need. Anything below 65°F will slow germination down significantly, and temperature swings between day and night can stall the process entirely.
Step-by-step setup: from unboxing to planting
- Open the box and lay everything out. Check that you have the basin, the growing medium pellet/disc, the seed packet(s), and the instruction sheet. Read through the included guide once before you do anything.
- Measure out 3/4 cup (about 180ml) of room-temperature water. Pour it slowly over the compressed growing medium pellet in the basin. Let it sit for a few minutes and watch it expand. It should roughly triple in volume.
- Once fully expanded, use a fork or your fingers to fluff the medium so it's loose and evenly distributed in the basin. You want it to fill the container without being packed down tightly.
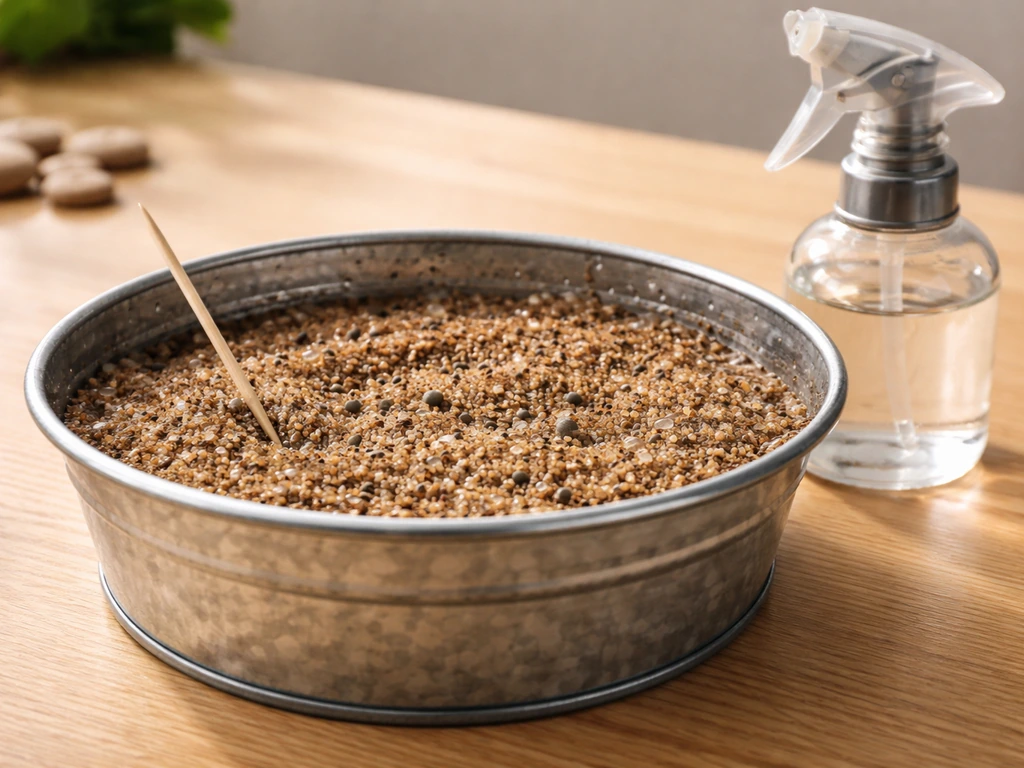
- Check the moisture level: the medium should feel damp throughout but not waterlogged. If water pools at the bottom of the basin, blot it gently with a paper towel. You want moist, not soggy.
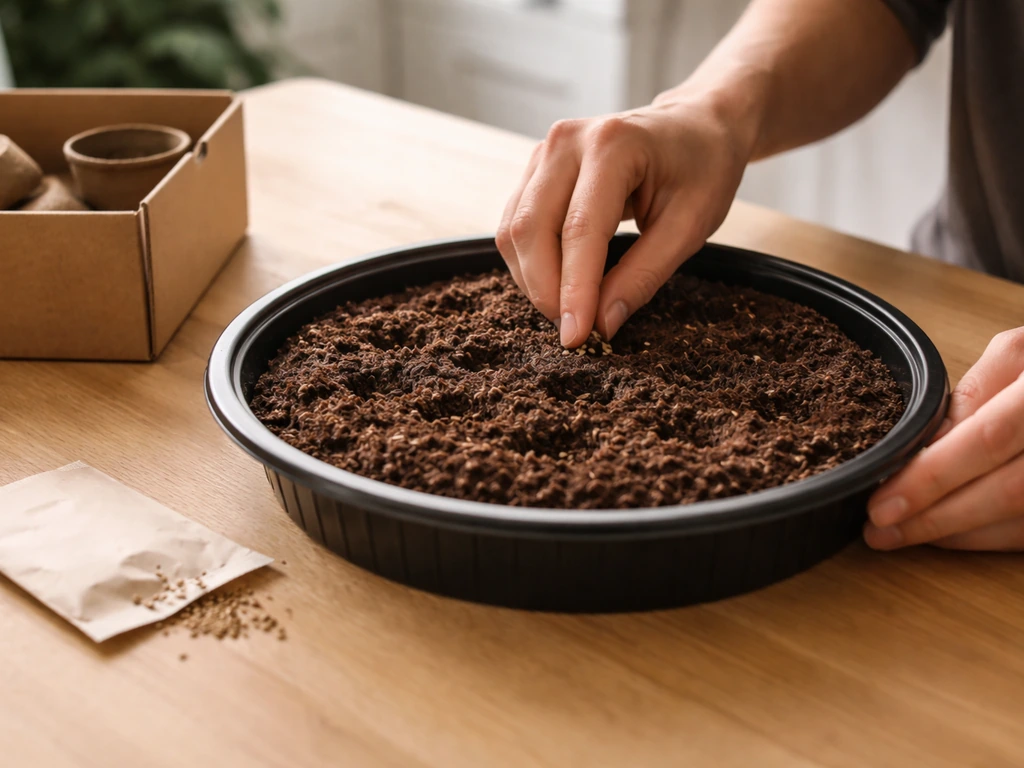
- Open your cactus seed packet. The seeds will be tiny, often smaller than a grain of sand. Don't lose them to a breeze. Work close to your setup.
- Sprinkle the seeds evenly across the surface of the growing medium. Try to space them out, but don't stress about perfect spacing. These are tiny seeds in a small basin.
- Gently press each seed into the surface of the medium with a fingertip or the back of a spoon. Then sprinkle the thinnest possible layer of growing medium over the top, barely enough to cover them. The instruction PDF calls this out specifically: a thin cover only.
- Cover the basin with plastic wrap or seal it inside a resealable bag. This creates a mini greenhouse that holds in humidity and warmth during the long germination window.
- Place the covered basin in your chosen bright, warm spot (70°F to 80°F). Don't disturb it for at least a few weeks.
How to water and manage the seeds during germination
Here's the part where most people go wrong. Because cactus seeds take so long to sprout (anywhere from 4 weeks to 3 months is completely normal), it's tempting to keep checking, adjusting, and adding water. Follow those same basic steps in your buzzy forget-me-not grow kit instructions to keep the seeds moist and the conditions consistent while they germinate. Resist that urge. The plastic wrap cover is doing the work of keeping moisture in, so you shouldn't need to add water frequently at all during germination.
Check the medium every week or so. If it still looks and feels damp, leave it alone. If the surface looks like it's starting to dry out, use a spray bottle to mist the surface lightly, then reseal the cover. Never pour water directly into the basin during this phase. The growing medium is already hydrated and the seeds just need consistent warmth and humidity, not repeated watering.
Sowing depth is worth repeating: cactus seeds are surface-sown with only a whisper of medium on top. Burying them deeper than a millimeter or two will prevent germination entirely. If you're unsure whether you covered them too much, that's fine. Err on the side of too little cover rather than too much.
Ongoing care once the seeds are in
Light
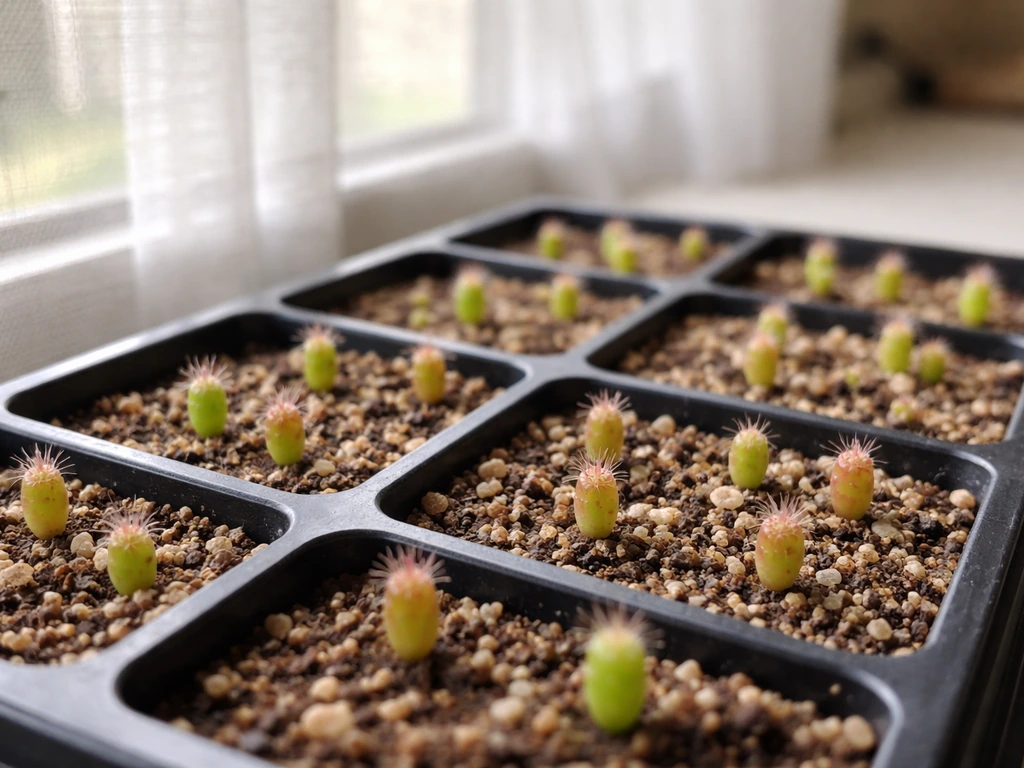
Bright light is non-negotiable for cactus seedlings. Once you start to see tiny sprouts (which will look like small green or reddish bumps at first), they need as much bright light as you can give them. A south-facing window is ideal. If you're in a low-light home, a grow light placed 4 to 6 inches above the seedlings for 12 to 14 hours a day will work well. Without enough light, you'll get etiolated (stretched and pale) seedlings that are weak and hard to recover.
Temperature and airflow
Keep temperatures between 70°F and 80°F throughout germination and early growth. Once seedlings are established, they can handle a wider range, but those first few months in the kit are the most temperature-sensitive. Once you remove the plastic cover after germination, introduce airflow gradually. A bit of gentle air circulation (from a fan on the lowest setting, pointing away from the seedlings) helps prevent mold and strengthens the tiny stems. Don't blast them with cold air, but stale, still air in a covered container gets old fast once sprouts appear.
Watering after germination
Once seedlings appear and you've removed the plastic cover, switch to a water-when-dry routine. Let the top of the medium dry out completely between waterings. For a small basin, that might mean watering once every 10 to 14 days in summer and even less in winter. Use a spray bottle or pour a small amount of water at the base. The goal is to mimic the natural desert cycle of wet and dry, not to keep things constantly moist.
Fertilizing
Don't fertilize until your seedlings have developed tiny visible spines. That's the signal that they're established enough to handle nutrients. Once you see spines, apply a balanced liquid fertilizer diluted to half strength, and only feed a few times during the growing season (spring through early fall). Overfeeding small cactus seedlings can burn their roots.
What to do when things go wrong
Nothing's sprouting after weeks
First, check the temperature. If your setup spot drops below 65°F at night, that's likely the culprit. Move the kit to a warmer location and give it more time. Cactus seeds can take up to 3 months, so anything before the 6-week mark is still within the normal range. Also check that the plastic cover is actually sealed. If the medium has dried out under the cover, that's your problem: mist it lightly, reseal, and wait.
Mold on the surface of the medium

White or grey fuzz on the surface usually means the medium is too wet or there's no airflow. If seeds haven't germinated yet, remove the cover for an hour each day to let moisture escape, then reseal. If it's widespread, you can gently scrape the affected area off with a spoon and sprinkle a tiny pinch of cinnamon on the surface (a natural antifungal). Once seedlings are up, remove the cover and improve airflow to prevent mold from recurring.
Damping off (seedlings collapse at the base)
Damping off is a fungal condition that causes tiny seedlings to suddenly keel over right at the soil line. It's almost always caused by too much moisture and too little airflow. If you see this, remove the plastic cover immediately, let the medium dry out more between waterings, and add a gentle fan nearby. Unfortunately, individual seedlings that have already collapsed won't recover, but you can save the others by drying out conditions fast.
Leggy, stretched seedlings
If seedlings are tall, thin, and pale instead of compact and green, they're not getting enough light. This is called etiolation and it happens fast in low-light setups. Move the kit to a brighter spot right away. Etiolated growth can't be reversed on the existing stem, but better light from this point forward will produce healthier new growth. A grow light is worth the investment if your windows just can't deliver.
Pests on tiny cactus seedlings
Fungus gnats are the most common pest with any indoor grow kit, and they thrive in wet growing medium. Letting the surface dry out between waterings is the best prevention. If you see tiny flies buzzing around the kit, yellow sticky traps near the basin will catch adults, and allowing the medium to dry out more aggressively between waterings will break the lifecycle. Spider mites can also appear in hot, dry indoor conditions. If you notice fine webbing or stippled markings on seedlings, a light spray with diluted neem oil (1 teaspoon per quart of water) handles them well.
The realistic timeline and when to repot
| Timeframe | What to expect | What to do |
|---|---|---|
| Week 1–2 | Nothing visible; seeds settling in | Keep covered, warm, and leave alone |
| Week 3–6 | Possibly first signs of germination (tiny green bumps) | Check moisture weekly; mist if needed, reseal |
| Month 1–3 | Most germination happens in this window | Maintain warmth and bright light; patience is key |
| Month 3–6 | Seedlings growing slowly, developing shape | Remove cover, introduce airflow, ease into watering routine |
| Month 6–12 | Tiny spines appearing, growth accelerating slightly | Begin diluted fertilizing; assess pot size |
| Year 1+ | Crowded roots, outgrowing the basin | Time to repot into individual small cactus pots |
Cactus seedlings grow slowly, and the mini basin from the kit will hold them comfortably for the first year. When you start to see roots circling the bottom of the container or growth stalling despite good light and care, it's time to move them on. Repot into individual small terracotta pots (2 to 3 inches) filled with a commercial cactus and succulent mix. Handle seedlings with folded newspaper or tongs to protect yourself from spines. Repotting is best done in spring, when the plants are entering their growing season.
If you're transitioning the seedlings to a porch or outdoor setup, do it gradually. Start with a shaded outdoor spot for a week, then introduce more direct sun over 2 to 3 weeks. Going straight from a windowsill to full outdoor sun will cause sunscald, which looks like bleached or brown patches on the stems. A slow acclimatization period makes all the difference.
The Buzzy Cactus Grow Kit is a genuinely satisfying project if you go in with realistic expectations. The long germination window can feel discouraging, but the moment you spot the first tiny green sprout after weeks of waiting, it's worth every bit of patience. If you enjoy the slow, low-maintenance nature of this kit, the Buzzy Succulent Grow Kit follows a very similar setup process and pairs well as a companion project. If you want to grow other succulents at the same time, follow the buzzy succulent grow kit instructions for a similar, low-effort setup. If you want another hands-on project with a similarly step-by-step approach, follow buzzy bonsai grow kit instructions for your next mini garden.
FAQ
What should I do if my buzzy cactus grow kit medium dries out too much during germination?
Yes, but only if you use the surface-sowing rule. Remove the cover and let the top breathe, then use a spray bottle (not pouring) to lightly re-wet just the surface. If the medium looks soaked or smells sour, do not rehydrate further, instead increase venting time and wait longer between checks.
I’m worried the seeds might be covered too deeply. Can I fix that?
You can lose germination if the seeds get buried. If you suspect you covered them with too much medium, gently scrape off excess from the surface and keep the humidity dome on. If the seeds are already buried deeper, you usually cannot “rescue” them reliably, so expect a slower or reduced sprout rate.
How can I tell whether I should mist again, especially when there’s condensation under the cover?
Avoid cleaning or watering on a tight schedule. If you see condensation inside the plastic cover, that usually means humidity is high enough, not that you must add water. As a rule, only mist after the surface starts to look lighter or feel barely damp, then reseal.
My medium looks crusty, not evenly damp. Is that a problem, and how do I adjust it?
If you notice the surface crusting over, it often means the medium dried unevenly. Use a fine mist to dampen the surface lightly, then keep temperature stable and do not remove the cover for long periods. Crusting can also trap moisture at the top while deeper layers remain dry, so check by gently pressing with a clean fingertip 1 to 2 cm down.
Can I remove the plastic cover immediately after I see sprouts, or should I acclimate?
Yes, but it should be gradual and careful. When you remove the cover after sprouts appear, start with shorter “uncovered” windows and increase airflow over several days. A sudden exposure to dry indoor air can stress seedlings before they are ready.
My kit has been going for 6 weeks with no sprouts. Should I restart?
Cactus seeds can sprout at different times, so some variation is normal. If nothing appears by around 8 to 10 weeks, first verify night temps stay above 65°F and that the cover is sealed without pooling water. If conditions are right, continue waiting, since 1 to 3 months is still within the normal range.
Does water quality matter for buzzy cactus seedlings, and what’s the safest water to use?
Don’t use calcium-rich water carelessly, especially if you’re in a hard-water area. Use room-temperature water, and if you see mineral buildup on the medium surface, switch to filtered or distilled water for the next misting cycles to reduce salt stress on seedlings.
I want to speed things up with fertilizer. When is it actually safe to start feeding?
Fertilizing too early is the bigger risk than “no fertilizer.” If you do not see visible spines, wait. Once spines are present, feed only a few times with half-strength balanced liquid, and stop feeding by early fall to avoid soft growth.
If I still see fungus gnats, what should I change first in the kit routine?
Yellow sticky traps help with gnats, but they do not address the root cause. The key is allowing the top of the medium to dry completely between waterings. If gnats persist, increase the drying interval, check the medium for hidden moisture, and use traps closer to the basin rather than across the room.
How do I know if I’m seeing damping off versus just losing a couple seedlings?
If only a few seedlings die while others look okay, you likely have localized wetness at the surface. Remove the cover immediately, dry the surface more between waterings, and increase gentle airflow. If many collapse at the soil line, damping off is likely, and you should prioritize moisture reduction right away.
When should I move seedlings out of the mini basin, and what’s the safest transition?
Yes, assuming you move them at the right moment. Repot when roots begin circling or the seedlings stall, typically after the first year in the mini basin. Use small terracotta pots for extra drying capacity, and keep the first days slightly shaded to reduce shock.