
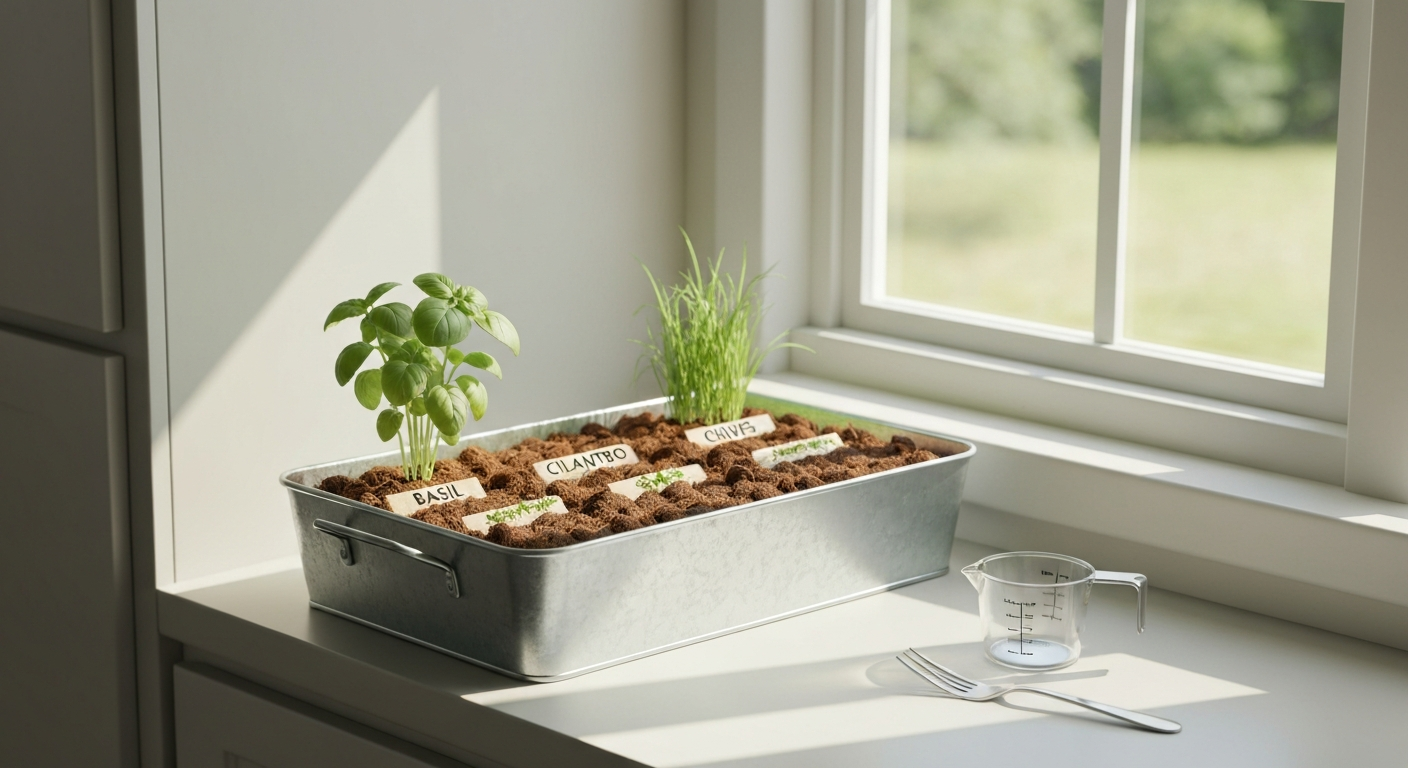
Fill the galvanized windowsill planter with your rehydrated coconut-husk pellet (dissolve the pellets in exactly 2¼ cups of water, fluff with a fork, and spoon the mix into the tray), sow each herb variety ¼ inch deep in its own section, mist gently, and set the whole thing on a south- or east-facing windowsill where it will get at least 6 hours of direct light per day. Basil and chives should sprout in 7–14 days; cilantro takes a little longer at 14–21 days. That is the core routine for the Buzzy Kitchen Herbs Grow Kit, and the rest of this guide fills in every detail so you actually get to eat what you grow. For focused, step-by-step basil setup and care, see the basil grow kit instructions.
Buzzy Kitchen Herbs Grow Kit Instructions: Setup Guide

Marcus Thornfield
16 Jul 2026
What this guide covers and who it's for
This walkthrough is written for anyone who has just unboxed a Buzzy Kitchen Herbs Grow Kit (or is seriously considering one) and wants practical, plain-language steps rather than a two-paragraph leaflet. The same Buzzy system powers several companion kits, including the Buzzy Basil, Buzzy Aloe, and Buzzy Mini Rose, so I have folded plant-specific tips for each of those into the relevant sections. Whether you have never started a seed in your life or you have just always struggled to keep windowsill herbs alive, this guide covers setup, daily care, troubleshooting, and what to do when things go sideways.
The Buzzy Kitchen Herbs kit at a glance, plus compatible pod options
The flagship kitchen herbs kit comes with basil, cilantro, and chives seeds in a single galvanized windowsill planter. Buzzy positions it as a countertop starter, meaning no special equipment and no hydroponic reservoir, just coconut-husk growing medium, seeds, and a sunny window. The same brand also sells the Buzzy Basil kit (a single-herb version good for high-volume basil harvests), the Buzzy Aloe Peaceful Pot (a compact succulent kit with an aloe seed and its own small decorative pot), and the Buzzy Mini Rose (seeds plus a terracotta or painted pail planter). These share the same coconut-pellet growing medium and similar care logic, but their watering volumes, light needs, and harvest styles differ enough to be worth calling out separately throughout this article.
Unboxing checklist: what should be in the box
Before you do anything else, lay everything out on a table and check it against this list. Missing or damaged items are worth catching now, not after you have already mixed the growing medium.
- 1 galvanized windowsill planter (herb kit) OR 1 small terracotta/decorative pot (aloe, mini rose, basil solo kit)
- 3 coconut-husk growing medium pellets for the herb kit (1 pellet for single-plant kits like aloe or basil)
- 3 seed packets labeled basil, cilantro, and chives (or the single-variety seeds for companion kits)
- Printed instruction sheet (check both sides — Buzzy sometimes prints tips on the reverse)
- Optional plastic humidity dome or cover sheet (present in desert/succulent variants, not always included in herb kits)
Inspect each pellet: it should be a firm, dry disc. A crumbled or powdery pellet has likely gotten damp in transit and may not expand evenly. Check seed packets for tears or moisture damage, damp seeds before planting can mean poor germination rates. If anything looks wrong, take a photo right away and contact Buzzy support before planting. Buzzy offers a Grow Guarantee that covers free seed-packet replacements if seeds fail to germinate, so document everything from the start.
What the kit does NOT include
Buzzy windowsill kits do not come with a grow light, a heat mat, or a liquid fertilizer. Those are optional extras that significantly improve your success rate, especially in winter or in rooms without a strong south-facing window. I will get into the specifics below, but factor them into your budget if your space is on the darker side.
Tools and optional extras to gather before you start
You do not need much, but having these on hand before step one makes the process smoother and reduces the chance of fumbling around mid-setup.
| Item | Required or Optional | Notes |
|---|---|---|
| Measuring cup (holds at least 2¼ cups) | Required | For precise pellet hydration — guessing the volume is a common reason pellets end up too wet or too dry |
| Fork | Required | Buzzy specifically instructs using a fork to fluff the expanded pellet into loose growing medium |
| Spray bottle or gentle watering can | Required | Misting is safer than pouring directly onto seeds, especially for tiny herb seeds |
| Permanent marker or plant labels | Recommended | Label each section of the tray with the herb variety — they look identical as seedlings |
| Liquid balanced fertilizer (e.g., 20-20-20 or similar) | Recommended | Not included; needed once seedlings reach their second set of leaves |
| Seedling heat mat | Optional but helpful | Basil and aloe germinate faster at 70–80°F; a mat helps in cooler rooms |
| LED grow light with timer | Optional but helpful | Critical if your window gets less than 6 hours of direct sun; seedlings need 16–18 hrs/day under a lamp |
| Small humidity dome or plastic wrap | Optional | Speeds germination by trapping moisture; remove as soon as seedlings emerge |
Step-by-step setup walkthrough
Work through these steps in order. I have included image suggestions at the relevant points so your photos match what you will actually see if you are following along on a phone while assembling the kit.
- Measure 2¼ cups of room-temperature water and pour it into a bowl or directly into the planter. (For aloe/desert kits, use ¾ cup instead.) IMAGE SUGGESTION: overhead shot of a measuring cup being poured into the galvanized planter.
- Drop all three coconut-husk pellets into the water. Wait 5–10 minutes until they fully expand — they will swell from a flat disc into a loose pile of dark, fibrous material. IMAGE SUGGESTION: side-by-side before/after of a pellet dry vs. fully expanded in the planter.
- Fluff the expanded pellets with a fork until the mixture is loose and evenly distributed across the planter. It should look like very dark, moist potting compost with visible fiber strands. If water is pooling at the bottom, tip the planter slightly to drain the excess.
- Divide the planter visually into three equal sections if growing all three herbs. Use a plant label or the blunt edge of a butter knife to mark a gentle dividing line. This keeps varieties separate so you can track germination by species.
- Sow each seed variety in its own section. Sprinkle seeds across the surface first, then use your fingertip or the eraser end of a pencil to press them to ¼ inch deep. For cilantro, lightly crush the husked seeds between your fingers before sowing to improve germination contact. IMAGE SUGGESTION: close-up of fingers pressing seeds into dark growing medium.
- Mist the surface with a spray bottle until the top layer looks uniformly damp but not flooded. You are not trying to soak the medium again — just settle the seeds.
- Place the planter in a warm location (65–75°F) with as much natural light as possible. If using a humidity dome or loose plastic wrap, lay it over the top now and remove it the moment you see any seedling pushing through.
- Check moisture daily. The surface should never dry out completely during germination. Mist or add a small amount of water if the top half-inch feels dry to the touch. IMAGE SUGGESTION: finger pressing into growing medium to check moisture level.
Setup notes for the Buzzy Aloe and Buzzy Mini Rose kits
Aloe seeds are tiny and should be pressed lightly onto the surface of the growing medium rather than buried. For more detail, follow the Buzzy aloe grow kit instructions in the dedicated aloe setup and care section. Use ¾ cup of water for the pellet (not 2¼ cups), and do not compact the surface after pressing the seeds in. The Buzzy Aloe Peaceful Pot is a smaller vessel, so it dries out slightly faster, check it every day. Mini rose kits follow the same basic setup as the herb kit but in a terracotta or painted pail. Rose seeds benefit from surface warmth, so a heat mat underneath the pot for the first two weeks can noticeably improve germination rates.
Where to put your kit: light, temperature, and humidity
Placement is where most Buzzy kit failures actually begin. The kit itself is well designed, but coconut-husk growing medium and small seedlings are unforgiving of a dark corner or a cold windowsill in winter.
Natural light
Basil is classified as a high-light herb by the University of Minnesota Extension, meaning it needs the brightest spot you can give it. A south-facing window is ideal; east-facing works with a grow light supplement. North-facing windows are not enough for basil or cilantro without supplemental lighting. Chives are slightly more tolerant of lower light but still perform best with 6-plus hours of direct sun.
Supplemental grow light setup
If your window is borderline, a small LED grow light on a timer is the single best investment you can make. For seedlings, position the light 4–6 inches above the tray and run it 16–18 hours per day until the seedlings are established. University of Minnesota Extension notes that culinary herbs like basil are 'high light' plants and recommends running supplemental lights 16–18 hours/day for seedlings (dropping to 12–14 hours for established herbs) with the fixture about 4–6 inches above the tray University of Minnesota Extension notes that culinary herbs like basil are 'high light' plants and recommends running supplemental lights 16–18 hours/day for seedlings (dropping to 12–14 hours for established herbs) with the fixture about 4–6 inches above the tray.. Once the herbs are actively growing and you have harvested once, you can drop to 12–14 hours per day. When shopping for a grow light, look for a PPFD (photosynthetic photon flux density) rating of 200–400 µmol per square meter per second at canopy level, rather than just wattage. Wattage alone tells you almost nothing useful about how much plant-usable light the fixture produces.
Temperature and humidity
The herb kit germinates best between 65–75°F. Aloe and succulent varieties prefer it slightly warmer: 70–80°F accelerates aloe germination noticeably. Avoid placing any Buzzy kit near an air conditioning vent, a drafty window, or directly above a radiator. Average household humidity (40–60%) is fine for the herb kit. The aloe kit tolerates lower humidity once established, which is actually good news if your home runs dry in winter.
Germination and growth timeline
| Plant | Expected Germination | Ready for First Harvest | Notes |
|---|---|---|---|
| Basil | 7–14 days | 6–8 weeks after germination | Needs warmth; slow germination usually means temperature is below 65°F |
| Cilantro | 14–21 days | 3–4 weeks after germination (cut-and-come-again) | Lightly crush husked seeds before sowing to improve contact |
| Chives | 7–14 days | 6–8 weeks after germination | Slow growers but persistent; snip from the top, leave 2 inches |
| Aloe | 14–28 days | Several months (not a fast-harvest plant) | Press seeds onto surface, do not bury; warm temps help a lot |
| Mini Rose | 14–21 days | Flowers in 10–14 weeks from germination | Keep medium slightly drier than herbs once seedlings emerge |
Daily and weekly care schedule
Once the kit is set up, the maintenance routine is genuinely simple. Here is what a normal week looks like.
| Task | Frequency | Details |
|---|---|---|
| Check soil moisture | Daily | Press a finger ½ inch into the medium. Mist or water lightly if it feels dry. The medium should be consistently moist, never soggy. |
| Rotate the planter | Every 2–3 days | A quarter-turn toward the window prevents seedlings leaning hard toward the light source. |
| Inspect for pests or mold | Every 2–3 days | Look under leaves and at the medium surface. White fuzz on seeds is often mold from overwatering; adjust moisture immediately. |
| Adjust grow light height | Weekly | As seedlings grow, raise the light to maintain 4–6 inches clearance. Seedlings touching a light bulb will scorch. |
| Water (post-germination, herbs) | Every 1–2 days depending on conditions | Switch from misting to a gentle pour once seedlings are 1–2 inches tall. Water at the base, not over leaves. |
| Feed with diluted fertilizer | Weekly or every other week | Start only after the second set of true leaves appears. Use half the dose on the fertilizer label. |
| Prune or harvest | Weekly once established | See the harvesting section below for cut points by plant type. |
Watering the aloe kit specifically
Aloe is a succulent, so its watering schedule differs significantly from the herb kit. Once aloe seedlings are established (usually 4–6 weeks after germination), let the surface of the growing medium dry out between waterings. Overwatering is the most common cause of aloe seedling death in kit form. Water about once a week, check that the medium surface is genuinely dry before adding more, and never let the pot sit in standing water.
Fertilizing, pruning, and harvesting
When and how to fertilize
Buzzy specifically instructs waiting until seedlings have grown their second set of true leaves (not just the first tiny seed leaves) before introducing any fertilizer. At that point, mix a balanced liquid fertilizer (something like a 20-20-20 ratio) at half the strength recommended on the label and water the base of the plants with it. University extension research supports this approach: half-strength weekly feeds are safer than full-strength doses for fragile seedlings, and over-fertilizing young plants causes more problems than under-fertilizing. Aloe and succulents need even less fertilizer, once a month at quarter-strength is plenty.
Harvesting basil
Harvest basil by pinching or snipping just above a pair of leaves, never pulling from the base. This is called a stem-tip harvest, and it encourages the plant to branch outward and produce more leaves rather than shooting up a single tall stem. Once you see flower buds forming, pinch them off immediately, basil that bolts (flowers and sets seed) becomes bitter and stops producing harvestable leaves. Harvesting from the top every 1–2 weeks keeps basil in a productive state for months.
Harvesting cilantro and chives
Cilantro is a cut-and-come-again herb in its early stages but is prone to bolting once temperatures rise above 75°F consistently. Harvest outer leaves first, leaving the inner growth point intact. Chives are the easiest: snip from the top with scissors, leaving at least 2 inches of green growth above the medium. They will regrow in 2–3 weeks. Never harvest more than one-third of the plant at a time for either herb.
The aloe kit: harvesting vs. growing as a houseplant
Aloe from seed is a slow-growing succulent, and the Buzzy Aloe Peaceful Pot is more of a long-term houseplant project than a quick harvest. If you want to use aloe gel, wait until the plant has at least 8–10 mature leaves and is clearly thriving. To harvest, cut an outer leaf close to the base with a clean knife. Most people find the Buzzy aloe kit most rewarding as a desk plant first, and a gel source second, the plant takes several months to reach a useful harvest size.
Mini rose care and blooming
Mini roses from seed take patience. Expect first blooms around 10–14 weeks after germination if light and temperature are right. Deadhead (remove spent blooms) by pinching just below the spent flower to encourage new buds. Feed mini roses with a diluted fertilizer that has a slightly higher middle number (phosphorus) once they start budding, as phosphorus supports flower development. Keep the medium slightly on the drier side compared to the herb kit.
Troubleshooting common problems
Almost every issue with a Buzzy kit comes down to one of a handful of causes. Here is a quick-reference guide to the most common ones and exactly what to do about each. For common early‑stage problems and fixes (damping‑off, leggy/etiolated seedlings from low light, and slow or uneven germination), see Ask Extension – Problems sprouting seeds in my new greenhouse (troubleshooting and remedies).
| Problem | Most Likely Cause | Fix |
|---|---|---|
| No germination after 21+ days | Temperature too cold, seeds too deep, or dried-out medium | Check room temp (minimum 65°F for herbs, 70°F for aloe). Re-moisten medium. If seeds were buried deeper than ¼ inch, sow a fresh packet at the correct depth. Use Buzzy's Grow Guarantee to request a replacement packet. |
| White fuzzy mold on the surface | Overwatering and low air circulation | Let the surface dry slightly, then reduce watering frequency. Remove the humidity dome if you were using one. Improve air circulation by cracking a nearby window or adding a small fan nearby on a low setting. |
| Leggy, tall, floppy seedlings | Not enough light | Move the kit to a brighter window or add a grow light 4–6 inches above the seedlings running 16–18 hours/day. This is the most common problem in winter setups. |
| Yellowing leaves | Overwatering or nutrient deficiency | Check root moisture first. If the medium feels soggy, reduce watering. If the medium looks right, begin half-strength fertilizer feeds if you haven't already. |
| Seeds germinated but seedlings died off quickly (damping off) | Fungal disease from waterlogged medium | Always remove the humidity dome at first sign of germination. Ensure the planter has adequate drainage. Start fresh with a new pellet and seed packet, keeping the surface just moist rather than wet. |
| Cilantro sprouted but bolted fast | Heat — room above 75°F consistently | Move cilantro to a cooler spot if possible. Harvest outer leaves quickly and frequently. Consider re-sowing cilantro in a separate small pot placed in a cooler location. |
| Tiny flying insects around the kit | Fungus gnats from consistently moist medium | Let the top inch of growing medium dry between waterings. Yellow sticky traps placed near the kit catch adults and confirm the ID. Avoid standing water in the planter tray. |
| Aloe seedlings rotting at the base | Overwatering combined with poor airflow | Scale watering back significantly. Aloe at seedling stage needs the medium to dry out between waterings, not stay consistently moist like the herb kit. |
Repotting and replacing seed pods
The galvanized planter and small pots in Buzzy kits are sized for starting, not for long-term growing. Once your herbs reach 4–6 inches tall and you notice roots appearing at the drainage holes (or the plant seems to stall in growth), it is time to repot. Transfer to a pot 2–3 inches larger in diameter using standard potting mix with good drainage. Herbs like basil and cilantro grow happily in 6-inch pots; chives can stay in a slightly smaller container if needed.
When your seed pods are exhausted (the seeds have all germinated or the growing season is winding down), you can re-use the Buzzy planter. Purchase replacement seed packets directly from the Buzzy Seeds website or from garden retailers that carry their range. New coconut-husk pellets are sold separately or come with any new Buzzy kit. You do not need to buy an entirely new kit, just the seeds and growing medium.
Do Buzzy grow kits actually work?
Honestly, yes, but with conditions. The coconut-husk pellet system is a legitimate, well-proven growing medium, and the seed quality from Buzzy is generally reliable. Where kits underperform is almost always a placement or care issue rather than a product defect: insufficient light (by far the most common failure), inconsistent watering, or temperatures that are too cold during germination. Growers who place their kit in a genuinely bright window, keep the medium consistently moist during the germination phase, and start feeding on schedule see strong results. Growers who put the kit on a poorly lit shelf and water sporadically tend to be disappointed.
If you have had a failed kit before and are wondering whether to try again, the answer is usually yes, just change one variable at a time. Add a grow light, use a heat mat, or check that your water measurements match Buzzy's instructions exactly (2¼ cups for herb kits, ¾ cup for succulent kits). Buzzy's Grow Guarantee means you can contact them for a free seed replacement if germination fails, which removes the financial risk of a second attempt. You can also look at the dedicated deep-dive on the question of whether Buzzy grow kits work for a broader look at success rates and the most common failure patterns across kit types.
Spare parts, replacements, and manufacturer support
Replacement seed packets and additional coconut-husk pellets are available directly from the Buzzy Seeds website (buzzyseedstore.com or the regional equivalent for your country). Buzzy kits are also stocked by a range of garden retailers both online and in physical stores, so checking your local garden center is often the fastest option. If you are replacing seeds after a failed germination and want to confirm you have the right variant, the retailer SKU or the manufacturer model number on the box (for example, model 96506 appears on the Cabela's listing for a Buzzy kit) helps match the exact seed type across different sellers.
For customer support, Buzzy's contact form is available on their official website. Their Grow Guarantee covers free seed-packet replacements for germination failures, so reach out before buying new seeds if your first batch did not come up. Document the issue with photos of your setup and a description of the conditions you provided, this helps Buzzy's team give you useful advice alongside the replacement.
Quick-reference checklist for first-time setup
- Check all kit contents against the unboxing list before you start
- Measure water precisely: 2¼ cups for herb kits, ¾ cup for aloe/desert kits
- Fluff expanded pellet with a fork until loose and evenly spread
- Divide the planter into labeled sections — one per seed variety
- Sow seeds ¼ inch deep and mist gently (do not drench)
- Place in the warmest, brightest spot available (or add a grow light)
- Cover loosely with a dome or plastic wrap only until first seedlings emerge
- Check moisture every day; the surface should never fully dry out before germination
- Remove the dome the moment any seedling appears
- Begin half-strength fertilizer only after the second set of true leaves
Plant-specific tips at a glance
| Kit / Plant | Key Setup Tip | Biggest Mistake to Avoid | Harvest Style |
|---|---|---|---|
| Basil (herb kit or Buzzy Basil kit) | Warm temps (70°F+) are essential for fast germination | Letting it bolt — pinch flower buds immediately | Stem-tip pinching above a leaf pair, weekly |
| Cilantro (herb kit) | Lightly crush husked seeds before sowing | Letting the room get too warm — cilantro bolts fast above 75°F | Cut outer leaves; harvest frequently |
| Chives (herb kit) | Slow but tough — be patient through 14 days | Pulling rather than snipping; always cut, never pull | Snip from top, leave 2 inches of green base |
| Aloe (Buzzy Aloe kit) | Press seeds onto surface — do not bury them | Overwatering; aloe seedlings rot quickly in soggy medium | Outer leaf cut at base (only when plant is mature) |
| Mini Rose (Buzzy Mini Rose kit) | Heat mat under pot during first 2 weeks helps germination | Overwatering once seedlings are established | Deadhead spent blooms just below the flower |
FAQ
What should be in the box (unboxing checklist) for a Buzzy Kitchen Herbs / related Buzzy kits?
Typical contents: one small planter (galvanized windowsill planter or small terracotta/pail), 1 coconut‑husk growing medium pellet (or three pellets for some windowsill kits), one or more seed packets (Basil, Cilantro, Chives, Aloe, Mini Rose or kit‑specific seeds), printed instructions and warranty/grow‑guarantee card. Missing items to check for: seed packet(s), pellet(s), printed instructions, and the correct planter. Kits generally do NOT include a powered LED grow light or fertilizer.
Exact pellet rehydration volumes and first steps to set up a windowsill Kitchen Herbs kit
For the windowsill Kitchen Herbs kits dissolve the coconut pellet(s) in 2¼ cups (approx. 560 ml) of water. Steps: 1) Pour 2¼ cups warm water into a bowl, 2) Add pellet and wait until it fully expands, 3) Fluff medium with a fork, 4) Fill planter to ~1/2–3/4 full leaving a little room, 5) Sow seeds about 1/4 inch (6 mm) deep (or surface‑sow species that require light), 6) Tamp lightly, mist the surface, cover if instructions suggest, and place in a warm bright spot.
Rehydration volumes and handling for small desert / succulent Buzzy kits (Aloe, Mini Desert)
For small basin/succulent kits Buzzy specifies dissolving the pellet in about 3/4 cup (≈180 ml) of water. Use a spray bottle to keep surface damp, press tiny seeds gently into the surface (do not bury seeds that require light), and avoid heavy watering. Keep covered or humidified only until germination begins, then remove dome to reduce damping‑off risk.
Concise, ordered setup walkthrough (step‑by‑step) with image suggestions
1) Unbox and confirm checklist (photo: laid‑out contents). 2) Rehydrate pellet in specified volume (photo: pellet expanding in bowl). 3) Fluff and fill planter (photo: filling planter). 4) Read seed packet for depth and spacing, sow seeds (photo: sowing close‑up). 5) Mist surface or gently water-in (photo: mist bottle). 6) Label sections if planting multiple varieties (photo: small plant labels). 7) Cover per instructions if included; place in a warm bright location (photo: kit on bright windowsill). 8) Start a simple care log or calendar (photo: sample printable checklist). Replace photos with licensed product images or your own step shots to avoid copyright issues.
Simple daily/weekly care schedule (watering, light, temperature, fertilizing, pruning/harvest)
Daily: check surface moisture; mist if top is drying; ensure adequate light. Weekly: rotate planter for even growth; inspect for problems. Watering: keep coconut medium consistently moist for seed starting but not waterlogged; use mist or bottom water for delicate seeds; for succulents let surface dry between light waterings once established. Light: bright windowsill or 12–16 hours/day under supplemental LED for seedlings; keep seedling lights 4–12 in (10–30 cm) depending on fixture. Temperature: aim 70–80°F (21–27°C) for basil and aloe germination; herbs generally like 65–75°F (18–24°C) after emergence. Fertilizer: begin diluted (half‑strength) balanced soluble fertilizer once seedlings have a second true leaf set; feed every 1–2 weeks. Pruning/harvest: harvest basil leaves by pinching above leaf nodes when plants reach ~6 in; pinch regularly to encourage bushiness. For aloe wait until pups are established before removing.
Germination and growth timelines for common Buzzy kit species
Typical windows (can vary by seed age and conditions): Basil: 7–14 days to germinate; visible harvestable leaves in 4–6 weeks. Cilantro: 14–21 days to germinate. Chives: 7–14 days. Aloe (succulent): 2–4 weeks or longer depending on warmth; slow to form true leaves—allow months to establish. Mini Rose (seeded micro‑roses): variable—often several weeks to months; many mini‑rose kits have less predictable germination. Cactus (in desert kits): ~2–4 weeks; Moss Rose: 7–14 days and requires light at surface.