Set up your Buzzy Seeds Daisy Grow Kit by hydrating the coconut husk growing medium first, dividing it into your cups or pot, sowing the blank" rel="noopener noreferrer">daisy seeds 1/8" deep, and keeping everything moist (not wet) in a warm, bright spot. If you want the exact step-by-step approach for timing, depth, and setup, check the buzzy seeds grow kit instructions for your specific kit version. Seeds typically sprout in 7 to 21 days, and seedlings are ready to transplant to a larger pot or the garden once they hit 2 to 3 inches tall. The biggest thing that trips people up is overwatering, which leads to mold fast, so a spray bottle is your best friend here.
Buzzy Seeds Daisy Grow Kit Instructions and Review Guide

Marcus Thornfield
11 Jun 2026
What's in the kit and what to do before you plant anything
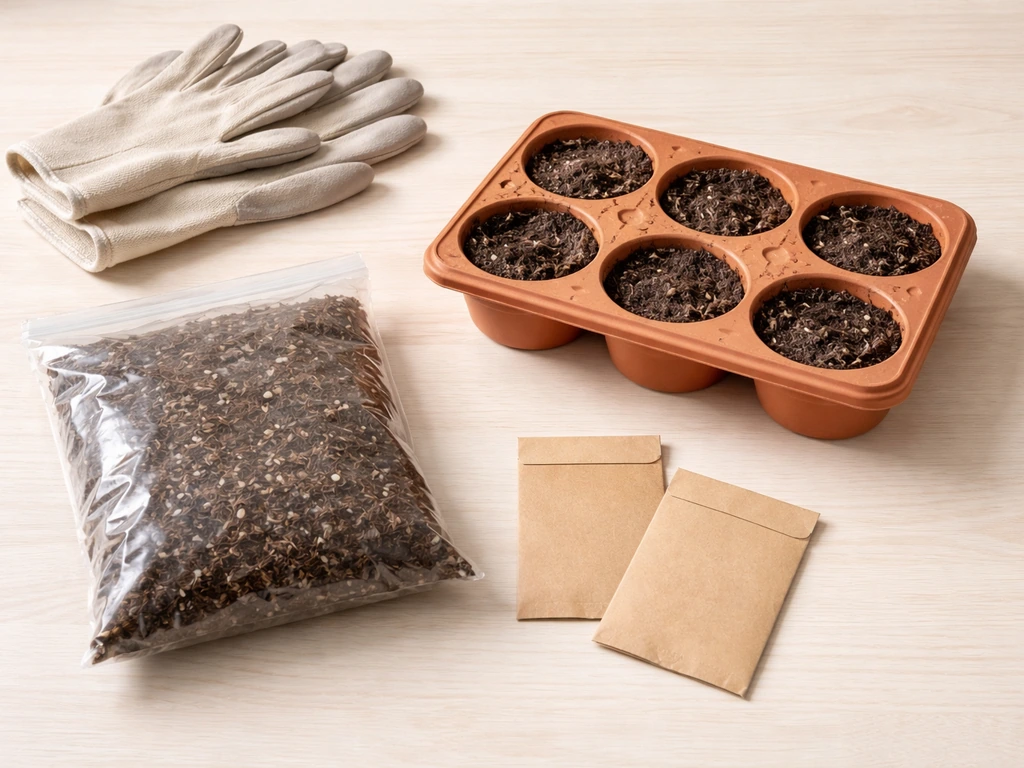
Buzzy Seeds makes a few versions of their daisy grow kit. The two most common are the colorful egg-carton version (usually a sunflower and daisy two-pack) and the Daydream mini terracotta pots version. Both include the same core items: natural non-GMO daisy seeds, a compressed coconut husk growing medium pellet, the planting vessel (either the egg-carton cups or the terracotta pot), and a printed instruction card. The seeds are not pre-soaked and the kit does not ask you to soak them before planting, so don't skip ahead.
Before you plant anything, the first job is hydrating the growing medium. Hydrate the growing medium by placing it in a separate bowl and adding warm water, then fluff gently once the pellets fully expand hydrating the growing medium. That pellet looks small and hard, but it expands significantly once it hits water. Do this in a separate bowl before it goes anywhere near your pot or cups. Get that step right and the rest of the setup flows pretty easily.
- Non-GMO daisy seeds (quantity varies by kit version)
- Compressed coconut husk growing medium pellet
- Planting vessel: egg-carton cups (6 cups in the egg-carton version) or a mini terracotta pot
- Instruction card with planting steps
Step-by-step setup and planting
Egg-carton version (Sunflower & Daisy 2-Pack)
- Place the compressed coconut husk pellet into a separate bowl. Add 5 tablespoons of warm water and let it sit for a minute or two until the pellet fully expands.
- Once the medium has expanded, gently fluff it with a fork until it's loose and evenly textured. It should feel like slightly damp potting mix, not soggy.
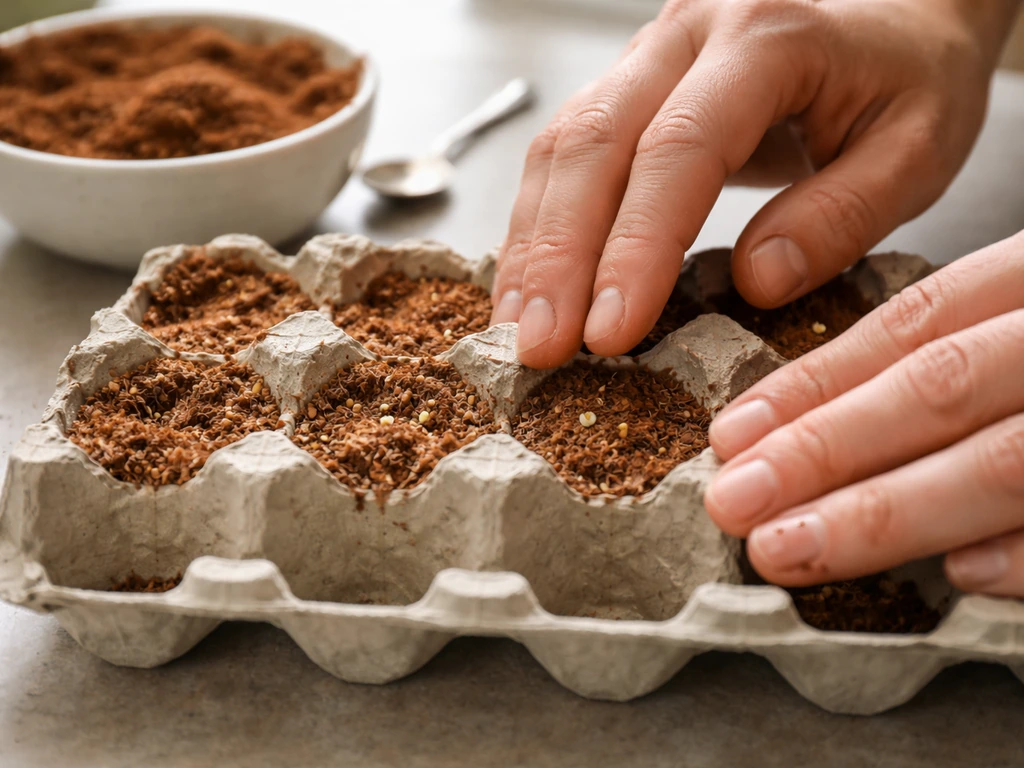
- Divide the fluffed medium evenly among the 6 egg-carton cups. Fill each cup most of the way but leave a little room at the top.
- Sow the daisy seeds at 1/8" deep. That's very shallow, so don't overthink it. Use your fingertip or a pencil tip to make a small indent, drop in one or two seeds per cup, then lightly cover them with a pinch of growing medium.
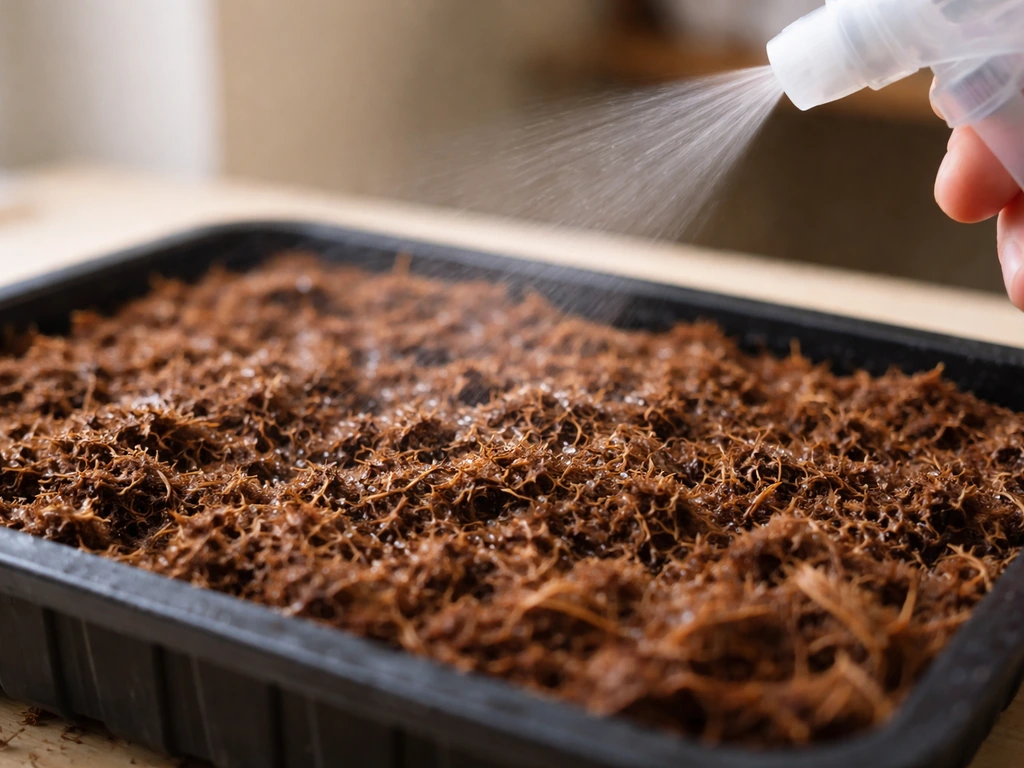
- Use a spray bottle to give each cup a gentle misting. You want the surface moist, not drenched.
- Set the egg carton in a warm, bright spot (more on placement in the care section below).
Mini terracotta pots version (Daydream 12-Pack)
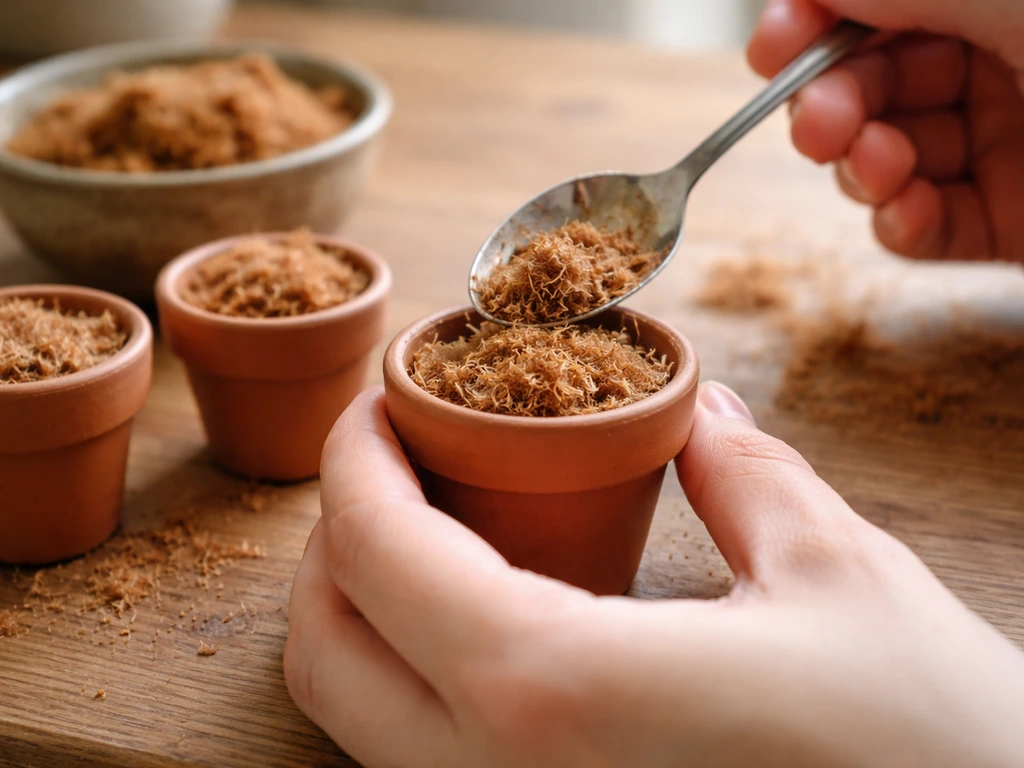
- Place the growing medium pellet in a bowl and add 1 tablespoon of warm water. Let it expand fully, then fluff with a fork.
- Spoon the fluffed medium into the terracotta pot and press it gently so it sits level.
- Sow daisy seeds at 1/8" deep, lightly covering them with the medium.
- Mist with a spray bottle until the surface is evenly moist.
- Place the pot in a warm location with bright, indirect light and good airflow around it.
One important note on the terracotta version: genuine terracotta is porous, which actually helps with drainage and airflow compared to plastic or ceramic pots. That's a plus for mold prevention, but it also means the medium can dry out faster, so check moisture more frequently in the first week.
Care schedule: light, water, temperature, and daily checks
Light
Put the kit on a bright windowsill where it gets several hours of morning or afternoon light. Buzzy doesn't give you an exact hour count, but think of it as the kind of spot where you'd happily read a book by natural light for a few hours. Avoid parking it in harsh direct afternoon sun for the full day, especially in summer, because that can dry out the medium too quickly and stress young seedlings. If your home doesn't get great natural light, a simple grow light set to run for 12 to 14 hours a day works well as a supplement.
Water
Use a spray bottle every day or every other day. The goal is to keep the coconut husk medium consistently moist, like a wrung-out sponge, not soaking wet. Press a finger about half an inch into the surface before each spray. If it still feels damp, skip the water that day. If it feels dry, give it a few spritzes. Pouring water directly from a cup is almost always too much at this stage and is the number one cause of mold problems.
Temperature
Buzzy recommends keeping the growing area between 65°F and 75°F. That's basically normal room temperature, so most indoor spots work fine. Avoid placing the kit near a cold drafty window in winter or directly under an AC vent in summer. Consistent warmth speeds up germination.
Daily check routine
- Check moisture level by pressing a finger into the medium before watering
- Look for any fuzzy white patches (early mold) and address immediately if found
- Rotate the kit a quarter turn so all sides get even light exposure
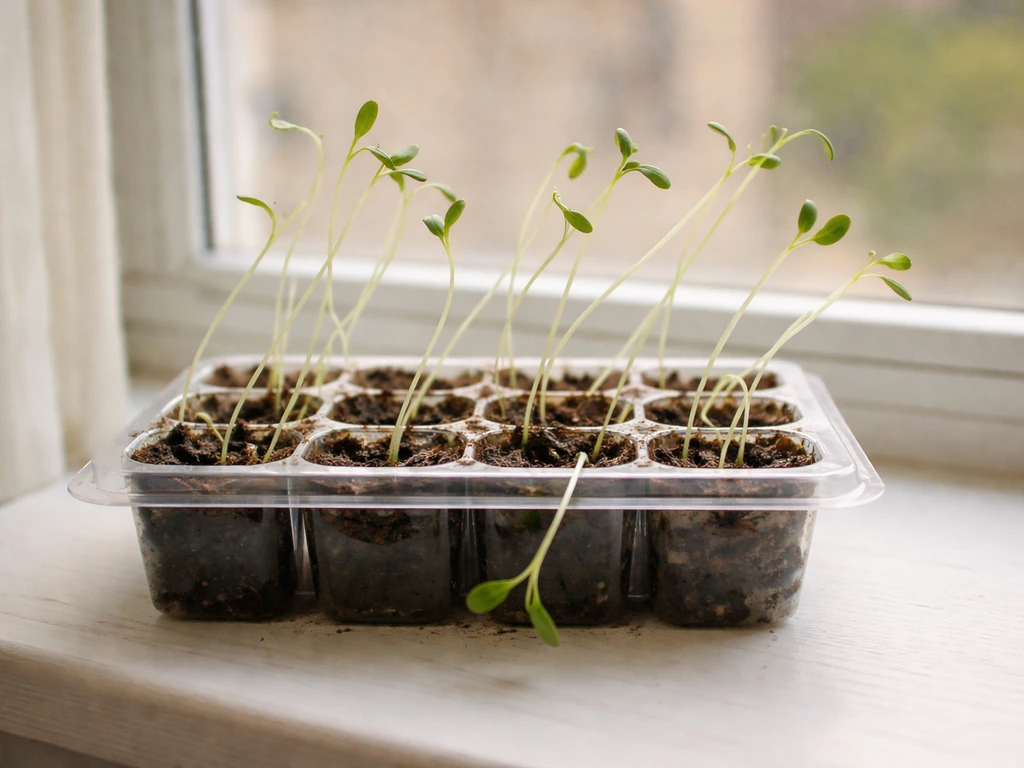
- Once seedlings appear, check that they're standing upright and reaching toward the light rather than flopping sideways
After the second set of leaves appears
Once your seedlings develop their second set of true leaves (those are the leaves that appear after the first tiny seed leaves), start feeding with a balanced liquid plant fertilizer mixed at half the strength shown on the label. Do this about once a month. Keep the light and moisture consistent and resist the urge to water more heavily now that there's something visible growing.
Timeline: what to expect and when
| Stage | Typical timing | What to look for |
|---|---|---|
| Germination begins | Day 7 to 21 | Tiny green sprouts breaking the surface of the medium |
| First true leaves | Around week 3 to 4 | Second set of leaves above the initial seed leaves |
| Start fertilizing | After second set of leaves | Feed at half-strength, about once a month |
| Ready to transplant | When seedlings reach 2 to 3 inches tall | Sturdy stem, two or more sets of leaves, roots starting to show at bottom |
The 7 to 21 day germination window is wide, and that's intentional. Daisy seeds are sensitive to temperature and moisture consistency. If you're at the cooler end of the recommended temperature range, or if the medium dried out even once in the first week, germination can push toward the 21-day end. Don't give up on a cup or pot before three weeks are up. Keep the conditions steady and give the seeds time to do their thing.
Troubleshooting common problems and fixes
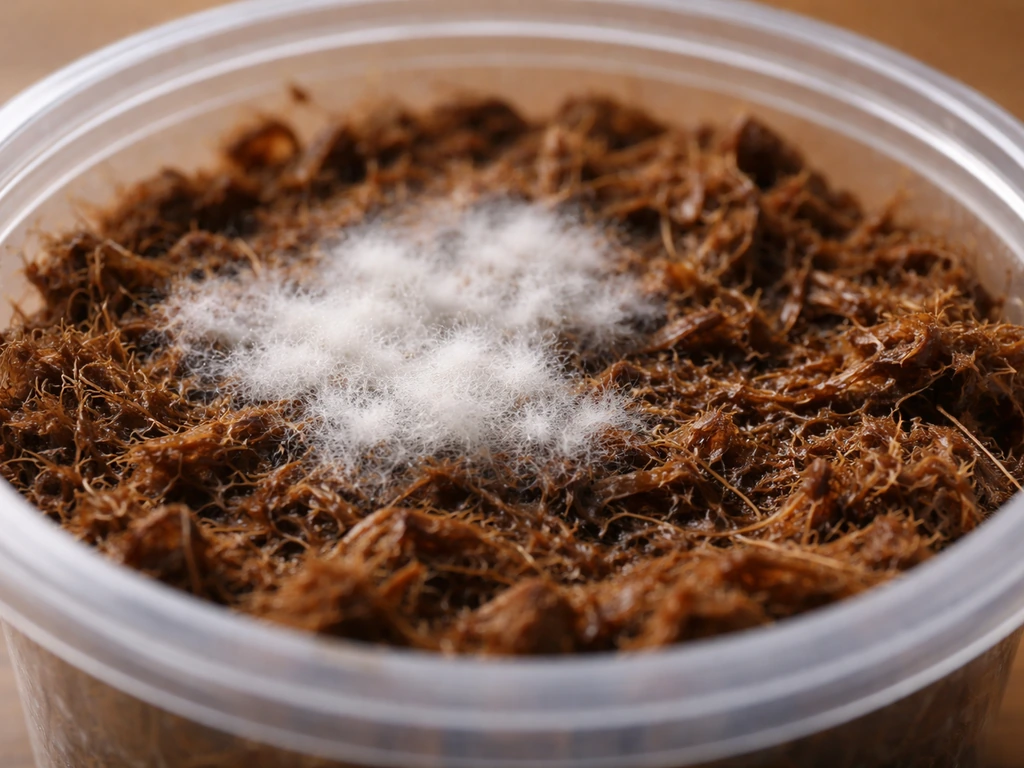
White fuzzy mold on the surface
This is the most common complaint with these kits, and it's almost always a combination of too much water and not enough airflow. If you see white fuzz appearing in the first week, move the kit to a spot with better air circulation, like near an open window (not drafty cold, just gently moving air) or in front of a small fan on its lowest setting. Let the surface dry out slightly before watering again.
Scraping off the visible mold gently with a toothpick and giving the kit better airflow usually stops it from spreading. If the mold is covering large areas and no sprout has appeared yet, the seeds underneath may not survive, but it's worth letting conditions improve before replanting.
Leaking or waterlogging
A few users have reported the kit leaking onto their windowsill. This happens when too much water is added during the medium hydration step or when watering after planting. Stick to the exact amounts (5 tablespoons for the egg-carton version, 1 tablespoon for the terracotta version) and use only a spray bottle for ongoing watering. If you're using the egg-carton version, place a small tray or folded paper towel underneath to catch any seepage.
No sprouts after 21 days
Check three things: temperature (was the kit in a warm enough spot consistently?), moisture (did the medium dry out completely at any point?), and planting depth (seeds planted too deep can fail to push through). If you've ruled out all three and still have nothing, the medium may have been overwatered early on and the seeds may have rotted. Try replanting with fresh seeds if you have extras, correct whichever condition went wrong, and start again.
Tall, leggy seedlings that flop over
Leggy seedlings that stretch upward and look weak are almost always a light problem. The seedlings are reaching toward the nearest light source because they're not getting enough overall brightness. Move the kit closer to the window, rotate it daily so all sides get exposure, and consider adding a grow light if your space is naturally dim. A seedling that's already quite tall and floppy can sometimes recover once light improves, but it may need a gentle support (a toothpick propped nearby) to stay upright while it strengthens.
Sprout appeared but died quickly
This is often what happens when mold appears early and a sprout manages to push through anyway. The mold competes with and overwhelms the fragile seedling. Fixing the airflow and moisture issue is the priority. It can also happen if the kit is in a cold spot or near a draft. If one cup or pot loses its seedling, check the others immediately and adjust conditions before more are affected.
Buzzy Seeds Daisy Grow Kit reviews: pros, cons, and what to expect
These kits get genuinely enthusiastic reviews from people who use them as activity kits with kids. The egg-carton version in particular scores points for being visually appealing, easy to understand, and satisfying when it works. Multiple buyers describe it as a "fun activity to do with kids" and "easy, fun, and worth the money." For a beginner or a gift, it delivers on that promise when the setup steps are followed correctly.
The honest downside is that the margin for error on watering is small. Unlike a plastic pot with drainage holes, some versions of the kit (particularly plastic or ceramic container variants) have no drainage, which means overwatering quickly creates standing moisture at the bottom with nowhere to go. That's the environment mold loves. Real-world reviews on Target and Walmart listings include complaints about the kit leaking and mold growing almost immediately. These aren't defective kits, they're kits that got too much water. Follow the spray-bottle-only rule and you sidestep most of these problems.
| What users like | What users dislike |
|---|---|
| Fun, hands-on activity, especially with kids | Mold risk if overwatered, and some versions offer limited drainage |
| Clear enough instructions for complete beginners | Leaking from some container types when watered too heavily |
| Compact size fits on a windowsill easily | Germination window (7 to 21 days) can feel unpredictable |
| Affordable and widely available at major retailers | Small amount of growing medium means seedlings outgrow the kit relatively quickly |
| Non-GMO seeds, coconut husk medium feels eco-friendly | Requires a spray bottle for best results, which isn't always included |
If you manage the moisture carefully and give the kit a bright, well-ventilated spot, you should see sprouts within two to three weeks and transplant-ready seedlings within about a month or so after that. The kit is genuinely well-designed for its purpose: a low-cost, low-footprint introduction to seed starting. It's not a replacement for a proper seed-starting tray if you're serious about growing a lot of daisies, but as a first experience or a gift project it works well. The terracotta pot version has a slight edge for mold prevention thanks to the porous material, while the egg-carton version is more fun visually and lets you start multiple plants at once.
If you've enjoyed this kit and want to branch out, Buzzy Seeds makes similar kits for sunflowers, watermelons, and other flowers using the same coconut husk medium and setup process, so the care skills you develop here transfer directly. If you are looking for buzzy watermelon grow kit instructions, the same care skills you use here will help you get consistent sprouts watermelons. If you want to use the same approach for a sunflower kit, look up buzzy sunflower grow kit instructions so you know what to do from hydration to care.
FAQ
Can I start the kit indoors one day and move it outside later?
Yes, you can, but only if the medium is kept consistently moist (wrung-out sponge feel) after sowing. When seeds sit in a cold or dry environment before you start regular warmth and bright light, germination often shifts toward the long end of the 21-day window.
My seeds in some cups sprouted early, but others are slow, what should I do?
Expect some variation. Seeds usually sprout within 7 to 21 days, and cups can lag because moisture and airflow differ slightly between vessels. If one cup is 10 to 14 days behind, keep watering the same way and wait at least until the three-week mark before declaring it a failure.
What if I see mold but a few seeds already sprouted?
If you see white fuzz, act quickly: improve airflow, let the surface dry slightly, and keep watering to a spray routine only. If no seedlings appear after 3 weeks, the seeds may have rotted underneath, so replanting with fresh seeds is usually more reliable than trying to “rescue” a failing cup.
How do I prevent leggy seedlings if my windowsill light comes from one direction?
Rotate the kit daily and use a small fan on the lowest setting if your home is still. Rotation prevents uneven stretching toward the brightest side, and gentle moving air lowers the chances that mold spreads across the surface.
Should I water more often once the seedlings have true leaves or after I start fertilizing?
Don’t. The kit instructions emphasize maintaining moisture, not saturating the medium, and adding extra water after you start seeing true leaves tends to restart mold risk and can delay stronger growth. Stick with half-strength fertilizer about once a month, and keep moisture in the same wrung-out range.
Can I poke the soil to check moisture instead of using a finger test?
Use a toothpick or small probe only to very lightly check whether the top looks damp versus dry. Avoid pressing deeply, because overly disturbing the surface can disturb seed position or damage fragile roots before the seedlings are established.
What’s the right way to thin seedlings if too many sprout in one cup?
Trim only if necessary, and only above the soil line. If you remove a weak seedling, do it when it’s established enough to handle (typically after true leaves show), and avoid digging into the coconut husk medium since that can disturb nearby seedlings.
How do I harden off seedlings from the kit before transplanting outdoors?
Yes, but do it gradually. Move seedlings to brighter outdoor conditions over a few days, starting with partial shade, then increasing light, while still protecting from cold drafts and harsh midday sun that can dry the medium too fast.
How can I tell if I’ve overwatered, and how do I fix it quickly?
If the kit has no drainage, the biggest sign is consistently wet, heavy medium that stays damp longer than a day despite spraying lightly. Correct course by switching to spray-bottle-only, improving airflow, and letting the surface dry slightly before the next watering.
What’s the safest way to transplant seedlings from the kit into a bigger pot?
When moving to a larger pot, use the seedlings at 2 to 3 inches tall, handle by the leaves, and keep as much of the coconut husk medium intact as possible. Gentle transplanting reduces root stress and helps seedlings resume steady growth without resetting.