
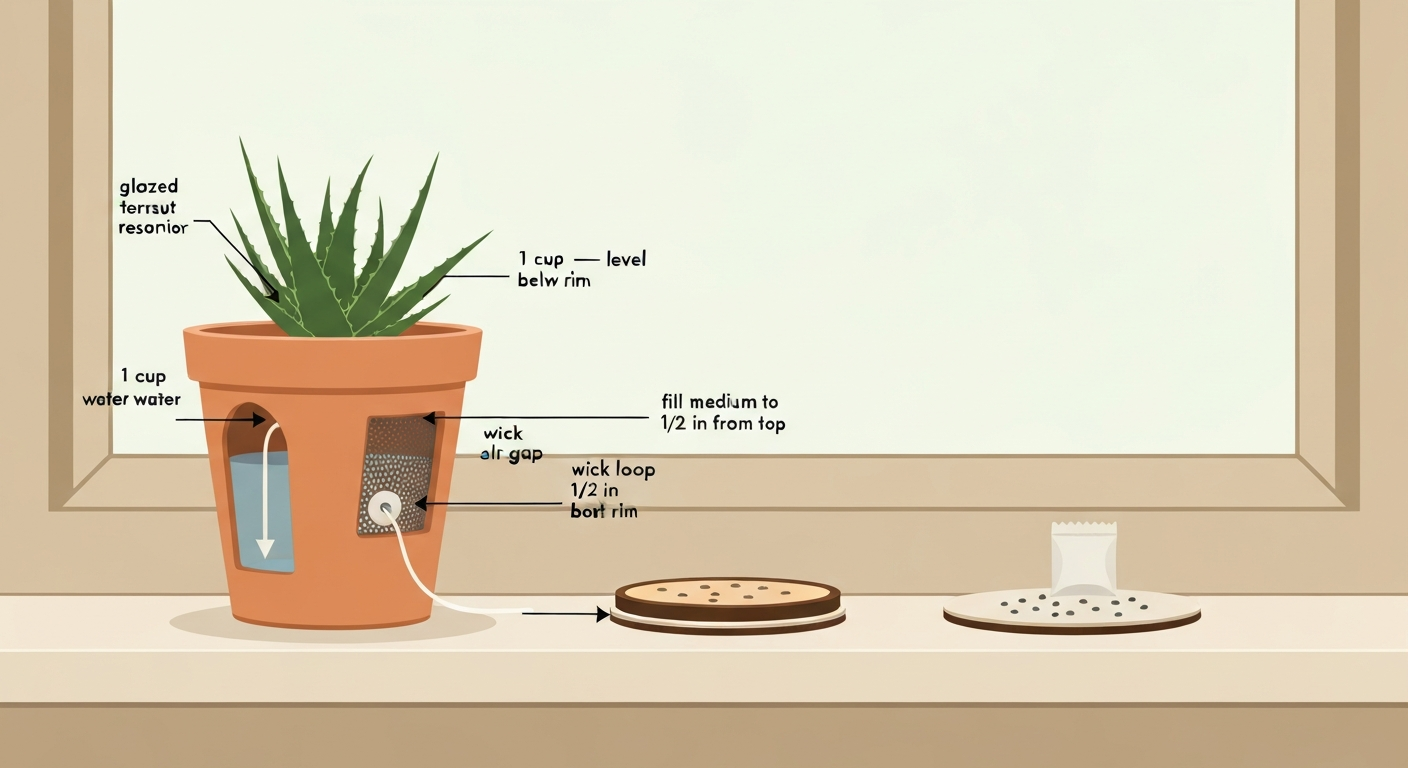
The Modern Sprout Aloe Grow Kit is a passive wick-fed hydroponic planter, a glazed terracotta reservoir with a stainless net pot sitting on top, connected by a small wick, and setting it up takes about ten minutes once you know the exact measurements. Pour 1 cup of water into the planter so the water level does NOT touch the net pot, position the wick loop ½ inch below the planter rim, fill the grow medium to ½ inch from the top, rinse it under a faucet for 30 seconds, hydrate the included coco disc, and scatter your aloe seeds just under the surface. That is the whole setup in a sentence. The rest of this guide walks you through every detail, covers the plantlet shortcut if you want faster results, explains when to switch to soil, and helps you troubleshoot the issues that trip most beginners up.
Modern Sprout Aloe Grow Kit Instructions: Setup, Care & Troubleshooting

Who this guide is for and what you will learn
This walkthrough is for anyone who just unboxed the Modern Sprout Aloe Grow Kit and found the included instruction card a little thin on detail. Maybe the PDF downloaded fine but left you wondering exactly how wet the coco disc should be, or what to do if nothing sprouts after three weeks. I have been through several passive hydro grow kits on my windowsill, and aloe is one of the trickier ones because it is a dry-loving succulent crammed into a water-wicking system, a combination that works brilliantly if you follow the numbers, but goes sideways fast if you guess. By the end of this article you will know: exactly what should be in the box, how to set up the planter using either seeds or a plantlet, how to care for your aloe week by week, when and how to harvest gel for household use, how to troubleshoot rot, pests, and slow growth, and when it makes sense to convert to soil or call Modern Sprout support.
Contents and parts checklist
Before you fill a single drop of water, lay everything out on a table and match it against this list. For the authoritative setup steps and exact measurements, refer to the aloe grow kit instructions in Modern Sprout’s TerracottaKit-Aloe-Instructions-R3 PDF. Modern Sprout's official instruction PDF (TerracottaKit-Aloe-Instructions-R3.pdf) names every component. For official healing aloe hydro grow kit instructions consult Modern Sprout's TerracottaKit-Aloe-Instructions-R3 PDF or contact their support for assistance. If anything is missing or damaged, do not proceed, contact Modern Sprout at [email protected] before you start, because some parts (especially the wick) are not easily replaced with hardware-store substitutes.
| Part | What it looks like | How to verify it's correct |
|---|---|---|
| Glazed terracotta planter (reservoir) | A small glazed pot, sealed inside to hold water | No cracks; glaze is unbroken on the interior walls |
| Stainless net pot | A small mesh cup that sits in the planter opening | Fits snugly in the planter mouth without wobbling |
| Wick | A short strip of absorbent fabric/fiber looped through the net pot | Loop is intact; no fraying that would slow water draw |
| Coco/perlite grow medium | Loose granular mix, light tan in color | Bag is sealed; no visible mold or off smell |
| Coco disc | A compressed brown disc | Solid, flat, no crumbling edges |
| Aloe seeds | Tiny, flat, papery seeds in a small packet | Packet is sealed; seeds are not clumped together |
| Plant food | Small packet of powdered or granular fertilizer | Packet is sealed and dry |
| Activated carbon | Small packet of black granules | Dry and free-flowing |
If your kit is the 'Find Balance' or 'Grounding Aloe' branded version sold through retailers like Maisonette, the components are identical, only the outer packaging and kit name differ. All setup steps in this guide apply equally to those versions.
Optional tools and accessories that make setup easier
The kit is self-contained, but a few extras will save you frustration. A liquid measuring cup is the single most useful thing to have nearby, the setup requires exactly 1 cup of water, and eyeballing it is how people accidentally let the reservoir touch the net pot (which causes waterlogging). Beyond that, here is what genuinely helps:
- A liquid measuring cup (1-cup capacity minimum)
- A spray bottle filled with room-temperature water for misting the coco during germination
- A small digital thermometer or smart plug with a display — aloe needs 72–76°F and it is easy to miss cold drafts near windows
- A grow light timer if you are supplementing with artificial light (Modern Sprout's Smart Grow Lights carry a 3-year warranty and pair well with the terracotta kits)
- A bright windowsill tray with a lip, to catch any overflow when you rinse the grow medium
- Fine-tipped scissors or cuticle scissors for trimming gel leaves at harvest
- Yellow sticky traps — cheap insurance against fungus gnats, which love moist coco medium
If you ever need replacement parts, a new net pot, fresh seeds, or a full replant kit, Modern Sprout sells an Immersion Hydroponic Replant Kit and explicitly states they will send replacement components for failed kits under their Thrive Promise. Reach out to [email protected] before ordering third-party substitutes, because the wick dimensions and net pot sizing are specific to the terracotta planter.
Seed vs plantlet, soil vs hydro: pick your path before you start
The kit ships with seeds, which is the slow but satisfying route. But many beginners swap in a small aloe plantlet (an offset or 'pup' from a garden center) to skip the 4–5 week germination window and get straight to growing. Separately, you might wonder whether to use the kit's built-in wick system or just pot everything in cactus soil. Here is a quick decision flow so you can commit before you open the bag of grow medium.
| Question | Choose seeds if... | Choose a plantlet if... |
|---|---|---|
| How patient are you? | You are happy to wait 4–5 weeks for sprouts and enjoy watching germination | You want visible growth within days and do not need the seed experience |
| Have you grown succulents before? | No — seeds are a great learning experience and this kit is designed for them | Yes — you know what healthy aloe roots and leaves look like |
| Space and light situation? | You have a consistent 72–76°F spot with 6+ hours of light or a grow light ready | Same requirement — but plantlets tolerate brief imperfect conditions better than seedlings |
| Question | Use the kit's wick/hydro system if... | Switch to soil if... |
|---|---|---|
| Experience level | You are a beginner who wants to follow the kit exactly as designed | You have grown succulents before and prefer a familiar medium |
| Watering discipline | You tend to forget to water — the reservoir self-feeds between refills | You are confident checking soil dryness and watering on a wet-dry cycle |
| Long-term plan | You want a compact windowsill planter that stays small | You plan to repot into a larger pot or move the plant outside eventually |
| Risk tolerance | You accept that mature hydro roots are hard to transplant later | You want maximum flexibility to repot or propagate at any point |
Step-by-step setup: the plantlet option
Using a small aloe plantlet (a rooted offset, roughly 2–3 inches tall) instead of seeds gets you past the germination phase immediately. The setup steps are the same as for seeds, with a few key differences at planting time. Before you begin, let a purchased plantlet sit out of its nursery pot for 24 hours so the roots firm up slightly, this reduces transplant shock.
- Set the stainless net pot aside and thread the wick through the net pot holes if it is not already threaded. The wick loop should hang down below the pot base.
- Pour exactly 1 cup of room-temperature water into the terracotta planter. Check that the water level does NOT reach or touch the bottom of the net pot — there should be an air gap between the waterline and the net pot base.
- Lower the net pot into the planter opening and pull the wick loop up until it sits ½ inch below the top rim of the net pot. This positioning keeps the wick in contact with the grow medium above and the water below.
- Scatter a small layer of grow medium (the coco/perlite mix) into the net pot — just enough to cover the wick loop. Rinse the grow medium under a slow faucet for about 30 seconds to remove dust and pre-moisten it.
- Sprinkle a pinch of activated carbon granules into the net pot. These suppress mold and keep the medium smelling fresh.
- Gently loosen the plantlet's roots and nestle it into the net pot. Fill in around the roots with the remaining grow medium up to ½ inch below the top of the net pot. Do not bury the base of the plant — aloe crowns rot if covered.
- Place the hydrated coco disc on top of the grow medium around the plant stem to help retain surface moisture and reduce algae light exposure.
- Set the planter in a spot with at least 6 hours of direct sunlight or under a grow light, at 72–76°F. In the first 72 hours, the wick will begin drawing water up from the reservoir. You do not need to water from the top during this window — just watch that the reservoir has water and check once on day two that the medium feels damp (not soggy).
- After 72 hours: if the grow medium is damp and the plantlet's leaves are upright and firm, you are set. Dissolve 1/8 teaspoon of plant food in 1 cup of water, pour ½ cup of that solution gently through the net pot around the stem, and pour the remaining ½ cup directly into the planter reservoir.
A small win to celebrate here: if after 48 hours the medium is damp and the plantlet has not wilted, the wick is working. That quiet capillary action is the whole engine of this kit, and it is genuinely satisfying to confirm it is running before you do anything else.
Step-by-step setup: the seed option and early germination care
This is the path the kit is officially designed for, and the official PDF numbers make it very approachable. The main thing to accept upfront: aloe vera seeds take 4–5 weeks to sprout. That is not a problem with your setup, it is just how this plant works. Patience here is not optional.
- Pour 1 cup of room-temperature water into the terracotta planter. Confirm the water does NOT touch the base of the net pot.
- Thread the wick through the net pot if needed, lower the net pot in, and pull the wick loop up so it sits ½ inch below the net pot's top rim.
- Add the grow medium and rinse it under the faucet for 30 seconds. Fill to ½ inch below the net pot rim.
- Hydrate the coco disc by placing it on top of the grow medium and adding a small amount of water to it directly — it will expand and soften within a few minutes. Press it gently flat.
- Scatter the aloe seeds from the packet just under the coco disc surface — lightly press them in rather than burying them deep. Aloe seeds need to be close to the surface to germinate.
- Sprinkle activated carbon granules across the coco disc surface to suppress mold during the moist germination period.
- Place the planter in its warm, lit spot. During germination, keep the coco disc slightly damp — mist it with a spray bottle when the surface starts to feel dry, rather than pouring water directly. Do not let it dry out completely, but equally do not let it stay soggy.
- Do NOT add plant food during germination. Wait until you see sprouts.
- Once sprouts appear (expect 4–5 weeks): empty the reservoir fully, then dissolve 1/8 teaspoon of plant food in 1 cup of water. Pour ½ cup of the solution through the net pot around the sprouts, then pour the remaining ½ cup directly into the planter reservoir. Resume normal reservoir refills going forward.
A practical note on germination patience: if nothing has happened by week 3, do not panic. Check that the coco disc is staying damp and that the temperature is genuinely hitting 72–76°F, not just close. A thermometer at windowsill level (not room-center) often reveals cold drafts that are invisible otherwise. If you hit week 6 with zero sprouts, that is a legitimate failure point, contact Modern Sprout about replacement seeds under the Thrive Promise before trying anything else.
Soil vs hydro for aloe: honest pros and cons
The Modern Sprout kit uses a passive hydroponic (wick-fed) system, which is very different from an active pumped hydro system like an AeroGarden. Understanding that distinction saves a lot of confusion. In this kit, there is no pump, no timer, no bubbler, just a fabric wick pulling water up from the reservoir into the grow medium by capillary action. For a dry-loving succulent like aloe, this is a tighter balance than it sounds.
| Factor | Modern Sprout wick/hydro system | Traditional cactus/succulent soil |
|---|---|---|
| Watering discipline required | Low — reservoir self-feeds; check every 1–2 weeks | Medium — must let soil dry completely between waterings |
| Risk of overwatering | Moderate — wick can keep medium too wet if reservoir overfilled | Lower if you use fast-draining cactus mix and a pot with drainage |
| Setup difficulty | Easy — all parts are pre-matched and sized | Easy — but you must source the right soil mix |
| Root health long-term | Good while plant is small; hydro roots are fragile if transplanted | Roots adapt to transplanting well; easier to propagate pups |
| Compact/apartment friendly | Excellent — tidy, self-contained, no soil mess | Fine, but needs a proper drainage saucer |
| Long-term flexibility | Limited — Modern Sprout advises against transplanting mature hydro root systems | High — repot at any size, move outdoors, share pups easily |
One key point Modern Sprout makes explicitly: hydroponic kits are generally NOT recommended for transplanting mature root systems. Hydro-grown roots develop differently from soil roots, they are longer, thinner, and more water-dependent, and they struggle when moved into soil after months in the wick system. If you know from the start that you want to eventually grow a large aloe in a terracotta pot on a patio, starting it in soil from the beginning is genuinely the better call.
Converting from hydro to soil: a quick overview
If you do decide to convert a young plant (before the roots have fully developed to hydro conditions, ideally within the first few months), here is the safest approach: remove the plant and grow medium from the net pot, gently rinse the roots with room-temperature water, trim any visibly damaged or overly long roots with sterile scissors, let the roots air-dry for 24 hours so cut surfaces can callus, then pot into a cactus/succulent mix with added perlite (a 50/50 blend works well for aloe). Do not water for the first week after transplanting. The callused roots need to adjust before they resume absorbing water.
Planting in soil: the full step-by-step
Whether you are starting from scratch in soil or converting from the hydro kit, the same principles apply. Aloe vera is a full-sun, low-water succulent that dies faster from too much water than from too little. The Missouri Botanical Garden lists its water needs simply as 'dry', meaning the medium should complete a full dry cycle between waterings, not just partially dry out.
- Choose a pot that is only slightly larger than the plant's root ball — oversized pots retain too much moisture around aloe roots. A pot with at least one drainage hole is non-negotiable.
- Mix your potting medium: use a commercial cactus/succulent mix and add extra perlite or pumice at roughly a 1:1 ratio. This ensures the mix drains fast and does not hold water around the roots.
- Cover the drainage hole with a small piece of mesh or a broken pot shard to keep medium in while letting water out freely.
- Fill the pot to about one-third with your mix. Set the aloe plant in the center and check that the base of the plant (the crown, where leaves meet roots) will sit at or just above the final soil surface — not buried.
- Fill in around the roots with more potting mix and gently press it down. The crown should be visible above the soil line.
- Do not water immediately after planting from a dry start — wait 3–5 days to let any disturbed roots settle. If you are transplanting from the hydro kit, wait a full week as described above.
- For the first watering: water thoroughly until it drains freely from the bottom, then tip out any standing water from the saucer. Going forward, water only when the top 2 inches of mix feel completely dry — and when you do water, soak thoroughly rather than giving small frequent sips.
- Place in the brightest spot available: a south- or west-facing window with 6 or more hours of direct sun, or directly under a grow light. UF/IFAS recommends moving plants gradually between light levels rather than jumping straight from low light to full sun, to prevent leaf scorch.
Daily and weekly care schedule
Aloe vera is genuinely one of the lower-maintenance plants you can grow, but it has two firm requirements: enough light, and discipline around watering. Most kit failures I have seen come down to one of those two things.
| Care task | Frequency | What to look for |
|---|---|---|
| Check reservoir level (hydro kit) | Every 7–14 days | Refill to 1 cup when reservoir is near empty; never let water touch net pot base |
| Check grow medium moisture (hydro) | Twice a week during germination; weekly after | Coco should feel damp, not dripping; mist if surface is dry during germination |
| Water (soil setup) | Only when top 2 inches of soil are completely dry | Leaves feel slightly less firm/turgid; medium pulls away from pot edges |
| Feed with plant food | Once after first sprouts appear, then every 4–6 weeks | Use 1/8 tsp dissolved in 1 cup water; do not feed during winter/dormancy |
| Light check | Daily for the first two weeks | 6+ hours direct sun or grow light; rotate pot ¼ turn weekly for even growth |
| Temperature check | Weekly | Keep at 72–76°F; move away from cold drafts or heating vents |
| Inspect for pests | Weekly | Check leaf undersides and soil surface for mealybugs, scale, fungus gnats |
| Empty and clean reservoir (hydro) | Every 4–6 weeks | Rinse reservoir interior to prevent algae buildup (algae is harmless but can stain) |
Propagating and repotting your aloe
Aloe vera produces offsets (called pups) from the base as it matures. These are free new plants. Extension guidance from Iowa State and Montana State suggests waiting until a pup is roughly one-quarter the size of the parent plant before separating it, smaller than that and it may not have developed enough independent roots to survive separation.
- Unpot the parent plant so you can see the pup's connection point clearly.
- Trace the pup's stem to where it connects to the parent root system.
- Use a sterile, sharp knife or scissors to sever the connection. Aim to keep a small section of root with the pup if possible.
- Let the cut surface on both the pup and the parent callus for 24–48 hours before repotting either one.
- Pot the pup in a small container (just large enough to hold the roots) with the same fast-draining cactus/succulent mix described above.
- Wait one week before watering the pup. Then follow the same soak-and-dry watering routine as the parent.
For repotting the parent plant: repot when roots are visibly circling the bottom of the pot or pushing out of drainage holes, or when the plant has clearly outgrown its container. Move up only one pot size at a time. For hydro kit plants, the same earlier caution applies, the younger and smaller the plant is when you decide to convert to soil, the better the outcome.
Harvesting aloe gel for household use
Once your plant has thick, mature outer leaves (typically after a year or more of growth), you can harvest gel for general household use, things like soothing minor kitchen burns, using as a hair treatment, or adding to DIY skincare routines. Harvest from the outermost leaves first, as these are the oldest and have the most gel. Cut one leaf at a time, close to the base, with clean scissors or a sharp knife. Let the yellow sap (aloin) drain out from the cut end for about 10 minutes before slicing the leaf open, this sticky substance can cause skin irritation for some people. Scoop or squeeze the clear inner gel out for use. Store unused gel in a clean sealed container in the refrigerator and use within a few days. I want to be clear that this guide describes household uses only, consult a healthcare provider before using aloe gel for any medical purpose.
Troubleshooting common problems
Overwatering and root rot
This is the most common aloe problem in any grow kit setup. Signs of root rot: leaves turn translucent, yellow, or brown and feel soft and mushy rather than firm; the base of the plant feels soft; there may be a faint unpleasant smell from the roots or soil. Rescue steps: remove the plant from the grow medium or soil, trim all visibly brown/mushy roots with sterile scissors, let the healthy remaining roots air-dry for at least 24 hours until cut surfaces callus, then repot in fresh, very fast-draining cactus mix. Extension guidance (Aloe Vera: Houseplant How‑To (SD State Extension)) recommends the same rescue sequence: remove the plant, trim rotten roots and tissue with a sterile tool, let healthy cut surfaces callus briefly, repot into a very fast‑draining cactus/succulent mix (add pumice or perlite), avoid immediate heavy watering, and use a clean container and fresh medium to reduce re‑infection risk. Use a clean container or thoroughly cleaned original pot. Do not water for the first week after repotting.
In the hydro kit specifically: the most common overwatering cause is the reservoir level being too high and actually touching the net pot base. Always keep a visible air gap between the water surface and the bottom of the net pot. If you see the medium staying perpetually soggy, check that gap first.
Mold on the coco disc
A small amount of white fuzzy mold on the coco surface during germination is common and usually not fatal. Modern Sprout's own troubleshooting guidance recommends sprinkling a little more activated carbon on the affected area, or dusting with ground cinnamon (a natural antifungal). Improve airflow around the planter and make sure you are not misting more than necessary. If mold is heavy or spreading fast, that usually means the medium is too wet or the room has poor air circulation.
Etiolation (stretching and leaning toward light)
If your aloe seedlings or plant is growing tall, thin, and leaning hard toward one side, it is not getting enough light. Aloe needs at least 6 hours of direct sun. Move the planter to a brighter window or add a grow light, but do it gradually over about a week, jumping from low light to direct afternoon sun can actually cause leaf-tip scorch. The RHS notes this concisely: 'place in full light with good ventilation.' Rotate the pot a quarter turn every week so all sides get even exposure.
Algae in the reservoir
Green or brown algae growth on the inside of the terracotta planter is harmless to the plant, but it is a sign the reservoir is getting too much light. Modern Sprout explicitly notes this in their FAQ. You can clean the reservoir every 4–6 weeks with a soft brush and plain water. Wrapping the exterior of the planter in a light-blocking sleeve or placing it in a slightly shaded spot to reduce light hitting the water can slow algae regrowth.
Fungus gnats
Fungus gnats love moist coco medium. Adult gnats are mostly an annoyance, but their larvae eat fine roots. Hang yellow sticky traps near the planter to catch adults immediately. For larvae, UC IPM and Penn State extension recommend Bacillus thuringiensis israelensis (Bti, sold as Gnatrol or in some organic pest products) applied to the growing medium, or beneficial nematodes watered in. Cultural control matters most: let the surface of the medium dry out between misting sessions during germination, and avoid overwatering. In the hydro kit, the activated carbon layer on the coco surface helps, but it is not a full solution.
Mealybugs and scale
Mealybugs look like tiny white cottony masses, usually in leaf joints. Scale appears as flat brown bumps on stems and leaf surfaces. Both feed on plant sap and weaken the plant over time. Immediate step: isolate the plant from any other plants in the house. Then physically remove what you can with a cotton swab dipped in rubbing alcohol. Follow up with spot treatments of horticultural oil or insecticidal soap according to the product label, repeating every 5–7 days for at least three cycles. The Missouri Botanical Garden specifically flags mealybugs and scale as the main pests to watch for on aloe.
Slow or no germination
If you reach week 5 without sprouts, run through this checklist before giving up: Is the temperature genuinely hitting 72–76°F at the planter level? Is the coco disc staying consistently damp, not dry between checks? Are the seeds close to the surface rather than buried? If everything checks out and you are past week 6, contact Modern Sprout. Under the Thrive Promise they will send replacement seeds so you can retry, this is much easier than sourcing compatible aloe seeds and guessing at viability.
How this kit compares to similar grow kits
If you are deciding between the Modern Sprout Aloe kit and other indoor grow kits, the passive versus active hydro distinction is the most important factor to understand. If you need specific guidance for a different succulent, see the prickly pear cactus hydro grow kit instructions for tailored setup and care. Here is a practical side-by-side.
| Kit type | System type | Light requirement | Reservoir/refill | Best for | Transplant flexibility |
|---|---|---|---|---|---|
| Modern Sprout Aloe (this kit) | Passive wick hydro (terracotta) | 6+ hrs direct sun or grow light, manual placement | ~1 cup, check every 1–2 weeks manually | Beginners, windowsill growing, succulents | Limited — hydro roots are fragile when mature |
| AeroGarden (e.g., Harvest 2.0) | Active pumped hydro with built-in timer/lights | Built-in 15-hr automated light cycle, auto-controlled | Larger reservoir; fill-to-line indicator; automated reminders | Herbs, leafy greens, faster-growing crops | Not designed for succulent growing |
| Generic aloe/healing aloe hydro kits | Varies — often passive wick or simple pot insert | Manual, no included light | Small reservoir, check weekly | Comparable to Modern Sprout; quality varies by brand | Similar limitations |
| Prickly pear cactus hydro kit | Passive wick, similar format to Modern Sprout | 6+ hrs direct sun, high light demand | Small reservoir, low refill frequency needed | Cactus enthusiasts, very dry-adapted plants | Similar to Modern Sprout aloe kit |
| Amaryllis-style indoor kits (e.g., Red Lion) | Soil-based bulb kit, no hydro component | Bright indirect light during growth | Traditional watering from top | Seasonal bloomers, gift kits, one-cycle plants | Straightforward — standard soil repotting |
The AeroGarden comparison is worth dwelling on briefly. If you have used or are considering an AeroGarden, it is a fundamentally different product, active pump, automated lights, larger reservoir, and designed for fast-cycling herbs and greens rather than slow-growing succulents. For setup details on AeroGarden systems, see the AeroGarden Grow Anything Kit instructions for how their active pump and light schedules differ from wick-fed kits. The Modern Sprout kit is quieter, lower-tech, and better matched to a dry-loving plant like aloe. You would not grow aloe successfully in an AeroGarden, and the AeroGarden's automated features would be overkill and counterproductive for a plant that needs to dry out between waterings. For a different bulb-focused kit with detailed setup steps, see the amaryllis red lion indoor grow kit instructions for guidance on planting and bloom care. Other aloe-specific kits (including some branded 'healing aloe' hydro kits) use a very similar passive wick format to the Modern Sprout, if you have one of those and need setup help, much of this guide applies directly, though the exact parts names and measurements may differ.
Replacement parts, support, and when to contact Modern Sprout
Before you search online for replacement components, check Modern Sprout's own options. They sell an Immersion Hydroponic Replant Kit that includes the key consumables, and under the Thrive Promise they will work with you on replacement seeds or parts for failed kits. Contact the support team at [email protected] for failed germination, damaged components, or missing parts. For return and exchange questions (including issues with live plants on arrival), Modern Sprout directs customers to both [email protected] and [email protected].
For grow lights specifically: Modern Sprout's Smart Grow Lights carry a 3-year limited warranty, and you will need proof of purchase when filing a claim. If you are supplementing with one of their lights and it fails, that warranty path is worth using before buying a replacement.
- General help and troubleshooting: [email protected]
- Returns and exchanges (including damaged live plant arrivals): [email protected]
- Replacement seeds or replant kits: ask via [email protected], reference the Thrive Promise
- Grow light warranty claims: contact Modern Sprout directly with proof of purchase (3-year coverage on smart grow lights)
- Official instruction PDF: search 'TerracottaKit-Aloe-Instructions-R3.pdf' from the Modern Sprout Instruction Manuals page
Growing aloe in a small terracotta wick planter is genuinely rewarding once the system clicks, and when it clicks, it runs quietly for weeks without much intervention. The gotchas are mostly up front: getting the reservoir level right, staying patient through germination, and not overwatering out of anxiety. If you run into a wall at any point, Modern Sprout's support team is one of the more responsive in the kit gardening space, and their Thrive Promise gives you a legitimate retry path rather than a dead end.
FAQ
What exact parts and materials should I list in the article’s contents and parts checklist for the Modern Sprout Aloe Grow Kit?
List the kit parts using Modern Sprout’s PDF names so readers can match what they have: stainless net pot, grow medium (coco/perlite mix), wick (net‑pot wick loop), reservoir/glazed terracotta planter, coco disc, seeds, plant food, activated carbon. Also list common extras to recommend: small spray bottle, pH test strips (optional), small hand trowel, sticky traps, horticultural alcohol, sterile scissors. (Source: Modern Sprout TerracottaKit-Aloe-Instructions-R3.pdf https://cdn.shopify.com/s/files/1/0019/8361/0978/files/TerracottaKit-Aloe-Instructions-R3.pdf)
What step‑by‑step quick‑start setup should I show (use verbatim kit values where available)?
Follow Modern Sprout’s exact steps for the wick reservoir setup: 1) Pour 1 cup water into the planter (do NOT let water touch the net pot). 2) Pull the net‑pot wick loop up so it sits ½" below the top of the planter. 3) Fill grow medium to ½" below the planter top and rinse under a faucet ~30 seconds. 4) Place and hydrate the coco disc on top. 5) Sprinkle seeds just under the surface. 6) Until sprouts appear keep the coco slightly damp (mist if needed). 7) Once sprouts develop: empty the reservoir and dissolve 1/8 tsp plant food in 1 cup water; pour ½ cup through the net pot around sprouts, then pour the remaining solution directly into the planter. Expect sprouts in ~4–5 weeks. Recommended temps: 72–76°F and at least 6 hours direct sunlight or supplemental grow light. Include labeled diagrams from the kit PDF for visuals. (Source: Modern Sprout TerracottaKit-Aloe-Instructions-R3.pdf; Instruction Manuals page https://modernsprout.com/pages/instruction-manuals)
How should I present the soil vs hydro (wick) decision and conversion steps?
Explain that the kit is a passive wick hydroponic system (wick + reservoir) — not a pumped AeroGarden‑style system — so pros/cons: passive wick = low maintenance, smaller reservoir, risk of over‑wet coco; soil = better long‑term drainage for mature aloes and easier to repot/propagate. For conversion: gently remove plantlet from net pot, shake off old coco, let roots air‑dry a few hours, pot into a fast‑draining cactus/succulent soil (mix 2:1 potting soil:pumice or perlite), use a pot 1 size larger with drainage, do not water for 3–7 days to let roots settle. Warn that Modern Sprout notes hydro kits are not recommended for transplanting mature root systems, and suggest contacting support for replacement replant kits if unsure. (Sources: Modern Sprout shop product copy and Thrive Promise https://modernsprout.com/shop https://modernsprout.com/pages/thrive-promise; extension repotting guidance from Iowa State and SD State https://yardandgarden.extension.iastate.edu/how-to/common-problems-and-issues-succulents https://extension.sdstate.edu/aloe-vera-houseplant-how)
What concise daily/weekly care schedule should I include for light, water, temperature, and feeding?
Give a simple routine: Daily—place kit in bright spot with at least 6 hours direct sun or run supplemental grow light; check coco surface and leaves. Weekly—mist coco lightly only if surface is dry until sprouts appear; once established, follow a wet‑dry cycle: check reservoir weekly and refill only as needed. Feeding—after first true leaves, use 1/8 tsp plant food per 1 cup water (as kit instructs); when dosing into reservoir, follow kit dosing frequency (start with monthly or per manufacturer directions). Temperature—keep 72–76°F when starting; avoid <50°F. Emphasize “water sparingly” once plants are growing (Aloe is drought‑tolerant). Cite RHS, Missouri Botanical Garden, UF/IFAS for general succulent rules and to justify the kit’s 6+ hour light recommendation. (Sources: Modern Sprout PDF https://cdn.shopify.com/s/files/1/0019/8361/0978/files/TerracottaKit-Aloe-Instructions-R3.pdf; RHS https://www.rhs.org.uk/plants/aloe; MBG https://plantfinder.mobot.org/PlantFinderDetails.aspx?kempercode=b628; UF/IFAS https://gardeningsolutions.ifas.ufl.edu/plants/ornamentals/aloe-vera/)
How should I describe propagation, repotting triggers, and exact repot steps?
Propagation: explain offsets (pups) are the easiest method — wait until pups are ~¼ the parent size, then gently separate with clean tools, let cut surfaces callus for a day, and pot in fast‑draining mix. Repot triggers: plant is rootbound, lots of pups, or you want to convert to soil (or show constant soggy medium/rot). Repot steps (soil conversion): 1) Remove from net pot, shake off medium, trim dead roots. 2) Let roots dry several hours. 3) Use clean pot with drainage and cactus/succulent mix (add pumice/perlite). 4) Position plant at same crown level, backfill, wait 3–7 days before first light watering. For moving from wick hydro to larger hydro systems, recommend replant kit or contact support; avoid forcing mature hydro roots into dense soil without acclimation. Use extension sources for timing and pot sizes. (Sources: Iowa State extension, SD State extension, Modern Sprout help center note on transplanting https://yardandgarden.extension.iastate.edu/how-to/common-problems-and-issues-succulents https://extension.sdstate.edu/aloe-vera-houseplant-how https://help.modernsprout.com/en-US/articles/growing-troubleshooting-51060)
What’s the correct, safe way to harvest aloe gel for household use (without medical claims)?
Give neutral, non‑medical instructions: 1) Use a healthy mature leaf near the base. 2) Cut close to the stem with a clean knife. 3) Stand the leaf upright to allow yellow sap (aloin) to drain for several minutes. 4) Peel away the rind and scoop clear inner gel with a clean spoon. 5) Store in an airtight container in the fridge and use within about a week (or freeze in small portions). Include a clear non‑medical disclaimer: do not present as medical advice and advise a patch test for skin sensitivity. Cite extension care pages for leaf maturity and safety practices. (Sources: SD State extension aloe how‑to https://extension.sdstate.edu/aloe-vera-houseplant-how; MBG https://plantfinder.mobot.org/PlantFinderDetails.aspx?kempercode=b628)