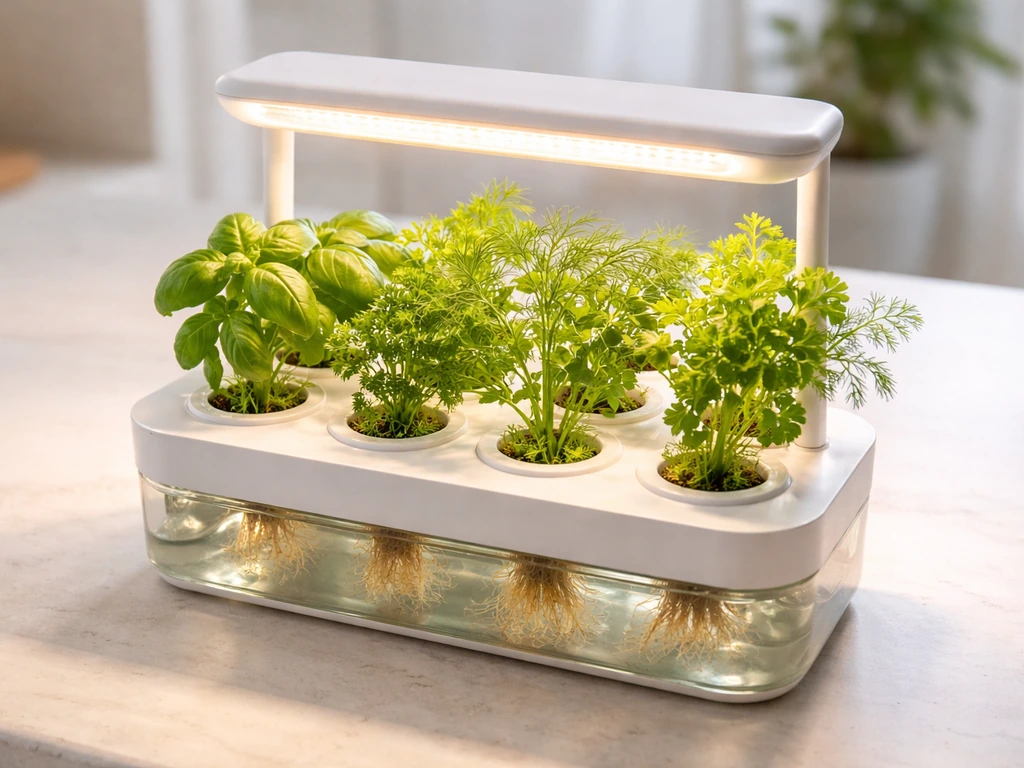
The Sharper Image LED Glow Grow Indoor Water Herb Garden Kit (model 1015191) is a soil-free hydroponic system that uses water, a built-in LED grow light, and an air pump to grow herbs right on your countertop. Setup takes about 15 minutes, and the built-in timer automatically runs everything for 12 hours before shutting off. Here is exactly how to get it assembled, planted, and producing visible growth as fast as possible.
Sharper Image Glow Grow Garden Instructions: Setup to Troubleshoot

Marcus Thornfield
20 Jun 2026
First: confirm which kit you have and what's in the box
The kit you are most likely holding is the Sharper Image LED Glow Grow Indoor Water Herb Garden Kit, with manufacturer part number 1015191. It is a compact unit, standing about 5.1 inches tall and weighing roughly 3 pounds assembled. Before you do anything else, check the bottom or back of the unit for that model number. This matters because Sharper Image has sold a few similar-looking garden kits, and the assembly steps and light schedules can differ between them.
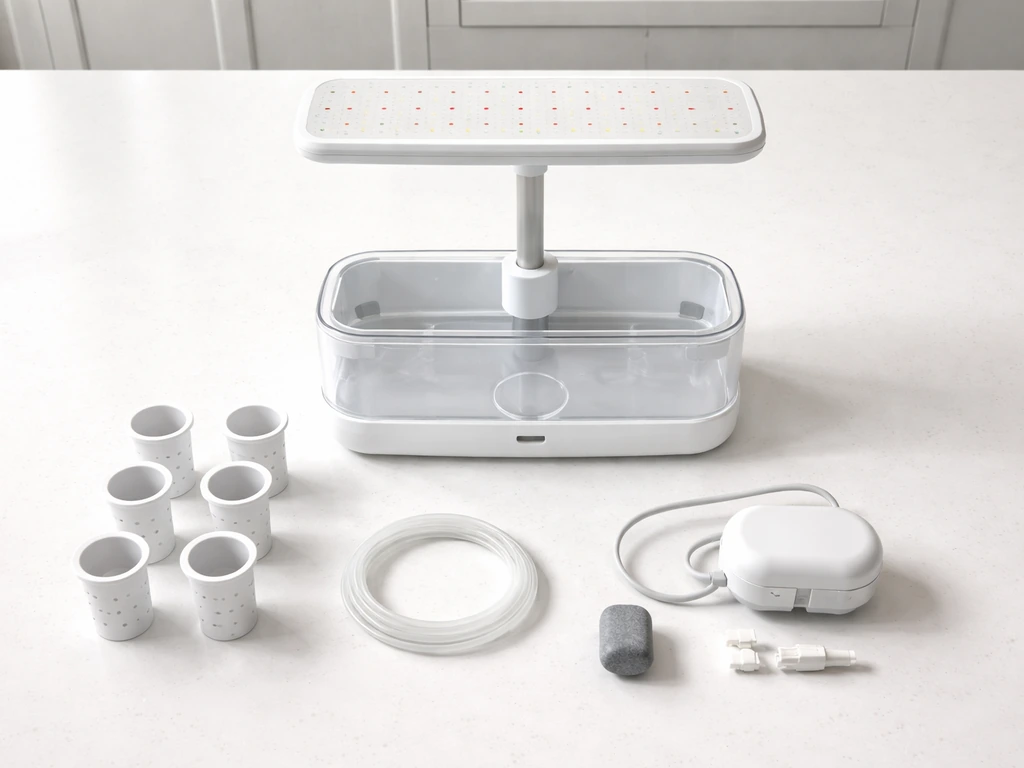
Once you confirm the model, do a full parts check. Here is what should be inside the box:
- Main housing unit with integrated LED grow light panel on top
- Water reservoir (the base tray or tank that holds the nutrient solution)
- Growing tray or pod inserts that sit above the reservoir
- Air pump or oxygenation system (the kit runs on water, light, and air)
- Power adapter or cord for the LED and air system
- Growing medium inserts (typically rockwool cubes, sponge plugs, or net pod inserts — no soil)
- Step-by-step instruction manual with seed recommendations
- Small parts for assembly (check the manual for a numbered parts list)
Note that seeds and water are NOT included. The listing is explicit about this. You will need to pick up herb seeds separately before you can plant anything. The instruction manual inside should list recommended seed varieties, so flip to that section while you are unboxing. If any component is missing or cracked, contact Sharper Image customer support before proceeding. Also, this kit contains small parts, so keep it away from children under 3.
If your box does not match this description, you may have a related kit such as a Discovery Glow Grow or a Discovery Mindblown Glow Grow, which have their own setup differences. If you are using a Discovery DIY terrarium grow kit, follow the discovery diy terrarium grow kit instructions to match the right parts and schedule Discovery Glow Grow. Those kits are worth looking up separately rather than following these exact steps.
Unbox and pick the right spot before you plug anything in
Location matters more than most people realize with these little countertop gardens. Get this part right and everything else is easier.
Power and placement
Place the kit within easy reach of an outlet. The reviewer notes from Walmart mention this specifically, and it sounds obvious, but the cord is short, so do not plan to stretch it across a kitchen. A countertop, shelf, or desk near an outlet works perfectly. Avoid placing it directly in front of a window where direct sunlight will compete with the built-in LED and heat the water reservoir, which can encourage algae growth.
Ventilation and heat
The LED light panel on this kit produces low heat compared to older grow lights, but you still want a little airflow around the unit. Do not put it inside a closed cabinet or box it in with other items on both sides. A few inches of clearance on all sides is enough. Room temperature between 65 and 75 degrees Fahrenheit is the sweet spot for most herbs.
Water safety
Since this is a water-based system sitting near an electrical outlet, take one minute to think about spill risk. Set the unit on a flat, stable surface. If you are placing it on a wood shelf or near electronics, put a small tray or mat underneath it as a precaution. When you fill the reservoir, do it carefully and avoid splashing water near the power cord connection.
Step-by-step hardware assembly
The Glow Grow is designed to be assembled without tools, so do not overthink this. Follow these steps in order and you will not run into problems.
- Lay all parts out on a flat surface and match them to the parts diagram in your instruction manual.
- Set the reservoir base on your chosen surface. Make sure it is level so water distributes evenly.
- Attach or seat the growing tray or pod holder into the reservoir. This typically clicks or drops into place over the water basin.
- Insert the growing medium pods or inserts into the pod slots in the tray. Do not compress or squeeze the sponge/rockwool plugs — just set them in gently.
- Connect the air pump tubing to the pump and route it into or under the reservoir according to the manual diagram. The air pump oxygenates the water, which is what keeps roots healthy in a soil-free system.
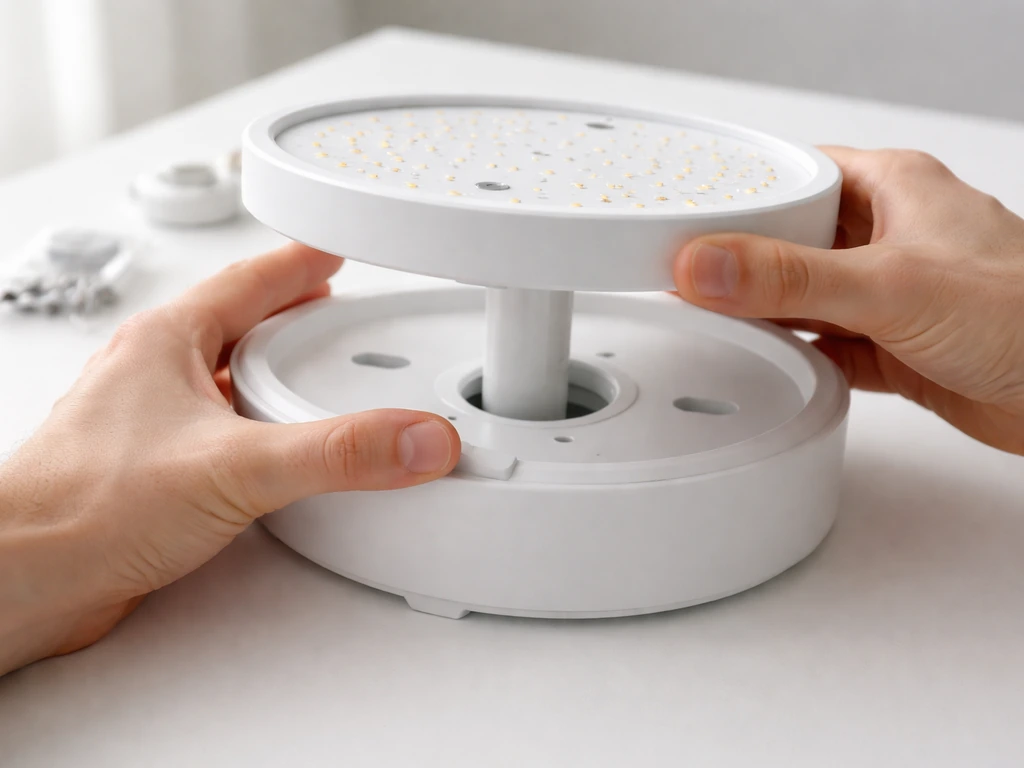
- Set the LED housing or light arm into position on top of the unit. On most versions of this kit, the light panel snaps onto the top frame or clips into guide rails.
- Run the power cord to the outlet but do NOT plug in yet. You want to fill with water and add seeds before powering up.
If something does not seem to fit or align, stop and recheck the manual diagram. Forcing plastic clips on these kits can crack the housing. The fit should always feel snug but not strained.
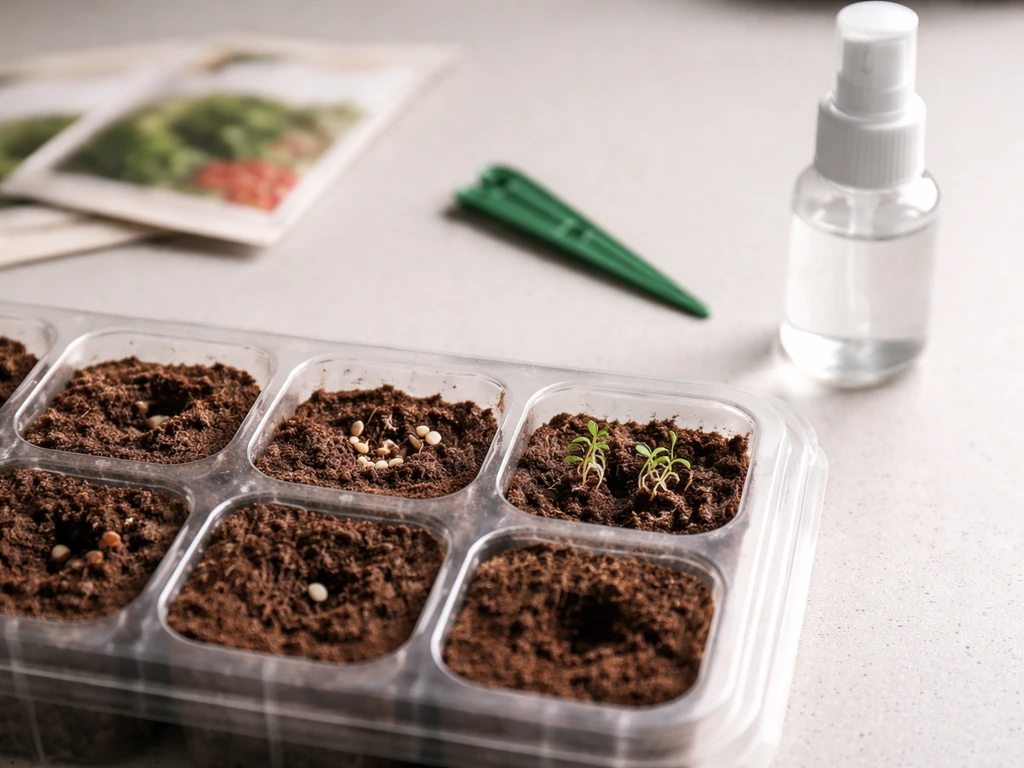
Planting your seeds or starter plugs
This is where a lot of first-timers make mistakes, so let me walk through it carefully.
Fill the reservoir first
Before adding seeds, fill the reservoir with clean water. Room temperature tap water works fine for most herbs, though filtered water gives slightly better results if your tap water is heavily chlorinated. Fill to the marked fill line inside the reservoir. Do not overfill. The water level should reach the bottom of the growing medium pods but not soak them entirely from the start. The air pump will circulate the water up to the roots.
Seeds vs. starter plugs
If you are using seeds, place 2 to 3 seeds per pod into the small depression or hole at the top center of each growing medium insert. Press them gently just below the surface, about 1/8 to 1/4 inch deep. Do not bury them too deep. In a soil-free system, seeds need to be near the surface to access both moisture and light for germination. After they sprout and you can see a clear winner, thin down to the single strongest seedling per pod by snipping the extras with scissors at the base. Do not pull them out, which would disturb the roots of the surviving plant.
If your seeds came with or you purchased pre-started seedling plugs (sometimes called starter inserts or seed pods), just press them gently into the pod slots so they sit flush with the tray. They should be snug but not crushed. The roots will find the water below on their own within a few days.
Which herbs work best in this kit
Check the seed recommendations in your instruction manual, which is tailored to this kit's light intensity and reservoir size. In general, compact herbs like basil, mint, chives, parsley, and cilantro perform well in small hydroponic countertop systems. Avoid large or deep-rooted plants like tomatoes or root vegetables. They will outgrow the reservoir quickly.
Setting up the grow light correctly
The LED light is the most important part of this kit, and getting it positioned and scheduled correctly is what separates a thriving garden from one that just sits there doing nothing.
Light positioning
The LED panel should sit directly above the pods, as close as the kit's frame allows while still leaving room for plant growth. On the model 1015191, the light housing is part of the main frame, so it is already in the correct position when assembled. Make sure nothing is blocking the light from reaching all pod slots equally. If you notice one side of your tray is in shadow, rotate the tray 180 degrees every few days to even out light exposure.
One thing to check: make sure the light panel is fully locked into its housing. If it is even slightly tilted or not seated properly, some pods will receive less light than others. Uneven growth is often caused by this simple alignment issue, not by the seeds themselves.
The built-in timer and light schedule
The Sharper Image Glow Grow kit has a self-timer built in. According to user reviews from the Walmart listing, the light and oxygen system will automatically run for 12 hours and then shut off. This 12-hour on / 12-hour off cycle is actually a solid schedule for most herbs, mimicking a natural day/night rhythm. You do not need to manually turn it on and off each day.
Plug the kit in at the same time each day that you want the light cycle to begin. For example, if you plug it in at 8 AM, the light and air will run until 8 PM, then turn off until you unplug and replug the next day, or if the timer is a true 12-on/12-off loop, it will automatically restart. Check your specific manual to confirm whether it loops automatically or needs to be triggered each cycle. If it needs manual triggering, plug it into a standard outlet timer (available at any hardware store for a few dollars) set to 12 hours on and 12 hours off.
How to tell if the light is working
- The LED panel should glow visibly when the unit is on. LED grow lights often emit a blue-purple or white-blue light.
- If the light looks dimmer on one side, check that the panel is fully seated in its housing.
- If the light does not come on at all, check the power connection first, then try a different outlet before assuming the LED is faulty.
- Seedlings leaning dramatically toward one side (etiolation) usually means uneven light coverage, not a light failure.
Day-to-day care: watering, nutrients, and maintenance
Once the kit is running, the daily routine is minimal but consistent attention makes a real difference.
Watering routine
Check the water level every 2 to 3 days, especially in the first few weeks when plants are establishing. Top it up to the fill line with clean, room-temperature water whenever it drops noticeably. In warmer rooms or during high grow-light hours, the water evaporates faster. Do not let the reservoir dry out completely, as exposed roots can dry out and die within hours in a soil-free system.
Nutrients and additives
Plain water works for germination, but once seedlings have sprouted and have their first set of true leaves (usually 1 to 2 weeks in), adding a diluted liquid hydroponic nutrient solution will noticeably speed up growth. Look for a basic hydroponic herb nutrient at a garden center. Use it at half the recommended dosage on the label. Change out the full reservoir water every 1 to 2 weeks to prevent salt buildup and keep the system fresh. The instruction manual may specify a nutrient brand or formula that is matched to this kit, so check that first.
General maintenance checklist
- Every 2-3 days: check and top up water level
- Weekly: check that the air pump is running (you should hear a faint hum and see small bubbles or movement in the water)
- Every 1-2 weeks: do a full water change, rinse the reservoir, and refill with fresh water plus diluted nutrients
- Monthly: wipe down the LED panel gently with a dry cloth to remove dust that reduces light output
- As needed: trim herb plants once they reach a few inches tall to encourage bushy growth and prevent them from shading lower leaves
Troubleshooting: when things go sideways
Here is the honest truth: most problems with the Sharper Image Glow Grow come down to a small number of easily fixable issues. Let me go through each one. If you are seeing slow results, follow the discovery steps for troubleshooting that glow and growth faster.
| Problem | Most Likely Cause | Fix |
|---|---|---|
| No growth after 1-2 weeks | Seeds too deep, wrong seed type, or water too cold | Re-seat seeds at 1/8 inch depth, confirm seeds are fresh and herb varieties, keep room above 65°F |
| Weak or leggy seedlings | Not enough light or light misaligned | Confirm LED panel is fully seated, check timer is running full 12-hour cycle |
| Light not turning on | Loose power connection or faulty outlet | Try a different outlet, check cord connection at both ends, confirm the timer has not cut power |
| Green algae in reservoir | Too much light reaching the water | Cover or wrap the reservoir sides with dark tape or paper to block light from the water basin |
| White mold on growing pods | Poor airflow or overwatered pods sitting in standing water | Check air pump is running, lower water level slightly so pods are not submerged |
| Overheating / warm water | Warm room + direct sunlight + LED heat combined | Move away from windows, ensure airflow around unit, do a full water change with cool fresh water |
| Water leaking from base | Reservoir not seated properly or overfilled | Check reservoir seating, drain to fill line, inspect for cracks in the tray |
| Plants dying after transplanting | Roots disturbed or water level too high post-transplant | Leave plants in kit until harvest, do not transplant mid-growth in this style of system |
Algae is probably the most common complaint with transparent reservoir kits like this one. It is not dangerous to plants in small amounts, but it does compete for nutrients and looks unpleasant. The fix is simple: block light from reaching the water. A strip of black electrical tape around the outside of the reservoir base is enough. This is a quick fix that also prevents future algae cycles.
If the air pump stops working, that is a more urgent issue. The air pump keeps oxygen in the water, and without it, roots can suffocate within a day or two. Check that the tubing has not kinked or disconnected. If the pump is completely dead, a small aquarium air pump from a pet store (around 5 to 10 dollars) can serve as a replacement while you contact Sharper Image for a warranty fix.
A few things to know about similar kits
If you are shopping around or helping someone else set up a similar garden, it is worth knowing that there are a handful of related products on the market. The Discovery Glow Grow, Discovery Mindblown Glow Grow, and the Grow and Glow Terrarium kits are all in the same general category but have different assembly steps, light schedules, and growing mediums.
Manuals+ also maintains a Sharper Image category of manuals and guides, which can help when you are looking for the right documentation for a specific variant Manuals+ provides a Sharper Image category of manuals and guides. The Grow and Glow Terrarium instructions can differ from this model, so use the guide that matches your exact kit Grow and Glow Terrarium kits. The instructions for those kits are not interchangeable with the Sharper Image model 1015191.
If you end up with one of those instead, look up their specific guides rather than adapting these steps.
Your next steps right now
If your kit is assembled, seeds are planted, water is filled to the line, and the cord is plugged in, you are done with setup. ManualsLib hosts a large index of Sharper Image manuals, though the specific Glow Glow Grow kit manual was not found in the index results for this kit you are done with setup.
The timer will handle the light and air cycle automatically. Now all you need to do is check the water level every couple of days and wait. If you need discovery glow grow instructions for faster results, revisit the light schedule and seed depth sections before troubleshooting. Most herbs show the first sprouts within 5 to 10 days, sometimes sooner with basil.
If nothing has happened by day 14, revisit the troubleshooting table above and start with seed depth and light alignment, which are the two most common culprits. Small wins like that first green shoot are genuinely exciting, and this kit is capable of producing a real, harvestable herb garden on your countertop with almost no effort once it is dialed in.
FAQ
How full should the water reservoir be during the first week, and is it bad if the pods sit in water?
Use the marked fill line inside the reservoir as the only reference, and aim for the water to touch the bottom of the medium pods without submerging them. If you regularly overfill and the pods stay soaked, you can increase algae and create a weaker germination environment.
What should I do if my seeds are slow to germinate in a cooler room?
If your room is cooler than about 65°F, germination often slows even when everything is assembled correctly. Try moving the kit to a slightly warmer spot and keep the light cycle consistent, then reassess after 3 to 4 extra days before changing seed depth or nutrients.
Why shouldn’t I pull out extra seedlings when thinning to one per pod?
The “snip, don’t pull” rule matters most right after sprouting, because the surviving seedling’s roots can be intertwined in the pod. Snipping also prevents disturbing the medium and avoids accidentally lifting the winner out of position.
When is it safe to start adding nutrients, and what happens if I add them too early?
Most nutrient issues show up as weak growth or leaf discoloration, so start with diluted hydroponic nutrient at half label strength only after true leaves appear (about 1 to 2 weeks). If you add nutrients too early, you can stress tiny seedlings and slow growth.
Should I rotate the tray, and how often, if one side grows faster than the other?
Yes, you can rotate the tray, but rotate the whole tray 180 degrees on a schedule (for example every few days) rather than moving individual pods. This helps correct for consistent light shadowing instead of changing conditions pod by pod.
I added black tape for algae but it keeps coming back, what else should I check?
If you notice algae appearing even after blocking light, check for gaps where light can reach the reservoir through the sides. Use the same opaque barrier around the reservoir base, and keep the unit away from direct window sunlight.
What should I do if the power goes out or I accidentally unplug the kit during the day?
A short power disruption can break the intended cycle, especially if your model requires manual triggering or uses an external timer. Reset by plugging back in at your usual start time (or by resetting the outlet timer) so the 12 on and 12 off rhythm stays consistent.
How can I tell whether the air pump issue is tubing-related versus a dead pump?
If the pump is humming but airflow seems weak, inspect the tubing for partial kinks or loose connections and make sure the air line is routed without tight bends. If the pump is silent or not moving air, a small aquarium air pump can temporarily oxygenate while you get warranty support.
When should I do a full reservoir water change instead of just topping up?
In a hydroponic countertop system, water chemistry can drift quickly. If you see persistent odor, cloudiness, or heavy mineral residue, do a full reservoir change sooner (not just topping up) and refill with fresh room-temperature water.
My growth is uneven, how do I confirm it is a light alignment problem and not something wrong with seeds?
If the LED housing is slightly unseated or tilted, uneven growth is common, but you should verify alignment before changing anything else. Reseat the light panel fully into its housing, then give it several days to show new growth patterns rather than reseeding immediately.
Can I run the kit on an external outlet timer, and what setting should I use?
Yes, but only if the kit supports that schedule. If your timer is not clearly automatic, use a standard outlet timer set to 12 hours on and 12 hours off, and ensure the timer can handle the kit’s power draw.
What plants should I avoid, and can I grow anything beyond the common herbs listed?
Don’t switch to large deep-root plants like tomatoes or root vegetables, they tend to outgrow the reservoir quickly. Stick with compact herbs, and if you want to try something new, keep it to shallow-root or fast-cycling varieties that match herb recommendations from your manual.
Is filtered water really worth it, and how should I handle chlorinated tap water?
If you plan to use tap water, let it sit for a few hours to reduce immediate chlorine impact, especially in areas with heavily chlorinated supply. If algae is a big issue, switching to filtered water can also help reduce extra particulates that feed algae.