
Before diving in: the Micro Mini 2 Grow Scooter is not a grow kit in the hydroponic or seed-growing sense. It is a convertible children's scooter made by Micro Mobility that literally grows with your child, adjusting from a three-stage ride-on toy for toddlers all the way to a standing kick scooter for kids up to around age six. See the Micro Mini2Grow Deluxe LED 2.0 product page on Micro Mobility's official site for official product details and images. If you landed here looking for foam pods, seed packets, or water reservoirs, this is not that product. But if you just unboxed a Mini2Grow and you are staring at a pile of parts wondering what goes where, you are exactly in the right place. This guide walks you through every step: identifying your exact model, checking the box contents, assembling the scooter correctly, adjusting it as your child grows, caring for it over time, and knowing where to find replacement parts or the official PDF manual.
Micro Mini 2 Grow Scooter Instructions: Setup & Care Guide

Wait, is this a grow kit or a scooter?
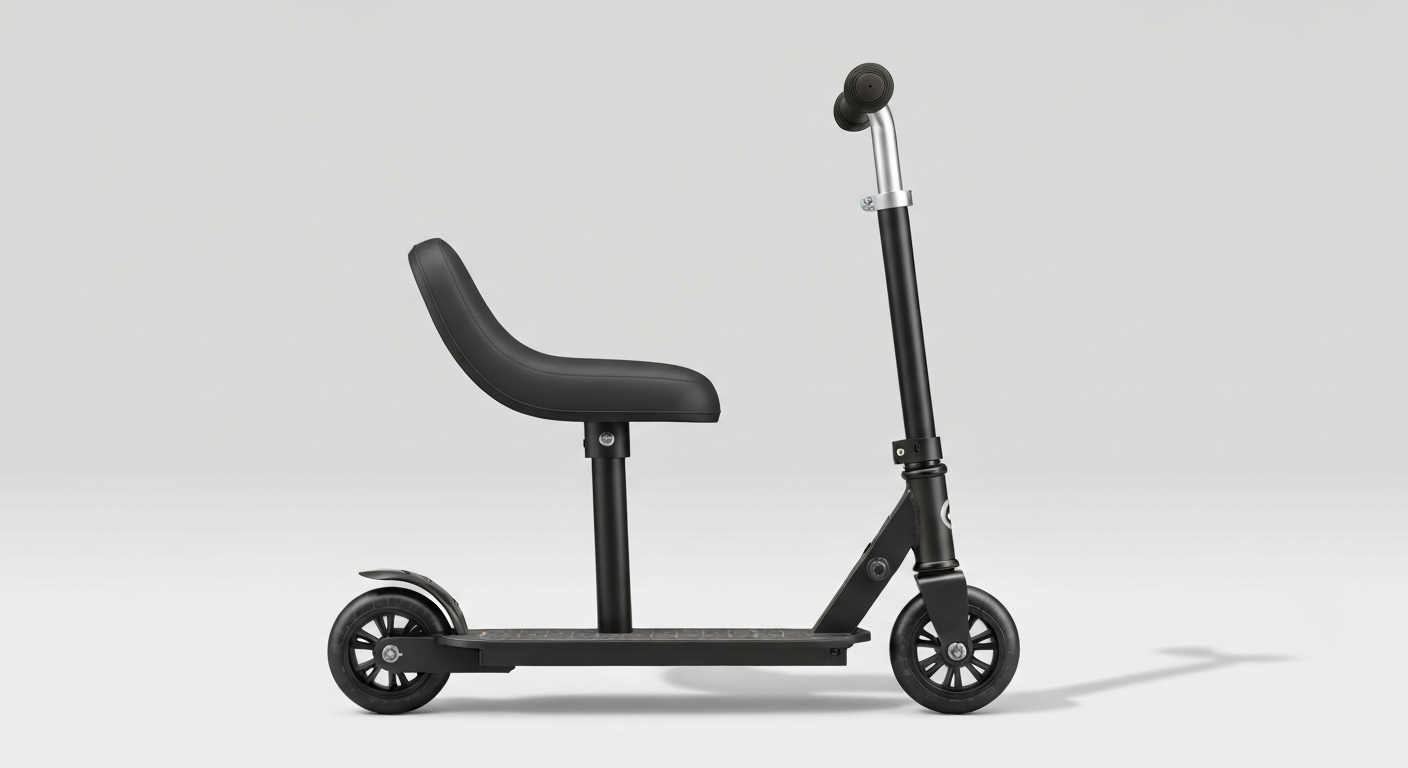
This is a fair and genuinely common point of confusion. The word 'grow' in the product name refers to a child's physical growth, not plant growth. The Micro Mini2Grow is designed so that one scooter adapts across multiple developmental stages, from a sit-and-push ride-on to a full kick scooter, by adjusting the seat height, handlebar height, and removing or adding components. It does not contain seeds, foam pods, water trays, or any hydroponic hardware. If you were searching for a toy that expands in water (like a grow-a-dinosaur or similar water-swelling toy), check out the instructions for grow-your-own dinosaur kits or grow-a-sloth toys elsewhere on this site, as those are entirely different product types with their own setup steps.
Identifying your exact Micro Mini 2 Grow model
Micro Mobility produces several versions of the Mini2Grow, and the setup steps differ slightly depending on which variant you have. Getting this right before you start saves a lot of frustration. Here is what to look for.
Where to find your model number
Flip the scooter box over and look for the SKU or model number printed near the barcode. Common model numbers for the Mini2Grow range include MMD356, MMD357, MMD358, and MMD359, with each number corresponding to a specific color variant. The model number also appears on the sticker affixed to the underside of the scooter deck. Write this number down before you begin assembly because you will need it if you ever contact Micro support or order spare parts.
Visual cues to confirm your kit
- The Micro logo (a stylized 'M') is printed on the deck and on the handlebar grips.
- The Mini2Grow Deluxe Magic LED version has illuminated LED wheels that glow when rolling. If your wheels light up, you have the LED variant.
- The seat is a rounded T-bar seat that slots into the deck column. This is the clearest sign you have a Mini2Grow rather than a standard Mini Micro.
- The handlebar stem has multiple locking notches for height adjustment, visible when you pull the stem upward.
- The packaging shows a child progression graphic (baby on seat, toddler steering, older child kicking) which confirms the multi-stage 'grow' design.
- The box should include 'Mini2Grow' in the product name text, not just 'Mini Micro' or 'Maxi Micro'.
If you are still unsure, the official manual PDF (available as a free download from the Micro Mobility website under Downloads) shows product diagrams with part labels that match every variant. The manual is multilingual and includes a clear front-page product photo you can compare against your unit. The Micro Mobility corporate contact is also available at [email protected] or by phone at +41 44 910 11 22 if you need confirmation direct from the manufacturer.
Everything that should be in the box
Before assembly, lay every component out on a clean floor and cross-check against this list. It is much easier to identify a missing part now than after you have already started putting things together.
- Scooter deck (the flat platform your child stands or sits on)
- Front fork and wheel assembly (120 mm front wheel, pre-attached or packed separately)
- Rear wheel (80 mm, smaller than the front)
- Handlebar stem (T-bar style, adjustable height)
- Handlebar grips (left and right, usually pre-fitted to the stem)
- Seat post and T-bar seat (the removable seat for the early ride-on stages)
- Seat post clamp or locking collar
- Rear footbrake (flexbrake, mounted over the rear wheel)
- Allen key (hex wrench, included for tightening bolts during assembly and adjustment)
- Multilingual user manual / instruction booklet
- Decals or sticker sheet (decorative, applied by the child or parent)
- LED wheel components (if Mini2Grow Deluxe Magic LED variant: LED axle caps or integrated LED wheel sets)
Photo suggestion: take a wide, flat-lay photo of all parts before assembly with each item labeled. This is genuinely useful if you ever need to describe a missing or damaged part to customer support. The Micro Spare Parts Brochure (a free PDF download from Micro Mobility's Downloads page) shows official part diagrams and part numbers for every component listed above. Cross-referencing that brochure against your physical parts is the most reliable way to confirm nothing is missing.
One practical tip: inspect the allen key that comes in the box. Some units ship with a small, budget-quality hex wrench that can round off bolt heads if you apply too much force. If you have a proper hex key set at home, use that instead and save the supplied key as a spare.
Step-by-step assembly walkthrough
The official Micro manual is the authoritative source for assembly, and the steps below follow that structure closely. Micro also publishes an unboxing video linked from the product page on their official store, which is worth watching alongside these written steps if you are a visual learner.
- Unpack everything and complete the parts checklist above before touching a single bolt.
- Attach the front fork to the deck if it is packed separately. Slide the steering column down through the headtube on the deck and secure with the collar clamp. Hand-tighten first, then use the allen key to fully tighten. Do not overtighten.
- Fit the front wheel axle through the fork dropouts. Thread the axle nut (or bolt, depending on variant) and tighten with the allen key. Give the wheel a spin to confirm it rolls freely without wobble.
- Attach the rear wheel to the deck's rear axle in the same way. The rear wheel is smaller (80 mm) and sits under the flexbrake.
- Check the flexbrake position. It should sit directly above the rear wheel and make contact when pressed down with a foot. If it is misaligned, loosen the mounting bolt, reposition, and re-tighten.
- Insert the seat post into the deck column for Stage 1 (ride-on baby stage). Choose the lowest seat height setting (22 cm) for children starting at 18 months. Tighten the seat post clamp with the allen key.
- Insert the handlebar stem into the seat post column or headtube (depending on configuration stage). Set handlebar height to the lowest notch for youngest riders.
- Tighten all bolts one final time and give the entire scooter a firm wiggle test. Nothing should move, creak, or shift under pressure.
- Apply any decals the child wants. This is a good moment to let them participate.
- For the LED variant: confirm the LED wheel axle caps are firmly seated. The LEDs are kinetic and need no batteries for the wheels; they activate automatically when rolling.
Photo suggestion: photograph the completed scooter from the side and from above before your child first rides it. This gives you a visual baseline that is useful for troubleshooting later if a component shifts out of position.
Adjusting the scooter as your child grows
This is the core feature of the Mini2Grow, and it is worth understanding each stage clearly so you get the maximum lifespan out of the product.
| Stage | Approximate Age | Seat Height | Configuration |
|---|---|---|---|
| Stage 1: Ride-on | 18 months – 2 years | 22 cm | Seat post installed, handlebar at lowest setting, child sits and pushes with feet |
| Stage 2: Seated scooter | 2 – 3 years | 27–32 cm | Seat raised, handlebar raised, child scoots while seated |
| Stage 3: Standing scooter | 3 – 5 years | Seat removed | Handlebar at 37 cm+, child stands and kicks, rear brake in use |
| Stage 4: Full kick scooter | 5 – 6 years | No seat | Handlebar at maximum height, full independent scooter use |
Micro Mobility specifies a maximum load of 20 kg when the seat is in use and 50 kg without the seat. The weight range for the scooter itself is approximately 2.18 to 3.48 kg depending on variant. Always re-tighten all bolts after any height adjustment, and check that the stem clamp is fully locked before the child rides.
Placement and riding environment guidance
Unlike a grow kit that needs a specific light environment, this scooter is used wherever children play. That said, the surface and environment matter for safety and for the longevity of the wheels and bearings.
- Best surfaces: smooth concrete, asphalt, wooden floors, or flat pavement. Avoid gravel, sand, or wet grass, which can jam the 80 mm rear wheel.
- Indoor use: the PU wheels (78° Shore A hardness, ABEC9 bearings) are quiet enough for indoor wooden or tile floors.
- Temperature: avoid leaving the scooter in direct sunlight or in a hot car for extended periods, as high heat can soften the PU wheel compound and degrade bearing grease over time.
- LED wheels (Deluxe Magic LED variant): the LED mechanism is kinetic and requires no charging, but avoid prolonged water immersion. Light rain is fine; puddle-jumping is not ideal.
- Storage: store indoors when not in use. Humidity and UV exposure will degrade rubber grips and the deck surface faster than normal indoor wear.
The first 24–72 hours: what to check after initial assembly
The first few rides are your quality-control window. Here is what to watch for in the first three days of use.
- Bolt creep: after the first 30 minutes of use, re-check every allen bolt. New assemblies often settle slightly and bolts that felt tight can loosen a turn or two.
- Wheel wobble: hold the scooter off the ground and spin each wheel. A wobble that was not there during assembly usually means the axle nut needs a quarter-turn tightening.
- Handlebar play: grip the handlebars and try to rotate them independently of the fork. Any rotation means the stem clamp bolt needs tightening.
- Seat stability: if the seat wobbles front-to-back, the seat post clamp needs tightening. This is the most common complaint in the first week.
- Flexbrake contact: press the brake with your hand and confirm it presses the rear wheel. If it misses the wheel entirely, the brake mount has shifted and needs repositioning.
- LED function (Deluxe LED variant): roll the scooter a short distance and confirm the wheels illuminate. If one wheel does not light up, check that the LED axle cap is fully pressed in.
Photo suggestion: take a short video of the child's first ride. Beyond being a lovely memory, it gives you a baseline visual record of how the scooter looks and handles when everything is correctly adjusted. If a problem develops later, you can compare.
Daily and weekly care schedule
The Mini2Grow is a low-maintenance product, but a simple routine keeps it safe and extends its life significantly. The official Micro manual specifies cleaning with a damp soft cloth. Here is a practical schedule broken down by frequency.
| Frequency | Task | What to Look For |
|---|---|---|
| After each ride | Visual inspection of wheels and deck | Debris caught in wheel bearings, cracks in deck, loose grips |
| Weekly | Wipe down with damp soft cloth | Sticky residue on grips, dirt buildup around axle bolts |
| Weekly | Check all allen bolts | Any bolt that moves more than a quarter-turn needs attention |
| Monthly | Inspect flexbrake for wear | Brake pad thinning or crack; replace if contact with wheel is reduced |
| Monthly | Check handlebar grip condition | Tears or slipping grips are a safety hazard; replace promptly |
| Every 3 months | Spin wheels and listen for bearing noise | Grinding or roughness indicates bearing wear; source replacement wheels via Micro spare parts |
| Before each season | Full bolt and component check | Re-tighten everything, confirm all height adjustments are locked |
Avoid using harsh chemical cleaners, solvent sprays, or pressure washers. These damage the PU wheel compound, degrade bearing grease, and can strip the deck's surface finish. A damp cloth and mild soap is genuinely all you need.
Growth milestones and what to expect over time
The 'growth' with this product is your child's development, and there are real, observable milestones that tell you when to adjust the scooter. Here is a practical timeline based on the manufacturer's age and height specifications.
| Milestone | Typical Age Window | Signs It's Time | What to Do | Photo to Take |
|---|---|---|---|---|
| First independent push | 18–24 months | Child can sit on seat and push with both feet | Confirm seat at 22 cm, handlebar at lowest setting | Side-on photo of child seated with feet flat on ground |
| Steering confidence | 24–30 months | Child turns corners intentionally | Raise seat one notch (27 cm), check handlebar height matches | Front-facing photo showing arm angle |
| Ready to stand | 3–3.5 years | Child stands beside scooter and height allows comfortable handlebar grip | Remove seat, raise handlebar to 37 cm, introduce brake practice | Standing posture photo, child gripping handlebar |
| First unassisted kick-glide | 3.5–4.5 years | Child can balance through a full glide without foot contact | Raise handlebar to near-maximum, confirm brake is accessible | Action photo mid-glide |
| Full scooter independence | 5–6 years | Child uses brake reliably and navigates obstacles | Set handlebar to maximum; consider transitioning to Maxi Micro | Confident riding photo |
These are guidelines, not strict rules. Some children move through stages faster and some slower, and both are completely normal. The adjustability of the Mini2Grow means there is no pressure to rush. If your child is not confident at a given stage, just leave the settings where they are.
Troubleshooting common problems
Handlebar feels loose or spins
This is the most common assembly issue. The stem clamp bolt has not been tightened enough. Use the allen key to tighten the clamp bolt until there is zero rotational play. If you have already tightened it fully and the problem persists, check whether the stem is seated in the correct notch and not sitting between two notches.
Seat wobbles or sinks during use
The seat post clamp needs tightening. Loosen the clamp bolt, re-seat the post at your chosen height, and re-tighten firmly. If the seat post itself feels loose inside the deck column even after tightening, the column may be worn. Contact Micro support for a replacement seat post or clamp collar.
Wheels do not roll smoothly
First check for debris (grit, hair, thread) wrapped around the axle. Remove with a small pick or tweezers. If the wheel is clean but still grinding, the ABEC9 bearings may be worn or contaminated. Micro sells replacement LED moon wheel sets and standard wheel sets for the Mini2Grow through their authorized spare parts network and dealers. Do not attempt to lubricate the bearings with WD-40 as it strips grease; use a proper bearing lubricant or replace the wheel assembly.
Flexbrake does not make contact with the wheel
Loosen the brake mounting bolt, push the brake pad down until it sits flush against the top of the rear wheel with light pressure, and re-tighten. Micro's support page includes a 'change brake' repair video that shows this adjustment clearly. If the brake material is visibly worn thin, order a replacement brake pad through official spare parts channels.
LED wheels are not lighting up (Deluxe Magic LED variant)
Kinetic LEDs require a minimum rolling speed to activate. Try rolling the scooter at a normal walking pace on a smooth surface. If one wheel lights up and the other does not, the LED axle cap on the dark wheel is likely not fully seated. Press it firmly until it clicks. If neither wheel lights up after this, contact Micro support as the LED mechanism may be faulty.
Grips are slipping or tearing
This is a safety issue and should not be ignored. Slipping grips reduce steering control. Replacement grips are available through Micro's spare parts network. Do not attempt to secure loose grips with tape as a permanent fix.
Cleaning, storage, and reuse between children
The Mini2Grow is built to last through multiple children, which is genuinely one of its best features. To pass it on in good condition, a thorough clean and inspection before storage makes a real difference.
- Wipe the entire scooter with a damp soft cloth. Pay attention to the deck surface, grip areas, and around the axle bolts where grime collects.
- Inspect all bolts and tighten any that have loosened over the season.
- Check the flexbrake pad for wear. Replace it before storage if it is thin, so the next user starts with a functional brake.
- Inspect wheel bearings. If they are noisy or rough, replace the wheel assembly before putting the scooter in storage.
- Disassemble to a flat pack if possible (remove the seat post and handlebar stem) to reduce storage footprint and prevent stress on the column.
- Store indoors in a cool, dry location. Avoid damp garages or outdoor sheds, which cause grip degradation and bearing rust.
- Photograph the scooter before and after storage. This is useful for insurance purposes and for accurately describing condition when passing it on.
Safety, certifications, and disposal
Micro Mobility takes safety compliance seriously, and the Mini2Grow comes with specific warnings and certifications that are worth understanding as a parent or caregiver.
Key safety requirements from the official manual
- Always use protective gear: helmet at minimum, knee and elbow pads recommended. Micro sells EN-certified helmets and pads with their own declarations of conformity.
- Maximum load with seat installed: 20 kg. Maximum load without seat: 50 kg. Do not exceed these limits.
- The Deluxe Magic LED variant includes a flash/epilepsy notice in the manual. Parents of children with photosensitive epilepsy should be aware of the LED wheel effect before purchase.
- Battery warnings apply to any battery-powered accessories (such as lights). Follow disposal regulations for batteries in your country.
- Do not modify any component. Aftermarket modifications void the safety certifications and may create hazards.
Certifications and standards
The Mini2Grow is designed and tested to comply with EN71, the European toy safety standard, and applicable EU product safety regulations. Micro Mobility publishes official Declarations of Conformity for its products (including helmets, pads, and lights) as free downloads from their Downloads page. In the United States, children's ride-on products like this are subject to CPSC oversight and mandatory third-party testing requirements under 16 CFR regulations governing children's products. If you are purchasing for a commercial setting such as a daycare or school, verify compliance documentation applies to your jurisdiction.
Disposal guidance
The scooter contains PU plastic, metal components, and (in the LED variant) electronic components. Do not dispose of it in general household waste. In most countries, take it to a local recycling or electronics drop-off point. Check your local municipality for e-waste rules if your unit has LED electronics. Donating a working scooter to a charity, school, or second-hand toy program is the most sustainable option and extends the product's useful life to another child.
Where to find replacement parts, manuals, and manufacturer support
Micro Mobility has a well-organized support infrastructure that makes sourcing parts and help relatively straightforward compared to many toy brands. This official support hub is a useful source for assembly diagrams, troubleshooting guides and ordering replacement parts Micro Mobility's Support / Repair page provides step-by-step repair instructions, repair videos (change wheel, change brake, adjust handlebar), and a dealer locator for parts and service..
- Official manual PDF: download free from the Micro Mobility website under the Downloads / Media section. Search for 'Mini2Grow Deluxe Magic LED User Manual'. The document is multilingual and includes parts diagrams.
- Spare Parts Brochure: also available as a free PDF download from the Micro Downloads page. Lists every official part number for the Mini2Grow range.
- Repair videos and support guides: Micro's Support / Repair page includes step-by-step video guides for changing wheels, adjusting brakes, and replacing handlebars.
- Authorized dealers and spare parts retailers: use Micro's dealer locator tool on their website to find the nearest authorized service point or parts supplier in your country.
- Online spare parts (example): authorized Micro dealers list individual parts such as LED moon wheel sets, axles, axle bolts, brace parts, and brake pads with official part numbers and pricing.
- Direct manufacturer contact: [email protected] or telephone +41 44 910 11 22. For regional warranty inquiries, use the local Micro website for your country.
- Unboxing and assembly video: linked from the official Mini2Grow product page on the Micro online store.
One thing I genuinely appreciate about Micro as a brand is that their parts are numbered, documented, and actually stocked. A lot of toy brands make replacement parts effectively unavailable, which means a broken scooter goes in the bin. With the Mini2Grow, a cracked wheel or worn brake pad is a five-minute fix with a part that costs a few dollars, not a reason to replace the whole product. That longevity is worth a lot over the years a child uses this scooter.
A note for readers who expected a water-based grow toy
If you arrived here searching for instructions on a toy that grows in water, you are looking for a different product type entirely. The Micro Mini2Grow contains no seeds, foam pods, water reservoirs, or hydroponic components of any kind. Water-swelling grow toys (the kind where you drop a small figure into a bowl of water and watch it expand) operate on superabsorbent polymer science and have their own setup steps around water temperature, soak times, and container sizing. The grow-your-own dinosaur instructions and the grow-a-sloth toy instructions covered elsewhere on this site are much closer to what you are looking for if that is your project. For step-by-step grow your own dinosaur instructions, see the dedicated guide on this site that covers soak times, container tips, and care for water-swelling figures. For step-by-step directions, see the grow a sloth toy instructions page on this site. The search term 'grow scooter' in this product's name is genuinely misleading for anyone familiar with the grow-kit hobby, and you are not the first person to land on the wrong page. If you're actually looking for step-by-step building instructions for a kids' DIY model, see Lowe's Build and Grow monster truck instructions for a guided project. If you actually meant a novelty or fictional guide, see our grow your own boyfriend instructions for that playful, imaginary scenario. If you actually need assembly directions for a different toy, see grow n up basketball stand instructions for step-by-step guidance.
FAQ
What is the single most important verification before writing a 'Micro Mini 2 Grow Scooter' grow-kit instruction article?
Confirm the product identity with the OEM. Obtain the exact product name, model numbers/SKUs and official product page from Micro Mobility (e.g., Micro Mini2Grow Deluxe Magic LED product page) and the official user manual (PDF). This verifies whether the product is actually a scooter (Micro Mini2Grow) or a different 'grow kit' product; official Micro pages show this is a convertible scooter, not a hydroponic grow kit.
Which official OEM documents and pages are required to build an accurate model-identification and parts checklist section?
Required OEM sources: the official product page(s) for the Mini2Grow (model variants, colors, SKUs); the downloadable user manual (assembly and safety sections) with parts diagrams; the spare-parts brochure/catalogue; the manufacturer's Downloads/Media page (brand assets and product images). These supply model names, SKU lists, parts diagrams, tool lists, and official photos for box contents verification.
What exact items should I capture and verify for a 'full parts-in-the-box checklist and images/diagrams'?
For each SKU/variant: list every physical item shown by the OEM/manual or packaging list (scooter chassis, handlebar, seat, wheels (LED or non-LED), axle/bolts, clamps, brake, allen key/tool, stickers, manual, batteries if included). For each part capture: OEM part number (from spare-parts brochure), a high-resolution photo (OEM press photo or manual diagram), simple labeled diagram showing orientation and assembly relationships, and dimensions/weights if available in the manual.
What authoritative sources should be used for step-by-step assembly/initial-setup instructions?
Use the OEM user manual assembly section (step-by-step images and torque/fastening notes) and OEM repair/assembly videos on the support page. Where OEM instructions exist, reproduce the sequence and safety warnings verbatim (or summarize with citation). Also capture any supplied tool specs (allen key size), torque or tightness guidance, seating positions and adjustable heights specified in the manual.
If the article must include water/seed/foam grow-kit planting steps, what verification is required given the product appears to be a scooter?
First verify whether Micro or any authorized seller documents hydroponic inserts for this SKU. Official Micro sources do not list seed/foam or reservoir specs for Mini2Grow. Therefore you must either: (a) identify the correct manufacturer and product for the intended grow kit and obtain that product’s official seed/foam/water specifications (seed type, foam composition, reservoir volume, soak time, planting depth); or (b) explicitly state in the article that the Mini2Grow is not a hydroponic grow kit and do not invent planting instructions. Any planting steps require verifiable manufacturer instructions or third-party product datasheets for that grow kit.
What source material is needed for a 'first watering / placement / seed prep' walkthrough if a true grow kit exists?
Manufacturer seed packet labels (germination notes), foam/insert specification sheet (material, porosity, recommended pre-soak time), exact reservoir capacity and fill-line markings from OEM product specs, water-quality guidance (acceptable pH and hardness limits) from the grow-kit manufacturer or authoritative hydroponic sources, and photos/diagrams showing placement of foam/seed in the kit.