Animal planter grow kits follow a simple core sequence no matter which brand or animal shape you have: identify your parts, expand or prep your growing medium, load it into the planter, add seeds, water correctly, put it in the right light, and keep the soil moist (not soaked) every day until sprouts appear. The differences between kits usually come down to the medium type (soil pellet, coconut coir, or sponge), the water method (top watering vs. a wick reservoir), and the specific seed inside. Once you know those three things about your exact kit, everything else clicks into place.
Animal Planter Grow Kit Instructions: Setup to Harvest

Marcus Thornfield
29 Jun 2026
Step 1: Identify your exact kit parts and read the label first
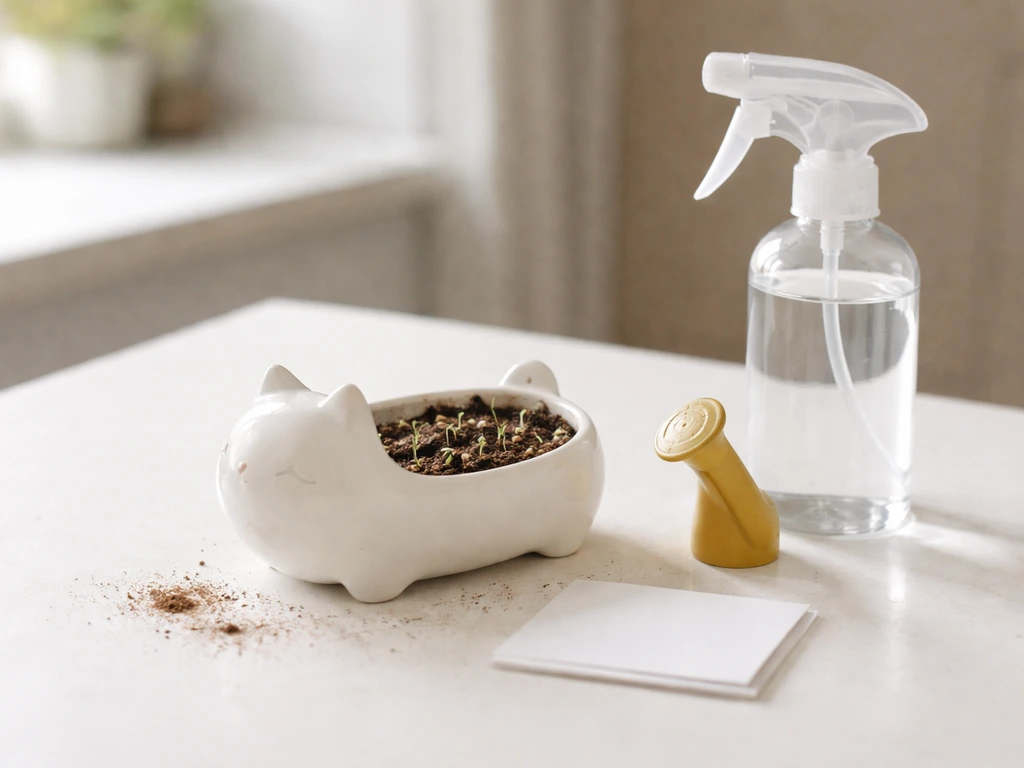
Before you touch water or soil, lay everything out on a flat surface and cross-check it against the instruction sheet. Most animal planter kits include: the animal-shaped planter pot, one or more compressed growing medium pellets (or a small bag of coir/soil mix), a seed packet or pre-seeded disc, and sometimes a small drainage tray or base. Some kits, like the TotalGreen Holland Jungle Animal Grow Kit, include a separate expansion pot to hydrate the pellet before loading the planter. Others use a built-in wick reservoir at the base. Knowing which system you have changes the setup entirely.
Check the label or manual for these four specifics before doing anything else: the recommended water volume (many kits give exact amounts like 3 tablespoons or 2 tablespoons), whether the medium needs pre-expanding in a separate container, the seed type included, and any light or temperature range listed. If your kit came without instructions, check the brand name printed on the packaging and look up the product online. If you are using a pet grass self grow kit, follow the same label-first approach, then tailor the steps to the specific instructions for that kit and seed type pet grass self grow kit instructions. Brands like Sprigbox, TotalGreen Holland, and others all maintain FAQ hubs or dedicated instruction pages. If yours is a jungle-themed grass kit, you might also find relevant guidance in a jungle animal grass grow kit guide.
- Animal-shaped planter pot (with or without a drainage hole)
- Compressed growing medium pellet or bag of coir/soil
- Seed packet, seed disc, or pre-seeded cover layer
- Drainage tray or base reservoir (not always included)
- Instruction card or QR code linking to digital instructions
Step 2: Prepping and assembling the planter correctly

For kits with a compressed pellet, do not try to expand it inside the planter itself. Use a separate cup or bowl. Add lukewarm (not hot, not cold) water to the bowl first, then drop in the pellet and let it absorb and expand fully. This usually takes two to five minutes. Stir it gently, then loosen the medium with a fork until it has a light, crumbly texture. You want it airy, not packed down, because roots need room to push through.
Once the medium is expanded and loosened, fill the animal planter about three-quarters full, leaving room for seeds and a thin covering layer on top. If your planter has a drainage hole at the bottom, set it on its tray now. If it has no drainage hole (common in novelty animal planters), you need to be extra careful with watering later since overwatering with no drainage is the number one way to kill the kit early. In that case, a thin layer of small pebbles or coarse sand at the very bottom can help buffer excess moisture.
For wick-style kits (where a fabric or foam wick draws water up from a base reservoir into the growing medium), fill the reservoir to the indicated line before adding medium, then thread or check the wick is sitting correctly before loading soil on top. The water wicks upward naturally, so you will water less often from the top with these systems.
Step 3: Adding seeds, medium, and the first watering
Sprinkle seeds evenly across the top of the medium. Do not cluster them all in one spot. Then cover them with the remaining expanded medium, but keep this covering layer thin. Burying seeds too deep is one of the most common reasons a kit fails to sprout. Most herb and grass seeds in these kits only need a light dusting of medium over them, not more than a few millimeters. Jungle animal grass grow kit instructions can vary slightly by brand, so always follow the seed packet and your kit manual for best results grass seeds. The TotalGreen Holland approach of using roughly three-quarters of the expanded medium as the base layer and the last quarter as the cover is a reliable ratio to follow.
For the first watering, add water slowly and evenly across the surface until the medium is evenly damp throughout but not dripping or pooling. Specific volumes vary by kit. TotalGreen Holland's kits reference about 3 tablespoons of lukewarm water during the expansion step, and their microgreens guidance suggests up to 3 to 5 tablespoons daily if needed. Sprigbox recommends roughly 2 tablespoons for their wooden planter kits. Always defer to the exact measurement on your manual. If none is listed, the rule of thumb is: the medium should feel like a wrung-out sponge. Damp throughout, no standing water.
| Medium type | How to prep it | Typical first-water amount |
|---|---|---|
| Compressed pellet (coir or peat) | Expand in separate bowl with lukewarm water, loosen with fork | 3 tablespoons (follow kit label) |
| Pre-bagged soil mix | Pour directly into planter, no pre-soaking needed | Water until evenly damp, no pooling |
| Sponge or foam disc | Soak disc fully, squeeze once to remove excess water | No additional water needed at first |
| Wick reservoir system | Fill base reservoir, let wick absorb upward | Top water lightly until wick is saturated |
Step 4: Light, temperature, and where to put it for fastest germination
Place your planter in a bright, warm spot as soon as it is assembled. A sunny windowsill facing south or west is ideal for most indoor setups. Most seeds in consumer grow kits germinate fastest between 65 and 75 degrees Fahrenheit (18 to 24 Celsius). Avoid placing the kit on cold windowsills in winter (glass surfaces can drop below 50 F at night, which stalls germination significantly) or in spots that get direct afternoon sun through glass in summer, which can overheat and dry out the medium too fast.
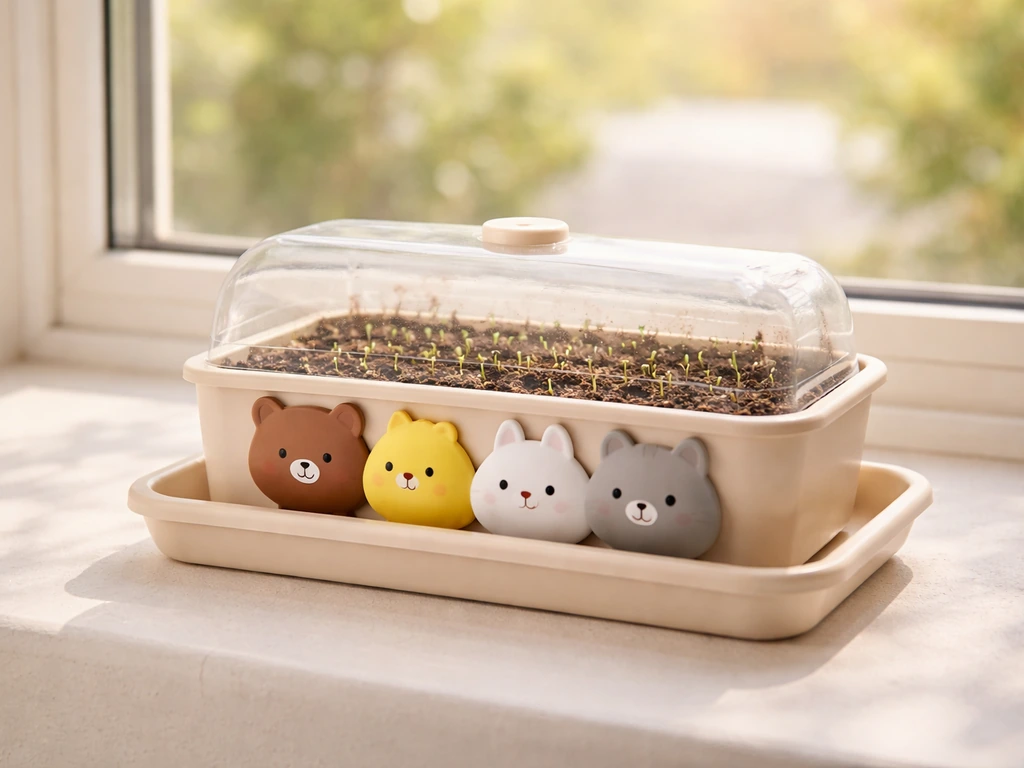
If you have a kit that includes a small plastic cover or dome, use it during the first few days to trap humidity and warmth while seeds germinate. But do not leave it sealed all day. Lift it for at least an hour each day to allow fresh air to circulate, which reduces the risk of mold. Once you see the first sprouts (usually within 3 to 10 days depending on seed type), remove the cover entirely. From that point forward, the plants need direct airflow more than they need the humidity tent.
Herb seeds like basil and cilantro typically germinate quickly, sometimes within 3 to 7 days. Slower herbs like lavender or rosemary can take several weeks. Wheatgrass and pet grass seeds, common in jungle-themed animal kits, usually sprout within 3 to 5 days. If your kit grows carnivorous plants, the timeline and conditions are very different (those kits follow completely separate care requirements). If you are growing carnivorous plants, follow grow it carnivorous plants kit instructions since the watering and light needs are different from grass and herb kits.
Step 5: Keeping it alive after the first sprout
Watering schedule
Once sprouts appear, water when the top of the medium surface feels dry to the touch. For most animal planter kits with no drainage hole, that means watering every one to two days in warm conditions, less often in cooler rooms. Add water slowly so it absorbs evenly. A rough guide is 2 to 3 tablespoons at a time for a small animal planter (roughly 3 to 4 inches wide). The goal is consistent moisture, not cycles of bone dry and then drenched.
Rotation
Turn the planter a quarter rotation every couple of days. Plants always lean toward the light source, and without rotation the seedlings in an animal planter will grow lopsided fast. Rotating keeps growth even and helps the 'hair' or 'fur' of grass-style kits look full rather than flopped to one side.
Thinning
If your kit grows herbs or flowers (rather than grass), you may notice crowded seedlings competing for space. Once seedlings are about an inch tall, snip the weaker ones at the base with small scissors rather than pulling them out. Pulling disturbs the roots of the neighbors. You are not trying to grow a full garden patch, so removing excess seedlings early helps the remaining ones grow stronger.
Fertilizing
For the first few weeks, skip fertilizer entirely. The growing medium in most grow kits has enough nutrients to get seedlings started. Adding fertilizer too early can burn tender roots. If your kit runs longer than six weeks (which is common for herb kits), you can start a light liquid fertilizer at half the recommended dose on the bottle. Wick-style kits like the GrowBox system often include dissolvable nutrient patches that handle this automatically, so check your kit manual before adding anything extra.
When things go wrong: troubleshooting the most common failures
No sprouts after 10+ days
First, check temperature. Seeds sitting below 60 F germinate very slowly or not at all. If the spot is warm enough, check depth. Seeds buried more than a centimeter deep in these small kits often fail to push through. Gently brush back the covering medium with a toothpick to see if seeds are swelling or cracking open. If the medium has dried out completely at any point since planting, the germination process resets and you may need to start over with fresh seeds.
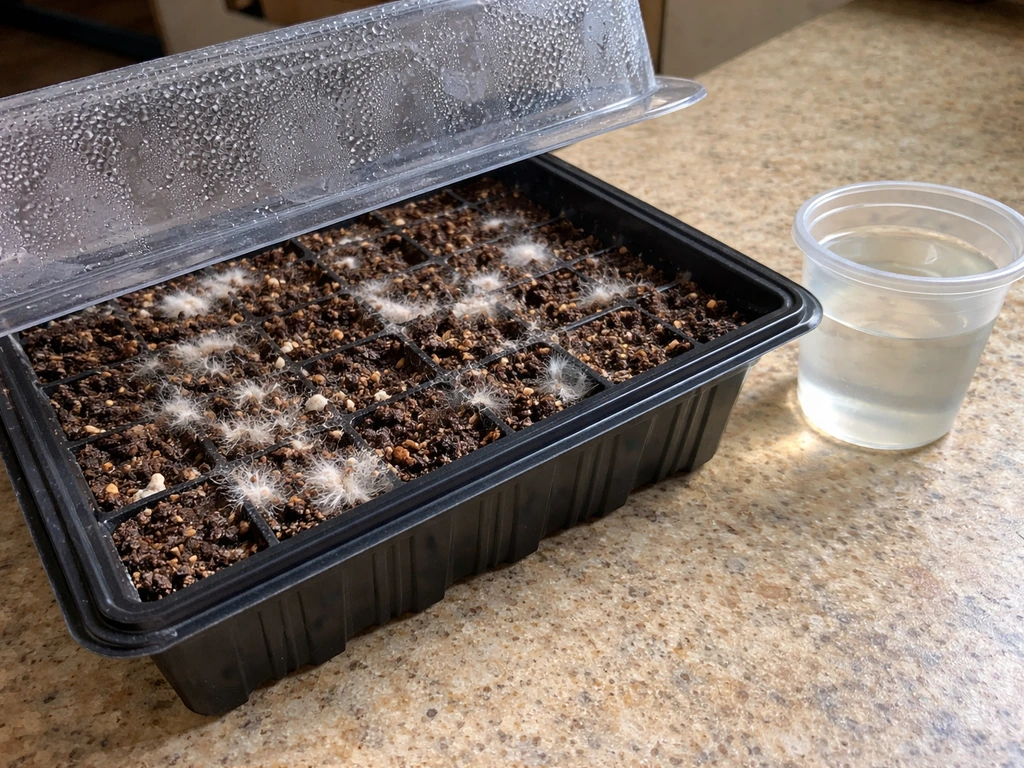
Mold or white fuzz on the soil surface
This is extremely common and usually harmless to the plants in the early stages, but it means conditions are too wet and too stagnant. Lake Valley Seed’s sprout-growing guide includes a blank" rel="noopener noreferrer">troubleshooting section that addresses mold and fungus risks under certain sprouting conditions. The fix is airflow first: if you have a dome or cover, remove it immediately and leave it off. Place a small fan nearby on the lowest setting to create gentle air movement around the kit. Let the surface dry out a bit between waterings. If you see gray or black mold (not just white fuzz), scrape off that layer of medium carefully and reduce watering frequency. After handling moldy medium, rinse the planter walls with clean water and blank" rel="noopener noreferrer">allow them to air-dry fully before adding fresh medium.
Fungus gnats (tiny flies hovering around the kit)
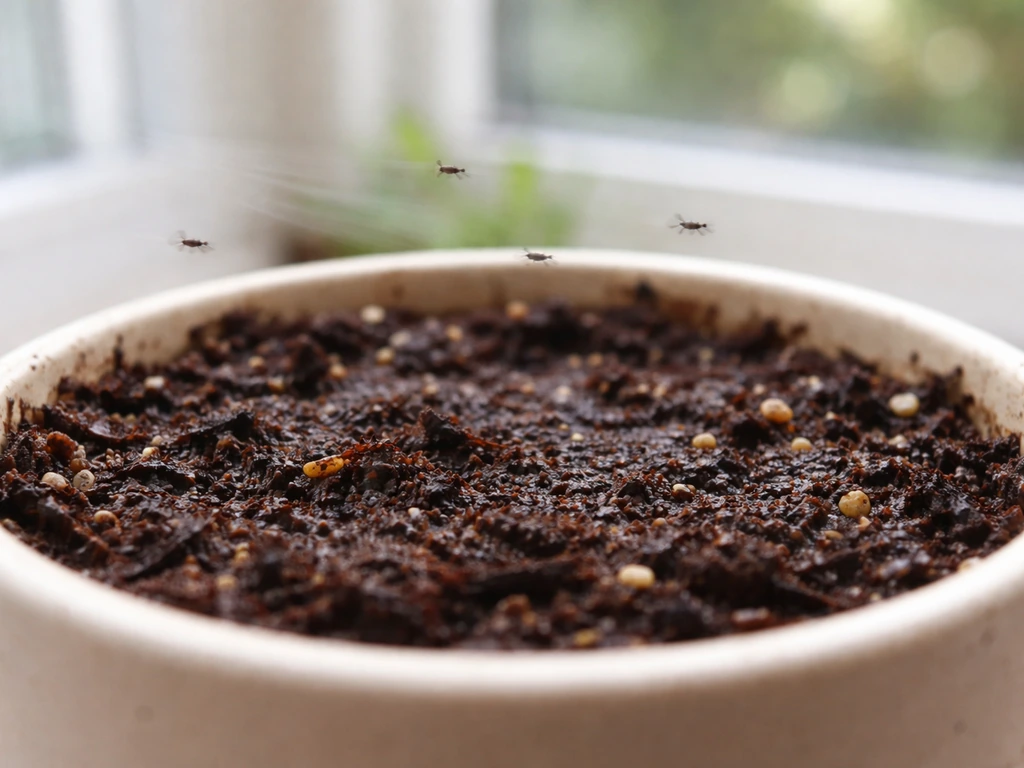
Gnats lay eggs in the top layer of moist soil, so the solution is drying out that surface layer. Let the top inch of medium dry out completely between waterings. You can place a thin layer of coarse sand on top of the medium, which dries out faster than the soil below and discourages egg-laying. Sticky yellow traps placed near the kit catch adults and break the cycle. Gnats are almost always a sign of overwatering, so adjusting your water schedule usually solves the problem within a week or two.
Leggy, stretched-out seedlings
Legginess means the plants are reaching desperately for more light. Move the kit closer to the window, or switch to a brighter window. If you are already on the brightest windowsill available, a small grow light placed 4 to 6 inches above the kit for 12 to 14 hours per day solves this immediately. Do not try to prop up leggy seedlings with supports. Fix the light first and new growth will come in compact and sturdy.
Green algae on the planter walls or medium surface
Green algae grows where water and light meet, so it typically appears on the inside walls of clear or translucent planters. It will not harm the plants, but it does compete for nutrients and indicates the medium is staying too wet. Reduce watering slightly and, if your planter is translucent, wrap the outside with a piece of paper or fabric to block light from reaching the medium and walls. Algae needs light to grow, so cutting off the light source stops it.
Harvesting, the end of the cycle, and what happens next
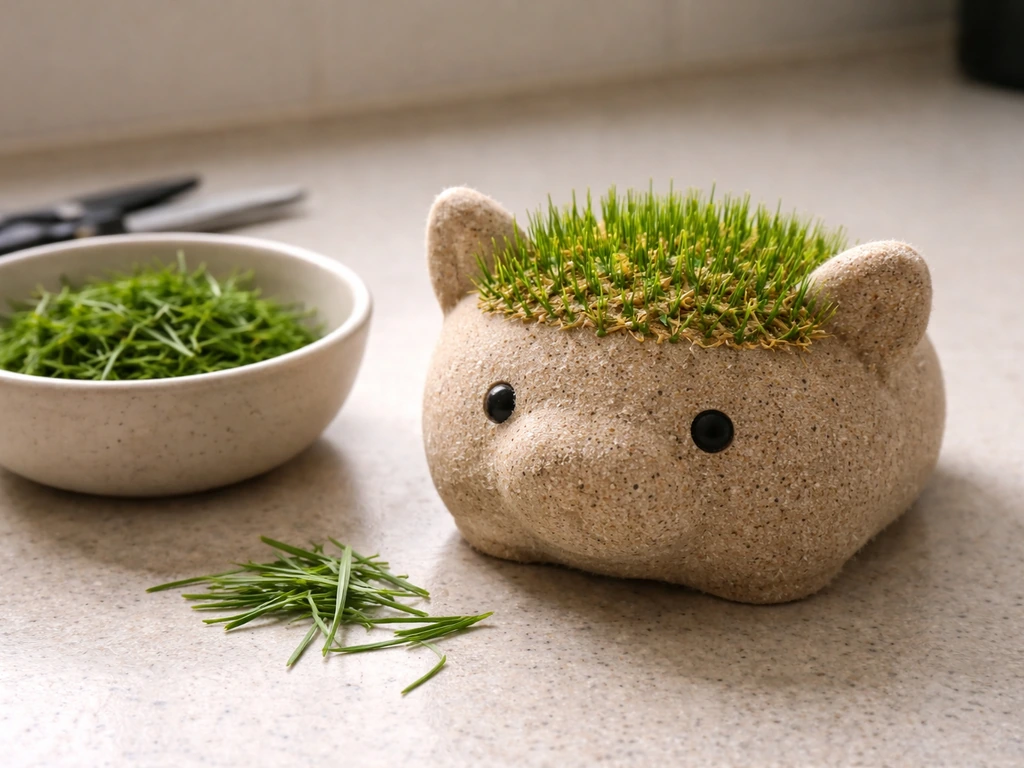
For grass-style animal kits (the ones where the grass grows out of the animal's 'head' like hair), harvest by snipping the grass down to about an inch above the medium surface when it reaches 2 to 4 inches tall. These jungle juice grow instructions follow the same overall approach, so once you know your kit type you can apply the steps for light, water, and timing to get steady sprouting. This is the point before it starts to yellow or flop over. According to TotalGreen Holland, the grass will grow back after cutting, so you can get multiple harvests from the same kit. Just keep watering and rotating as normal after the cut.
For herb kits, harvest by snipping leaves or stems just above a leaf node (the point where a smaller leaf or branch forks off). Never remove more than one-third of the plant at once. Sprigbox-style herb kits can produce their first full harvest around two months after planting. Regular light harvesting actually encourages bushier growth rather than slowing it down.
When the kit is truly done (medium is exhausted, plants have bolted or died back), empty the planter completely, rinse it with clean water, and let it air-dry fully before storing. Do not put the lid on a damp planter. If you plan to replant the same animal planter with a refill kit or fresh seeds, make sure all old root material is removed. For kits with wick systems, rinse the wick and let it dry separately. Store everything dry in a cool spot for the next round.
A quick note on safety around pets and small children
Animal-themed planters attract curious kids and actual pets. Most seeds and herbs in these kits are non-toxic, but some (like certain decorative grasses or herbs) can cause mild stomach upset if eaten by cats or dogs in large amounts. Keep the planter out of reach of pets while seeds are germinating, since the moist medium at that stage is also the stage most likely to have surface mold or gnats. Once the plants are established, wheatgrass kits are actually safe and beneficial for cats, which is a fun bonus if you have one. Check the seed type on your specific kit and verify it against a pet-safe plant list if you have animals at home.
FAQ
My animal planter grow kit has different instructions than the ones I found online, which should I follow?
Use the kit-specific manual first, especially for the exact water volume, whether the medium must be pre-expanded in a separate cup, and the light range. If you have conflicting sources, follow the seed packet plus your kit’s measurement, since a few tablespoons too much or too little can change germination timing.
Can I expand a compressed pellet inside the animal planter to save time?
Avoid it. Compressed pellets expand unevenly and can overfill or compact in the planter, which blocks airflow for roots. Expand in a separate bowl with lukewarm water, loosen to a crumbly texture, then transfer and load to about three-quarters full.
What should the medium feel like right after planting and after daily checks?
It should be evenly damp throughout, like a wrung-out sponge. If the surface looks shiny, you likely added too much water. If it feels dry and pulling away from the sides, you need a smaller top-up rather than soaking all at once.
My planter has no drainage hole, how do I water without drowning the seeds?
Water slowly in small amounts until the surface is damp but not pooling, then wait longer before the next watering. If you notice wet, heavy medium or a sour smell, pause watering and increase airflow (remove any dome earlier) before trying again.
How do I tell whether I’m watering with the wick reservoir correctly?
Confirm the wick is fully seated where the base reservoir can wick moisture upward, then fill only to the line shown in your manual. With wick systems, the surface often dries more slowly, so rely on the “top feels dry” rule rather than watering on the same schedule as top-water kits.
How thin should I cover the seeds, and what if seeds seem to be too deep after loading?
Cover with only a light dusting (a few millimeters). If you suspect they went too deep, gently brush the top layer back with a toothpick to expose them slightly, then replace just a thin cover so seedlings can push through.
What if seeds do not sprout by the timeline listed for my kit?
First check temperature (below about 60 F often stalls germination), then check seed depth and whether the cover was too thick. If the medium dried out completely at any point, germination can reset, so you may need fresh seeds rather than only watering more.
I see white fuzz or light mold. Is that always a problem?
Early white fuzz can be less concerning than gray or black mold, but both point to too much moisture and stagnant air. Remove any cover promptly, add gentle airflow, and scrape off moldy layers if it darkens or spreads, then reduce watering frequency.
My kit gets gnats. What’s the fastest practical fix?
Dry out the surface layer between waterings, not the entire medium. Let the top area dry completely before re-watering, and consider a thin coarse-sand layer on top. Sticky yellow traps help catch adults, but fixing the wet surface breaks the egg cycle.
Leaves look pale and stretched, how do I fix leggy seedlings immediately?
Increase light first, move the kit closer to the brightest window, or use a grow light 4 to 6 inches above for about 12 to 14 hours per day. Don’t prop seedlings up, since that delays the real fix and can further stress tender stems.
Should I rotate my planter every day?
Rotate about a quarter turn every couple of days. Daily rotation is usually unnecessary and can disturb seedlings. Consistent rotation prevents one-sided leaning so the grass “fur” fills out evenly.
When do I start thinning, and should I pull seedlings out?
Thin once seedlings are about an inch tall if they are crowded. Snip weaker seedlings at the base with small scissors, pulling can tear neighboring roots and create gaps that slow recovery.
Do I need fertilizer, and what if my plants already look healthy?
Skip fertilizer in the first weeks, most kits have enough nutrients for early growth. If you go beyond roughly six weeks, start only at half strength and only if your kit manual supports it, since overfeeding early can burn roots.
Can I harvest the grass or herbs more than once?
Yes, many grass-style kits regrow after cutting when you snip to about an inch above the medium surface and keep watering and rotating. For herb kits, harvest gently by cutting above a leaf node and never remove more than one-third at once to avoid stunting.
What’s the safest way to clean the planter after the kit is done and replant later?
Empty completely, rinse thoroughly, and let it air-dry fully before storing or reusing. If you replant in the same animal planter, remove old root material to reduce disease carryover. For wick kits, rinse and dry the wick separately before the next round.
Are animal planter grow kit seeds safe for pets?
Many are non-toxic, but “safe” depends on the exact seed type included. Keep the planter out of reach during germination because moist medium can attract pets and mold or gnats may be present. After establishment, check the seed packet for pet-safety, especially for cat and dog exposure.