Most jungle animal grass grow kits work the same way: you hydrate a compressed growing medium pellet, fill the animal-shaped planter, scatter grass seeds on top, keep everything moist and warm, and within 3 to 7 days you have a little patch of green grass sprouting out of a ceramic lion or elephant. The exact steps depend on whether your kit uses a pellet, a soil disk, or a pre-seeded mat, but the core process is short, forgiving, and genuinely hard to mess up if you know the two most common mistakes (overwatering and too much direct sun). Here is everything you need to get it right the first time.
Jungle Animal Grass Grow Kit Instructions: Setup to Success

Marcus Thornfield
24 Jun 2026
What's in your jungle animal grass grow kit (and what each piece does)
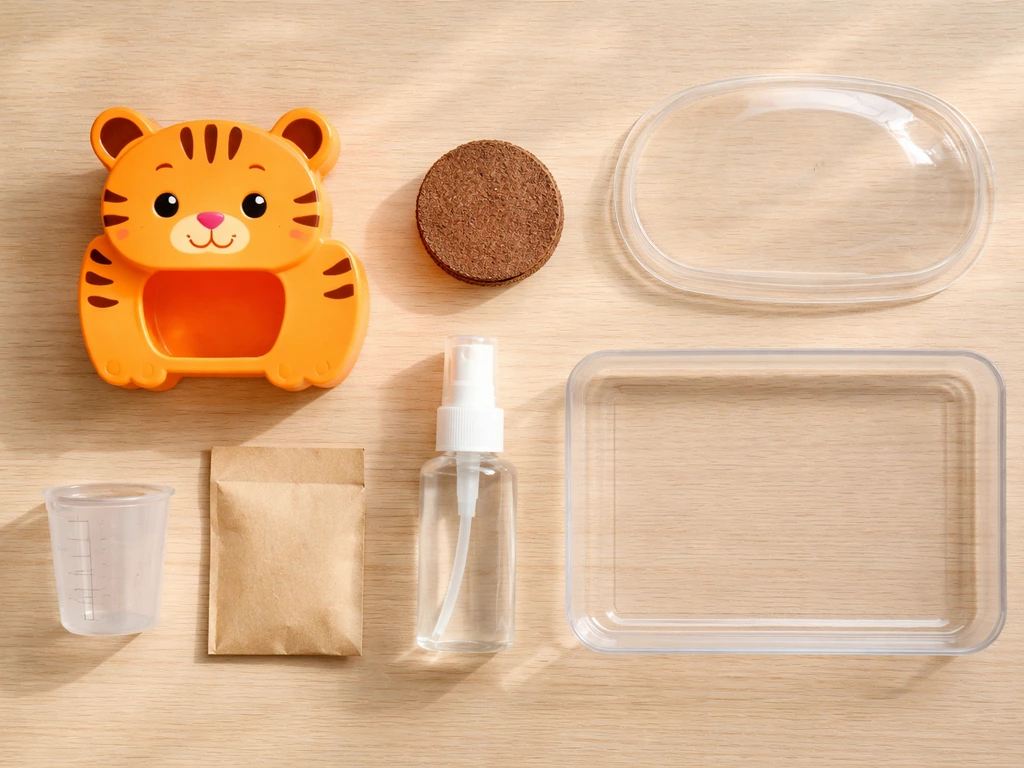
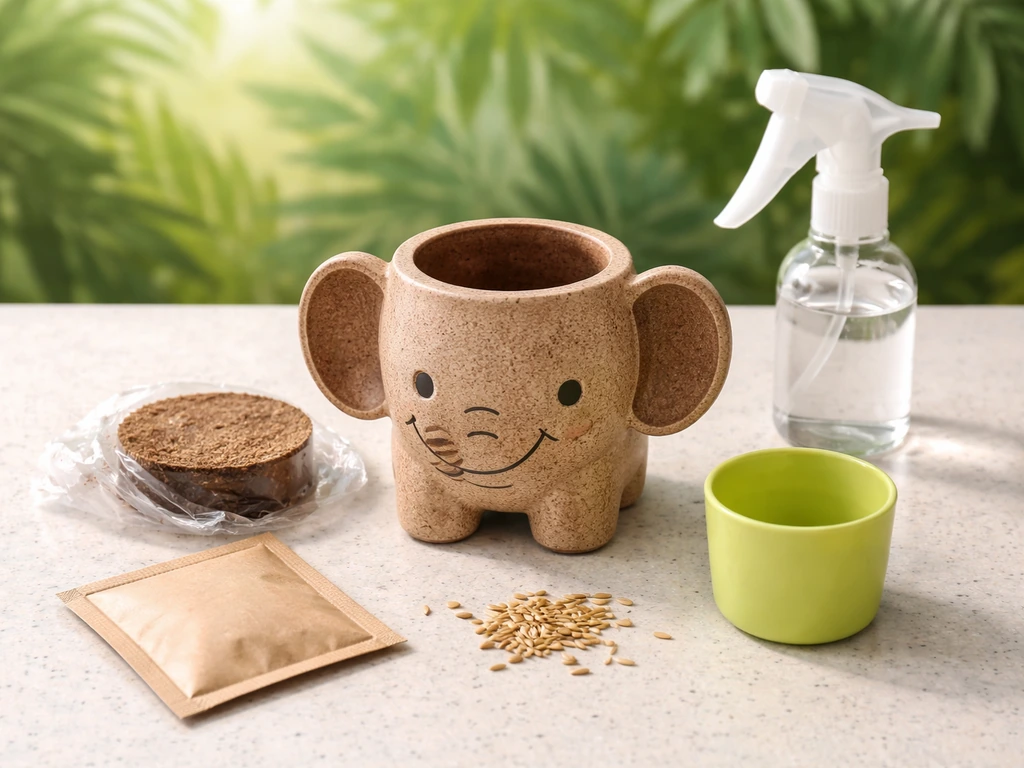
Before you do anything, lay out everything that came in the box. Kits vary by brand, but you should recognize most of these pieces. Knowing what each one does saves a lot of confusion mid-setup.
| Kit Component | What It Is | What It Does |
|---|---|---|
| Animal planter/pot | Ceramic, plastic, or terracotta container shaped like a jungle animal (lion, elephant, giraffe, etc.) | Holds the growing medium and displays the finished grass |
| Growing medium pellet or disk | A compressed, dehydrated block of coir fiber or peat-based mix | Expands when hydrated to become the soil the seeds grow in |
| Grass seed packet | Usually annual ryegrass (Lolium multiflorum) or a similar fast-germinating species | The seeds that sprout into the grass within days |
| Lid or plastic cover (some kits) | A small plastic dome or wrap included separately | Traps humidity during the first 1-2 days to kick-start germination |
| Drainage tray (some kits) | A shallow tray that sits under the planter | Catches excess water so the medium doesn't get waterlogged |
| Instruction card | A small printed card or pamphlet | Brand-specific steps and seed type info |
The Buzzy brand jungle animal kit, for example, includes exactly three things: one growing medium pellet, one grass seed packet, and one animal pot. Some kits (like ZestiGreens-style self-watering versions) add a reservoir bottom and a lid. If your kit has a lid, that is a meaningful difference and the setup steps below will call that out. If all you have is a pot, seeds, and a pellet or soil disk, you are working with the most common configuration.
Quick setup checklist before you start
Run through this before you add any water. Getting the location and conditions right before setup means you will not have to move the kit mid-germination, which can disturb seeds.
- Location: A bright windowsill is ideal. Indirect light works well. Avoid direct harsh afternoon sun, especially through south-facing glass, which can dry the medium out too fast.
- Light: Natural daylight is best. If you have no good window, a standard grow light or even a bright desk lamp a few inches above the planter will work.
- Temperature: Aim for 65 to 75°F (18 to 24°C). Grass seeds germinate best in steady warmth. A cold kitchen counter in winter or a hot windowsill in summer can both slow things down.
- Air circulation: A little airflow goes a long way toward preventing mold. A slightly cracked window or a small fan on the lowest setting nearby is enough.
- Safety: These kits are non-toxic, but the seeds and growing medium are not meant to be eaten. Keep kits away from young children who might put things in their mouths. If you have pets, Italian ryegrass is generally safe for cats and dogs to nibble once grown, but check your specific seed packet to confirm the species.
- Water source: Use lukewarm (room temperature) water, not cold tap water straight from the faucet. Cold water can shock seeds and slow germination.
Step-by-step: activating your growing medium and planting the seeds
This is where kits differ the most. Read the short section below that matches what you found in your box, then follow that path. If you want step-by-step animal planter grow kit instructions, follow your kit's method for hydrating the medium and planting at the right depth.
Path A: You have a compressed pellet or soil disk (most common)
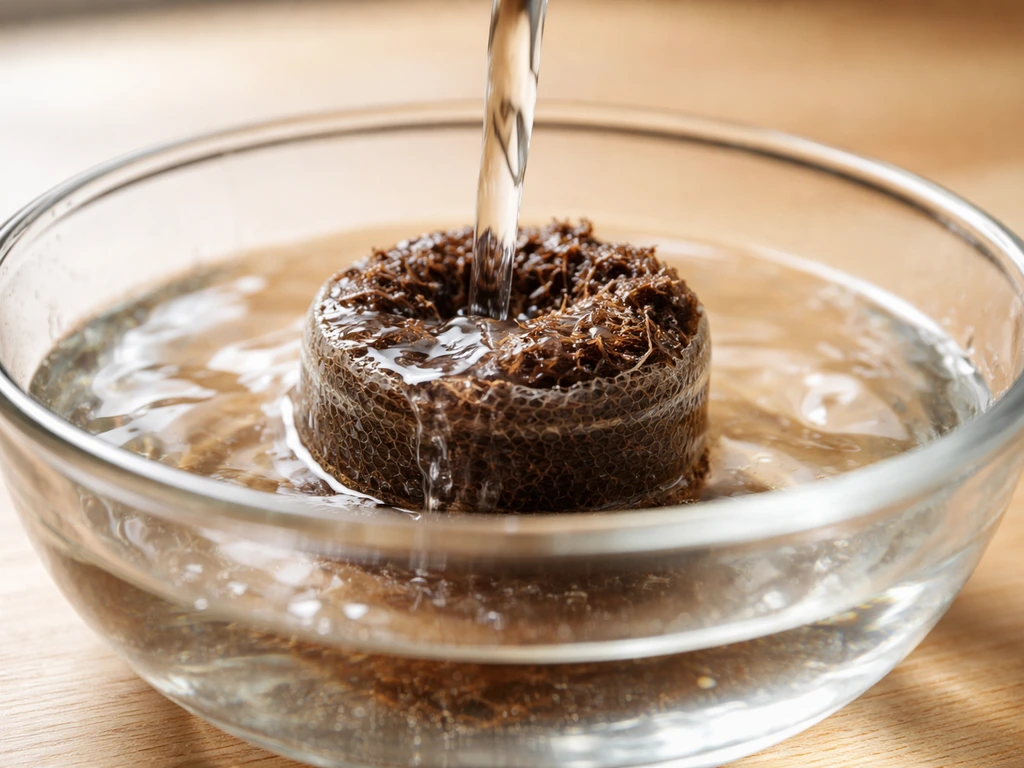
- Place the pellet or disk in a separate bowl or container, not directly in the animal planter yet.
- Pour roughly 1/2 cup to 2.5 cups of lukewarm water over the pellet. The exact amount depends on size: a small soil disk (about 2 inches wide) needs about 1/2 cup; a larger pellet needs up to 2.5 cups (20 fl oz). Add water gradually and wait 5 to 10 minutes for it to absorb.
- Once the pellet has fully expanded (it will roughly triple or quadruple in size), use a fork to fluff and loosen the medium. Break up any clumps. For the best absorption, you can leave it in the water for 30 minutes or even overnight.
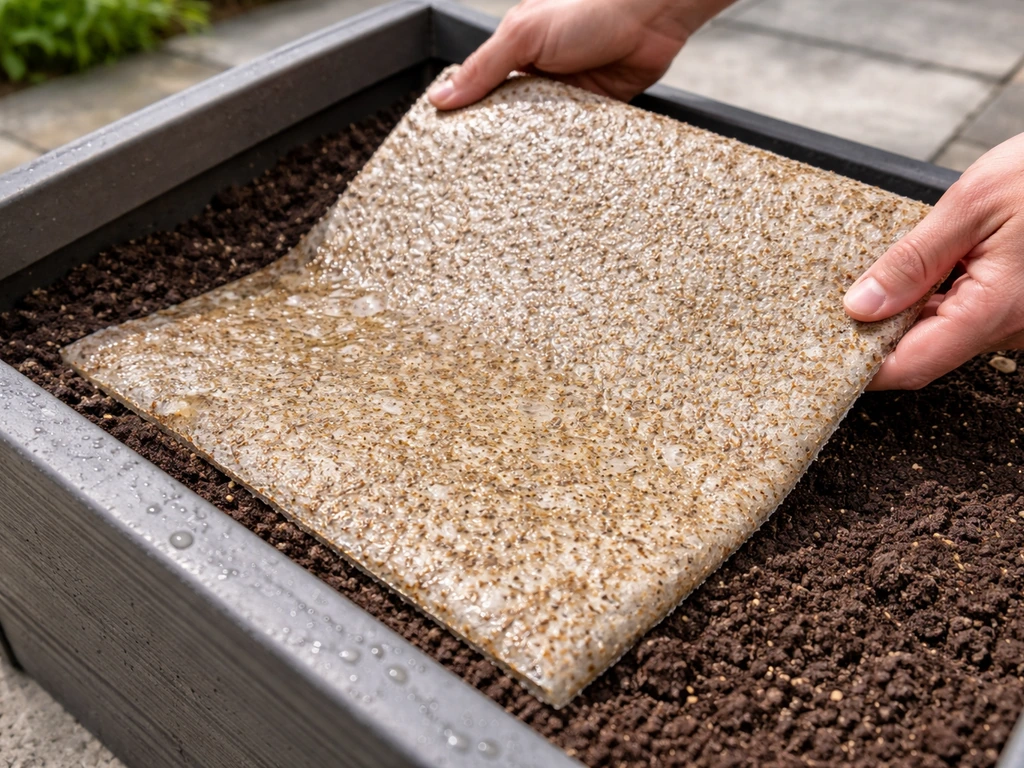
- Fill your animal planter to about 90 to 95% full with the expanded growing medium. Do not pack it down hard. Light, fluffy medium lets roots breathe.
- Open your seed packet and scatter the seeds evenly across the surface of the medium. Aim for even coverage without huge gaps or piles.
- If your kit is seed-only on top (like the Buzzy kit): leave seeds mostly on the surface. Grass seeds like ryegrass need some light to germinate, so do not bury them deep. A very light dusting of leftover growing medium (about 1/8 inch) over the seeds is fine, then gently press down with your fingertips.
- If your kit included a plastic lid or dome: place it on top of the planter now. Remove it after 24 to 48 hours, or as soon as you see the first sprouts poking up.
- Give the planted surface a gentle mist with a spray bottle. The surface should look damp but not flooded.
Path B: You have a self-watering kit with a reservoir
- Follow the same hydration steps above for your pellet or included medium.
- Fill the planter section with the expanded medium and seeds as described in Path A.
- Pour water into the reservoir according to your kit's instructions (ZestiGreens-style kits typically call for about 3 cups in the reservoir at setup).
- Place the lid on top of the planter. Leave it on for 3 days, then remove it.
- After the lid is off, check the reservoir level every couple of days and top it up with a small amount of water as needed.
Path C: You have a pre-seeded mat or grass-growing sheet
- Place the mat in the bottom of your planter or the surface it is designed for.
- Soak the mat thoroughly with lukewarm water until it is uniformly damp all the way through.
- Position the planter in your chosen spot (indirect light, 65-75°F).
- Mist the mat surface daily to maintain moisture. Do not flood it. The mat should feel like a wrung-out sponge, not sitting in a puddle.
Watering and care schedule from day one to full growth
The single biggest mistake people make is watering too much too early. Here is a simple day-by-day rhythm to follow:
| Days | What to Do | Moisture Target |
|---|---|---|
| Day 1 (setup) | Hydrate medium, plant seeds, mist surface, optionally cover with lid/plastic wrap | Medium feels like a damp sponge; surface is visibly moist but no pooling water |
| Days 1-3 (pre-sprout) | Mist the surface with a spray bottle once or twice a day. Do not pour water. If using a lid, keep it on. | Surface stays consistently damp. Lift the lid briefly to check; mist if it looks dry. |
| Day 3-4 (first sprouts appear) | Remove lid or plastic wrap when you see sprouts. Switch from misting to light watering if needed. | Soil just below the surface should feel damp. Poke your finger about 1/2 inch in to check. |
| Days 4-7 (active growth) | Water every 1 to 2 days. Add 3 to 5 tablespoons of water at a time rather than a large pour. | Medium is moist throughout but not soggy. The bottom of the planter should not feel sloshy. |
| Day 7 onward (mature grass) | Water when the top 1/4 of the medium starts to feel dry. Do not wait until it is bone dry, but do not water on a fixed schedule either. | Consistent moisture without saturation. The 'finger test': stick a finger 1 inch in; if it feels dry, water. |
A useful rule from Catit's guidance: only water again when the top quarter of your soil feels completely dry. This gives the roots moisture without keeping the medium so wet that mold takes hold. During the first few days especially, a spray bottle is your best tool because it adds moisture without risk of overwatering.
How to tell if it's going right: timelines and what to expect
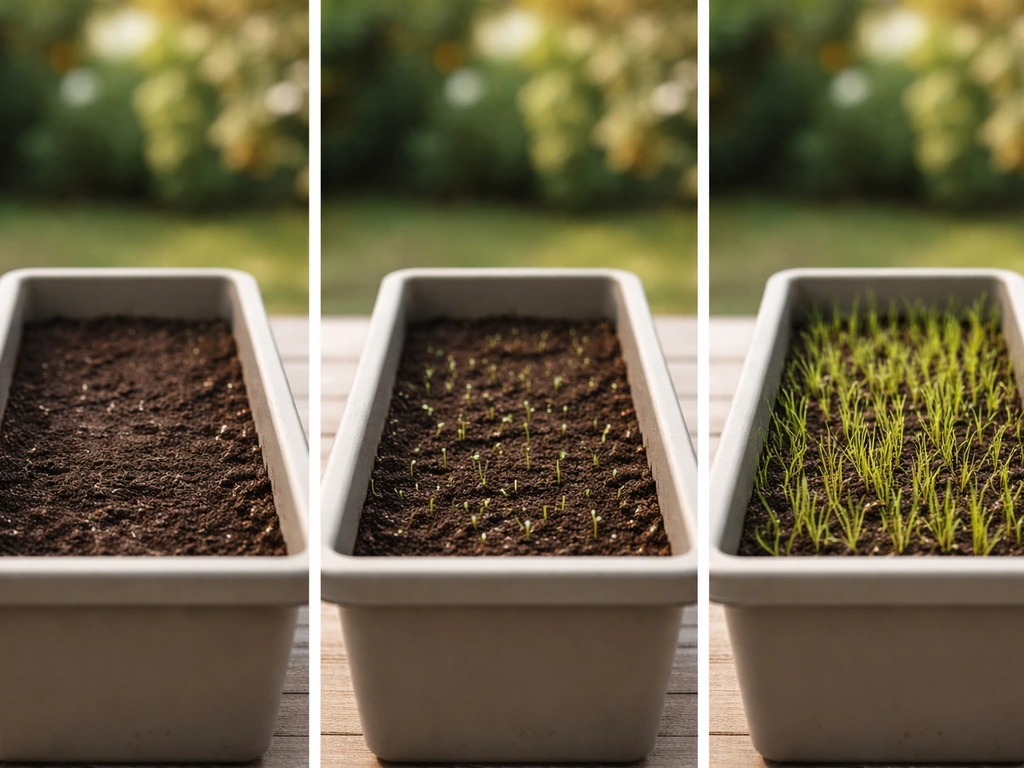
Fast-germinating grass varieties like Italian ryegrass (Lolium multiflorum, common in Buzzy kits) are genuinely quick. Here is a realistic timeline so you know whether to celebrate or troubleshoot:
- Days 1-2: Nothing visible yet. This is normal. Seeds are absorbing moisture and cracking open underground.
- Days 2-4: Tiny white or pale green shoots appear, usually 1/4 to 1/2 inch tall. This is germination. If you have a lid on, this is when you remove it.
- Days 4-6: Shoots are clearly green and starting to stand upright. You should see coverage across most of the planted area, not just one corner.
- Days 5-7: Grass reaches roughly 2 to 3 inches tall. This is the 'ready' stage for most kits. Whisker Field Farms and similar brands call this the grazing-ready milestone.
- Days 7-10: Full, lush growth of 3 to 5 inches. At this point you can trim or shape the grass for display.
The grass coming out of the animal planter's head, neck, or back is the visual payoff of these kits. A good result looks like even, dense, upright grass with consistent green color across the entire planted surface. If your grass is leaning heavily toward one direction, rotate the planter a quarter turn each day to encourage even growth toward the light source.
Troubleshooting: what to do when things go wrong
No sprouts after 5+ days
First, check moisture. Pick up the planter and feel the bottom. If it feels very light and the medium pulls away from the sides, it has dried out. Water it gently and give it 2 more days. If moisture is fine, check temperature. Seeds sitting below 60°F can stall completely. Move the kit to a warmer spot. Finally, check seed depth. If you buried the seeds more than 1/4 inch, they may struggle to reach light. Next time, keep them at or near the surface.
Patchy or uneven growth
Patchy growth almost always comes down to two things: uneven seed distribution at planting, or uneven watering afterward. If one side is lush and one side is bare, check whether that bare side is drying out faster (maybe it gets more airflow or is closer to a heat source). Water the dry patches individually with a targeted mist. You can also press a few extra seeds gently into the bare patches and keep them moist. They will germinate within a few days if conditions are right.
White fuzz, mold, or fungus on the surface

White fuzzy growth on the soil surface is almost always mold caused by blank" rel="noopener noreferrer">overwatering and poor air circulation. Both Reddit growers and professional kit brands consistently point to this as the number one issue. Stop misting for a day or two and move the kit to a spot with a little more airflow. If you have a fan nearby, run it on the lowest setting pointed near (not directly at) the kit for a few hours. Remove any visible mold with a clean spoon, then resume watering only when the surface is genuinely dry to the touch. Catit also advises using a moisture approach to help prevent mold, watering only when about 1/4 of the soil is completely dry and avoiding overwatering blank" rel="noopener noreferrer">resume watering only when the surface is genuinely dry to the touch. Going forward, switch from pouring to misting and do not water more than once a day.
Fungus gnats (tiny flies around the kit)
Fungus gnats are attracted to consistently moist growing medium, especially indoors. Let the top layer dry out slightly between waterings, which breaks their breeding cycle. Yellow sticky traps placed near the kit will catch adults. If gnats persist, consider watering from below by placing the planter in a tray of water for 20 minutes rather than wetting the surface (this keeps the top layer drier). Gnats are annoying but they do not usually kill grass if you catch them early.
Grass yellowing or going limp
Yellow or limp grass after a healthy start usually means one of three things: not enough light, the medium has been waterlogged for too long, or the grass has run out of nutrients in a depleted medium. Move to a brighter spot first. If the medium smells sour or the bottom of the pot feels soggy, reduce watering significantly for a few days. Yellowing at the tips of mature grass (past day 10) is normal as the first flush of growth ages.
Grass growing but leaning sideways
This just means the grass is growing toward its primary light source. Rotate the planter a quarter turn every day or two to even it out. This is a feature, not a failure.
Keeping it looking good: maintenance after the first week
Once your grass hits 3 to 4 inches, you have a few options. You can trim it with small scissors to keep a tidy, even look. Cut to about 1.5 to 2 inches from the surface and the grass will continue growing from the base. Buzzy's instructions mention removing any heat mat once grass hits 1. For more jungle juice grow instructions, follow the same watering and light rules as your kit’s seed-to-grass schedule. 5 inches tall, which is also a good marker for switching to a more hands-off maintenance routine.
For ongoing watering, stick with the finger test: if the top inch of medium feels dry, water with a few tablespoons of room-temperature water. Do not flood it. Grass in a small planter does not need much water at all once established.
Most growing mediums in these kits will support active grass for 3 to 6 weeks before the roots exhaust the nutrients and the grass starts thinning or yellowing. At that point, you can replace the medium entirely. Remove the old soil, rinse the planter, hydrate a fresh pellet (sold separately by most brands), and start the seed process again with a new seed packet. If you are looking for pet grass self grow kit instructions, the same watering and troubleshooting tips above will help you keep your setup on track. The animal planter itself lasts indefinitely.
If you need to store the kit before using it, keep seeds in a cool, dry place away from direct sunlight. Unopened seed packets stay viable for 1 to 2 years. Compressed pellets can be stored indefinitely if kept dry.
A quick note on similar kits you might also have
If you picked up a jungle animal grass kit and also have other grow kits around the house, the setup principles overlap more than you might think. Pet grass kits use the same pellet-and-seed process, and animal planter kits are essentially the same format in a shaped container. Carnivorous plant kits share the humidity-management challenge but need very different water (usually distilled) and very different light. If you are working with a kit labeled 'jungle juice' or a liquid-nutrient system, that is a completely different product aimed at hydroponic growing rather than soil-based grass. Stick with the steps in this guide for anything that came with a pellet, seeds, and a shaped planter.
FAQ
Can I use tap water for a jungle animal grass grow kit instructions setup?
Often you can, but if your tap water is very hard or treated with lots of chlorine, it can slow germination or leave residue that affects moisture. If you notice consistent yellowing despite good light, try using filtered or bottled room-temperature water for the next watering cycle.
How often should I mist if my room is dry or air-conditioned?
Follow the top-quarter dryness rule, but in very dry rooms you may need more frequent light misting to keep the surface from fully drying between days. Use a spray until the top layer is evenly damp, then pause, instead of repeatedly wetting the medium.
Should I cover the planter with plastic or a lid to boost humidity during germination?
Only if your specific kit includes a humidity cover, because extra DIY covering can trap moisture and make mold more likely. If you want to experiment, limit it to very short periods and ensure airflow, you should still see the surface dry slightly between waterings.
What’s the right way to tell if seeds are too deep when using jungle animal grass grow kit instructions?
If you used a thick layer of medium on top of the seeds, seedlings may emerge late or not at all. On the next attempt, aim for seeds at or near the surface, then press them lightly so they make contact without burying more than about 1/4 inch.
Why is one animal pot sprouting faster than another kit I started the same day?
Small differences in placement matter a lot, warmer temperature and brighter indirect light speed germination, and uneven moisture after planting can create lag. Rotate and check moisture on each planter separately, especially the one closest to vents or windows.
Is it safe to run a fan at all times, or will it dry the medium too quickly?
A low fan on intermittently is useful for preventing mold, but constant direct airflow can dry the top layer faster than the bottom. Keep airflow gentle, and still rely on the finger test to decide when to water.
Can I fertilize grass while it’s in the early sprouting stage?
Usually no, these kits typically rely on nutrients already in the pellet. Adding fertilizer too early can create salt buildup and encourage mold. If tips yellow after the mid-cycle, refresh the medium rather than trying to “save it” with extra fertilizer.
What should I do if the grass starts leaning hard even after rotating the planter?
Leaning is normal, rotation helps it even out. If it never straightens, it usually means the light source is coming from one direction or too low, move the kit slightly closer to bright indirect light and rotate more consistently.
When should I trim, and will cutting restart growth or stunt it?
Trim once grass is around 3 to 4 inches if you want a tidy look. Cutting to about 1.5 to 2 inches generally keeps growth going from the base, but avoid cutting too short, and only trim when the medium is moist but not waterlogged.
Do fungus gnats come back, and how do I prevent repeat outbreaks?
Yes, they can return if the top layer stays wet. Prevent repeats by watering only when the top layer is dry to the touch, using misting instead of pouring, and keeping sticky traps near the kit for at least a week while conditions improve.
How do I know when the medium is done supporting growth and it’s time to replace it?
Replace when grass thins noticeably, color fades, or growth slows for several days even with correct light and finger-test watering. Also check smell, a sour odor or consistently soggy feel is a sign the medium is beyond its useful window.