An all-in-one mushroom grow bag is exactly what it sounds like: everything you need to grow mushrooms is already packed into a single bag. No separate mixing, no extra equipment hunt, no complicated prep. You get the bag, you follow a short sequence of steps, and mushrooms appear. That said, "all-in-one" can mean a couple of different things depending on where you bought it, so let's sort that out first before diving into the actual instructions.
All-in-One Mushroom Grow Bag Instructions: Use or DIY

Marcus Thornfield
24 Mar 2026
What an all-in-one mushroom grow bag actually is
When most people search for booming acres grow bag instructions, they're holding one of two things. booming acres grow bag instructions The first is a pre-inoculated (or pre-colonized) fruiting block kit, like those from North Spore, MycoSphere, or Mushroom Mountain. The substrate inside is already colonized with mycelium, meaning the hard work is done. You just need to trigger fruiting. The second type is a DIY all-in-one bag: a sterilized grain-and-substrate bag with a filter patch that you inoculate yourself, then incubate, then fruit. This is popular with growers who've picked up some spores or liquid culture and want a self-contained vessel. blooming acres grow bag instructions
The instructions for these two types diverge pretty quickly at the start. A pre-colonized kit skips straight to fruiting setup. A DIY bag starts with inoculation and incubation. This guide covers both, so find the description that matches what you're holding and all-in-one mushroom grow bag instructions
- Pre-inoculated/pre-colonized kit: substrate is white or off-white with visible mycelium, bag is sealed, no action needed until fruiting setup
- DIY all-in-one bag: bag contains sterilized grain and/or bulk substrate, has a self-healing injection port or filter patch, and arrives uninoculated
- Some kits (like certain oyster mushroom bags) are partially colonized and just need a few more days of warmth before fruiting can be triggered
If you're not sure which type you have, check the packaging. Does it say "ready to fruit" or "pre-colonized"? That's type one. If you're not sure which type you have, check the packaging. spore sorcery grow bag instructions Got a bag from a brand like North Spore, Mushroom Mountain, or MycoCultures? Almost certainly pre-colonized, then use the north spore grow bag instructions to match your kit. Got a plain bag with a filter patch and an injection port from a mycology supply store? That's a DIY vessel.
Step-by-step setup: using a pre-colonized all-in-one bag
This is the path for anyone who bought a ready-to-grow kit. The most important thing to know upfront is this: do not open the bag before mushroom pins appear. Premature opening invites contamination and disrupts the humidity balance the mycelium needs. Just leave it sealed until the mushrooms tell you it's time.
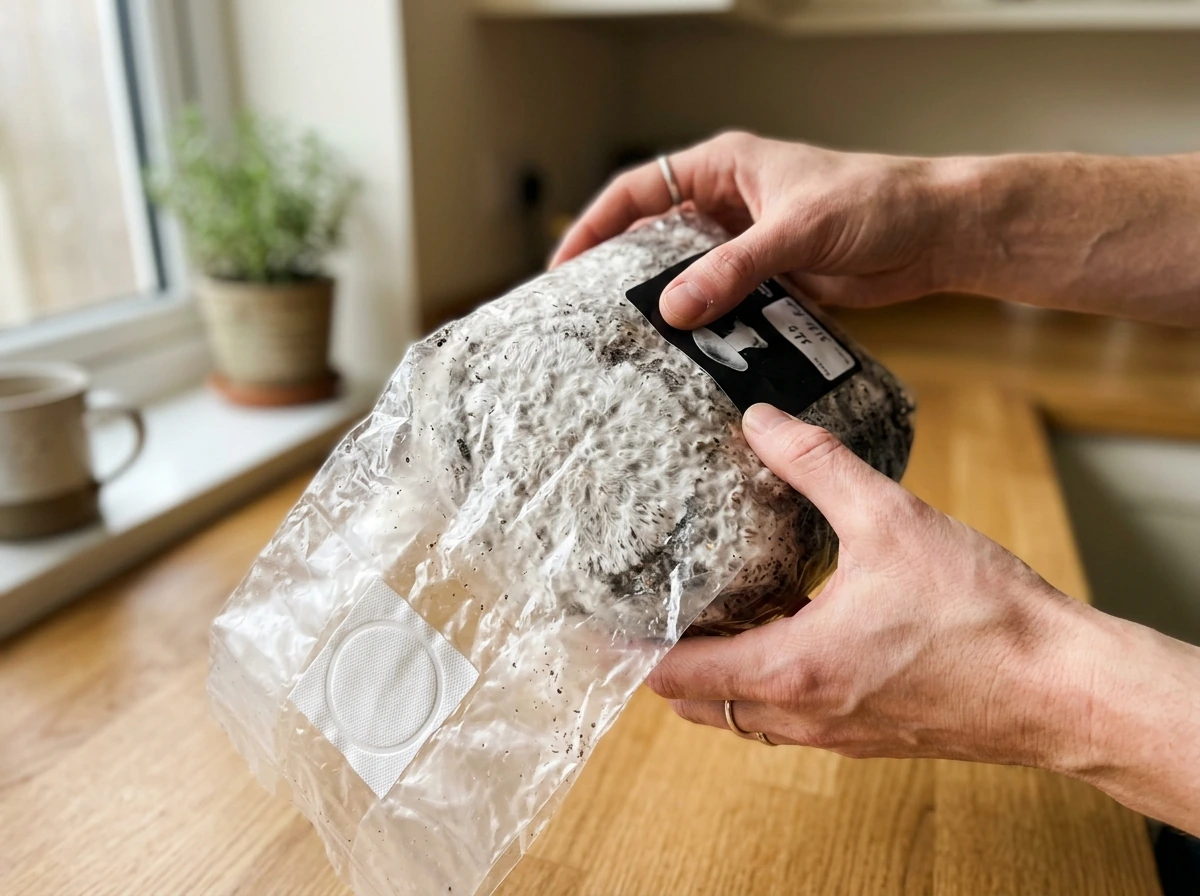
- Unbox the bag and inspect it. You want to see white, fluffy mycelium throughout the substrate. Any green, black, or pink patches are a red flag (more on that in the troubleshooting section).
- Place the bag in its fruiting environment. Indirect light, stable temperature between 24–27°C (about 75–80°F), and a location with some airflow. A countertop away from a sunny window works well.
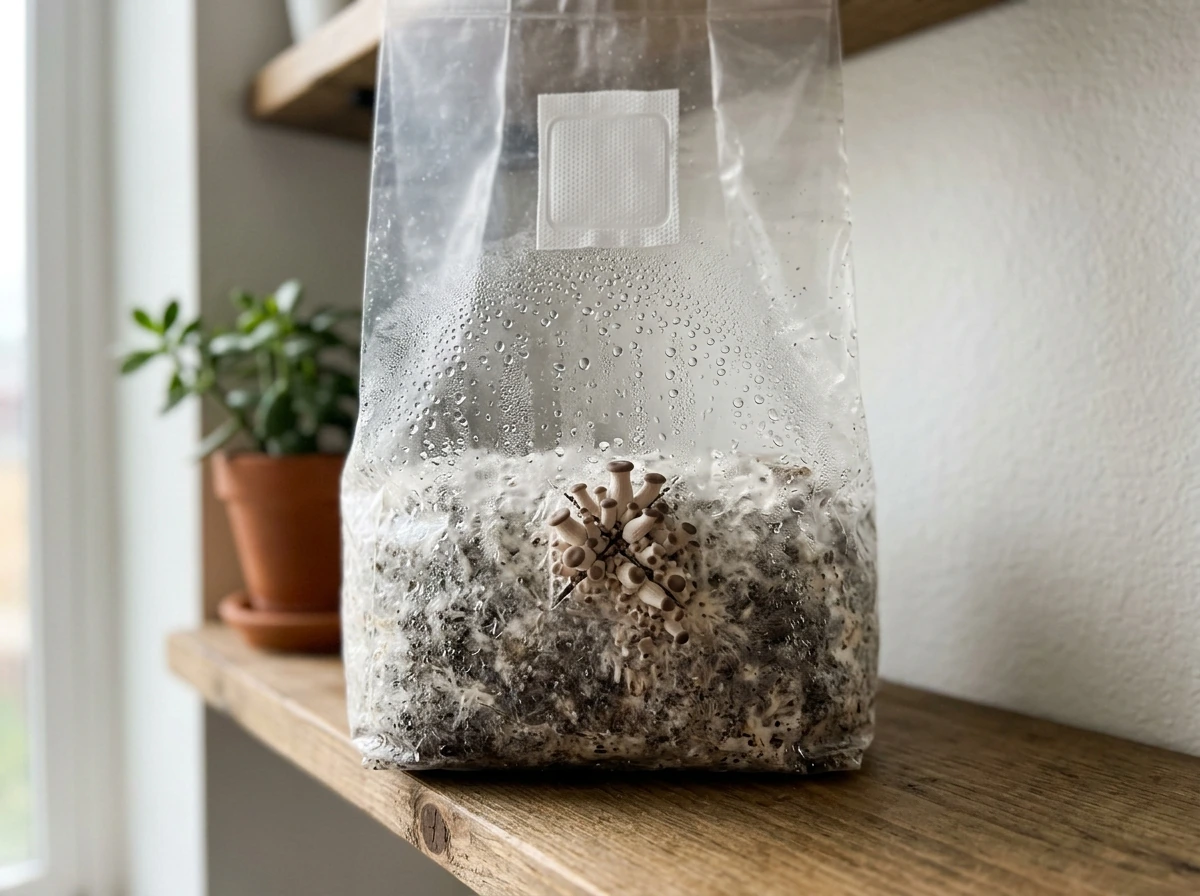
- Make your fruiting cut. For top fruiting, cut off the entire top of the bag (some kits specify this). For side fruiting (common with Lion's Mane and oysters), use an X-cut: make an X starting about 1–2 inches from a corner of the bag. The cut opens a small window where the fruits will emerge.
- Set up a humidity tent. Drape a loose plastic bag or a clear trash bag over the block. Cut about a dozen 1/2-inch holes in the loose bag to allow fresh air exchange while keeping humidity high. This is key: humidity alone without fresh air produces small, thin, malformed mushrooms.
- Start misting. Spray the inside of the humidity tent (not directly onto the substrate) 2–4 times daily. You're targeting 85–95% relative humidity around the block.
- Wait for pins. Tiny mushroom primordia (pins) will start appearing, usually within 3–10 days depending on the species and conditions.
- Once pins appear, you can remove the humidity tent if you prefer. Keep misting the block directly 1–2 times daily. Mist the air around it, not a direct soak onto the pins themselves.
- Harvest before the caps flatten out completely. For oysters specifically, harvest when the cap edges are still slightly curled inward. Once the edges flatten or turn upward, they're past their prime.
One thing that trips people up: they mist too much directly onto the pins and the fruits rot, or they mist too little and the pins dry out and stall. The sweet spot is misting the air and inner tent walls rather than drenching the mushrooms. Think of it as maintaining a humid atmosphere, not watering a plant.
How to get fruiting: placement, moisture, and fresh air
The three variables that actually control whether your bag fruits well are temperature, humidity, and fresh air exchange. A North Spore grow kit FAQ discussion on Reddit similarly emphasizes that, after you open or cut the bag for fruiting, keeping high humidity and providing fresh-air or FAE is key to getting the grow to proceed effectively blank" rel="noopener noreferrer">temperature, humidity, and fresh air exchange. Most beginners focus entirely on humidity and then wonder why their mushrooms look like pale, stringy noodles. Fresh air is just as important. Insufficient fresh air exchange is the most common reason for weird-looking, underdeveloped fruits, even when humidity is perfect.
For placement, pick a spot with indirect light (not direct sunlight), stable temperature, and some passive airflow. A windowsill in a room that gets used daily is often ideal, because opening and closing the door provides natural fresh air exchange. Avoid airtight closets or humid bathrooms where CO2 can build up. Mushrooms need CO2 levels around 500–1,000 ppm, which is basically just normal indoor air with a little ventilation.
For the humidity tent, the 1/2-inch hole strategy works well as a starting point. Cut about a dozen holes in your loose plastic tent. Mushroom Mountain’s oyster kit instructions also call for making a 1-inch wide cut in the kit bag and misting that cut area once daily cut about a dozen holes in your loose plastic tent. If your home is already very humid (say, above 60% ambient humidity), you can cut more holes for more airflow. If your home is dry (desert climate or heavy central heating), cut fewer holes and mist more frequently. Adjust based on what you're seeing: if the tent walls are dripping wet and the substrate looks waterlogged, add more holes and back off on misting. If the tent interior looks completely dry within an hour of misting, add fewer holes and mist more often.
Once pins form, pull back the tent or at least fan the block a couple of times a day by fanning the opening briefly. This fans out CO2 and brings in fresh oxygen. It takes about 30 seconds per session and makes a noticeable difference in fruit size and density.
Species-specific fruiting notes
| Species | Fruiting Temp | Humidity Target | Cut Style | Notes |
|---|---|---|---|---|
| Oyster mushrooms | 65–75°F (18–24°C) | 90–95% | X-cut on side or top cut | Very fast growers; harvest 3–5 days after pins form |
| Lion's Mane | 65–75°F (18–24°C) | 85–95% | Side fruiting preferred | Needs very high fresh air exchange; blobs turn yellow if too dry |
| Shiitake | 55–75°F (13–24°C) | 85–95% | Top cut or full open top | Often needs a cold shock (soak in cold water) to trigger fruiting |
| Reishi | 75–85°F (24–29°C) | 85–95% | Top cut | Slower grower; antler stage develops with low fresh air, caps with high fresh air |
How to make a DIY all-in-one mushroom grow bag
If you want to build your own all-in-one bag from scratch (because you have spores, liquid culture, or grain spawn and want a self-contained vessel), here's the general workflow. This is more involved than using a pre-made kit, but it gives you full control over species and substrate.
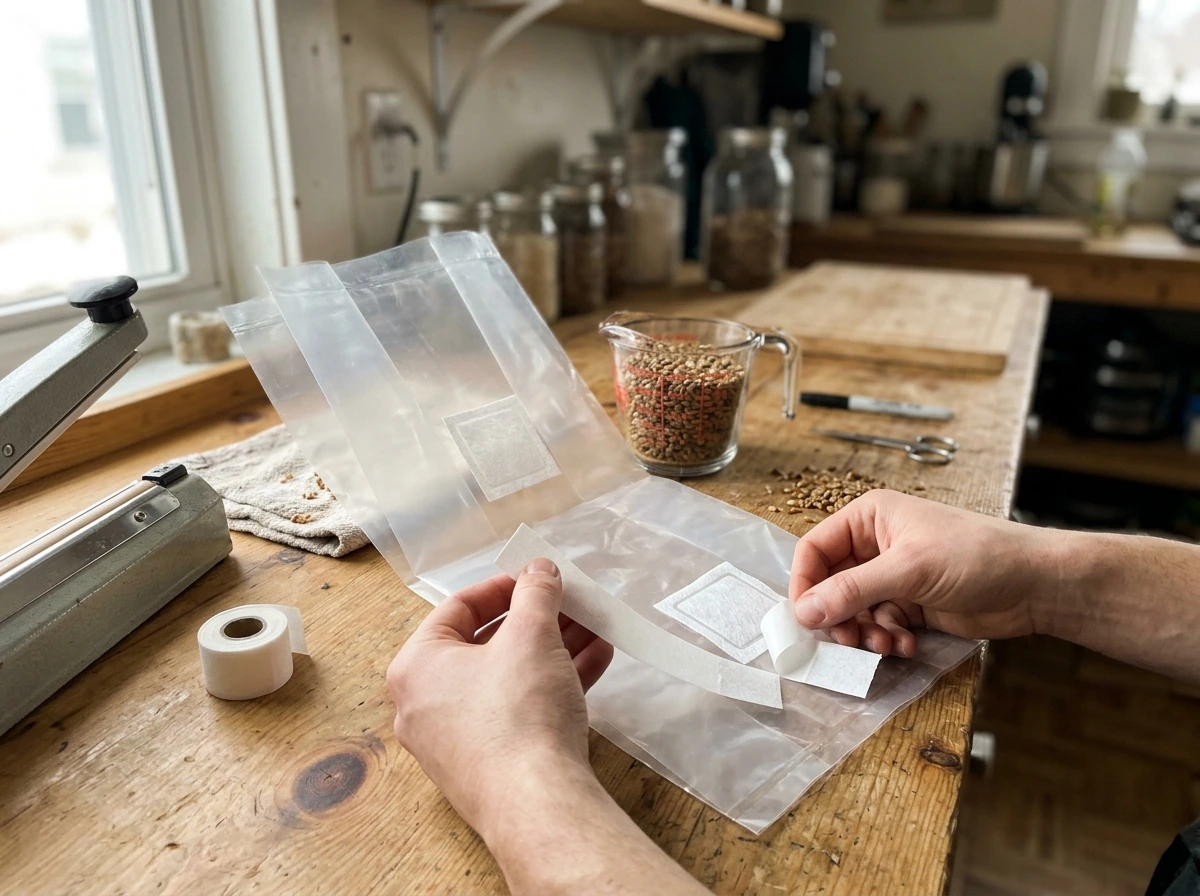
What you'll need: polypropylene grow bags with filter patches (these are sold specifically for mushroom cultivation), a pressure cooker, your substrate mix (typically a grain layer for colonization plus a bulk substrate layer like supplemented hardwood sawdust or coco coir), and your inoculant (liquid culture or a spore syringe). The filter patch on the bag allows gas exchange during colonization without letting contaminants in, which is what makes it an "all-in-one" vessel.
- Prepare your substrate. A common all-in-one mix is hydrated grain (rye, wheat berries, or popcorn) layered with or mixed into bulk substrate like hardwood sawdust with bran. Fill the bag to about 2/3 full to leave room for mixing if needed.
- Sterilize. Pressure cook at 15 PSI for 90 minutes for a 5 lb grain bag. Larger bags may need up to 2.5–3 hours. Let it cool completely (at least 12 hours) before inoculating. This step is non-negotiable. Under-sterilized substrate is the number one cause of contamination.
- Inoculate in a clean environment. Wipe down your workspace with 70% isopropyl alcohol. Use a flame-sterilized needle to inject liquid culture or spore solution through the self-healing injection port, or through the bag wall if it's designed for that. Use about 3–5 ml of liquid culture per pound of substrate.
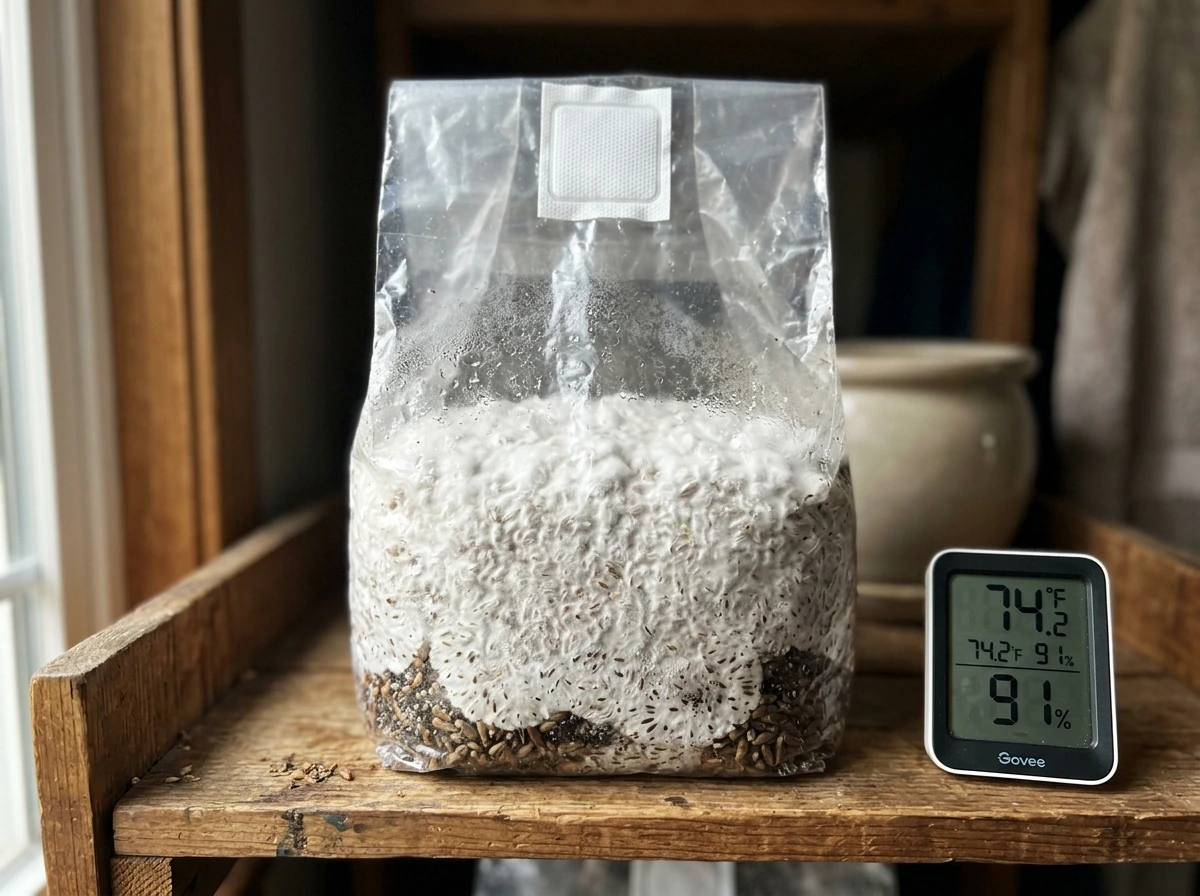
- Seal the injection point and incubate. Tape over the injection hole if needed. Store the bag at species-appropriate incubation temperature (generally 70–75°F for most varieties) in a dark location. The filter patch handles gas exchange automatically.
- Monitor colonization. You'll see white mycelium spreading through the substrate over 2–4 weeks. Shake or break up the bag once when colonization is about 30% complete to speed things along, then leave it alone.
- Once fully colonized (substrate is fully white and firm), treat it like a pre-colonized kit and follow the fruiting steps above: make your cut, set up the humidity tent, and start misting.
The DIY path has more failure points than a pre-made kit (mainly at the sterilization and inoculation stages), but once you get through colonization cleanly, fruiting behaves exactly the same way. If this is your first time, consider doing one pre-made kit alongside your DIY bag so you have a reference point for what healthy colonization looks like.
What to expect over time: progress signs and harvest timing
Knowing what normal looks like is half the battle, especially when you're staring at a bag trying to figure out if something is wrong or if you just need to be patient.
For a pre-colonized kit, the timeline from setup to first harvest typically runs 5–14 days depending on species and conditions. Here's what you should see at each stage:
- Days 1–3: Nothing visible. The mycelium is adjusting to its new environment. This is normal. Maintain misting and temperature.
- Days 3–7: Tiny white or cream-colored bumps begin forming on the cut surface. These are primordia (pins). This is the signal that fruiting has been triggered.
- Days 5–10: Pins elongate noticeably. Species like oysters will develop visible caps within days of pinning.
- Days 7–14: First flush reaches harvest size. Oysters are often ready 3–5 days after visible pinning. Lion's Mane takes a bit longer and develops as a single pom-pom shape.
- After harvest: The block rests. You can rehydrate it (soak in cold water for 4–12 hours) and attempt a second flush. Most blocks produce 2–4 flushes total before exhausting the substrate.
For oyster mushrooms, the key harvest window is when the caps are still slightly cupped and the edges haven't flattened or curled upward yet. Once they start flattening, they're releasing spores and flavor starts to decline. Harvest by twisting and pulling the entire cluster at the base, not by cutting individual caps. This keeps the fruiting surface cleaner for the next flush.
A practical tip: once pins form, check your bag twice a day. Mushroom growth accelerates fast once it starts, especially with oysters. What looks like a tiny cluster in the morning can be a full-size harvest by evening.
Common problems and how to fix them
No pins forming
This is the most common complaint. If your bag has been in fruiting conditions for more than 10–14 days without any pins, work through this checklist. First, check temperature: is it in the right range for the species? Too warm is more common than too cold for indoor growers. Second, check fresh air exchange: are there enough holes in your humidity tent? Stale, CO2-rich air suppresses pinning. Third, check humidity: if the tent interior looks dry or the substrate surface has dried out, increase misting frequency. Some species (shiitake especially) also need a cold shock to trigger fruiting, so try dropping the temperature by 10°F for 12–24 hours.
Pins form but stall and don't mature
This usually points to one of two things: not enough light or not enough fresh air. Mushrooms need ambient light (indirect, not intense) as a directional cue and they need fresh oxygen to grow properly. If your bag is in a dark closet or a sealed container, move it to a brighter spot with more airflow. Increase fanning sessions to 2–3 times daily and check that your humidity tent holes aren't blocked. Verify room temperature too: temperatures outside the species range slow everything down dramatically.
Contamination: green, black, or pink patches
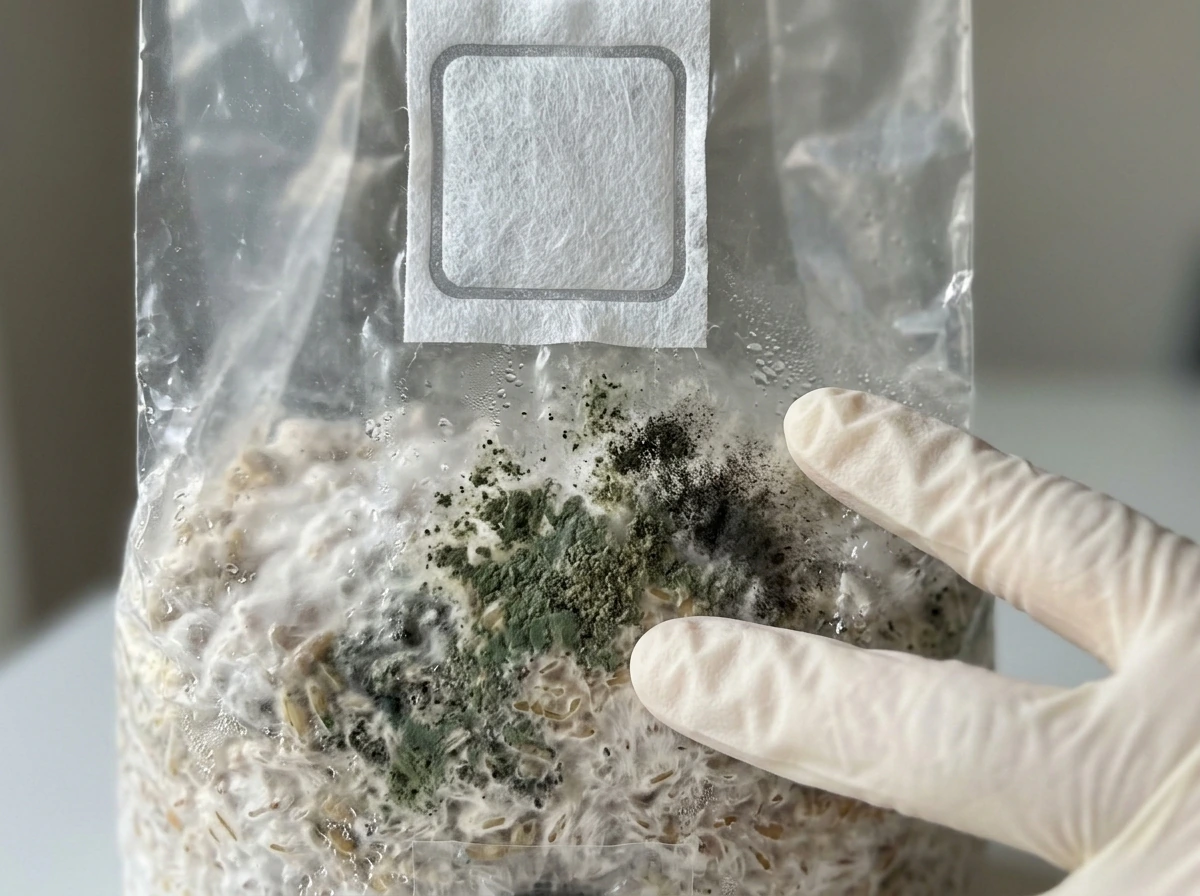
Green mold (Trichoderma) is the most common contaminant and it's aggressive. If you see any green, black, or pink coloration that isn't white mycelium, act fast. Move the bag away from any other grows immediately. Do not open the bag or try to cut out the contaminated section (this just spreads spores). Seal the bag in a trash bag and discard it. Then sanitize every surface and tool that touched the bag with 70% isopropyl alcohol or a diluted bleach solution. The same rule applies to bacterial contamination: wet, glossy, slimy patches with a sour or rotten smell mean the bag is done. Isolate and discard.
Contamination on a pre-colonized kit is frustrating, but it's not a reflection of your skills. Sometimes bags get contaminated during shipping or handling before they reach you. For DIY bags, contamination almost always traces back to incomplete sterilization or a breach during inoculation. Both are fixable with practice.
Weird-looking or deformed mushrooms
Long, thin, leggy mushrooms with tiny caps? Not enough fresh air. Mushrooms grow toward oxygen and stretch themselves out trying to find it when CO2 builds up. Add more holes to your humidity tent and increase fanning. Very small, dense clusters with caps that open too early? The fruiting surface may be too large (consider whether your cut was too big). Mushrooms that turn yellow or brown before harvest? Likely drying out between misting sessions, too much direct airflow, or you're past the harvest window.
Spore release (dark powder on surfaces)
If you wait too long to harvest, mature mushrooms will drop spores. This creates a visible dusty layer on surfaces below the bag. It's not dangerous, but it's messy, and heavy spore release can inhibit future flushes on the same block. Harvest before the caps fully open to avoid this. Check your bag twice daily once pins are visible.
Your quick-start checklist for today
Whether you just unboxed a pre-colonized kit or you're building your first DIY bag, here's a printable-style checklist you can run through right now.
- Identify your bag type: pre-colonized kit (ready to fruit) or DIY all-in-one bag (needs inoculation first)
- Inspect the substrate for any signs of contamination (green, black, pink, or slimy patches). If clean, proceed.
- Choose your fruiting location: indirect light, stable temperature in species range, some ambient airflow
- Make your fruiting cut: X-cut for side fruiting (1–2 inches from a corner), or top cut for top-fruiting species
- Set up your humidity tent: loose plastic bag or clear trash bag draped over the block, with about a dozen 1/2-inch holes cut in it
- Start misting: spray the inside of the tent walls 2–4 times daily; avoid soaking the substrate or pins directly
- Check twice daily once pins appear, because growth accelerates fast after pinning starts
- Harvest at the right time: oysters before cap edges flatten; twist and pull the full cluster at the base
- After first harvest: rest the block, rehydrate if desired, and repeat the misting routine for the next flush
- If anything looks wrong (no pins after 14 days, contamination, deformed fruits): use the troubleshooting section above to identify the variable to adjust
If you're working with a specific brand's bag (North Spore, MycoSphere, Mushroom Mountain, or others), the steps above match their general guidance closely, but check your brand's specific instructions for any species-specific variations in cut placement, temperature range, or rehydration method. Brands like North Spore and Mondo Growkits also publish helpful brand-specific walkthroughs if you need more detail on their exact kit format.
The big picture here is simple: mushrooms want to grow. Your job is to give them humidity, fresh air, indirect light, and the right temperature, then get out of the way. Most failures come from either opening things too early, skipping fresh air exchange, or ignoring early signs of contamination. Nail those three things and your first flush is very much within reach. If you are growing golden teachers specifically, use golden teacher grow bag instructions for the right incubation and fruiting targets.
FAQ
Can I open the all-in-one mushroom grow bag early to check colonization or add more water?
Most pre-colonized “ready to fruit” bags are meant to stay sealed until you see pins. If you must open briefly (for example, a damaged bag or a missing part), do it in a clean area, minimize the time exposed, and keep the humidity tent ready. As a rule, you avoid pulling the block out of the bag before pins, because even short exposure can shift humidity and introduce contaminants.
What happens if I over-mist, and how do I correct it without restarting the whole grow?
Yes, but use the tenting strategy instead of soaking the bag. In most setups, you should mist the air and inner tent surfaces so droplets do not pound the pins. If you do get water pooling on the substrate surface, reduce misting and increase venting slightly, since standing water can lead to mushy caps and bacterial blotches.
Do I need to rehydrate the block before fruiting, and how much is too much?
Rehydration depends on the type of bag. Pre-colonized kits are usually designed to start fruiting with rehydration only if the kit instructions call for it (often indicated by notes about “soak” or “hydrate”). For DIY bags, avoid adding extra liquid after sterilization and inoculation, and instead control moisture through the fruiting tent once the block is colonized.
My bag is colonized but no pins are forming, what should I troubleshoot first?
If pins stall after the environment seems correct, try changing one variable at a time. A common next step is to increase fresh air exchange slightly (more brief fans) while keeping humidity stable, because CO2 buildup can suppress pinning even when the tent looks humid. Only after that, adjust temperature within the species range (for shiitake, a modest cold shock can help).
How do I dial in the hole size and misting schedule for different home humidity levels?
A humidity tent with holes is a starting point, not a fixed recipe. If your tent walls stay dry quickly, either mist more frequently or reduce airflow by cutting fewer holes. If the walls stay wet or you see water running, increase holes or venting and mist less, since constant saturation encourages rot rather than stronger pinsets.
What is the best time to harvest so I do not reduce future flushes?
Harvest timing matters for both quality and future flushes. If you wait until caps fully flatten and release spores, you may see reduced vigor on subsequent flushes, and you can get a dusty spore layer that makes cleanup harder. Harvest when caps are still slightly cupped and the cluster is fully ready, then allow the block to rehydrate lightly between flushes only if your kit guidance suggests it.
If I suspect contamination, should I quarantine the bag or try to salvage it?
Do not use the same tools or gloves across contaminated and clean bags. If you see green, black, or pink growth that is not normal white mycelium, isolate immediately. Since the article recommends sealing and discarding, treat the bin and any contacted surfaces as contaminated, and sanitize with a suitable disinfectant rather than just wiping.
Does letting mushrooms fully mature and drop spores affect the next flush or other bags?
For many growers, spore release is the biggest practical downside of late harvest. Spores can land on other bags and settle on surfaces, and heavy spore release can also inhibit the next flush on that same block. The practical response is to harvest on schedule and reduce disturbance once caps start to open widely.
Can I get multiple flushes from the same all-in-one grow bag, and when do I stop?
You usually can, but it depends on the species and the bag format. Some species fruit in repeated waves from the same block, while others can slow after flushes or degrade faster if kept too wet or too dry. The safest approach is to follow the rehydration and fresh-air guidance between flushes, and observe whether the block looks healthy (firm substrate with active white regrowth) before expecting another strong fruiting.
Should I use different handling rules before pins versus after pins form?
For consistent results, make changes that match the growth stage. During colonization and early fruiting, keep disturbances minimal and avoid unneeded opening. Once pins form, increase regular fanning and adjust humidity tent behavior based on what the tent and substrate surface are doing, rather than copying a fixed misting schedule from another home.
What is the most common temperature mistake, and how can I keep it stable?
If your room is cool, you can slow everything down or trigger odd growth. If it is too warm, you can get weak or malformed development and faster drying in the tent. Use the species temperature range as your target, and if needed use stable passive temperature control rather than frequent moving, since yo-yo temperatures can delay pinning.