The Booming Acres grow bag is a mushroom cultivation kit, not a vegetable or herb planter. Specifically, it's their 5lb All-In-One Mushroom Grow Bag, designed so you can colonize and fruit mushrooms entirely inside the same bag without needing separate equipment. If you landed here expecting a flower or vegetable grow bag, this one is built for fungi, and the setup process is pretty different. That said, once you understand what it's doing and why, it's actually one of the more beginner-friendly mushroom kits out there.
Booming Acres Grow Bag Instructions: Setup to Harvest

Marcus Thornfield
24 Mar 2026
What the Booming Acres grow bag is and what it's actually for
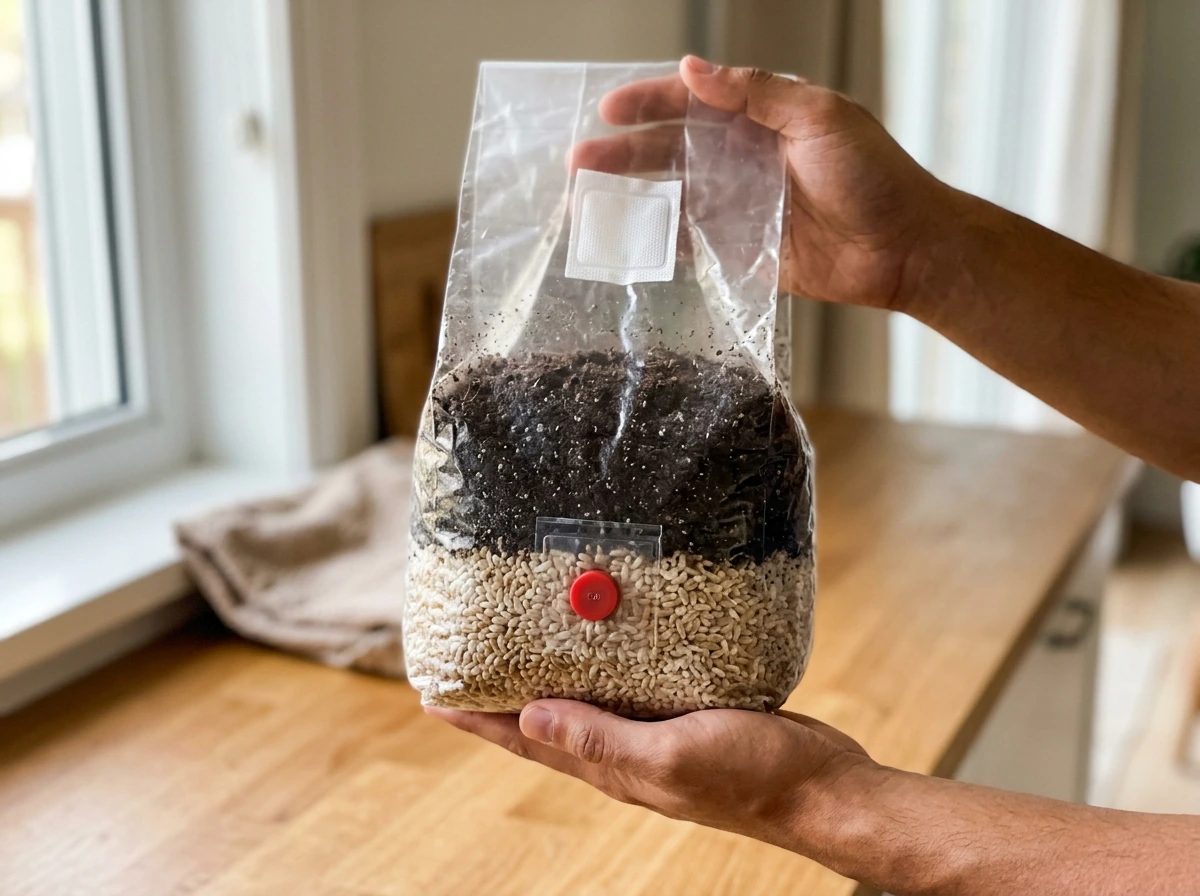
The Booming Acres All-In-One (AIO) bag contains two layers inside a single sterile bag: a layer of grain (which is your inoculant carrier) and a layer of CVG substrate, which stands for coco coir, vermiculite, and gypsum, with Azomite added in. The grain colonizes first when you inject your mushroom genetics into it, then you break it up and mix it into the CVG substrate layer, which triggers full colonization and eventually fruiting. The whole system is designed specifically for manure or dung-loving mushrooms, like Psilocybe cubensis varieties. It's not suitable for oyster mushrooms or lion's mane as a primary setup, though Booming Acres does mention side-fruiting modifications for those species.
One important distinction: this bag requires grain spawn or a liquid culture syringe to inoculate. You cannot just shake spores in and expect results. Spores can work, but they're significantly slower and less reliable. Liquid culture syringes are the preferred method and will show visible growth within 2 to 4 days. [spore syringes] may take up to 2 weeks before you see any mycelium (the white, thread-like growth that eventually becomes mushrooms).
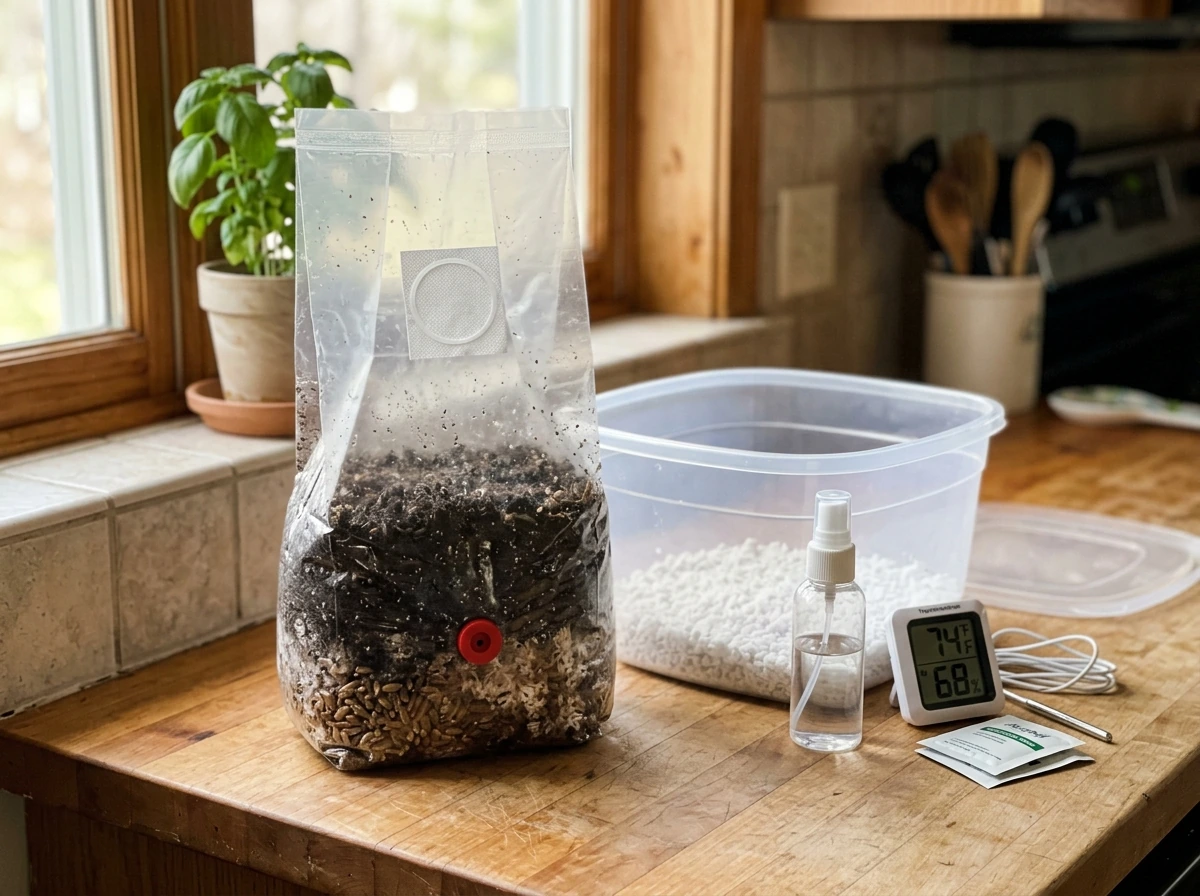
What comes in the box and what you need before you start
When your Booming Acres bag arrives, the box is minimal by design. Here's what should be inside:
- 1 x 5lb All-In-One Mushroom Grow Bag (pre-sterilized, contains grain and CVG substrate)
- 1 x sanitizing alcohol wipe
- Some stickers
That's genuinely it. The bag itself is the kit. Everything else you need, you'll have to source separately before you open anything. Here's what to have on hand before you start:
- A liquid culture syringe or spore syringe (liquid culture strongly recommended for beginners)
- A lighter or alcohol lamp to sterilize the needle
- Additional 70% isopropyl alcohol or bleach wipes (the single included wipe won't go far)
- A still-air box or clean, low-traffic space to work in (a bathroom with the shower run hot for a few minutes to kill airborne particles works in a pinch)
- A heat mat if your space runs below 70°F (optional but often necessary)
- A thermometer to monitor your colonization space
Do not open or cut the bag until your workspace is prepped and your syringe is ready to go. Every second the bag is exposed increases contamination risk.
Setting up the bag: medium, drainage, and placement
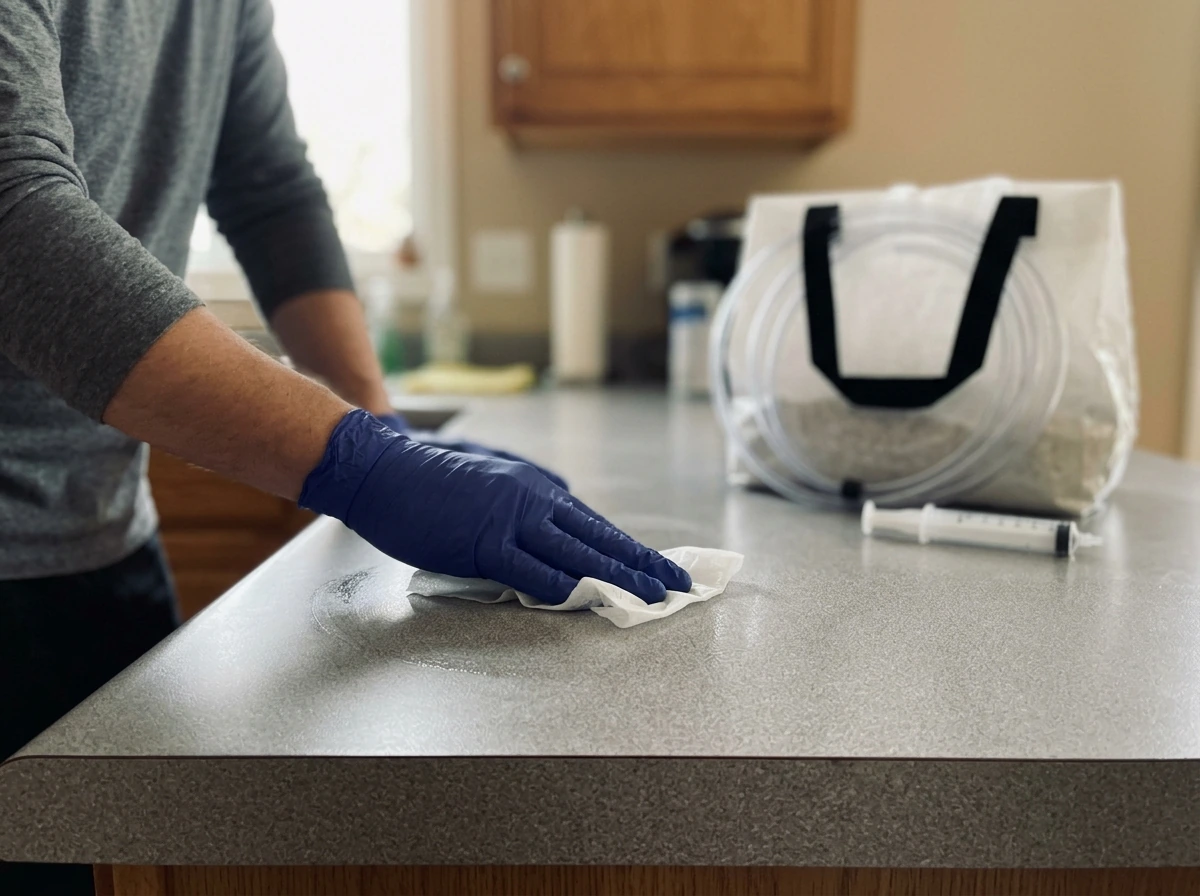
The good news is that the medium is already inside the bag and pre-sterilized. You don't need to mix, hydrate, or prepare anything. What you do need to do is set up your work area correctly before inoculation, because that's where most beginner mistakes happen.
Wipe down your entire work surface with 70% isopropyl alcohol or bleach wipes. Let it fully dry before you place the bag down. Then wipe the outside of the bag itself, including the black rubber injection port on the side of the bag. Let everything dry. If you're working in a still-air box (a clear plastic tote you've wiped down and are using as a low-airflow workspace), do the same wipe-down inside the box.
For placement during colonization, find a spot that stays consistently between 70 and 75°F. A dark closet, a cabinet, or the top of a refrigerator (which generates gentle heat) are all popular options. If your space is cooler than 70°F, use a heat mat, but don't set the bag directly on it. Place a folded towel or a piece of cardboard between the mat and the bag to prevent the heat from drying out the substrate too quickly.
Drainage is not a concern with this bag since mushroom substrate isn't watered the way soil is. The bag is self-contained and maintains its own moisture. You only deal with moisture management later, once you open or modify the bag for fruiting.
How to inoculate and start the colonization process
This is where mushroom cultivation differs from any other grow kit. There's no planting seeds or transplanting. Instead, you inject mushroom genetics (via syringe) into the grain layer of the bag, and the mycelium does the growing from there.
- Attach the needle to your syringe and remove the cap. Do this inside your still-air box or cleaned workspace.
- Using a lighter, heat the metal tip of the needle until it glows red hot. This sterilizes it.
- Let the needle cool for 15 to 20 seconds. Do not blow on it or wave it around.
- Locate the black rubber injection port on the side of the bag. This is the only entry point — do not poke anywhere else.
- Insert the cooled needle through the rubber injection port at an angle and inject 2 to 4cc of your liquid culture or spore solution. You can go up to 10cc if this is the only bag you're using the syringe on, but more is not necessary.
- Remove the needle and recap your syringe immediately.
- Give the bag a very gentle shake to distribute the inoculant slightly, then place it in your colonization spot.
One gotcha worth calling out: if you accidentally heat the needle too much and melt the rubber injection port, don't panic. Booming Acres specifically addresses this. Just put a piece of tape over the port as soon as you notice it, before any air gets in. It's not ideal, but it's recoverable.
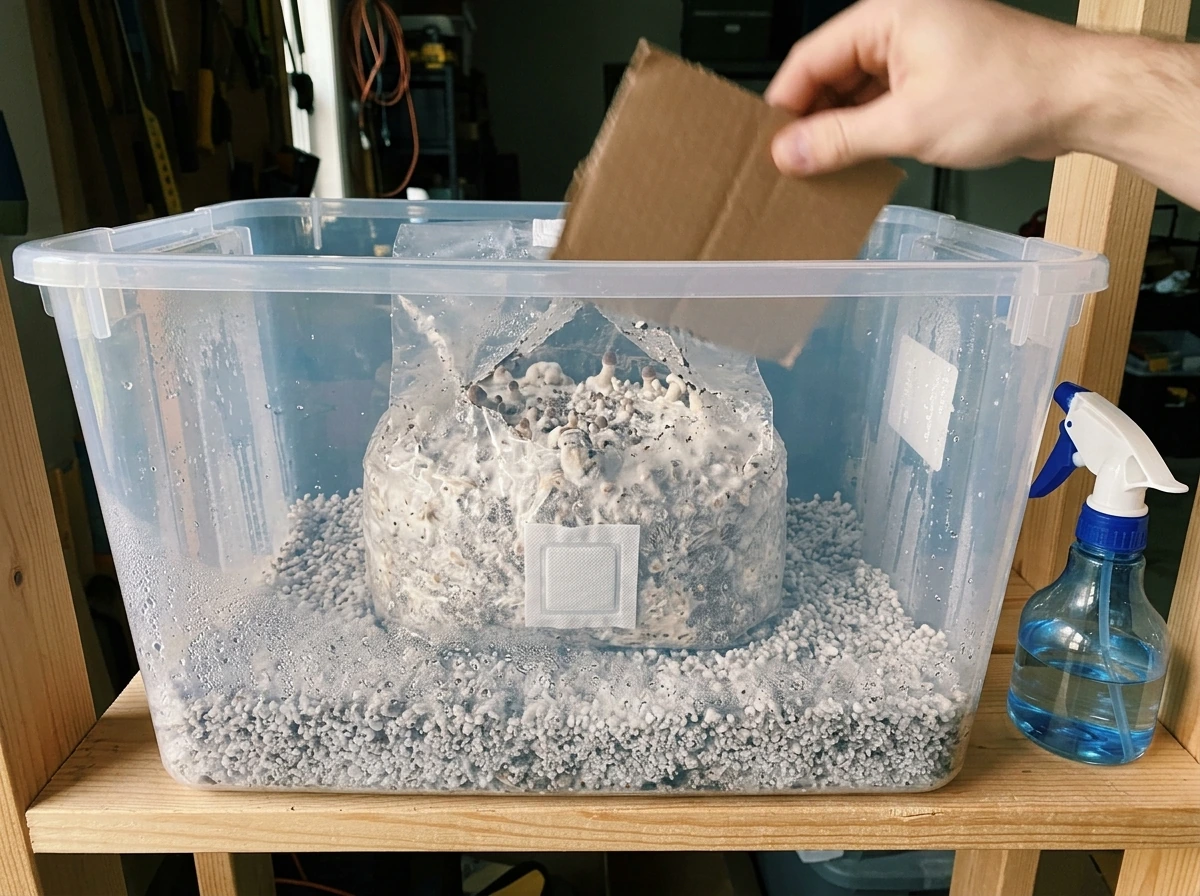
The break-and-shake step (this one matters a lot)
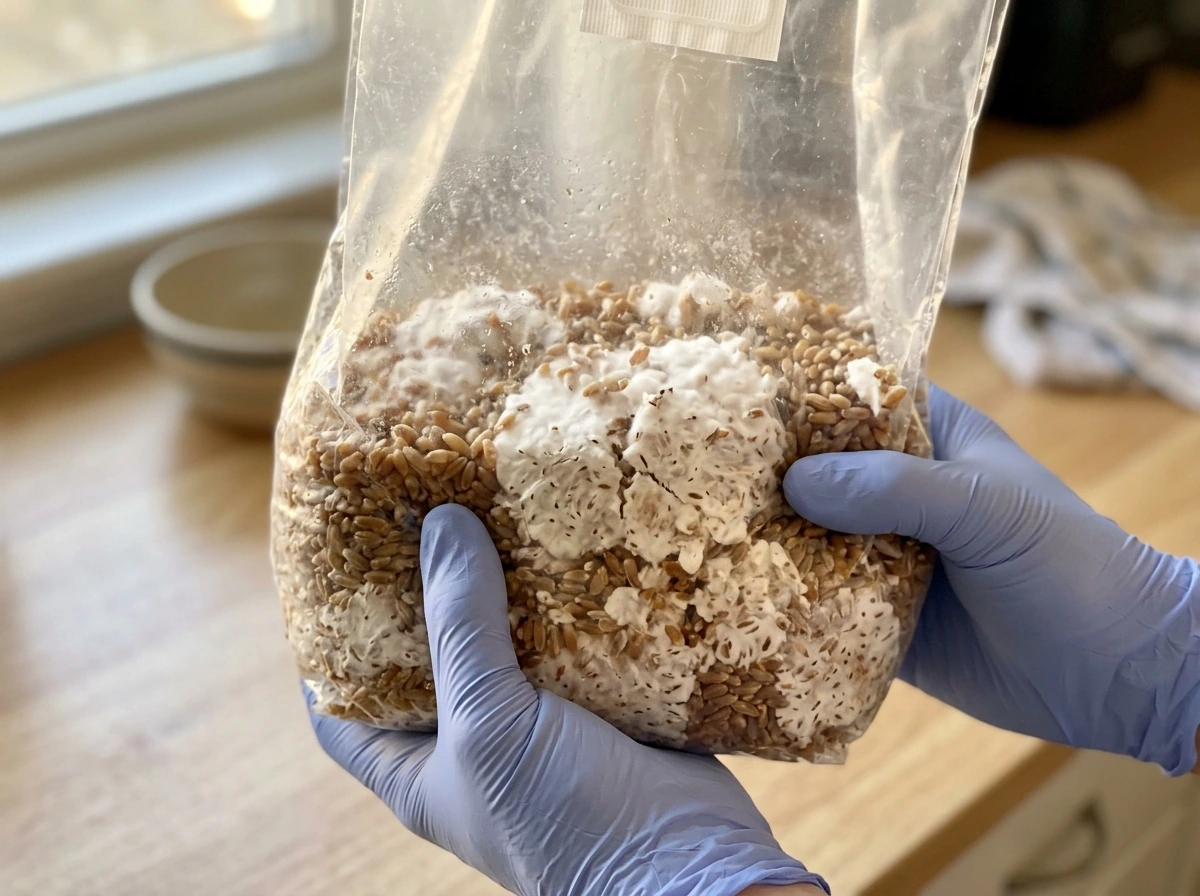
Once the grain inside the bag is 50 to 80% colonized (you'll see white, fluffy mycelium covering roughly half to most of the grain), it's time to break up the colonized grain and mix it into the CVG substrate layer below it. This is called the break-and-shake. Squeeze and knead the bag from the outside to break the grain up as thoroughly as possible, then massage it down into the substrate. This mixing is what drives full colonization of the CVG and eventually triggers fruiting.
One thing Booming Acres emphasizes: once you've done the break-and-shake, stop moving the bag around. Repeatedly disturbing the bag can tear the mycelial strands and cause stalling, where the mycelium stops growing or slows dramatically. Find a spot for it and leave it alone.
Watering, misting, and keeping moisture right
During colonization, you don't water anything. The bag is sealed and maintains its own humidity. This is actually one of the beginner-friendly parts of the AIO design. Once you move into fruiting and start opening or modifying the bag, moisture management becomes an active task.
If you're fruiting in the bag with the top cut open (Method 1)
Cut the top seal of the bag to allow fresh air exchange (more on this in the fruiting section). Once you do, mist the inside walls of the bag at least once a day using a clean spray bottle. Don't spray directly onto the surface of the substrate or directly onto forming pins (tiny mushroom buds). Instead, aim for the sides and the air space inside. If you're getting too much drying, keep the open bag inside a plastic tote to buffer the airflow.
If you're fruiting the block in a tub (Method 2)
Remove the block from the bag, place it in a tub lined with moist perlite, and fan the top of the tub at least twice a day for fresh air exchange. Mist the inside walls of the tub, not the surface of the block directly. You want humidity without pooling water.
Signs you're over or under-misting
| Problem | What it looks like | Fix |
|---|---|---|
| Under-misting | Pins dry out and abort before developing, substrate surface cracks or pulls away from bag sides | Increase misting to twice daily, reduce airflow slightly |
| Over-misting | Water pooling on substrate surface, mushy or discolored base of mushrooms, increased mold risk | Skip a misting session, improve airflow, let surface breathe before misting again |
| Good moisture | Substrate looks dark and moist but not wet, pins develop steadily without cracking or aborting | Keep doing what you're doing |
Getting a second flush
After your first harvest, you can rehydrate the block for a second flush. For top-fruiting setups, fill the bag with cold water until the substrate surface is covered, let it soak for 1 hour, then drain completely. After draining, go back to your fruiting setup and wait for pins. Booming Acres is upfront that second flushes are typically much smaller, often 50% or less of the first, so set your expectations accordingly.
Light, temperature, and where to put the bag at each stage
Temperature and light needs change depending on which stage you're in, and getting this wrong is one of the most common reasons kits underperform. Here's how to think about it:
| Stage | Temperature | Light | Notes |
|---|---|---|---|
| Colonization | 70 to 75°F | Dark preferred | Heat mat okay but don't place bag directly on it |
| Fruiting initiation | 68 to 70°F | 12 hours on / 12 hours off cycle | Any indirect ambient light source works; no direct sunlight |
| Active fruiting | 68 to 70°F | 12/12 cycle continues | Avoid drafts and direct sunlight; consistent temps matter more than intensity |
The light doesn't need to be strong. A nearby lamp on a simple timer is enough. The 12 on / 12 off cycle mimics natural day/night rhythms and signals to the mycelium that it's time to produce mushrooms. You can also use an 18/6 cycle if that's what your timer setup allows, but 12/12 is the standard recommendation.
Keep the bag away from direct sunlight at all stages. Strong direct light can damage mycelium, especially during colonization. A window ledge in full sun is a bad spot. A shelf lit by a lamp a few feet away is fine.
Humidity inside the sealed bag during colonization is self-managing. Once you open or cut the bag for fruiting, humidity becomes something you actively maintain through misting. Booming Acres notes that as long as the bag is closed, humidity isn't something you need to worry about.
Fruiting method options: what to actually do after full colonization
Once the entire block is white and colonized, you have three paths to trigger fruiting. Which one you pick depends on how hands-on you want to be and what species you're growing.
Method 0: Leave it alone
This is Booming Acres' recommended starting point for beginners. Lower the temperature to 68 to 70°F, set up a 12/12 light cycle nearby, and just wait. No cutting, no handling, no modification. Many growers get their first flush this way with zero extra effort. It's not the highest-yield method, but it's the lowest-risk one.
Method 1: Cut the top seal
Cut just the top seal of the bag to allow fresh air to circulate. Some growers on Reddit also discuss experimenting with light versus no light during fruiting after starting fresh air exchange, since real-world results can vary. This is called fresh air exchange (FAE) and it's a key trigger for fruiting in many species. Once you cut the top, start misting the inside walls at least once a day and consider keeping the bag inside a plastic tote to prevent it from drying out too fast. Mushrooms should start pinning from the top of the substrate.
Method 2: Side-fruiting for oysters or lion's mane
If you're growing oyster mushrooms or lion's mane, you can cut two 1 to 2 inch crossing lines (forming an X shape) into the short sides of the bag. Keep the cuts above the substrate line so you're cutting into the empty bag area, not the block itself. Fold the top of the bag over to push air exchange through the X holes and mist those holes 2 to 3 times a day. This directs fruiting out through the sides rather than the top.
Method 3: Cake fruiting in a tub
Carefully cut the bag open and remove the fully colonized block (now called a cake). Place it in a plastic tub lined with a 1 to 2 inch layer of moist perlite. Perlite holds humidity without sitting water against the cake. Fan the top of the tub at least twice a day and mist the inside walls. Don't blow air directly at the developing pins, as strong airflow causes them to dry out and abort.
Fixing common problems
Nothing is growing after inoculation
Don't panic too quickly. If you used a spore syringe, visible mycelium can take up to 2 weeks to appear. If you used liquid culture, you should see white growth within 2 to 4 days. If you used liquid culture and still see nothing after 2 weeks, wait another 2 weeks before giving up. Check that your temperature is in the 70 to 75°F range and that the bag hasn't been moved or jostled repeatedly. If growth still doesn't appear and there's no sign of contamination, the genetics may have been weak or the syringe may have been old. New genetics are the next step.
Green, blue, purple, grey, or yellow growth in the bag
This is contamination. Healthy mycelium is white or off-white. Any other color, especially green, is almost always mold (Trichoderma is the most common culprit and it's bright green). Booming Acres' official guidance is to dispose of the bag promptly: throw it in the trash or cut it open into an outdoor compost bin. Don't open a contaminated bag indoors. Some contaminants produce spores that spread quickly and can cause health issues, so earlier disposal is better. This is one case where there's no fix, only a clean restart.
Colonization stalled or growth stopped partway
Stalling during colonization usually comes from one of three things: temperature dropping below 70°F, the bag being moved or handled too much after the break-and-shake, or contamination starting to compete with the mycelium. Check your temp first. If it's fine and there's no discoloration, just leave the bag completely undisturbed for another week. Mycelium sometimes needs time to recover from disturbance.
Pins forming but aborting before developing
Aborted pins (tiny mushrooms that stop growing and dry out or turn yellow) are almost always a moisture or airflow problem. Either the humidity dropped too low, there's too much direct airflow hitting the pins, or the temperature swung. Increase misting frequency slightly, reduce direct drafts, and make sure your temperature is stable at 68 to 70°F. If you're using Method 1, try keeping the open bag inside a tote to buffer the environment.
The injection port melted when you sterilized the needle
It happens. The fix is simple: cover the melted port with a piece of tape as soon as you notice it. The point is to seal the opening so no outside air or contaminants get in. Do this immediately rather than finishing inoculation first. A taped port is totally workable.
Mushrooms look good but growth seems slow
Slow fruiting is usually a temperature or light timing issue. Make sure you're at 68 to 70°F (not 75°F, which is more appropriate for colonization, not fruiting) and that the 12/12 light cycle is consistent. Inconsistent light schedules can confuse the trigger. Also check that you did a thorough break-and-shake before fruiting. Unbroken grain clumps colonize unevenly and can delay pinning.
Your next steps after setup
If you've worked through everything above, here's where you should be and what to do next: If you want a complete, step-by-step overview, use these all-in-one mushroom grow bag instructions as your checklist from inoculation through fruiting. For golden teacher grow bag instructions, focus on inoculation timing and then keep the fruiting environment stable. If you want more detailed North Spore-specific steps, follow these north spore grow bag instructions alongside your Booming Acres checklist.
- Inoculated and sealed: place in a 70 to 75°F dark spot and check every few days for signs of white mycelium growth
- 50 to 80% colonized: do your break-and-shake, then put the bag back and leave it alone
- Fully colonized (all white): choose your fruiting method, drop temp to 68 to 70°F, and start 12/12 light cycle
- Pins forming: begin misting routine based on your chosen method, keep environment stable
- First harvest done: rehydrate with cold water soak for 1 hour, drain, and set up for second flush
- Any contamination spotted: dispose promptly, don't try to save the bag
If you're curious how the Booming Acres AIO bag compares to other all-in-one options on the market, there are walkthroughs on this site for similar bags from other brands, including blooming acres grow bag instructions covering the general format and magic grow bag instructions for a different brand's take on the same concept. If you're curious how the Booming Acres AIO bag compares to other all-in-one options on the market, there are walkthroughs on this site for similar bags from other brands, including blooming acres grow bag instructions and magic grow capsules instructions for another brand's take on the same concept. magic grow bag instructions Each brand has its own quirks, so model-specific guidance like this guide makes the process a lot less frustrating than following generic mushroom cultivation advice.
FAQ
Can I reuse the bag or the CVG block after a flush, or do I need a new one each time?
For this AIO approach, you typically reuse the same colonized block for a second flush only (by rehydrating as instructed). After that, yields usually drop sharply, so most growers switch to a fresh bag to avoid inconsistent pinning and higher contamination risk from handling multiple times.
What if my bag arrives already fully or partially white, can I inoculate it anyway?
If you see broad, healthy-looking mycelium before you inoculate, do not inject again. Pre-growth can indicate an opened, mixed, or compromised kit. The safest move is to treat it as a contamination or mis-handled shipment risk and contact the seller for replacement guidance.
Do I need to shake or knead the bag during colonization after inoculation, before break-and-shake?
No. Before the scheduled break-and-shake, you should minimize movement and only handle the bag when you need to. Shaking earlier can tear developing strands and slow colonization, especially if temperatures are borderline.
How do I know whether my problem is stalling versus contamination when the bag is not progressing?
Look for spread and color change. Stalling usually looks like slow, uniform whitening with no off colors. Contamination often shows distinct green, black, orange, or fuzzy patches that expand. If color appears, dispose promptly rather than trying to “wait it out.”
Can I cut additional holes for side-fruiting, even if I’m not growing oysters or lion’s mane?
You can, but it is more hands-on and increases moisture and airflow variables. For the most beginner-stable results, stick to the beginner starting method for your chosen species, then only add side-fruiting cuts if you are confident the genetics match and you can maintain consistent humidity and misting.
Is a still-air box required, or can I inoculate on an open counter?
A dedicated low-airflow workspace reduces contamination risk, but the key is cleanliness and airflow control. If you inoculate on an open counter, contamination risk rises because drafts carry spores. If you do not have a still-air box, work in a closed room, reduce movement, and keep the bag closed as much as possible.
What should I do if my injection needle clogged while injecting the bag?
Stop and avoid forcing liquid, since excess pressure can leak through the port or damage the port seal. Let the needle be ready again and reattempt carefully only if the port area is still sealed and not melted. If you already caused port damage, tape it immediately and continue only if the bag is still properly sealed at the port.
My temperature is between 70 and 75°F, but it spikes to 78°F occasionally. Is that harmful?
Short spikes can be risky, because the guidance expects stable temperatures for predictable colonization. If you see frequent excursions above the range, move the bag to a cooler, more stable location or use a temperature controller. The goal is consistent 70 to 75°F during colonization, then 68 to 70°F during fruiting.
Can I use a larger timer cycle than 12/12 for fruiting, like continuous light?
It is better to follow a scheduled day-night cycle. Continuous light can reduce predictability of the fruiting trigger. Stick to 12/12 during fruiting for the most consistent results and only adjust if your setup is known to perform well.
What is the safest way to handle an aborted pin situation, should I open the bag more or less?
Usually you should correct airflow and humidity rather than increasing openings. Reduce direct drafts aimed at pins, mist the interior walls appropriately, and keep the bag or tub in a buffered environment like a tote if the airflow is drying things out. Excess opening can dry pins faster than you can compensate.