North Spore's ShroomTek all-in-one grow bag is one of the most beginner-friendly mushroom kits on the market because the entire grow happens inside the bag itself, from the moment you inject your spores all the way through colonization and your first flush. If you follow the steps in order and keep your environment dialed in, you can reasonably expect your first harvest somewhere between 30 and 60 days after inoculation. This guide walks you through every stage in plain language so you know exactly what to do, what to watch for, and how to fix it when things get weird.
North Spore Grow Bag Instructions: Step-by-Step Guide

Marcus Thornfield
24 Mar 2026
What the North Spore ShroomTek bag is and what you need
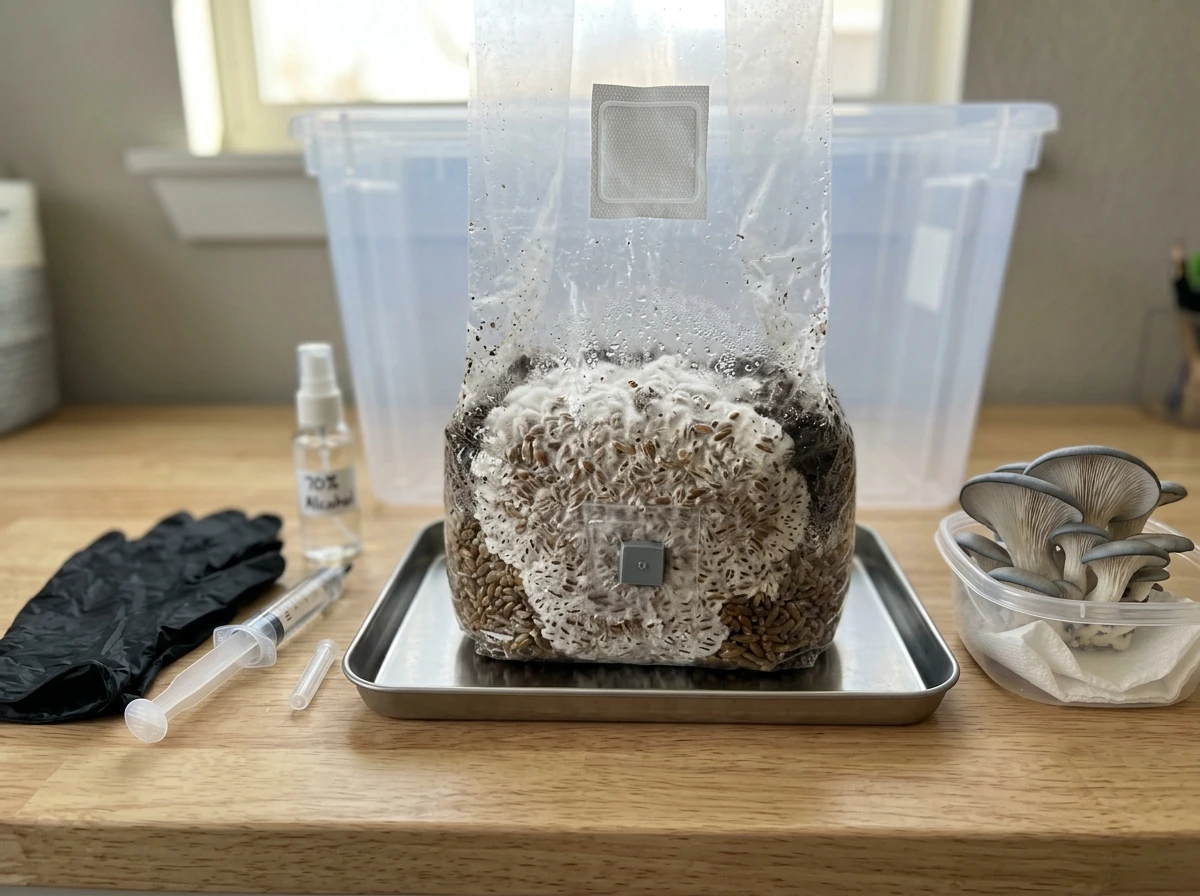
The ShroomTek is a pre-sterilized, pre-hydrated substrate bag that North Spore fills with a blend of organic manure-based compost, organic grain, and coco coir, plus their own substrate supplements. The exact recipe is proprietary, but the key point is that it arrives optimally hydrated and ready for inoculation. You are not mixing substrate from scratch. You are injecting spores or liquid culture into a bag that already has everything mushrooms need to grow.
The bag has two built-in features that make it work. The first is a self-healing injection port, a thick rubber septum that reseals after your needle passes through it. The second is a 5-micron filter patch that blocks airborne contaminants while still allowing gas exchange so the mycelium can breathe. Both of these are doing real work for you, so handle the bag carefully and avoid poking anything other than your syringe needle through the injection port.
Required supplies
- North Spore ShroomTek all-in-one grow bag
- Spore syringe or liquid culture syringe (2.5–5cc per bag)
- Nitrile or latex gloves
- Spray bottle filled with 70% isopropyl alcohol
- Spray bottle filled with previously boiled or distilled water
- Scissors or a utility knife
- Rubber band
Optional but helpful
- Paper towels or alcohol wipes
- Still air box (North Spore's NocBox works well) or a flow hood for cleaner inoculation
- Alcohol burner for needle flaming (do NOT use this inside a still air box)
- Fruiting chamber like a BoomRoom or monotub for higher-humidity fruiting
- Digital timer for lighting automation
One thing to note about timing: North Spore recommends letting your ShroomTek bag sit at room temperature for one to two weeks after it arrives before you inoculate. This conditioning period lets any issues from shipping show up before you waste your spores. If you see green, black, or pink patches forming during that window, the bag may already be contaminated and you should contact North Spore before proceeding.
Setup and inoculation: do this before anything else
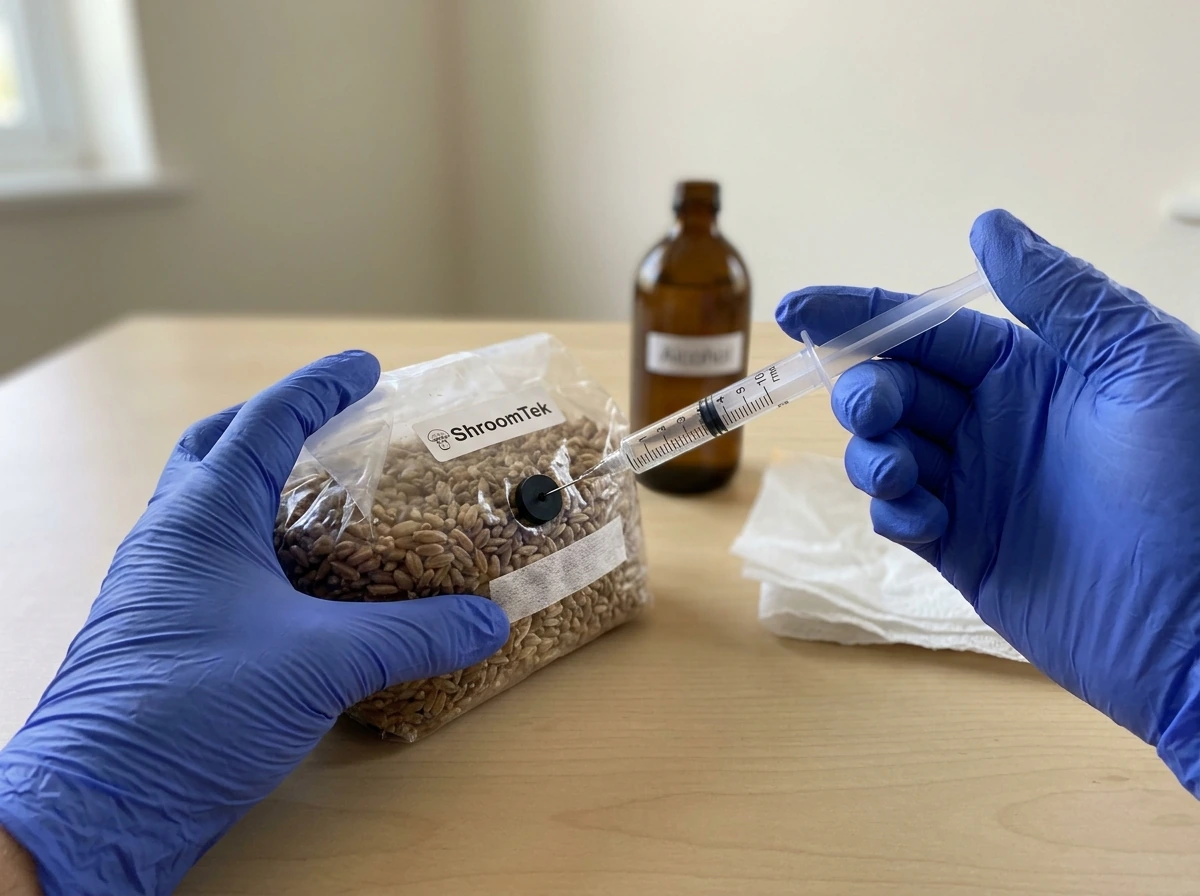
Contamination is the number one reason grow bags fail, and it almost always comes from the inoculation step. The goal here is simple: get the spore or liquid culture syringe into the bag without introducing bacteria or mold from the air or your hands. Take your time and do not rush the sanitization steps.
- Put on your nitrile or latex gloves before touching anything else.
- Spray your work surface thoroughly with 70% isopropyl alcohol and wipe it down or let it air dry.
- Spray the outside of the ShroomTek bag with isopropyl, focusing on the injection port area, and let it dry completely or wipe it dry with a clean paper towel.
- Spray your gloved hands with isopropyl as well.
- If you have a still air box, place the bag and your syringe inside it now. If you are using an alcohol burner to flame the needle, do that outside the still air box first, then let the needle cool completely before injecting. Never use an open flame inside the still air box.
- Draw 2.5 to 5cc of spore or liquid culture into your syringe. Using closer to 5cc will help the mycelium colonize faster and reduces the window where contamination can take hold.
- Insert the syringe needle straight into the self-healing injection port and inject slowly and evenly.
- Withdraw the needle and immediately wipe the port with an alcohol wipe or a paper towel dampened with isopropyl.
- Gently shake or rotate the bag to distribute the inoculant across the substrate.
That is it for inoculation. The bag is now sealed and ready to colonize. You do not need to open it, add water, or disturb it in any way until it is fully colonized.
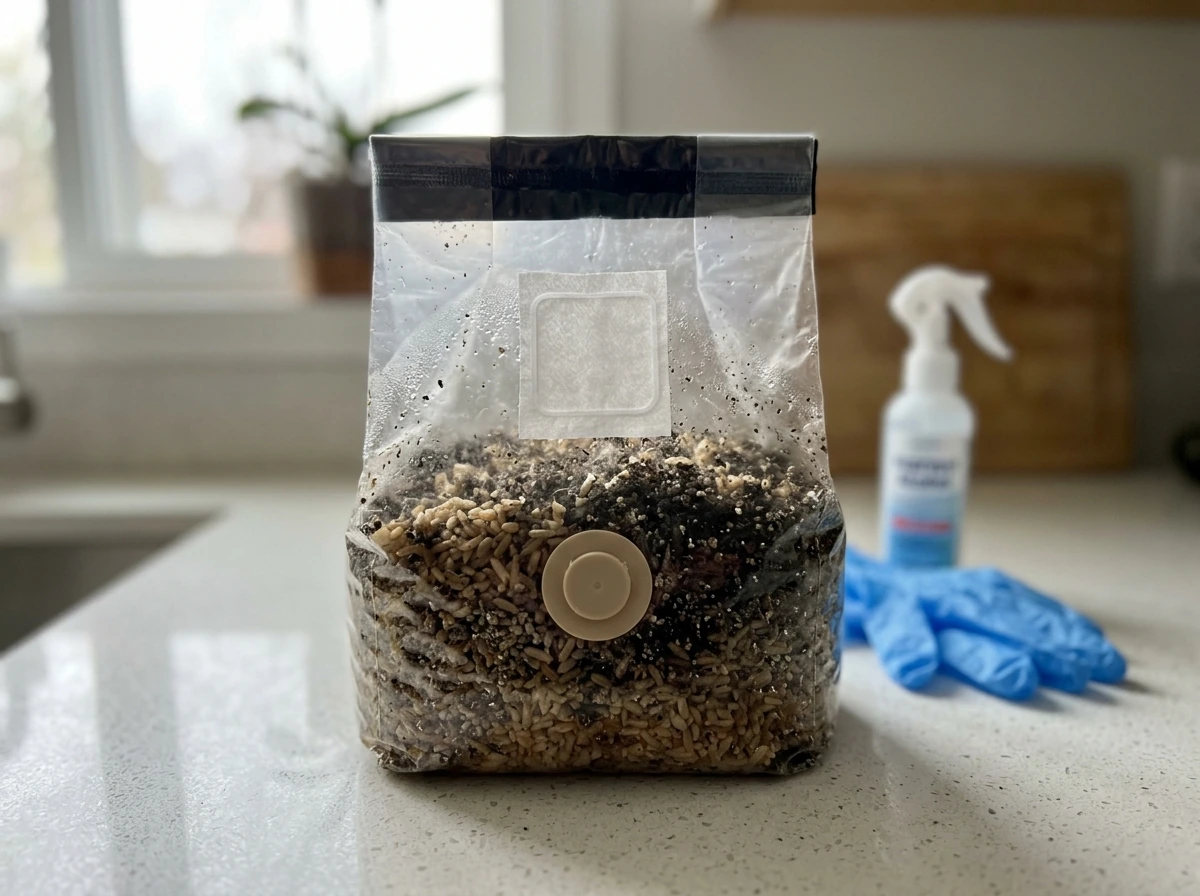
Incubation phase: where to put it and what to watch for
After inoculation, your bag needs a warm, stable environment to colonize. The mycelium (the white, thread-like root network that will eventually produce mushrooms) needs to spread through the entire substrate before you can trigger fruiting. North Spore specifies that incubation temperature should stay between 55°F and 75°F, and staying toward the warmer end of that range will speed things up noticeably. The FungiAlly shiitake booklet also notes that shiitake incubation is typically around 73°F and warns that dropping incubation temperature significantly can affect growth and fruiting performance between 55°F and 75°F. A shelf in a room that stays around 70°F is ideal for most species.
Keep the bag out of direct sunlight during incubation. The mycelium does not need light at this stage, and direct sun can heat the bag unevenly and stress the culture. A dark closet, a cabinet, or a shelf away from windows all work well. The bag should not be in the refrigerator during this phase.
Over the next few weeks, you will see white fuzz slowly spreading through the substrate from the injection point. This is healthy mycelium doing its job. Full colonization typically takes a few weeks and looks like the entire substrate has turned white or off-white. Some areas may look slightly more yellow or cream-colored, which is normal. What you are watching out for is any green, black, orange, or pink patches, which signal contamination and mean the grow is compromised.
Common incubation hiccups
- Slow or patchy colonization: usually means the bag is too cold. Move it somewhere warmer (closer to 70–75°F) and give it more time before worrying.
- No visible growth after two weeks: double-check that you actually inoculated through the injection port and not the filter patch. If growth still does not appear after three weeks, your spores may have been weak or the injection missed the substrate.
- Yellow liquid pooling at the bottom: small amounts of metabolite liquid (called 'blush') are normal and not a sign of contamination. If it smells strongly foul or is brightly colored, be more concerned.
- Green or black spots: this is mold contamination. Isolate the bag immediately, seal it in a garbage bag, and dispose of it outside. Do not open a contaminated bag indoors.
Triggering fruiting: when and how to make pins happen
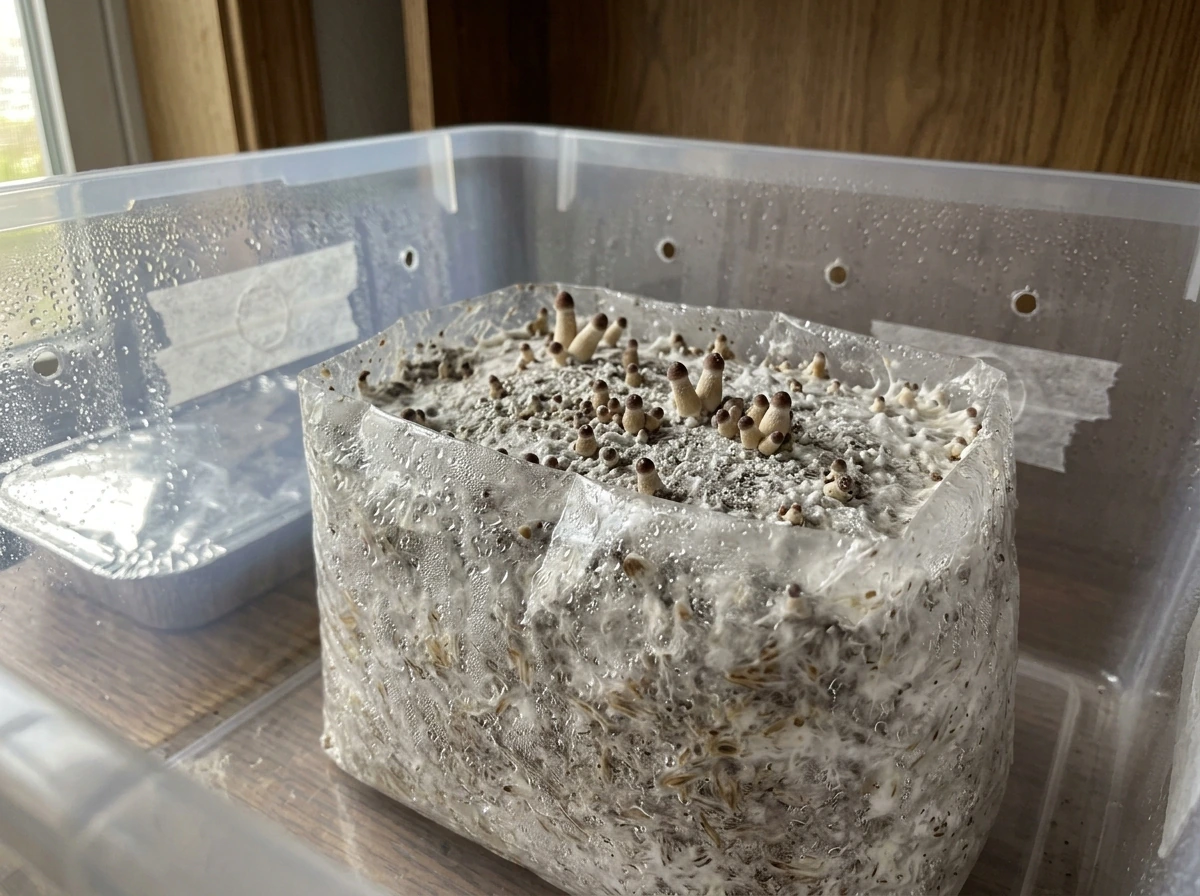
Once the substrate is fully colonized, you need to signal to the mycelium that it is time to produce mushrooms. North Spore describes four environmental triggers: fresh air, humidity, light, and a temperature shift. The mycelium senses drops in CO2 concentration at the surface as a sign that conditions are right to fruit. Your job is to create those conditions by cutting the bag open in a specific way.
Before you cut, sanitize your scissors or utility knife and your gloves with 70% isopropyl alcohol. Then follow these steps:
- Place a rubber band around the fully colonized block through the bag, roughly 1 inch below the substrate surface. This cuts off oxygen to the bottom portion of the block, which discourages side pins and directs fruiting energy upward.
- Using your sanitized scissors or knife, cut a horizontal slit in the bag 1 to 2 inches above the substrate surface. The slit should be roughly as wide as the filter patch on the bag. This is called the 'fruiting cut.'
- Fold the top portion of the bag (the hood) upward and away from the cut to allow fresh air in.
- Move the bag to your fruiting location, which should have indirect light (a window out of direct sun, or artificial lights on a 12-hours-on/12-hours-off cycle using a timer) and temperatures between 60°F and 80°F.
- Begin misting the inside of the hood with your distilled or boiled water spray bottle several times per day. Spray up into the hood so droplets fall gently rather than blasting the substrate directly. Do not spray the substrate or growing mushrooms directly.
Pins (tiny baby mushrooms) typically appear within about a week of making the fruiting cut, though it can take longer depending on the species and your environment. If you are growing oyster mushrooms, which colonize and pin quickly, you can cut the hood fully open as soon as you see the first pins forming. For slower species, hold off and extend the cut gradually as things develop.
Humidity and fresh air during fruiting
Humidity is the most critical variable during fruiting. Mushroom fruit bodies are mostly water, and even brief dry spells can cause pinning mushrooms to abort their growth entirely. The ShroomTek booklet is direct about this: short dry spells stop growth. Your goal is to keep the interior of the bag humid without waterlogging the substrate. Misting the inside of the hood several times per day rather than the substrate itself is the right technique. If you see droplets of water pooling at the bottom of the bag, you are overdoing it.
Fresh air exchange (often abbreviated FAE in mushroom cultivation communities) matters too. Fresh air exchange (often abbreviated FAE in mushroom cultivation communities) matters too. As mushrooms grow, they produce CO2. If that CO2 builds up too much, you get long, spindly stems and small caps. If fresh air is too aggressive and humidity drops, mushrooms crack and abort. The rubber band, the hood, and the progressive cuts are all tools for managing this balance.
Harvesting and getting the most out of your bag
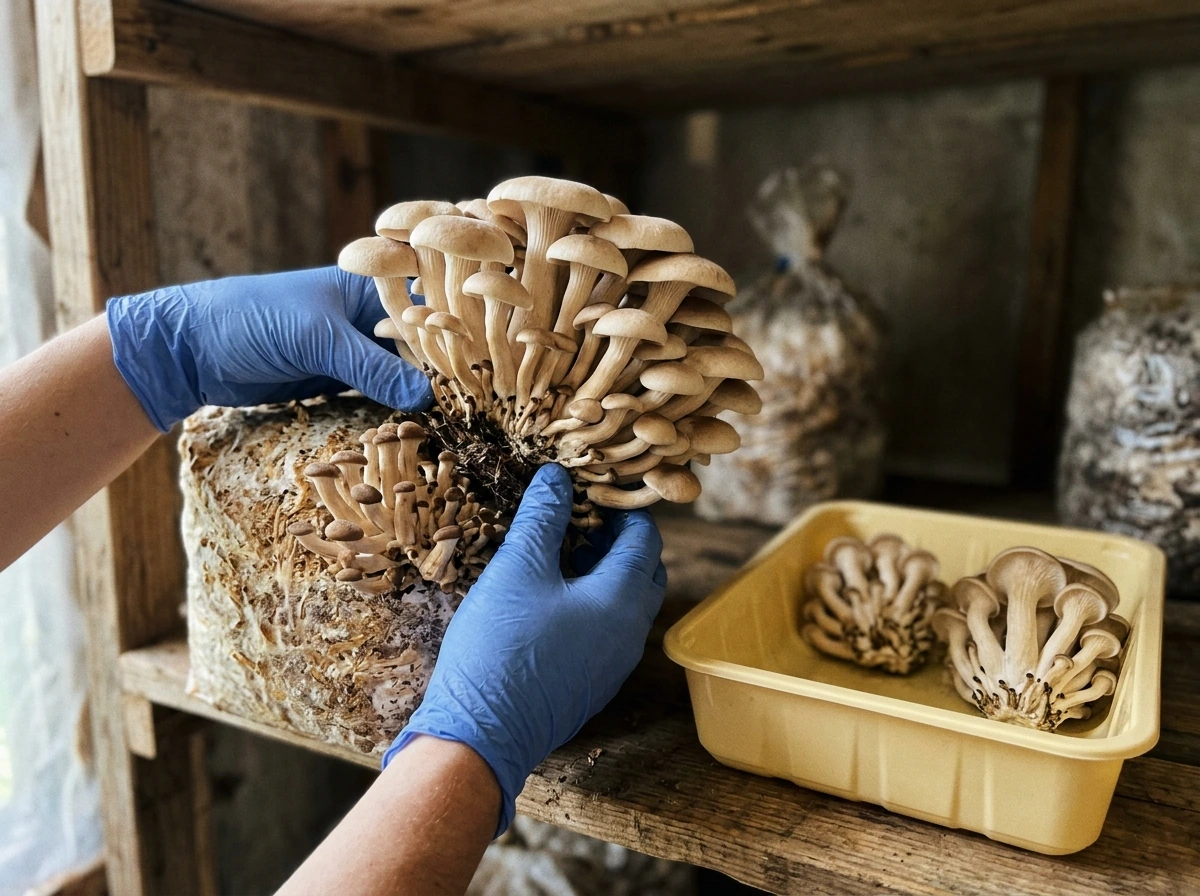
Timing your harvest correctly makes a big difference in both yield quality and spore load in your space. North Spore's instruction booklet gives a clear rule: harvest before the caps flatten out or become concave (bowl-shaped upward). For mushrooms that have a veil, which is a thin membrane connecting the cap to the stem, harvest when the veil just begins to tear or break. Waiting too long means the mushrooms drop spores heavily, which can irritate allergies and trigger contamination on the substrate.
To harvest, reach your hand around the base of the mushroom cluster and twist gently to pop it off the block. A clean scissors or knife is also fine. The goal is to remove the entire cluster cleanly without leaving stub ends behind, because stubs rot and invite contamination.
Setting up for the next flush
After harvesting, clean the surface of the substrate block thoroughly. Remove any leftover fruiting body material, including tiny pin stumps, down to the white myceliated substrate. North Spore specifically instructs this step to prepare for a second flush and to prevent rotting and contamination from taking hold in leftover material.
Once the block is clean, rehydrate it by spraying the sides and up into the hood several times over a couple of hours. Spread it out rather than dumping a large amount of water at once to avoid pooling at the bottom. Then fold the hood back down around the block to trap CO2 and humidity, mimicking the closed environment from early fruiting. The block will rest and re-colonize any exposed areas, then produce another flush. Repeat this process until the block is spent and stops producing. Most growers get two to three solid flushes from a single ShroomTek bag, with the first flush typically being the largest.
Troubleshooting when things go wrong
Most grow bag problems fall into a handful of categories. Here is what to check first and what to do about each one.
| Problem | Most Likely Cause | Fix |
|---|---|---|
| No growth at all after full colonization | Block is too dry or needs a trigger | Try soaking: submerge the block in its bag in water for about 20 minutes, then drain. For stubborn cases (especially shiitake), try a cold shock: refrigerate at around 40°F for overnight up to 24 hours. Use caution with wispy species like lion's mane; they are more sensitive to soaking. |
| Growth stalled or pins aborted | Humidity dropped temporarily | Increase misting frequency. Spray up into the hood more often throughout the day, not just once. Check that the hood is trapping enough humidity between mistings. |
| Fuzzy or elongated stems | Too much CO2 and/or too much moisture | Open the hood more to increase fresh air exchange. Reduce misting slightly. For fast-growing species like oysters, cut the full hood open once pins appear. |
| Brown or cracked caps | Too little humidity or harvested too late | Increase misting frequency and harvest earlier in the mushroom's development cycle, before caps flatten. |
| Pale or washed-out fruiting bodies | Temperature too high or not enough light | Move the bag to a cooler spot and place it near ambient natural light or use artificial lights on a 12-hour cycle. |
| Green, black, or pink patches on substrate | Contamination (mold or bacteria) | Isolate immediately. Seal in a garbage bag and dispose of outdoors. Do not open indoors. This batch cannot be saved. |
| Foul or sour smell from the bag | Bacterial contamination | Same as above. A healthy ShroomTek smells earthy and slightly mushroomy. A sour, rotten, or ammonia-like smell means something has gone wrong. |
If your bag colonized fully but simply will not pin after a week or two of fruiting conditions, do not give up immediately. Work through the soaking and cold shock techniques before writing it off. Many growers are surprised by a flush that finally appears after a cold shock, especially with shiitake or late-season species.
Hygiene, safety, and keeping your space clean
Mushrooms produce airborne spores as they mature, and for some people, those spores cause respiratory irritation or allergic reactions. If you or anyone in your household has allergies or a compromised immune system, consider fruiting your bag in a well-ventilated area, near an open window, or even outdoors during mild weather. Harvesting mushrooms before the caps flatten and the veil breaks also dramatically reduces the spore load in the air.
For routine hygiene, always wear your nitrile or latex gloves when handling the substrate or cutting the bag. Clean gloves, clean scissors, and a sanitized work surface are your first line of defense against contamination. Between flushes, wipe down your workspace and spray bottle nozzles with isopropyl alcohol. You do not need to go full laboratory sterile during fruiting, but keeping things clean reduces your odds of losing a flush to a stray mold spore.
For storage: if you have not inoculated your ShroomTek yet, keep it at room temperature out of direct sunlight. No refrigeration needed. North Spore says you can store the bag this way for several months before use. Once inoculated and colonized, do not refrigerate the block unless you are specifically cold-shocking it to trigger fruiting. Extended cold storage after colonization will slow or kill the mycelium.
When the block is fully spent and no longer producing, dispose of the substrate in your compost or garden. The spent mushroom substrate is rich in organic matter and breaks down beautifully in a compost pile. The bag itself can go in the trash. Wipe down any surfaces the bag rested on and you are ready to start a fresh grow.
A few final notes on getting the most from your grow
The ShroomTek is a well-designed kit and it gives you a lot of help built in, but it is not foolproof. The two things that trip up beginners most often are rushing the incubation phase (cutting the bag open before full colonization) and not misting consistently enough during fruiting. Both are easy to fix once you know to watch for them. blooming acres grow bag instructions. magic grow capsules instructions blooming acres grow bag instructions
If you are curious about how other all-in-one grow bag designs compare, the approach and technique across brands shares a lot of common ground, though each bag has its own quirks. The ShroomTek stands out for its pre-supplemented substrate blend and the quality of the filter patch, which is a real advantage during the long incubation phase. Take your time, keep things clean, and give the process the two to three days of consistent attention it needs during fruiting, and you are very likely to pull off a successful harvest.
FAQ
What should I do if my north spore grow bag looks contaminated before inoculation?
If you see green, black, or pink growth during the 1 to 2 week conditioning period or anytime before full colonization, do not proceed with fruiting. The safest next step is to contact North Spore with photos and the date of arrival and inoculation, since cutting the bag later will not “fix” an already contaminated substrate.
Can I open my ShroomTek grow bag during incubation to check progress or add moisture?
No, you should not open the bag during incubation or add water to the substrate. During colonization the goal is a sealed, stable environment, and opening increases airborne contamination risk and can disrupt the balance of humidity and CO2 the mycelium is relying on.
My bag is fully colonized but won’t pin yet, can I cold shock it immediately?
If the bag shows solid white colonization but pins are delayed, the cold shock step can help, but only after you have confirmed the bag is fully colonized and the fruiting cut has been made correctly. Cold shocking an incompletely colonized bag often slows progress or invites contamination, so wait until the substrate is fully off-white rather than patchy.
How do I know if I’m misting too much during fruiting?
In general, more humidity is not always better. Target misting the inside of the hood rather than saturating the substrate, and stop short of puddles at the bottom. Pooled water can lead to stalled pins and uneven growth, so adjust to a “damp walls, not wet floor” target.
What does it mean if my mushrooms are tall and skinny with small caps?
Yes, carbon dioxide buildup can cause long, thin stems and smaller caps, even if humidity seems fine. If you notice that pattern, reduce the time the hood stays overly closed and ensure you are using the bag’s intended cutting and rubber band setup for fresh air exchange.
Why are my pins aborting, and how do I correct it?
If caps crack or abort quickly, it usually means fresh air is too aggressive for the humidity level. Loosen fresh air only slightly by adjusting how open the hood is and increase misting frequency to keep the interior humid, aiming for consistent conditions rather than short bursts.
When is the safest time to harvest to reduce spore mess?
Harvest timing affects both spore release and the look of the mushrooms. If caps are flattening or turning concave upward, harvest promptly, and for veil-connected species harvest when the veil is just starting to tear rather than waiting for complete separation.
How should I rehydrate for the second flush without causing rot?
After harvesting, remove leftover pin stumps and fruiting debris down to the white substrate, then rehydrate gradually. If you dump a lot of water at once, pooling can create rot-prone zones, so spray the sides and hood first, then fold back to trap humidity and CO2 for regrowth.
Can I refrigerate my block after colonization to pause the grow?
For storage, do not refrigerate a colonized block unless you are specifically following a cold shock protocol. Refrigeration for “just to slow it down” can weaken or stop the mycelium, causing reduced yields or no subsequent flush.
How can I tell normal growth from contamination once I start fruiting?
During fruiting, symptoms that usually point to contamination are persistent colored patches (green, black, orange, pink) or rapidly spreading fuzzy growth that is not normal mycelium. If you see this after the cut, stop attempting to fruit and remove the bag to protect your workspace, then review inoculation hygiene for next time.
What are common hygiene mistakes with scissors and gloves during the cut?
Wear gloves for handling, but also sanitize the specific cutting tool you’ll use for the fruiting cut. A common mistake is wiping scissors once and then touching other surfaces, so sanitize right before cutting and keep the tool from contacting dirty areas (like a sink rim or workbench edge).
How can I manage spore irritation while still keeping humidity stable?
Yes. If your goal is lower airborne spore exposure, fruit in a location with better airflow but without strong drafts that dry out the hood. Combine earlier harvest timing with a stable humidity routine, because spore reduction alone will not prevent dryness-related pin aborts.