The 'Money Does Grow On Trees' kit from Gift Republic (SKU GR130011) is a soil-based seed-starting kit, not a hydroponic setup or a water terrarium. If you’re specifically following grow a living Christmas tree kit instructions, the core early steps are similar: start with the right seed setup, use gentle watering, and give it plenty of bright, indirect light. Inside the box you get a packet of money plant seeds, a small coconut husk (coir) starter pot, a compressed coir compost disc that expands when you add water, and a wooden plant marker. That's everything you need to get started. You expand the disc, fill the pot, sow your seeds, and wait. Simple in theory, but there are a few gotchas that trip people up in the first week, and this guide walks through all of them.
Money Does Grow on Trees Plant Kit: Setup and Planting Guide

First, figure out exactly which kit you have
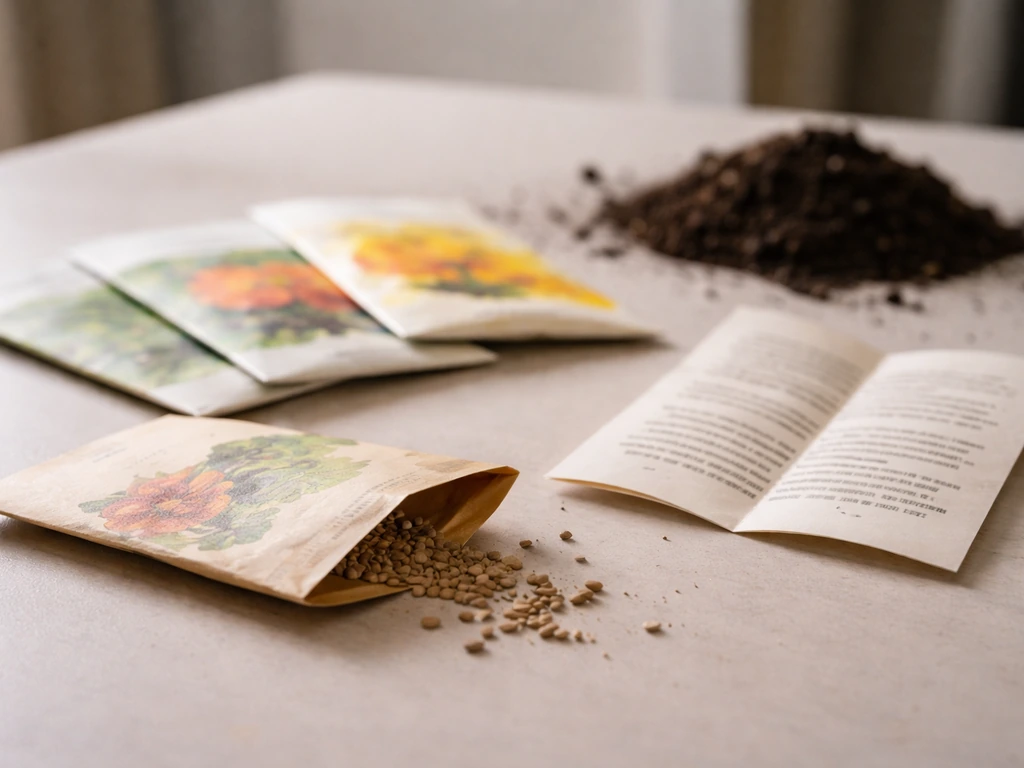
This matters more than you'd think. The 'money plant' label gets applied to several completely different plants: Pachira aquatica (the braided houseplant often sold as a money tree), Crassula ovata (jade plant), and Lunaria annua (honesty plant, with its silvery coin-shaped seed pods). Gift Republic's version most commonly contains Lunaria or a similar novelty seed, NOT a Pachira or jade cutting. Customer reviews on IWOOT flag exactly this confusion, where buyers expected a houseplant-style money tree and received honesty seeds instead.
Check the seed packet inside your kit before doing anything else. If the seed variety is printed on it, look it up so you know your germination timeline and ideal conditions. If it just says 'money plant seeds' with no further detail, treat it as Lunaria by default. The care steps in this guide apply broadly to all three possibilities, with any key differences called out as you go.
What's in the box: your unboxing checklist
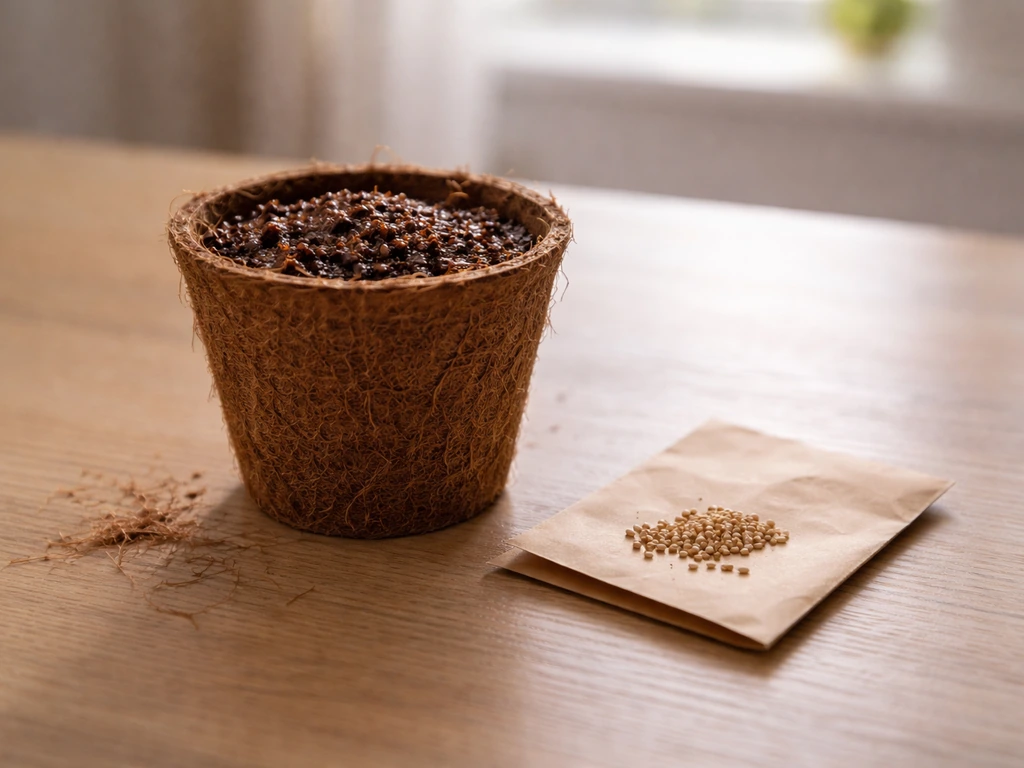
The kit box measures about 9 x 8.5 x 7 cm, so it's compact. Before you do anything, lay everything out and confirm you have all four components. The IWOOT listing for the Gift Republic “Grow Me Money Does Grow On Trees” kit says it includes one packet of seeds, a coconut husk starter pot, a coconut husk compost disc that expands when watered, and a wooden plant marker, and also notes that seed germination is not guaranteed and components may be substituted the kit includes seeds, a coconut husk starter pot, a coir compost disc that expands when watered, and a wooden plant marker.
- Seed packet (money plant seeds, variety may vary)
- Coconut husk starter pot (small, biodegradable)
- Compressed coir compost disc (flat, dry, will expand significantly with water)
- Wooden plant marker
Note the kit's own disclaimer: the coir disc and pot may occasionally be substituted with equivalent components, and germination is not guaranteed. If your disc looks different from what you expected, that's why. The function is the same.
Tools and supplies to grab before you start
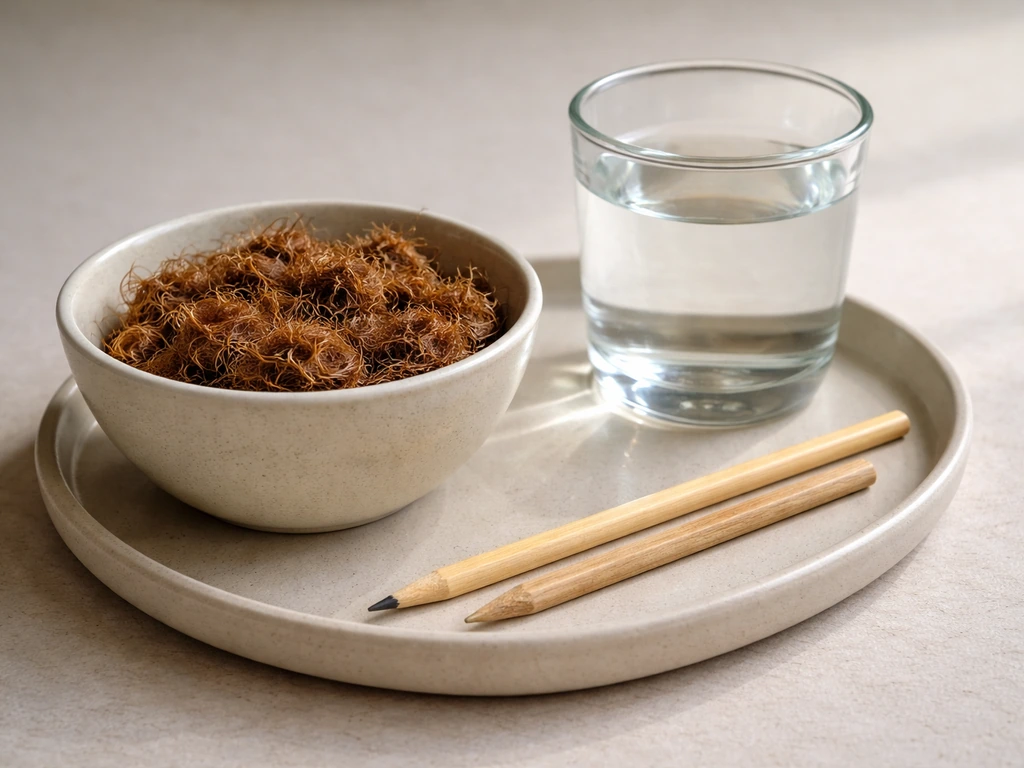
- A small cup or bowl (to expand the coir disc)
- Room-temperature water (roughly 100-150ml to start)
- A pencil or chopstick (for making a seed hole)
- A small saucer or tray to sit the pot on
- Optional: a clear plastic bag or food wrap (to create a humidity dome in week one)
Pick the right location before you plant
Get your spot sorted before sowing, because moving seedlings around in week one is a common reason they stall or die. You want a bright windowsill with indirect light, not direct harsh sun. A south- or east-facing windowsill works well. The temperature should stay consistently between 18°C and 24°C (65°F to 75°F). Avoid placing the kit on a cold windowsill in winter where the glass chills the pot overnight, and keep it away from radiators and air vents, which dry the compost out too fast. Consistent warmth is more important than a few extra degrees of light.
Planting your seeds: the exact steps

This kit uses a soil/coir medium, so the process is straightforward seed sowing. For larger grow tubes, keep the media evenly moist and follow the same germination timing and temperature range so seedlings establish quickly how to use tree grow tubes. There's no hydroponics, no water-capsule activation beyond the disc expansion, and no cuttings or propagation involved. Here's how to do it properly.
- Place the coir disc in your bowl and slowly pour about 100ml of room-temperature water over it. Watch it expand upward (it can triple in height). Add water in small amounts and wait between pours. You want it moist and fluffy, not waterlogged and dripping.
- Once expanded, gently break up any clumps with your fingers and loosely fill the coconut husk starter pot. Don't pack it tightly. The coir should feel like damp (not wet) sponge cake.
- Open your seed packet. Most money plant seed packets contain 5 to 10 seeds. Sow 2 to 3 seeds per pot to improve your odds. (You can thin to one seedling later.)
- Use a pencil or chopstick to make a small indentation about 5mm to 1cm deep (roughly half a fingernail deep) in the centre of the coir.
- Drop a seed into each hole and gently cover with a pinch of the surrounding coir. Do not bury deeply. Shallow sowing is critical for small seeds.
- Place the pot on a saucer. Mist the surface lightly with water or add a very small amount of water to the saucer so the coir can absorb from the bottom.
- Position your wooden plant marker behind the pot, write the date on it, and move the whole setup to your chosen windowsill.
If you want to boost germination rates, loosely cover the pot with a clear plastic bag or a piece of cling film and secure it around the pot's base. This creates a mini greenhouse effect that keeps humidity and warmth consistent. Remove it for 10 minutes each day for air circulation and take it off completely once you see the first sprouts.
First-week care: how to water without killing it
The biggest killer of seeds in this type of coir-based starter kit is overwatering in the first week. If you notice germination is lagging, compare these watering basics with palm tree grow kit instructions for how different seeds handle moisture and warmth. The coir disc holds moisture well, and if you keep adding water because nothing is happening yet, you'll rot the seeds before they even germinate. Here's the rule: check the top layer of coir before watering. If it still feels damp when you press a finger gently against it, don't water. If it's starting to feel dry to the touch and is pulling away from the pot edges slightly, add a small splash to the saucer and let it wick up.
In most indoor conditions at 18°C to 24°C, you'll water every two to three days at most. Do not water daily. Bottom watering (adding water to the saucer) is better than pouring from the top because it avoids disturbing seeds and reduces surface mold risk.
| Condition | What to do |
|---|---|
| Coir surface feels damp | Wait, check again tomorrow |
| Coir feels dry on top, damp below | Add a small splash to the saucer only |
| Coir is dry all the way through | Water from below, allow full absorption |
| Water pooling in saucer after 30 minutes | Tip out excess immediately |
Don't use cold tap water straight from the tap if your home has hard water or if it's winter. Let the water sit in a cup for an hour to reach room temperature first. Cold water shocks seeds and slows germination noticeably.
Germination timeline varies by seed type. Lunaria typically sprouts within 10 to 21 days under good conditions. Pachira and Crassula can take longer, sometimes 3 to 4 weeks. Mark your start date on the wooden marker so you're not guessing how long it's been.
When things go wrong: troubleshooting common problems
No sprouting after two to three weeks
First, don't panic. The kit's own seed disclaimer acknowledges that germination isn't guaranteed. But before blaming the seeds, check these common culprits: temperature too low (below 18°C at night will significantly stall or prevent germination), seeds buried too deep, compost staying too wet, or seeds sown in a spot with low or no natural light. Try moving the pot somewhere warmer. If you sowed seeds deeper than 1cm, gently scrape back the surface to check whether the seeds are intact. Shrivelled or mushy seeds have rotted. Firm, unchanged seeds are still viable and just need more warmth.
White mold or green algae on the surface
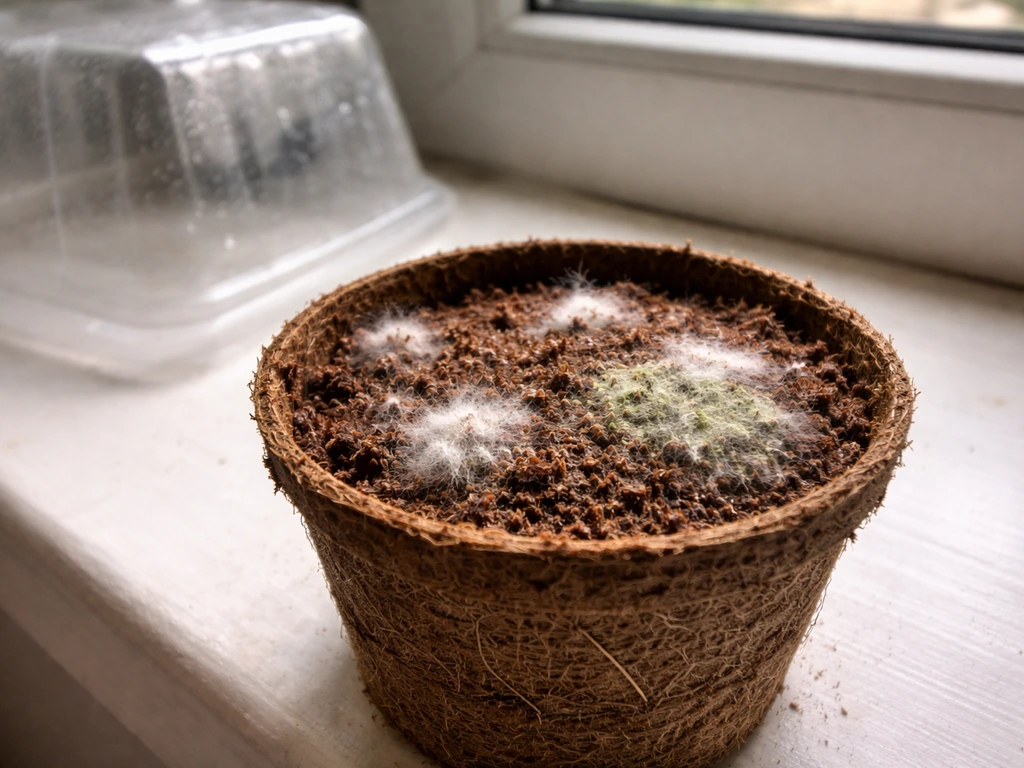
White fuzzy mold on the coir surface almost always means too much moisture with too little airflow. Remove any plastic bag humidity dome immediately and move the pot to a spot with slightly more air movement. Let the surface dry out for a day before watering again. A very light dusting of cinnamon powder on the surface acts as a natural antifungal and won't harm seeds. Green algae on the pot's surface (especially on the coir pot itself) is caused by light hitting wet coir. It looks alarming but is mostly harmless; just reduce watering and improve airflow.
Seedlings turning yellow or going pale
Yellow seedlings in week one or two are almost always a light problem. The kit's coir compost doesn't contain significant nutrients at this early stage, but seedlings have enough stored energy in the seed itself to put out their first leaves (called cotyledons) without extra feeding. Yellow at this stage means the seedling is stretching for light and not photosynthesising efficiently. Move the pot closer to a bright window. If your windowsill gets less than 4 to 6 hours of natural light per day, a small grow light placed 15 to 20cm above the pot for 12 to 14 hours per day will fix this immediately.
Growth stalled after initial sprouting
Seedlings that sprout and then stop growing are usually running out of nutrients in the starter compost or are rootbound in the small coir pot. If your seedling has its first set of true leaves (the second set that appears after the initial seed leaves) and growth has slowed, it's time to transplant. See the section below on next steps.
Long-term care after the first sprouts appear
Light and temperature going forward
Once your seedlings are established and you've removed any humidity dome, maintain the same bright indirect light position. Lunaria can tolerate more direct morning sun as it grows. If you're growing a Pachira-style money tree, it prefers filtered bright light and dislikes harsh direct afternoon sun on young leaves. Jade plant (Crassula) is the most tolerant and can handle several hours of direct sun once it's past the seedling stage. Keep temperatures above 15°C year-round, and avoid cold drafts near windows in winter.
When and how to transplant
The coconut husk starter pot is biodegradable, which means you can plant the entire pot directly into a larger container without disturbing the roots. Do this once the seedling has two to three sets of true leaves and you can see roots starting to peek out of the pot's base. Choose a pot that's about 8 to 10cm in diameter with drainage holes. Fill it with standard multipurpose potting compost, make a hole in the centre, drop the coir pot in, and backfill around it. Water gently and place in your established bright spot. The coir pot walls will break down naturally within a few weeks.
Feeding your plant
Don't feed the seedling while it's in the starter kit. The coir provides minimal nutrients and adding fertiliser at this stage can burn young roots. Once transplanted into fresh potting compost, wait another four weeks before introducing a diluted liquid feed (half the recommended dose on the packaging). For Lunaria, a balanced NPK feed works fine. For a Pachira money tree or jade plant, use a balanced liquid feed monthly during spring and summer, and stop feeding altogether in autumn and winter when growth slows.
Pruning and training if you're growing a money tree
If your kit did include Pachira seeds and you're growing a proper money tree, you can begin light shaping once the plant reaches about 15 to 20cm tall. Pinch out the growing tip (the very top bud) to encourage bushier side growth rather than a single tall stem. The classic braided money tree trunk you see in shops is achieved by twisting multiple young seedling stems together and securing them loosely while the plant is still flexible, typically when stems are around pencil-thickness. This is a longer-term project, but it's achievable at home.
If you enjoy growing things from kits and want to try something on a larger scale, tree-specific grow kits like giant sequoia or living Christmas tree starter kits follow a similar seed-sowing approach but with different timing and cold-stratification requirements. If you move on to a larger kit like a giant sequoia tree set, the steps are broadly similar but the timing and cold-stratification details will differ. The basic skills you've built here transfer well.
What success actually looks like
Week one: nothing visible, but roots are developing underground. This is normal. Week two: a pale green loop or tiny shoot breaking the surface. Week three to four: first seed leaves (cotyledons) fully open and green. Weeks five to eight: first true leaves appear, and the plant is ready to transplant. After transplanting, you're looking at a genuinely growing plant that will continue for years with basic care. The kit is a starting point, not the finished product, and getting past that first germination hurdle is the real win.
FAQ
My packet just says “money plant seeds.” How do I know what I actually have?
If your kit does not say a specific species on the seed packet, treat it as Lunaria (honesty). That said, always check the packet first, because Pachira and Crassula seeds can have very different sprouting times, and the “money tree” expectations from reviews can lead to overwatering or impatience before anything appears.
I see white fuzzy mold on the coir. Should I throw the whole kit away?
Yes, small surface mold is usually a moisture or airflow issue, not a sign to discard everything. Remove any clear humidity covering immediately, improve airflow, and wait until the top coir layer has dried slightly before the next watering. A very light cinnamon dusting can help, but avoid heavy coatings that can suffocate seedlings.
When is the right time to move seedlings out of the coconut husk starter pot?
Do not transplant based only on having a sprout. Wait until you have at least two to three sets of true leaves, and ideally roots peeking out from the base of the coir pot. If you up-pot too early, seedlings can stall while the root system re-establishes in the new compost.
How exactly should I water, and how do I know I’m not overdoing it?
Use bottom watering into the saucer, and stop as soon as the surface coir looks evenly damp. If water keeps collecting or the coir stays wet for days, you are likely watering too frequently or the room is too cool. The target is “evenly moist, not soggy,” especially during week one and week two.
Should I keep the clear plastic bag over the pot after I see sprouts?
If you germinated in a humid dome, take it off for good once you see the first sprouts. Leaving it on too long increases the chance of mold and leggy seedlings because the coir stays wet and airflow remains low.
What should I do if I buried the seeds too deep?
If seeds were buried deeper than about 1 cm, gently scrape back only the surface layer and check whether seeds are still intact. If they are shriveled or mushy, they likely rotted, so do not keep watering expecting them to recover. For viable-looking seeds, return them to proper depth and correct warmth and light conditions.
Some seeds look brown or mushy. Are they still viable?
Black or translucent mushy seeds indicate rot, not successful germination. Firm, unchanged seeds are more likely viable. If the coir is staying wet, correct that first, then wait through the full expected range for your suspected seed type (Lunaria around 10 to 21 days, others often longer).
My tap water is hard, should I change anything for watering?
Hard water can create issues over time, including crusting on the coir and inconsistent moisture. Letting tap water sit to reach room temperature helps with shock, but if you regularly see white residue, switch to filtered or softened water for future watering to keep the medium behaving consistently.
Why are my seedlings turning yellow before true leaves appear?
Yellow cotyledons are typically a light problem, not a feeding problem, because starter compost is low nutrient. Move to a brighter window, or add a grow light 15 to 20 cm above the pot for 12 to 14 hours daily if you have fewer than 4 to 6 hours of natural light.
My seedlings sprouted but then stopped. Could it be because they are rootbound?
Yes, roots can outgrow the small coir pot and slow growth, even if you are still seeing some new leaves. If growth stalls after true leaves appear, transplant into a pot about 8 to 10 cm wide with drainage, using standard multipurpose compost so roots can spread and moisture stays balanced.
When can I start pinching or braiding my “money tree” seedlings?
Start pinching or shaping only when the plant is established and around 15 to 20 cm tall. Pinching earlier often causes delays because small seedlings first need stable light, warmth, and enough energy to build a branching structure.