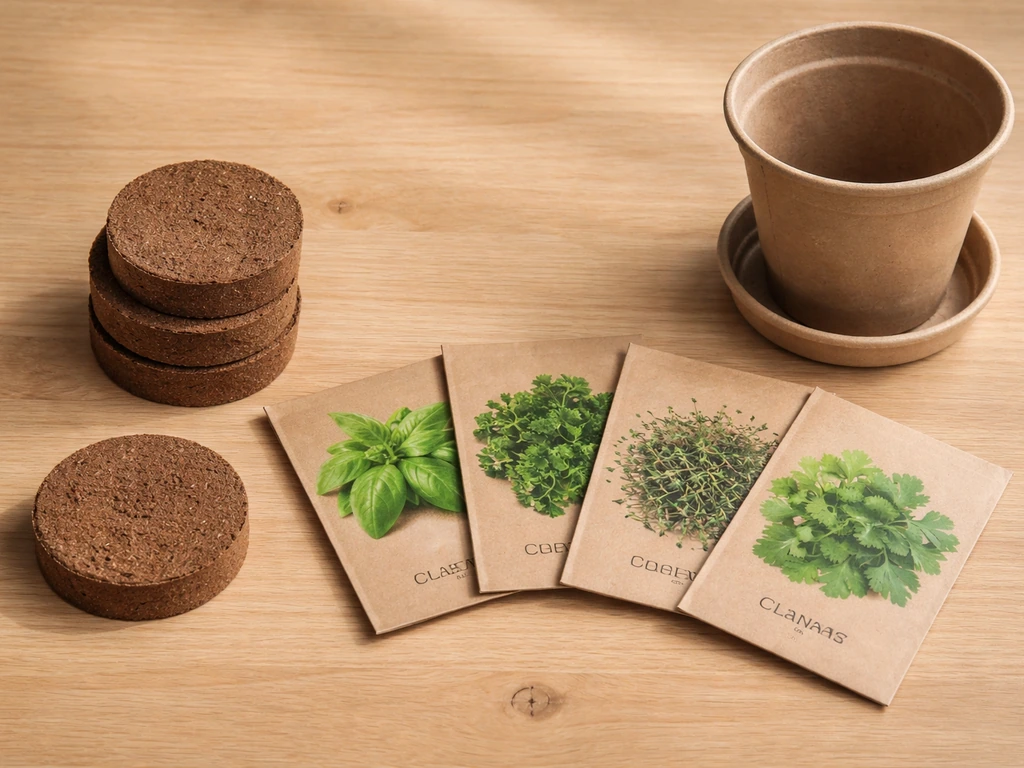
The Nature's Blossom Sow and Grow Seed Starter Kit comes with [four seed packets (Basil, Parsley, Thyme, and Cilantro), four biodegradable pots, four compressed peat-and-coconut soil discs, and four plant markers. ](https://images. thdstatic. com/catalog/pdfImages/41/41014123-aad6-46aa-bbe0-7676d885389a.
Nature’s Blossom Sow and Grow Seed Starter Kit Instructions

Marcus Thornfield
16 Jun 2026
pdf) You expand the soil discs with water, fill the pots, sow seeds at roughly 1/4-inch depth, keep the soil moist with a spray bottle, and place everything in a warm, bright spot. That's the whole system. The steps below walk you through each stage in the exact order you need to do them. Follow the sow and grow instructions in the manual to time each step for best germination <a data-article-id="4A57014A-1083-4119-B848-D1C63818CC4B">That's the whole system.
</a>. For step-by-step guidance on using the kit properly from start to finish, follow the instructions on how to use Sensi Grow.
What's in the kit and how it all fits together
Before you do anything, take everything out of the box and check you have all four components. The kit is designed around a simple pot-and-disc system rather than a tray-and-dome setup, which is worth knowing upfront because the setup process is a little different from what some beginners expect.
- 4 seed packets: Basil, Parsley, Thyme, and Cilantro (all culinary herbs)
- 4 biodegradable pots: small, brown, and made to be planted directly in the ground later
- 4 compressed soil discs: a mixture of peat and coconut coir, shrunk down into a small puck shape
- 4 plant markers: for labeling each pot so you don't lose track of which herb is which
The soil discs are the key feature here. They look tiny, but they expand 6 to 7 times their original size when you add water. Once expanded and drained, they become a loose, fluffy growing medium that fills each biodegradable pot perfectly. You don't need to buy extra soil for this kit.
Getting set up before you sow a single seed
Setup takes about 15 minutes and most of it is just waiting for the soil discs to expand. Don't rush this part, the quality of your soil prep directly affects germination.
Pick your location first
Choose a warm spot indoors that gets consistent temperature before you even start expanding the discs. A kitchen windowsill, a countertop near a south-facing window, or a dedicated grow light setup all work well. You want somewhere with temperatures between 65°F and 75°F (18°C to 24°C) and good airflow. Avoid windowsills that get cold drafts at night, especially in the spring or fall, since cold temps are one of the biggest reasons herb seeds fail to germinate.
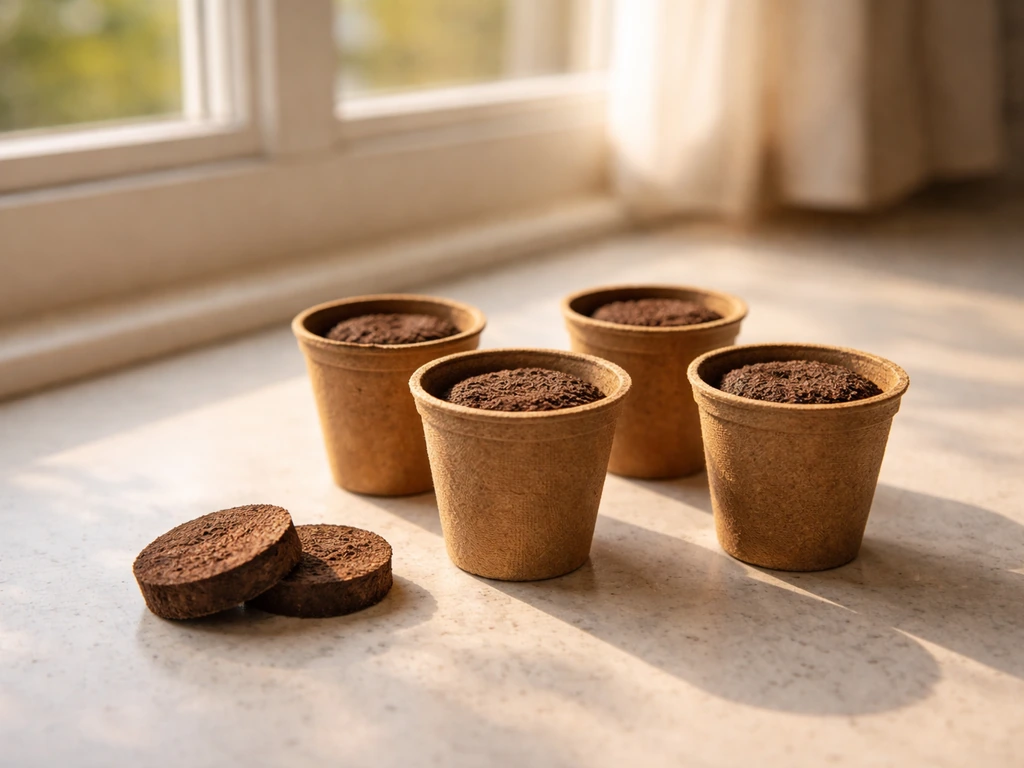
Expand and prep the soil discs
- Place each soil disc in a bowl or directly in its biodegradable pot.
- Pour warm water over the disc slowly — roughly half a cup per disc to start.
- Wait 5 to 10 minutes for the disc to expand. It will swell up dramatically, going from a flat puck to a full, loose clump of soil.
- Once fully expanded, drain off any excess standing water. You want the soil moist but not sitting in a puddle.
- Crumble the expanded soil lightly with your fingers to break it apart and remove any hard clumps.
- Fill each biodegradable pot with the crumbled, expanded soil, leaving about half an inch of space at the top.
The peat-and-coconut mix holds moisture well while still draining, which is ideal for germinating seeds. One thing to watch: if you over-soak the discs, the pots will stay waterlogged for too long. Squeeze out excess moisture if the soil feels more like mud than a damp sponge.
Label your pots before you sow
Use the plant markers now, before you add seeds. Write the herb name on each marker and press it into the corresponding pot. Once seeds are in the soil, all four pots look identical, and it's incredibly easy to mix them up. Labeling first saves a lot of confusion later.
One optional prep step worth knowing
Some people who use this kit report that the instructions mention a cold-stratification or refrigerator step for certain seeds to help schedule or prime germination. For the herbs included in this kit (Basil, Parsley, Thyme, Cilantro), cold stratification isn't strictly required, but if your printed manual references a fridge or freezer step, it's generally about timing or triggering germination for slow starters like Parsley.
If your goal is to follow Dutch nutrient grow A and B instructions, use the bottle labels and apply them at the proper dilution and schedule for the growth stage your seedlings are in. Check your specific packet for any notes on this before sowing. If you want the best results, follow the specific A and B feeding instructions in your Sensi Grow plan for your growth stage.
How to sow seeds correctly
Sowing is where a lot of beginners either go too deep or too shallow. The herbs in this kit are small seeds, and small seeds need shallow planting.
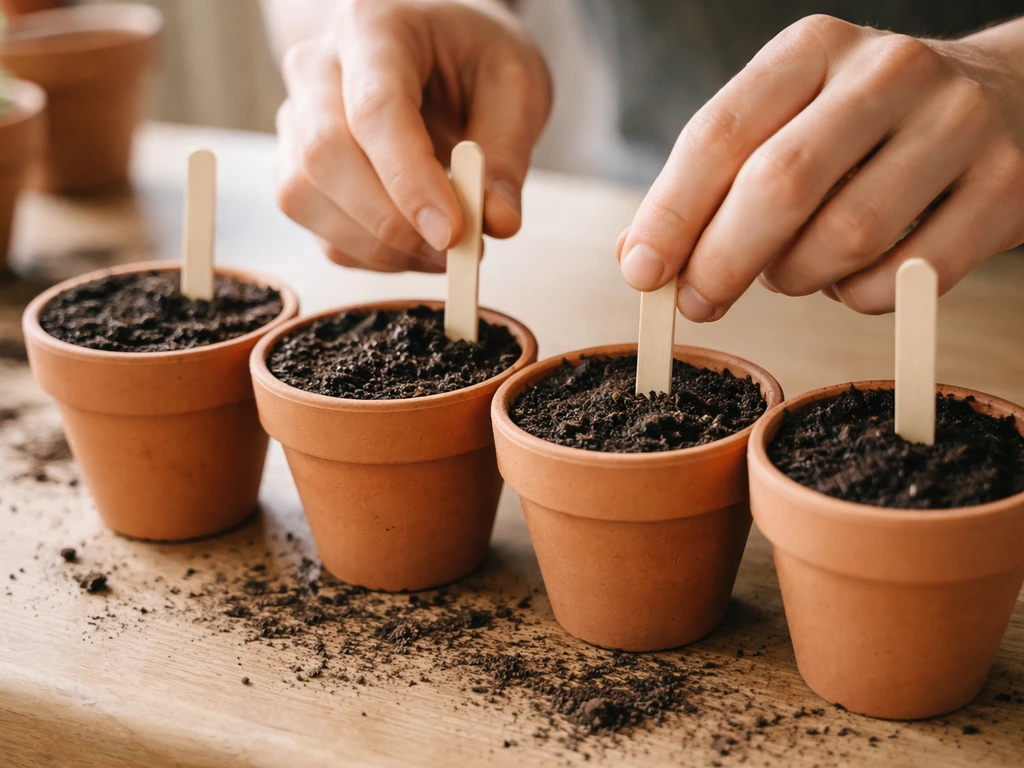
Planting depth and spacing
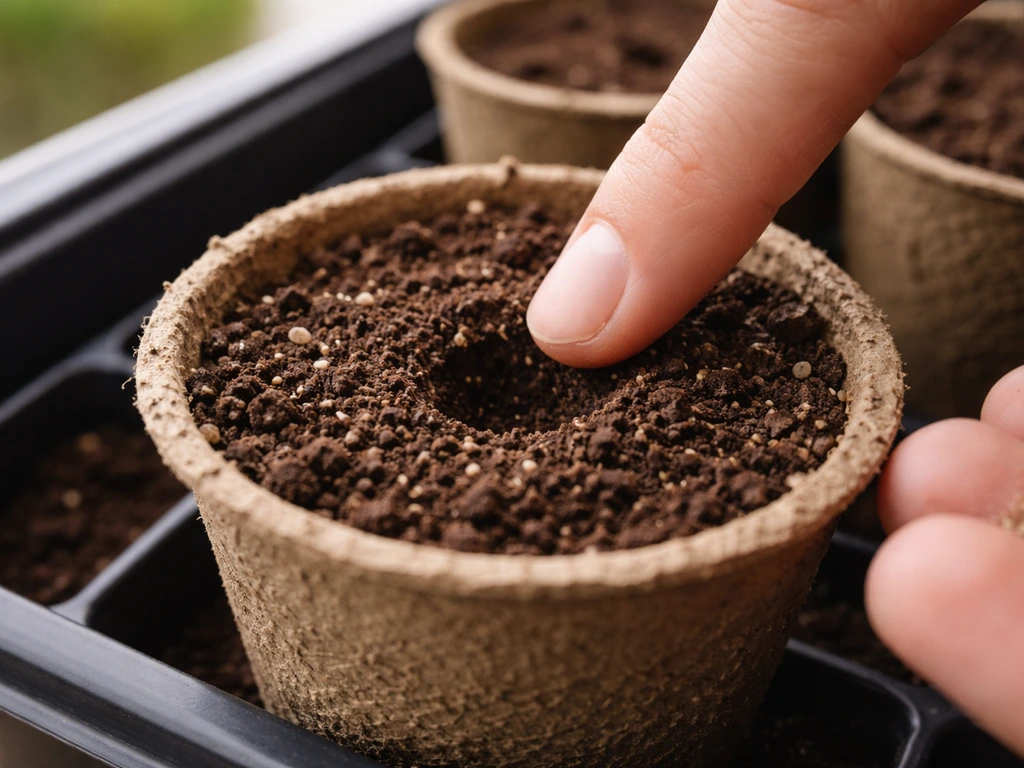
For all four herbs in this kit, aim for a planting depth of about 1/4 inch (roughly 6mm). Press your fingertip or a pencil into the center of each pot to create a small indent. Drop 2 to 3 seeds into each pot (this gives you backup germination in case one or two don't sprout). Cover the seeds lightly with the surrounding soil and press down gently. You don't want to pack the soil tightly, just close the hole and make light contact.
Since each biodegradable pot is its own individual container, spacing between pots is taken care of automatically. Within each pot, if you're planting 2 to 3 seeds, drop them in the same small area in the center rather than spreading them across the whole pot surface. This keeps them close enough together that they'll germinate under the same conditions.
Watering after sowing
Use a spray bottle, not a watering can. This is one of the most important details in the Nature's Blossom manual and it matters. Following the Nature's Blossom Sow and Grow instructions step by step helps you keep moisture and planting depth consistent for the best germination results. A hard stream of water from a can will displace tiny seeds, push them too deep, or wash them to the edge of the pot. A spray bottle lets you add moisture evenly and gently. After sowing, give each pot 8 to 10 sprays until the surface looks evenly damp. The soil should look dark but not be dripping.
Keeping moisture consistent early on
Place all four pots on a small tray or plate to catch any drainage. This also makes it easy to move them around without disturbing the seeds. For the first few days before germination, you want the soil surface to stay consistently moist. Check it morning and evening. If the top of the soil feels dry to the touch, give it a few sprays. You're not watering deeply at this stage, you're just keeping the surface hydrated so the seeds can absorb moisture and start swelling.
Light, temperature, and watering once seeds are in the ground
Temperature targets
Keep your pots somewhere that stays between 65°F and 75°F consistently. Once your sprouting starts, you can keep following the same grow-light and moisture basics to learn how to use grow pods effectively all the way through transplanting place the pots somewhere that stays between 65°F and 75°F consistently. Basil is the most temperature-sensitive herb in this kit, it really struggles below 60°F and may refuse to germinate.
Parsley and Cilantro tolerate slightly cooler conditions (down to about 55°F), but warmer is still better for speed. Thyme is the most forgiving. If your home is cooler at night, consider moving the pots to the warmest room or placing them on top of the refrigerator, which often has a warm top surface.
Light requirements
During the germination phase (before sprouts appear), seeds don't need light, they need warmth and moisture. But the moment you see the first green sprout pushing through the soil, light becomes critical. Move the pots to your brightest windowsill immediately or place them under a grow light. Herbs need at least 6 hours of direct sunlight or 12 to 16 hours under a grow light per day. Insufficient light after sprouting is the single most common reason seedlings go leggy (tall, thin, and floppy), which we'll cover more in the troubleshooting section.
Watering schedule after germination
Once seeds sprout and seedlings start growing, shift from surface misting to light bottom watering. You can do this by adding a small amount of water to the tray under the pots and letting the biodegradable pots absorb it from the bottom up. This encourages roots to grow downward and avoids getting water on the leaves, which can cause fungal issues. Water every 2 to 3 days, or whenever the top inch of soil feels dry. The biodegradable pots absorb and hold moisture well, so be careful not to over-water, soggy soil at the seedling stage is a recipe for damping-off disease.
When and how to transplant your seedlings
The biodegradable pots in this kit are designed to be planted directly into a larger container or garden bed, pot and all. The pot walls break down in the soil without harming the plant roots, which means you avoid transplant shock from disturbing the root ball.
Signs your seedlings are ready to move
- The seedling has 2 to 4 true leaves (not just the initial seed leaves, which are rounded and simple)
- Roots are starting to show through the sides or bottom of the biodegradable pot
- The plant looks strong and upright rather than floppy or pale
- It's been at least 3 to 4 weeks since germination
Hardening off before transplanting outdoors
If you plan to move your seedlings outside, don't do it suddenly. Start about 7 to 10 days before transplant day by placing the pots outdoors in a shaded, sheltered spot for an hour or two. Gradually increase outdoor exposure each day, moving from shade to partial sun. This process, called hardening off, adjusts the plant to outdoor temperature swings, wind, and direct sun. Skipping this step often causes wilting or leaf scorch even in otherwise healthy seedlings. UMD Extension also advises not to put tender seedlings outdoors on windy days or when temperatures fall below 45°F (7°C) before they are hardened Skippings this step often causes wilting or leaf scorch even in otherwise healthy seedlings..
How to transplant
- Water the seedling in its biodegradable pot about an hour before transplanting so the soil is moist.
- Dig a hole in your target container or garden bed slightly larger than the biodegradable pot.
- Place the entire biodegradable pot into the hole — do not remove the plant from the pot.
- Backfill with soil around the pot and press gently to remove air pockets.
- Water well after planting and keep the soil consistently moist for the first week while the roots establish.
Troubleshooting the most common problems
No germination after 2 to 3 weeks
Parsley is notorious for slow germination, it can take 2 to 4 weeks, sometimes longer. Basil typically sprouts in 5 to 10 days, and Cilantro and Thyme are usually somewhere in between. If nothing has appeared after 3 weeks, check your temperature first. Cold is the most common culprit. Also dig into the soil gently with a toothpick to see if the seed has swelled or rotted. A swollen but unsprouted seed just needs more time and warmth. A soft, mushy seed means it rotted from too much moisture.
Leggy, tall, floppy seedlings
This is almost always a light problem. Seedlings stretch toward any available light source when they're not getting enough, producing weak, elongated stems. Move the pots to a brighter window immediately, or add a grow light positioned 2 to 4 inches above the seedlings. You can also gently bury the leggy stem slightly deeper when transplanting to give the plant better structural support.
Mold on the soil surface
White fuzzy mold on top of the soil usually means too much moisture and not enough airflow. Let the surface dry out more between waterings, improve air circulation by moving the pots near a gentle fan, and reduce the frequency of misting. A thin layer of mold on the soil surface alone (not on the seedling itself) isn't usually fatal, just reduce moisture and it typically clears up within a few days.
Damping-off (seedlings collapsing at the stem)
Damping-off is a fungal condition where seedlings appear healthy one day and then suddenly fall over at the base of the stem, which looks pinched or water-soaked. It's caused by overwatering and poor airflow, and unfortunately there's no saving a seedling once it has damped off. The fix is prevention: always use a spray bottle rather than pouring water, never let pots sit in standing water for more than an hour, and keep air moving around the pots. If one pot damps off, isolate it from the others immediately.
Uneven sprouting across pots
It's completely normal for some herbs to sprout faster than others. Basil and Cilantro tend to race ahead while Parsley lags significantly. If you planted 2 to 3 seeds per pot (as recommended), you'll also get natural variation within each pot. Once you have a clear winner per pot with 2 to 3 true leaves, you can snip the weaker seedlings at soil level with scissors to give the strongest one the best shot. Don't pull them out, you'll disturb the roots of the survivor.
Overwatering vs. underwatering: how to tell the difference

| Symptom | Likely cause | Fix |
|---|---|---|
| Yellowing lower leaves, soft stem | Overwatering | Let soil dry out, improve drainage, water less frequently |
| Dry, crispy leaf edges, soil pulling away from pot sides | Underwatering | Water more frequently, check soil moisture daily |
| Wilting even when soil is moist | Overwatering / root rot | Reduce watering immediately, check for mushy roots |
| Slow growth with pale color | Too cold or too little light | Move to warmer spot or add grow light |
| White crust on soil surface | Mineral buildup from tap water | Switch to filtered water or let tap water sit overnight |
If you've worked through a general sow-and-grow kit before, a lot of these principles will feel familiar. The Nature's Blossom kit follows the same core logic as most seed-starting systems: warm soil, consistent moisture, and good light after sprouting. Once you follow the sensi grow instructions for temperature, moisture, and light, you’ll be able to dial in faster, healthier germination. The biodegradable pots and expandable soil discs are the distinguishing features, and once you've done the expansion step correctly, the rest of the process is pretty forgiving. Take it one stage at a time and you'll have healthy herb seedlings ready to transplant within a few weeks.
FAQ
Do I need to turn on grow lights during the germination phase?
Yes, but do it only after you see healthy sprouts. For these herbs, you do not need a light exposure stage while seeds are still in the soil, so start with warmth and consistent surface moisture. The moment a green sprout appears, switch to a bright window or grow light right away to prevent stretching.
How do I know I overwatered the soil discs before seeds germinate?
Squeeze out excess moisture from the expanded discs if the pot contents feel muddy or stay soggy. A simple check is whether the surface looks evenly damp after misting, not glossy or dripping. If you notice water pooling in the tray, empty it promptly (after about 5 to 10 minutes) so the pot bases do not sit in standing water.
My home gets cooler at night, what should I do?
If your kitchen is cooler at night, use a consistent warm spot rather than moving the pots randomly. The most reliable approach is to keep the pots in the warmest room you can find, or place them on top of a warm appliance area that stays within the kit’s target range (roughly 65°F to 75°F). Basil is the first to fail when nighttime temps dip.
Can I spread the seeds around the whole pot instead of planting them in the center?
No, not for these pots. Because each biodegradable pot is a container by itself, you should keep 2 to 3 seeds in the center of each pot as directed, then thin later. Spreading seeds across the pot makes it harder for seedlings to germinate uniformly under the same moisture and can weaken the best plant because competition is less predictable.
What should I check if only some seeds germinate, or none of them do?
If nothing appears, first confirm temperature and moisture are within range, then wait longer for slow species, especially Parsley (it can take 2 to 4 weeks or more). If seeds are not swollen after gently checking one or two, that usually means they never started due to cold or too-dry conditions. If seeds are soft and mushy, it points to excess moisture and rotting.
Do I need to remove the seedlings from the biodegradable pots before transplanting?
At transplant time, keep the entire pot intact and place it into the larger container or bed at the same depth it was growing in the starter pot. Do not break the pot or remove the roots, and give extra watering during the first few days to help the biodegradable walls soften and integrate into the surrounding soil.
Can I water from the bottom right away to make things easier?
You generally should not. These small herb seeds are easy to displace, and a hard pour often buries them deeper than the recommended depth. Use the spray bottle method to keep placement shallow and moisture gentle, then if the surface dries later, mist again rather than switching to bottom soaking too early.
My seedlings are leggy, how can I fix it fast?
If you see thin, leggy seedlings, raise the light source and increase daily light hours immediately. A practical fix is positioning a grow light about 2 to 4 inches above seedlings and ensuring at least 6 hours of direct sun or 12 to 16 hours under a grow light. When transplanting, you can bury the stem slightly deeper to improve stability, but improving light is the real fix.
When and how should I thin seedlings in each pot?
Snip thinning only once seedlings have true leaves. Use scissors to cut the weaker seedlings at soil level, leaving the strongest plant in each pot. Avoid pulling, because even small root disturbance can slow the remaining seedling and can increase the chance of damping-off.
Is fuzzy white mold on the soil ever safe, and when should I act?
A thin mold layer on the soil surface is usually a moisture and airflow issue, not an immediate plant-killer, as long as it is not spreading onto the seedling itself. Let the top dry slightly between misting, increase airflow gently, and reduce how often you spray. If a seedling shows the classic base pinching and collapse of damping-off, isolate that pot right away and do not attempt to revive it.