If your grow kit instructions say to 'dip and grow' something, here's what that actually means and exactly how to do it. The dip step is just pre-wetting your growing medium (a plug, block, sponge, or seed) before you place it into the kit. Done right, it sets up the humidity and moisture levels that make germination happen reliably. Done wrong, you get mold, failed seeds, or stunted sprouts. This guide walks you through the whole process for the most common consumer kit types. la colors mega grow instructions
Dip and Grow Instructions for Consumer Grow Kits

Marcus Thornfield
24 Mar 2026
What 'dip and grow' means in your grow kit
The phrase means different things depending on your exact kit. In most seed-starting, hydroponic, and plug-based consumer kits, 'dip and grow' refers to soaking or dunking the growing medium (a coco-coir plug, Rapid Rooter, grow sponge, or Eazy Plug) in water until it's fully saturated, then placing it into the kit's tray or pod holder to start germination. Some kits (like AeroGarden pod systems) treat the pre-wet as filling a bowl to a marked line and submerging the pod. Others, like Airgarden coco-coir plugs, expand from a dry compressed disk over 3 to 10 minutes of soaking.
There's also a second, narrower meaning you may have encountered: Dip'N Grow is a specific brand of liquid rooting concentrate used for propagating cuttings. In that context, you dip the cut end of a stem into a diluted solution to stimulate root growth. That's a separate product and workflow, and if that's what you're dealing with, we have a dedicated article on dip n grow instructions that covers the rooting concentrate workflow specifically.
For most people landing on this page, the 'dip and grow' step is about pre-wetting a grow medium before seeding. That's what this guide focuses on, covering plug-based kits, soilless/hydroponic sponge systems, and hybrid seed-starting trays.
Materials, setup, and safety before you start
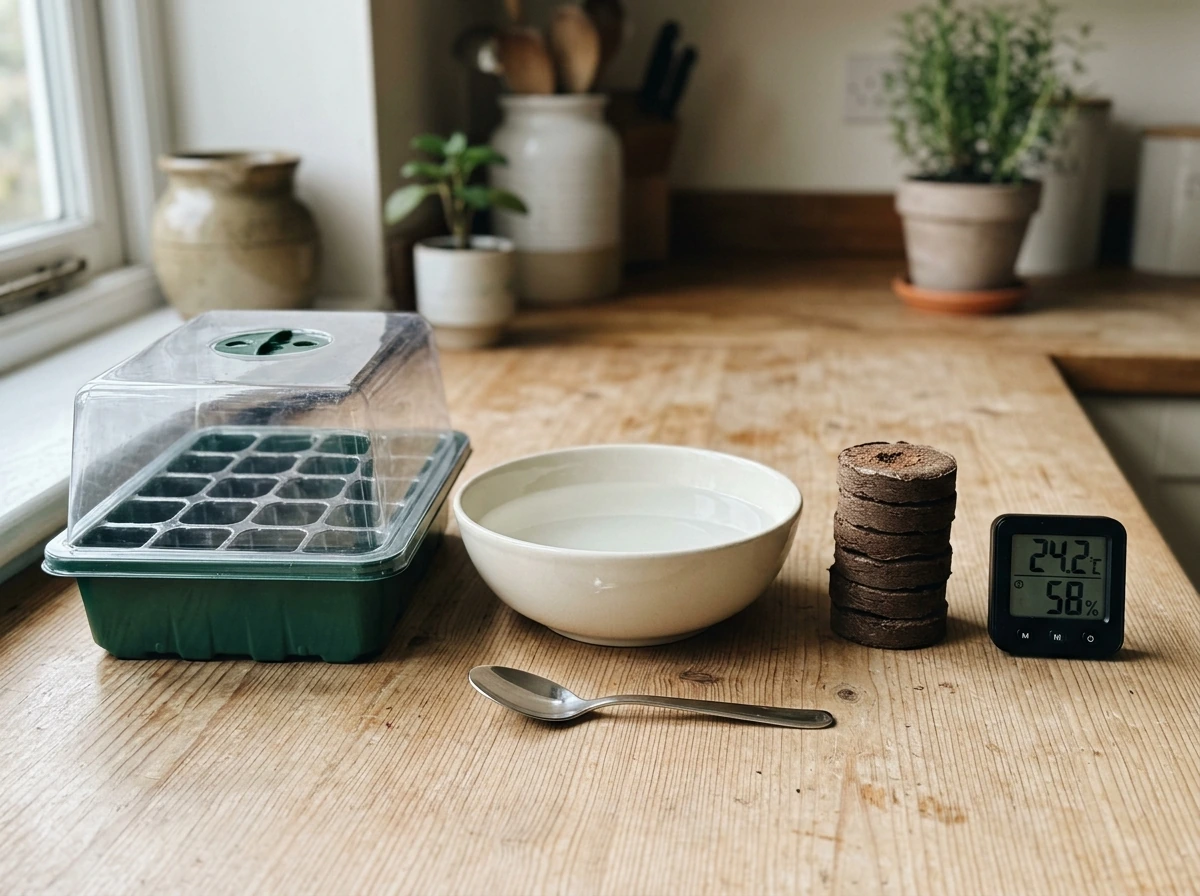
Before you dip anything, gather what you'll need. Most kits don't tell you this upfront, but having everything on the table before you start prevents the common mistake of letting plugs dry out between steps.
- Your kit's grow plugs, blocks, sponges, or pods (still dry/compressed, right out of the packaging)
- A clean bowl or shallow tray large enough to submerge the plugs without crowding them
- Cool tap water or distilled water (avoid hot water, which can disturb beneficial microbes in coco-coir plugs)
- Your kit's germination dome or lid (if included)
- Seeds appropriate for your kit and the season
- A small pair of tweezers for placing seeds into tight plug holes
- Gloves if you're working with the Dip'N Grow rooting concentrate (the product's safety data sheet specifically calls for chemical splash goggles and protective gloves)
A quick note on water quality: if your tap water is heavily chlorinated, let it sit in an open container for 30 minutes before using it, or use filtered water. Chlorine isn't going to kill your seeds, but it can affect coco-coir plugs' ability to hold beneficial moisture over time. Distilled water is a solid default if you're unsure.
Temperature matters more than most people realize at this stage. Germination stalls in cold water and cold rooms. Aim for water and ambient air temperature in the 70 to 80°F range (21 to 27°C). If your home runs cold, a seedling heat mat under the tray makes a real difference.
One thing worth saying clearly: If you're using the Dip'N Grow rooting concentrate product on cuttings (not seeds), the mixing step matters. The concentrate must be diluted before use. Applying it undiluted can damage the basal tissue of your cutting instead of stimulating it. The manufacturer's instruction sheet includes specific mixing ratios for different plant types, so check that before you pour anything.
Step-by-step dip-and-grow instructions by kit type
Different kits use different grow media, so the dip step looks slightly different for each. Find your kit type below and follow that path. If you're not sure which category your kit falls into, check whether your kit includes compressed disk-shaped plugs (coco-coir type), foam/sponge pods (hydroponic type), or a solid block medium (Eazy Plug/rockwool type).
Coco-coir plug kits (like Airgarden grow plugs)
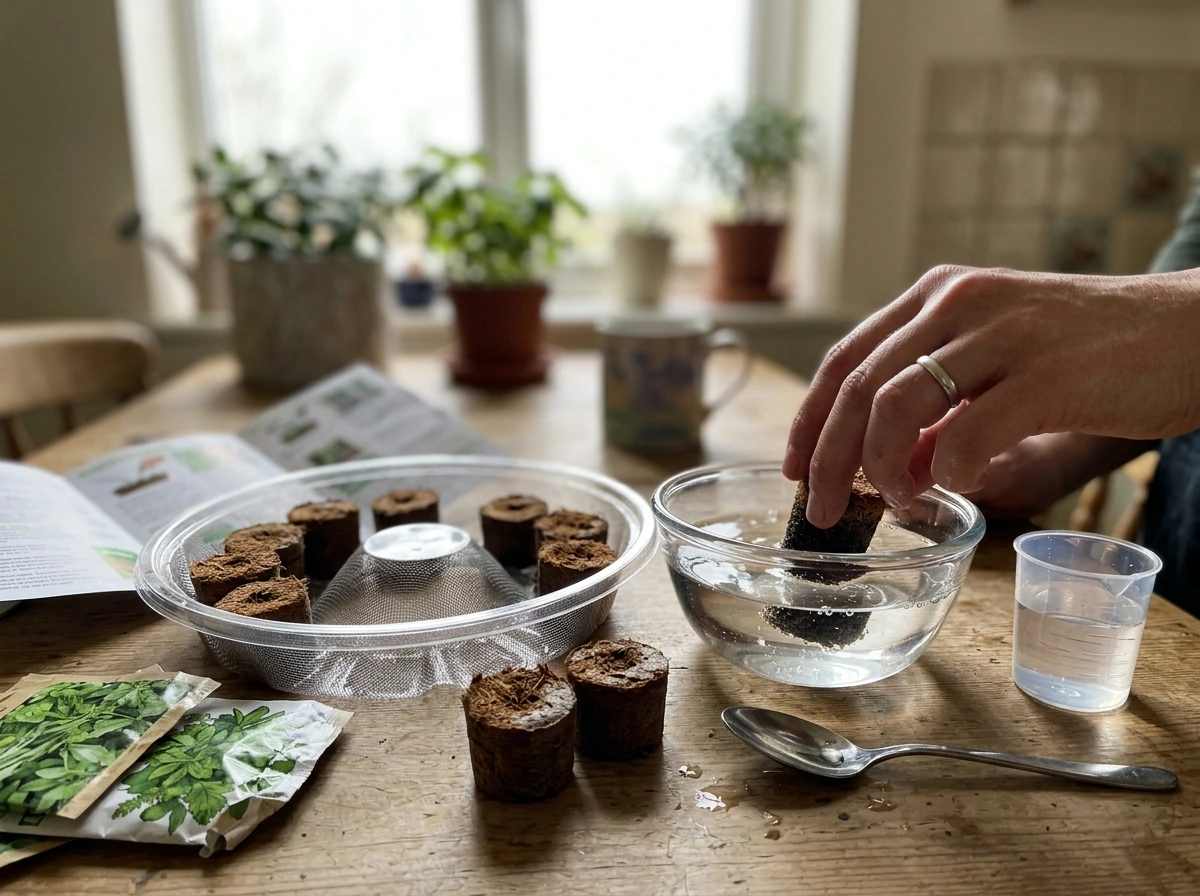
- Place the compressed coco-coir plugs into a shallow bowl or tray.
- Pour cool water over them until they're fully submerged. Leave them for 3 to 10 minutes. You'll see them expand from flat disks into full, spongy plugs during this time.
- Lift each plug out and give it a gentle squeeze over the sink, or let it sit on a paper towel for 30 seconds. You want it moist throughout, not dripping. If it drips continuously, it's holding too much water and can cause rot.
- Place the plug into its tray slot or holder in your kit.
- Use a pencil or your finger to make a small hole in the top of the plug if one isn't already there. Drop 1 to 2 seeds in, then gently push a tiny bit of coco from the edges over the hole to cover.
- Place the germination dome or lid over the tray to lock in humidity.
- Set the tray in a warm location out of direct harsh sunlight. Check daily. As plugs start turning lighter brown (a sign they're drying), add a small amount of water to the tray bottom, or briefly dip the plug again into water.
Hydroponic sponge/pod kits (like AeroGarden Grow Anything and Vivosun VGrow)
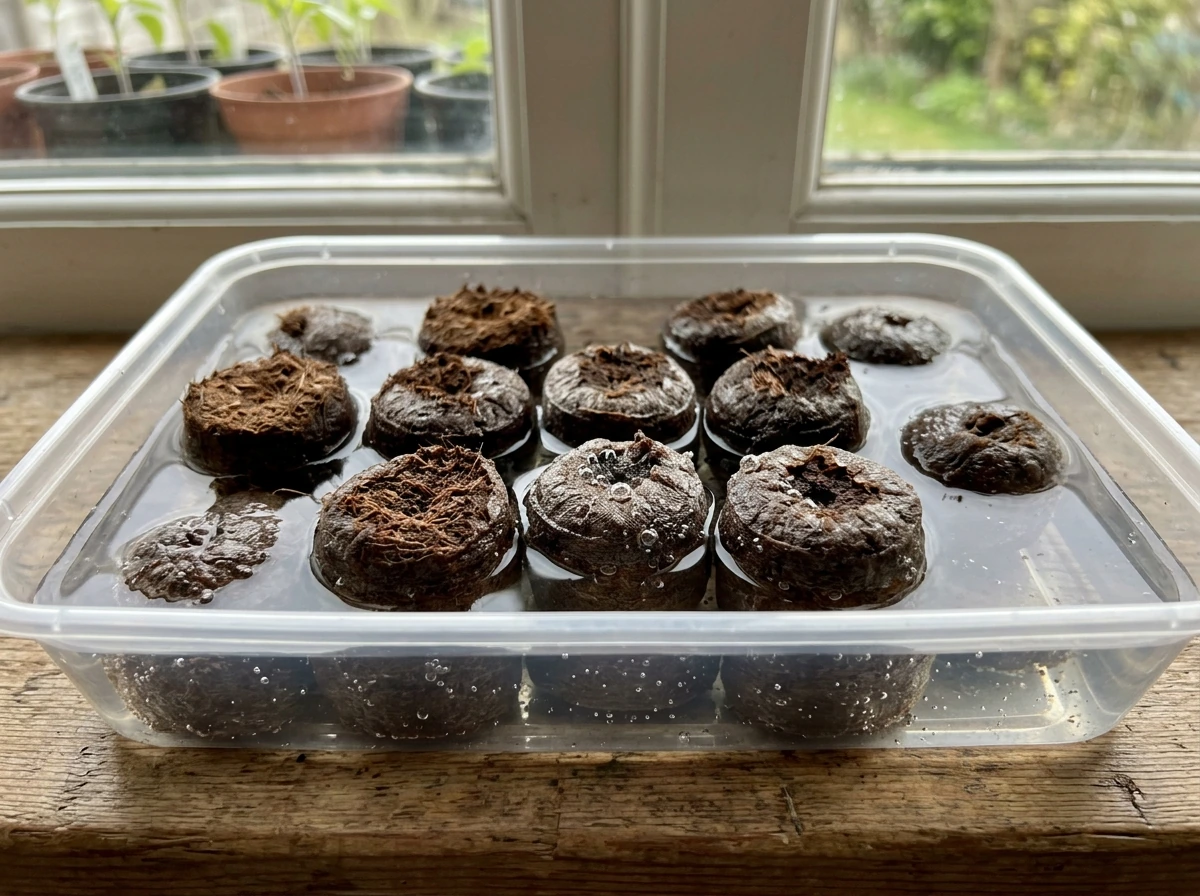
- Fill a clean bowl with cool tap water or distilled water. If your kit includes a 'Fill to Here' indicator line on a container, use that instead of a separate bowl.
- Submerge the sponge pods or Rapid Rooter plugs fully. Let them saturate completely, which typically takes 2 to 5 minutes. Don't rush this step.
- Lift each pod out and allow excess water to drain off. Eazy Plugs in particular rely on a self-regulating drainage mechanism, so placing them somewhere they can drain freely (not sitting in a pooled water tray) is important.
- Seat the saturated pod into its slot in the kit's pod holder or tray.
- Place one or two seeds into the hole on top. Cover lightly with any removed coir or the small label that came with the pod.
- Snap the germination dome or lid onto the unit. For AeroGarden-style systems, keep the air vents on the dome lid closed during germination to maintain the humid environment.
- Fill the kit's reservoir to the indicated level and turn on any pump or light the system includes.
- Wait. Don't lift the dome repeatedly to check. Most seeds show sprouts within 4 to 10 days under proper humidity and warmth.
Cuttings with Dip'N Grow rooting concentrate

- Prepare your cutting: make a clean angled cut just below a node, strip lower leaves, and have your rooting medium (a pre-wet plug or moist perlite cup) ready before you mix the solution.
- Dilute the Dip'N Grow concentrate with water per the ratio on the instruction sheet. The dilution varies based on whether you're working with softwood or semi-hardwood cuttings.
- Wearing gloves (and eye protection if you're sensitive to splash), dip the basal (cut) end of the cutting into the diluted solution for the time specified in your instruction sheet, typically a few seconds to a few minutes depending on wood type.
- Remove the cutting, let excess drip off, and immediately insert it into your pre-wet rooting medium.
- Cover with a humidity dome or a loose plastic bag to retain moisture around the cutting.
- Keep in indirect light at room temperature and check daily for wilting or mold. Avoid photoperiods that might push the plant into flowering mode, as this interferes with rooting.
Common failure points and how to troubleshoot them fast
Most dip-and-grow problems fall into a handful of categories. Here's what to look for and what to actually do about it.
Nothing is germinating after 10+ days
The most common cause is temperature. Seeds germinate in a narrow window, and if your room runs below 68°F consistently, germination slows dramatically or stalls. Try adding a seedling heat mat. The Vivosun VGrow guide specifically recommends blank" rel="noopener noreferrer">70 to 80°F for germination, and that range applies broadly. Also check that the dome is fully seated and that you haven't been lifting it daily, which vents all the humidity you're trying to build.
Mold or fuzzy growth on the plugs or inside the dome
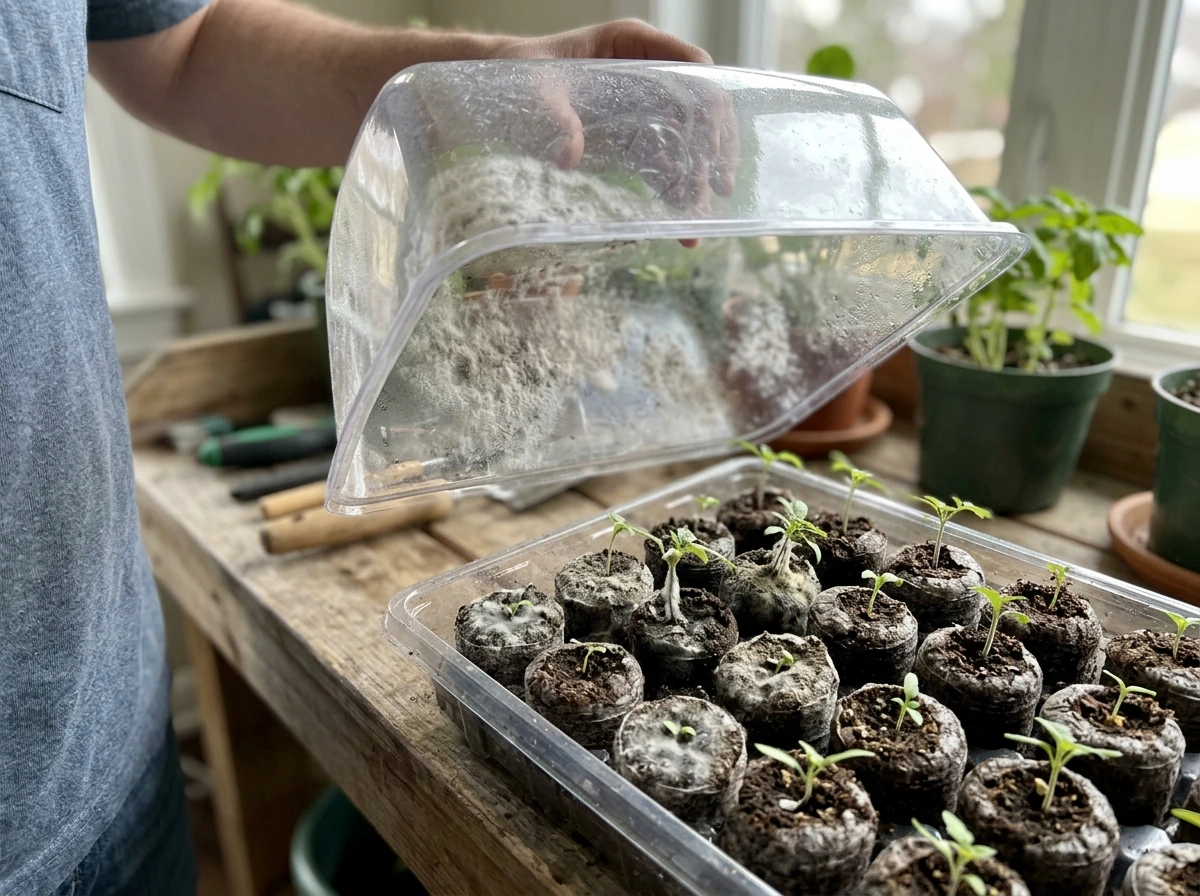
This is almost always a ventilation problem after sprouting has occurred, or a saturation problem before it. If sprouts are already visible and the dome is still on, remove it. Plantaform's germination guide also advises removing the germination dome once all pods have sprouted to improve air circulation and help prevent mold growth. Both Click & Grow and Plantaform's germination guides are explicit that the dome comes off once sprouts appear. Leaving it on longer creates the warm, still, humid air that mold loves. If mold appears before sprouting, your plugs are likely holding too much standing water. They need to drain freely at all times, not sit in pooled water at the base of the tray.
Seeds or plugs floating instead of staying submerged during the dip
Dry coco-coir plugs and some foam pods will float initially. That's normal. Use a clean spoon or your finger to gently press them under the water surface every minute or so during the soak. Full saturation takes a few minutes and they'll stay down on their own once the air pockets are pushed out.
Plugs look dry and crusty after a few days
This means your kit's environment is too dry or the tray reservoir is empty. Add a small amount of water to the tray bottom (not soaking depth, just a shallow amount to rehydrate from below), or briefly re-dip the plug in water. The Airgarden instructions specifically call this out: when plugs start turning light brown, add water to the top or dip them again.
Growth looks leggy or stretched
Leggy sprouts are reaching for light. Either your light source is too far away, the light isn't on long enough per day, or the temperature fluctuation is causing the plant to stretch. Click & Grow's guidance on preventing leggy growth connects this directly to dome use and temperature consistency during early germination. Move the light closer (most pod-based kits specify an exact height above the pods, usually 2 to 4 inches at the seedling stage), and make sure your day/night light schedule is consistent.
Stunted growth after transferring seedlings
If you transferred your seedling from a plug into a larger system and it stopped growing or wilted, you likely moved it too early. Airgarden is really clear about this: wait until roots are visibly showing out of the bottom of the plug before transferring. Moving before that means the roots don't have access to water and nutrients in the new system, and the seedling essentially starves while looking fine on the outside.
Timing, care schedule, and how to know it's working
Once the dip is done and your seeds are in their plugs under the dome, your job becomes consistent monitoring without over-intervention. Here's a simple schedule that works for most consumer plug-based and hydroponic kits.
| Task | Frequency | What to look for |
|---|---|---|
| Check dome humidity (condensation on inside) | Daily | Light condensation is good. No condensation means too dry. Heavy dripping means too wet. |
| Check plug/medium moisture color | Daily | Medium brown = good. Light/pale brown = add water. Dark soggy brown = let it drain and improve airflow. |
| Check temperature of the grow area | Daily | 70 to 80°F is ideal. Below 65°F slows germination significantly. |
| Remove dome once sprouts appear | One-time, when sprouts are visible | Sprout tips pushing through the plug surface or pod hole. |
| Check reservoir level (hydroponic kits) | Every 2 to 3 days | Keep at indicated fill line. Never let it run completely dry. |
| Check for mold or algae | Every 2 to 3 days | White fuzzy patches on plugs = mold risk. Green film on reservoir = algae. Both need action. |
| Check for root emergence at plug bottom | Weekly after day 7 | Visible white root tips poking out the bottom = ready to transfer. |
The signs that things are working: you'll see a tiny pale sprout tip pushing up through the plug within 4 to 10 days for most common herbs and vegetables. By day 14, you should have a recognizable seedling with its first set of true leaves forming above the seed leaves (cotyledons). Roots will be developing down through the plug during this same period, even if you can't see them yet.
If you're at day 14 with no sprout at all, it's worth replanting. Seeds have a viability window and sometimes a bad batch or improper storage leads to zero germination. That's a learning moment, not a failure. Try fresh seeds with the same plugs (re-dip them briefly to refresh moisture) and recheck your temperature setup.
After germination: harvesting, transferring, and doing it all again
Once your seedling is established with roots at the bottom of the plug and 2 to 4 true leaves above, you have options depending on what your kit is designed for.
Transferring into a hydroponic system or Airgarden
Don't rush this transfer. Wait for the roots to visibly emerge from the bottom of the plug. Then slide the entire plug (don't remove the plant from the plug) into the net cup or pod holder in your main growing system. The plug goes in as a unit. Tearing it apart damages the root structure you've spent two weeks building.
Transplanting into soil (AeroGarden or pod kits going to pots)
For pod-to-pot transitions, AeroGarden's guidance recommends filling around the grow sponge with moist potting mix rather than trying to remove the sponge. Let the sponge absorb as much water from the surrounding mix as it can, then pour off any standing excess in the saucer. Overwatering at the transplant stage is one of the top reasons healthy seedlings die in the first week after moving to soil.
Harvesting herbs and leafy greens
For herbs like basil, mint, or cilantro in a pod-based system, start harvesting as soon as the plant has 6 or more healthy leaves and is clearly growing actively. Cut or pinch from the top, not the bottom. Taking the top growth encourages the plant to branch outward and stay productive longer instead of shooting straight up and bolting.
Repeating the cycle with better results
When you're ready to run another round, rinse the tray or reservoir with a mild diluted bleach solution (1 teaspoon per gallon of water), rinse clean, and let it air dry before adding new plugs. Algae and mold spores linger in used trays and will head-start problems in your next cycle. Use fresh plugs from a sealed bag (old plugs sitting open in humid air can pre-grow mold). Keep a simple log: what seeds, what date, what temperature, and how long to sprout. After two or three cycles you'll have your own reliable baseline for your specific home environment, which is more useful than any general guideline.
If you're also working with spray-and-grow nutrient systems alongside your dip setup, there are separate spray-n-grow instructions worth reviewing, since the timing of nutrient application changes once seedlings are actively growing versus just germinating. Getting those two workflows coordinated makes a real difference in how quickly your plants take off after the initial germination phase.
FAQ
Can I dip the plugs in cold water or right from the tap?
No. Use room-temperature water for the soak, then keep the room and tray near the same range (roughly 70 to 80°F / 21 to 27°C). If your water is cold, pre-warm it so the plugs do not cool down during the dip, since germination stalls in consistently colder conditions.
How much water is too much during the dip step?
Use water until the medium is fully saturated, then drain so the base of the tray is not sitting in pooled water. A good cue is that after soaking and loading, the medium should stay evenly moist but not glistening with standing water at the bottom, since that is a common mold cause.
What should I do if I see mold before any sprouts appear?
If water pools under the dome or at the plug base, switch to a “moisture management” approach: keep the dome on for humidity early, but ensure drainage and avoid overfilling the reservoir. If you see mold developing before sprouts, remove the dome temporarily for short checks and re-balance by reducing standing water.
Is dip-and-grow the same thing as using Dip'N Grow rooting concentrate?
Do not use the dip-and-grow step on already-rooted cuttings meant for rooting concentrate. The “dip and grow” instructions for seeds and plugs are different from Dip'N Grow rooting concentrate use (cuttings and dilution). Mixing the two workflows can lead to damage or stalled growth.
How do I maintain water after the initial dip without drowning the plugs?
Don’t chase a specific “water depth” number unless your kit provides one. Instead, keep the medium fully wetted during the initial soak, then maintain a shallow, replenishing reservoir so the plugs rehydrate from below without sitting submerged. Overfilling is riskier than slightly underfilling.
Should I keep pressing the plug under water the whole time?
Yes, but don’t overdo it. Press down only to release trapped air pockets during the soak, then stop interfering once the plug is fully saturated. Constant handling can disturb plugs, create uneven moisture, and slow sprout emergence.
At what point should I re-dip versus replace the seeds?
If sprouts haven’t appeared by around day 14, replace the seeds rather than repeatedly dipping forever. Refreshing the plugs can help if moisture was the issue, but no germination often points to temperature problems, seed viability, or an already compromised batch.
If my seedlings are leggy, is it always the light or could it be something from the dip step?
Light schedule inconsistency can contribute to leggy growth, but it usually matters only after sprouts emerge. If you’re still in the pre-sprout dip stage, focus on temperature and dome fit first. Once sprouting begins, verify light timing and keep the light at the kit’s stated height for seedlings.
Can I transfer to the next system before roots show?
Wait until roots are visibly emerging from the bottom of the plug before moving to the next system, and transplant the plug as a unit. Separating the plug or moving early can cut off the water and nutrient pathway the roots are building.
Do I need to sanitize the kit after a failed germination or an old cycle?
Clean and sanitize the tray or reservoir between cycles. A mild diluted bleach rinse (about 1 teaspoon per gallon of water), a thorough rinse, and full air-drying help prevent algae and mold carryover that can “pre-start” problems in the next dip-and-grow round.