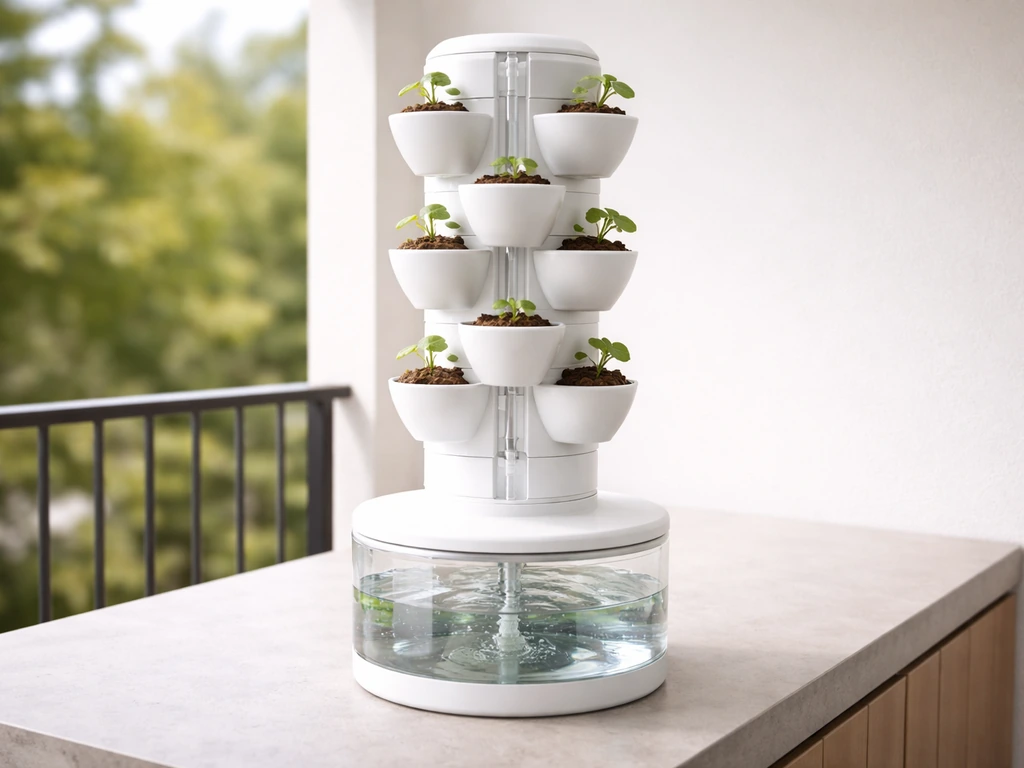
The Grow Up hydroGarden manual walks you through assembling a stacked, 5-pot hydroponic tower that sits on a 20-gallon reservoir, runs off a single submersible pump, and grows up to 20 plants at once outdoors or indoors. The Grow Up HydroGarden user manual identifies the system as a blank" rel="noopener noreferrer">20-gallon reservoir countertop-style hydroponics unit with five stacked garden pots and a submersible pump (Pump Jr 1100 in the deluxe supplies graphic). Fill the reservoir with 10–15 gallons of water, dose with Dyna-Gro Foliage Pro at 1 teaspoon per gallon, stack your pots down the center PVC pipe, plug in the pump, and you're growing. That's the core of it, but there are a handful of details the manual glosses over that can make or break your results, so let's walk through the whole thing properly.
Grow Up HydroGarden Manual: Setup, Care, and Troubleshooting

What the Grow Up hydroGarden kit and manual actually cover
The Grow Up hydroGarden is a countertop-style vertical hydroponic tower originally released around 2015. The unit is built from UV-protected, food-grade plastic, which matters if you're running it outdoors in direct sun. The manual itself is a short PDF (about 4 pages) that covers parts identification, assembly, first-run operation, day-to-day care, and end-of-season cleaning. It's not a deep-dive growing guide, but it covers everything specific to this system.
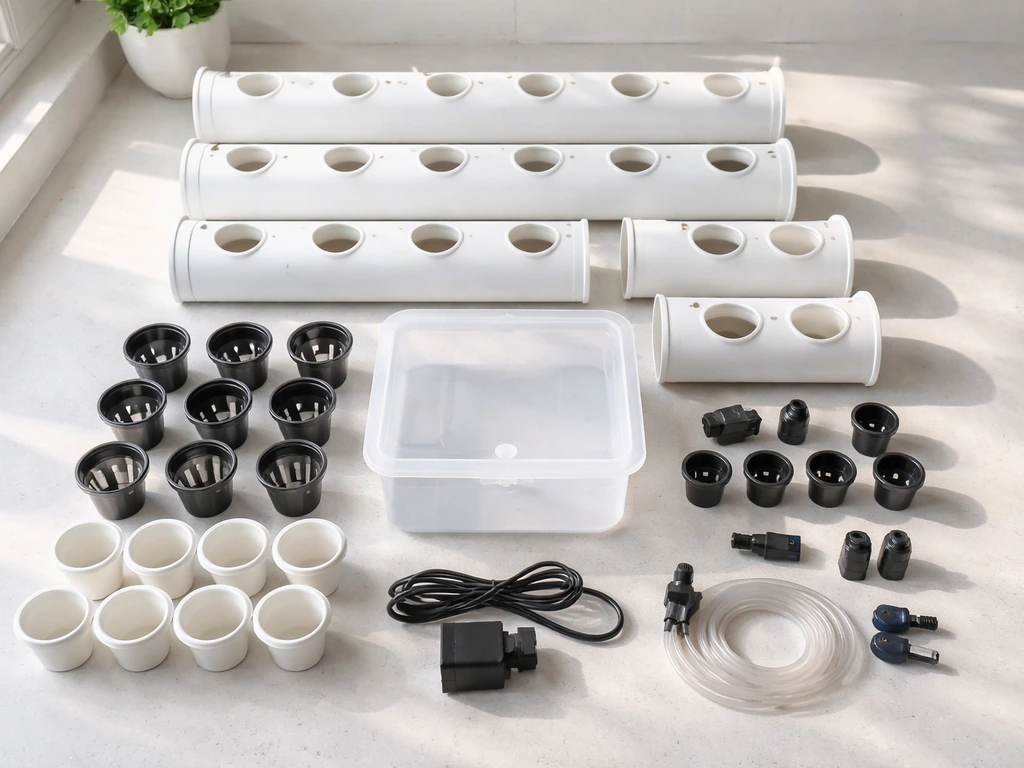
The Deluxe kit, which is the version the manual is written for, includes everything you need to start growing out of the box. Here's exactly what's in it:
- 20-gallon reservoir tub with reinforced lid and cap
- 5 stacking garden pots (20 planting slots total)
- Submersible Pump Jr 1100
- PVC pipe, fittings, and end cap
- Two 9-liter bags of Growstone GS-1 (drainage layer media)
- Two 9-liter bags of Growstone Mix This (main growing medium)
- 1 quart of Dyna-Gro Foliage Pro 9-3-6 liquid nutrients
- User manual
The base (non-deluxe) version leaves out the growing media and nutrients, so you'd need to source coarse perlite and a compatible nutrient solution separately. The manual explicitly warns you that only extra-large, coarse perlite ("Colossal Rock Perlite") will work in this system. Using fine perlite, dirt, or any other medium will clog the PVC pipe and void your warranty. That's not a minor footnote, it's probably the single most important line in the whole manual.
Unboxing and assembling the system, step by step
Assembly is genuinely straightforward once you know the sequence. The biggest mistake people make is rushing the order of operations, specifically plugging in the pump before everything is seated. Follow these steps in order and you'll have a working tower in under 30 minutes. If you want step-by-step vivosun hydroponic grow kit instructions, follow the kit’s pump, nutrient, and light setup flow in the same order.
- Choose your location first. The reservoir needs to sit on level ground near a power outlet. Outdoors, pick a spot that gets at least 6 hours of direct sun. Indoors, position it near a south-facing window or under a grow light.
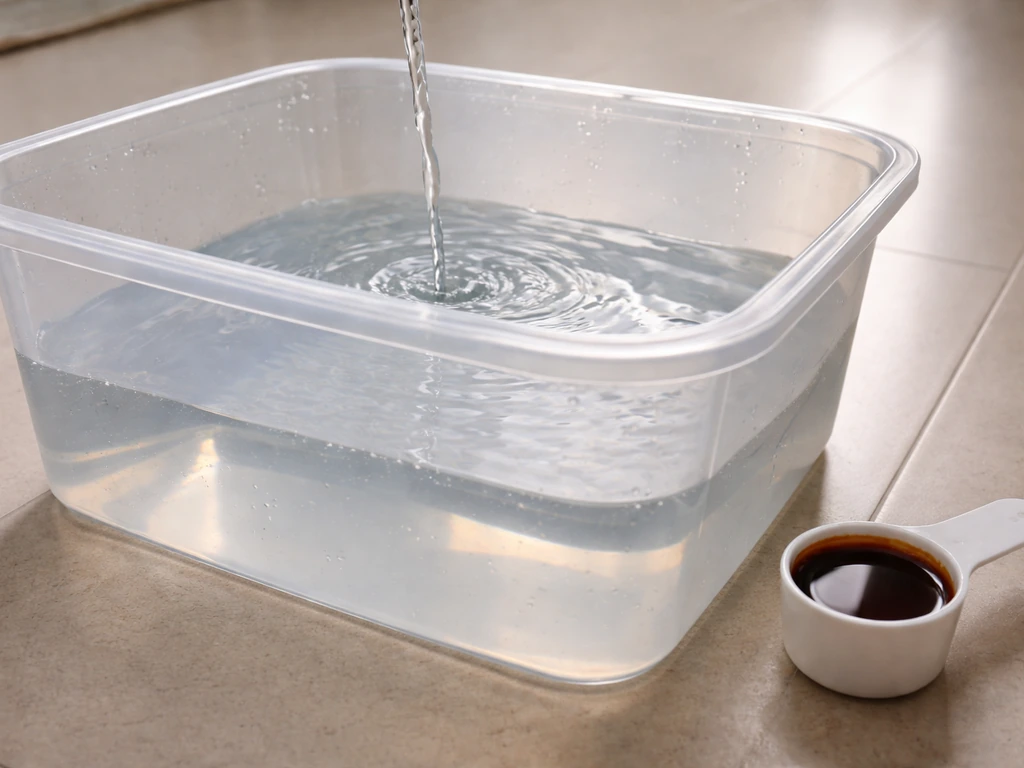
- Place the empty reservoir tub in your chosen spot before filling it. A 20-gallon tub of water is very heavy and awkward to move once full.
- Fill the reservoir 1/2 to 3/4 full (roughly 10–15 gallons). Use clean, room-temperature water.
- Test the water pH before adding nutrients. You're aiming for a pH between 5.5 and 6.5. Adjust if needed using pH up or pH down solution.
- Add Dyna-Gro Foliage Pro at 1 teaspoon per gallon of water and mix it in.
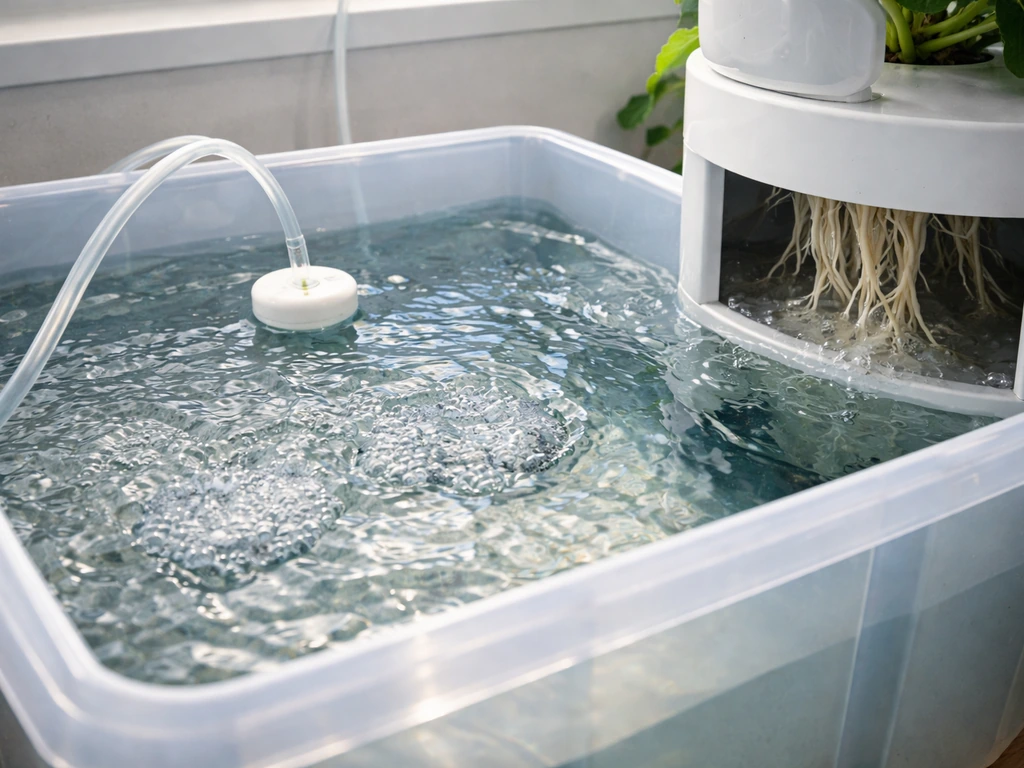
- Place the submersible pump into the center of the reservoir.
- Attach the PVC pipe to the pump using the enclosed sleeve connector, then stand the pipe upright. Tape the open top end of the pipe with masking tape to keep debris out during assembly.
- Slide the reservoir lid down over the PVC pipe and rest it on the tub. Do not plug in the pump yet.
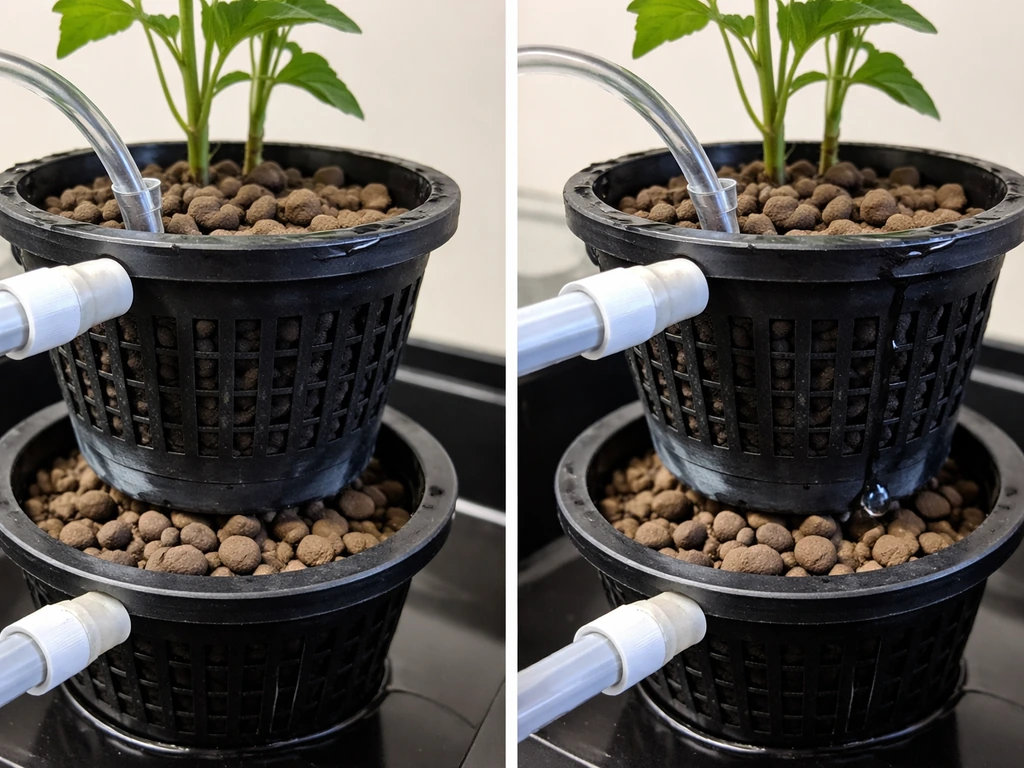
- Slide the first garden pot down over the PVC pipe so it sits on the lid.
- Cover the bottom of the pot with 1.5 to 2 inches of Growstone GS-1 (or coarse perlite) for drainage.
- Fill the pot halfway with Growstone Mix This (or your lightweight growing medium).
- Soak your starter plants' roots briefly in lukewarm water to remove loose soil. Position each plant at a slight outward angle so the leaves reach toward the edge of the pot.
- Fill around the roots with growing medium to about 1 inch from the rim of the pot.
- Repeat steps 9–13 for each of the remaining 4 pots, sliding each one down the PVC pipe and stacking them.
- Once all 5 pots are stacked, remove the tape from the top of the PVC pipe and replace it with the PVC end cap.
- Plug in the pump. Adjust the flow dial on the front of the pump from left (low) to right (high). For the first 24 hours, run it at a higher flow setting, then dial it back to medium for ongoing growth.
That's it. The pump circulates nutrient-rich water up through the PVC pipe, which then flows down through the stacked pots via gravity, delivering water and nutrients to every plant's root zone. It's a simple flood-and-drain style loop.
Day-to-day operation: water, nutrients, light, temperature, and routine care
Water and nutrients
Check the reservoir water level every 1 to 3 weeks. How often you actually need to top it up depends on your plant load, the ambient temperature, and how sunny or hot your setup location is. In summer heat with a full tower of leafy plants, you may need to replenish weekly. In cooler months or with fewer plants, every 2 to 3 weeks is more realistic.
Every time you replenish, add water and nutrients together, never water alone. The ratio stays the same: 1 teaspoon of Dyna-Gro Foliage Pro per gallon of water you're adding. The manual is also firm about never letting the water level drop below the top of the pump. If the pump runs dry, it will overheat and burn out.
Always test pH before adding nutrients on a fresh reservoir fill, then test again within 24 hours to confirm balance. The target range is 5.5 to 6.5. Outside that window, plants can't absorb nutrients properly no matter how much you add, so this check is worth the 2 minutes it takes.
Light
The manual recommends a minimum of 6 hours of direct sunlight per day for ideal growth. If your setup spot only gets sun on one side (common for balconies or against a fence), rotate the whole reservoir 180 degrees once a week so all the plants get even exposure. If you're growing indoors, you'll need a full-spectrum grow light positioned to cover all 5 pot levels, since a single south-facing window usually isn't enough to hit that 6-hour target.
Temperature
The manual doesn't specify a hard temperature range, but as a general hydroponic rule, your reservoir water should stay between 65°F and 75°F to prevent root rot and maintain proper oxygen levels. In summer, avoid placing the dark-colored reservoir tub in a spot where it receives direct sunlight on the sides, since that can heat the water quickly. A layer of reflective material around the tub helps in very hot climates.
Routine plant care
- Prune any oversized leaves that shade the plants growing below them in the stack
- Keep leaves from growing under the lip of each pot, as this traps moisture and can cause disease
- If you spot pests, snip off affected leaves and remove any caterpillars by hand; use Neem Oil spray for ongoing prevention
- For indoor setups, manually pollinate by gently flicking the backs of flowering plants once a day to simulate wind movement
- At the end of the season, drain the reservoir, discard old plants and used growing medium, and thoroughly clean all components before storing
Troubleshooting common problems
Water isn't reaching the upper pots
First, check that the pump flow dial is turned toward the higher end. Consulting the Vivosun Grow Hub controller manual can help you set the right monitoring and control parameters for your grow pump flow dial. If the dial is set too low, water won't have enough pressure to reach the top of the PVC pipe and cascade down properly. If the dial is already at medium or high and the problem persists, check that the PVC pipe is fully seated into the pump's sleeve connector, with no gaps where pressure can escape.
PVC pipe is clogged or flow has dropped over time
This is almost always a media problem. If you used fine perlite, regular potting soil, or any growing medium other than extra-large coarse perlite or Growstone-equivalent media, particles will have washed down into the pipe over time and caused a partial or full blockage. Drain the reservoir, disassemble the tower, and flush the PVC pipe with clean water. Going forward, only use the correct media. This is the most preventable problem in the whole system.
Plants are growing slowly or look pale/weak
Run through this checklist in order before assuming something is wrong with the plants themselves:
- Check reservoir water level. If it's dropped below the pump top, refill immediately with water and nutrients.
- Test pH. A reading outside 5.5–6.5 locks out nutrients even if you've been dosing correctly.
- Check when you last added nutrients. If you topped up with plain water at any point, your nutrient concentration has been diluted.
- Check light hours. Less than 6 hours per day will visibly slow growth, especially for fruiting plants.
- Check pump flow. A slow drip rather than a steady flow means the pump is underperforming or the pipe has a partial blockage.
Pump stopped working
The most common reason a pump burns out on this system is running the reservoir dry. If the water level ever dropped below the top of the pump, heat damage is likely. The Pump Jr 1100 is a replaceable submersible pump, so you can source a compatible replacement without buying a whole new kit. Before replacing it, also check that the power outlet is working and that the pump cord hasn't been damaged.
Roots look brown or slimy
Brown, slimy roots usually mean the water temperature is too high or your reservoir hasn't been replenished recently enough. Warm, stagnant water depletes oxygen and promotes root rot. Drain and refill with fresh, temperature-appropriate water, add nutrients, and check pH. If the problem is ongoing, look at whether your reservoir is getting direct sun on the sides and add some insulation to keep water temps in the 65–75°F range.
Not enough growing medium to fill all 5 pots
This is a real complaint that shows up in user reviews. The Deluxe kit includes two 9-liter bags each of Growstone GS-1 and Growstone Mix This, which is sometimes just barely enough to fill 5 pots properly (especially if you're generous with the drainage layer). If you're running short, prioritize getting the drainage layer right in each pot and supplement the growing medium layer with additional coarse perlite. Don't thin out the drainage layer to compensate, that's the layer that keeps the pipe from clogging.
Getting more out of the manual: checklists and schedules
The manual is short and written in a fairly breezy style, which means some important instructions are easy to skim past. Here are the things most worth double-checking before and after setup.
Pre-assembly checklist
- Level ground confirmed at your chosen spot
- Power outlet within reach
- 6+ hours of sun available (or grow light positioned)
- Water pH testing kit on hand
- Growing medium confirmed as extra-large coarse perlite or Growstone equivalent (not fine perlite, not soil)
- Dyna-Gro Foliage Pro or equivalent nutrient solution ready
- Masking tape ready for capping the PVC pipe during assembly
Weekly and ongoing care schedule
| Task | Frequency | Notes |
|---|---|---|
| Check reservoir water level | Weekly | Never let it drop below the pump top |
| Add water and nutrients | Every 1–3 weeks | Always add together, 1 tsp Foliage Pro per gallon |
| Test water pH | Every replenishment | Target 5.5–6.5; test before and 24 hrs after |
| Rotate reservoir | Weekly (if uneven sun) | 180-degree rotation for even light exposure |
| Prune oversized leaves | Weekly | Especially any shading lower pots |
| Check for pests | Weekly | Remove by hand; apply Neem Oil as needed |
| Pollinate (indoor only) | Daily | Flick backs of flowers gently |
| Check pump flow | Weekly | Adjust dial if flow seems weak |
| End-of-season drain and clean | Once per season | Discard plants and old media; clean all parts |
How to interpret the confusing parts of the manual
A few parts of the manual are easy to misread. When it says to fill the reservoir "1/2 to 3/4 full," that means roughly 10 to 15 gallons for a 20-gallon tub. When it says to plant at an "angle with leaves reaching toward the edge," it just means lean the plant slightly outward so the foliage doesn't all point straight up and compete with the plant above it. And the pump flow dial instruction ("left to right") means counterclockwise is lower flow and clockwise is higher flow, which is standard for these dial-style pumps. Start on the higher end for the first day, then back off to medium.
What real users say: honest feedback and things to watch for
User feedback on the Grow Up hydroGarden sits in an interesting middle ground. People who follow the setup correctly and use the right growing medium tend to report genuinely fast results, with some leafy greens and herbs ready in as little as three weeks. The marketing claim of growing crops "2X as fast" as soil gardening is plausible for herbs and lettuces in a well-maintained system with good nutrient and pH management. Users frequently praise the assembly as quick and manageable, and the deluxe kit does include most of what you need to get started.
On the negative side, the most consistent complaints break down into three areas:
- Growing medium volume: some users find the included media barely covers all 5 pots, which means you either pack pots too tight or run short on the last one. Buying an extra bag of coarse perlite before you start is cheap insurance.
- Pump and pipe issues: users who didn't read the media warning carefully (or grabbed the wrong perlite size) end up with clogged pipes and reduced flow relatively quickly. Once this happens, a full disassembly and flush is unavoidable.
- Occasional strong negative reactions: a handful of users have had very poor experiences, typically tied to a combination of incorrect media, low light, and infrequent nutrient replenishment rather than a fundamental flaw in the kit design. The system is sensitive to all three variables at once.
- This is a discontinued product on at least one major retailer, so replacement parts (especially the Pump Jr 1100) should be sourced before you need them rather than after.
The Grow Up hydroGarden is a capable system for someone willing to follow the media and nutrient instructions closely. It's not quite as forgiving as simpler all-in-one kits like the Back to the Roots hydroponic system or the Modern Sprout hydroponics line, which are more self-contained and less sensitive to setup choices. But for someone who wants more growing capacity (20 plants vs. a typical 6 to 12) and doesn't mind a slightly more hands-on setup, the Grow Up delivers solid results when run correctly.
Should you buy it, and what to do if you already have it
If you're buying: source extra coarse perlite at the same time, confirm your growing location hits 6 hours of sun, and pick up a pH test kit if you don't have one. Those three prep steps prevent the most common failures. If you already have the kit and it's underperforming, check pH and nutrient concentration first, then inspect the PVC pipe for partial blockage, then evaluate your light situation. In most cases the issue is one of those three things, and all three are fixable without replacing any parts.
FAQ
Can I use the Grow Up hydroGarden indoors with a window, or do I need a full grow light?
A window is usually not enough for the system’s 5 pot levels. If you only have one bright window, use a full-spectrum grow light positioned to cover all levels evenly, and turn the unit weekly. If you try to run on window light alone, expect slow growth and uneven stress between the top and bottom pots.
What pH test kit should I use, and how often should I check pH after the initial setup?
Use a liquid pH test kit or an electronic meter that can measure 5.5 to 6.5 reliably. The article notes you should test right after filling and again within 24 hours. After that, check whenever you top up or when plant color suggests a nutrient uptake issue, because pH can drift as water evaporates and nutrients are consumed.
Is it okay to top off with plain water if the reservoir is low?
No. The system is designed around maintaining both nutrient concentration and pH. Topping off with water alone will dilute nutrients over time and can shift pH, which can look like an underfeeding problem even when you are adding correct nutrients initially.
How can I tell if my perlite is too fine before it causes a blockage?
Before loading, check that it’s extra-large and coarse (the manual’s “Colossal Rock Perlite” requirement). If it feels dusty or passes through quickly when you shake a small handful, it’s likely too fine. Fine material can migrate into the PVC pipe and create partial blockages that reduce top-pot flow.
My pump seems noisy or weak. Should I replace the pump immediately?
Try the easy checks first. Confirm the pump flow dial is set toward higher flow, ensure the PVC pipe is fully seated with no gaps, and verify the reservoir never ran below the pump top. Only replace the Pump Jr 1100 after you’ve ruled out flow restriction or an electrical issue (outlet and cord damage), since a clogged pipe can mimic pump failure.
How do I prevent root rot if I can’t keep the reservoir between 65°F and 75°F?
If your water runs warm, reduce side exposure to sun (especially for dark reservoirs), add insulation or a reflective wrap around the tub, and replenish more frequently in hot weather. Also keep the reservoir covered to limit heating and algae, because warmer, stagnant water reduces oxygen availability.
What should I do if only the top pots grow slowly, while lower pots look okay?
This pattern often points to reduced top pressure, partial pipe blockage, or the pump dial set too low. Inspect that the PVC pipe is seated fully, then check for early signs of clogging from incorrect media. If the pipe is clean and the dial is correct, recheck pH and nutrient strength, since top plants can also show stress from uptake issues.
How long should I run the pump each day, is it supposed to be continuous?
The manual’s setup is based on the pump running to circulate through the PVC tower during growth, not on a short timed schedule. If you unplug it or run it intermittently, water delivery and oxygenation can become inconsistent, increasing the risk of poor root health. Keep it running according to the system’s intended operation.
The deluxe kit media bags barely fill the 5 pots. What’s the safest way to handle short media?
Prioritize keeping the drainage layer intact. If you’re short, supplement mainly by adding more coarse perlite to the growing medium layer rather than thinning the drainage layer. A weaker drainage layer increases clog risk because the pipe relies on that flow path to keep material from migrating.
Can I reuse Growstone media or perlite from a previous season?
You can reuse media only if it’s thoroughly cleaned and you confirm it’s not breaking down into fine particles. Because fine debris is the leading cause of pipe blockage, any degraded media that produces lots of dust or small fragments should not be reused. If in doubt, replace with the correct coarse media.
What’s the end-of-season cleaning sequence, and should I flush the PVC pipe even if it seems fine?
Yes, flush the PVC pipe with clean water during cleaning, not just when symptoms appear. A partial blockage can build gradually and reduce flow without obvious failures. Cleaning at season end also helps remove nutrient residue that can affect pH drift and clog risk next run.
Are there signs that my nutrient concentration is too high even if my pH is in range?
Yes. If concentration is excessive, you can see leaf tip burn, overly dark or stressed foliage, or slower growth despite a “correct” pH reading. When that happens, drain and refill, then add nutrients at the stated teaspoon-per-gallon rate, because accuracy on dose is important for this system.