
Most self-watering grow kit instructions tell you to 'fill the reservoir and insert the wick' without explaining what that actually means or what to do when the wick sits dry three days later. Here is a complete, practical walkthrough for wick-based and reservoir-style consumer grow kits, with specific notes for Wick & Grow and Costa Farms Wick & Grow systems, so you can go from unboxing to a thriving plant without guessing.
Self-Watering Grow Kit Instructions: Wick & Reservoir Guide

Marcus Thornfield
7 Aug 2026
Quick-start checklist before you touch anything
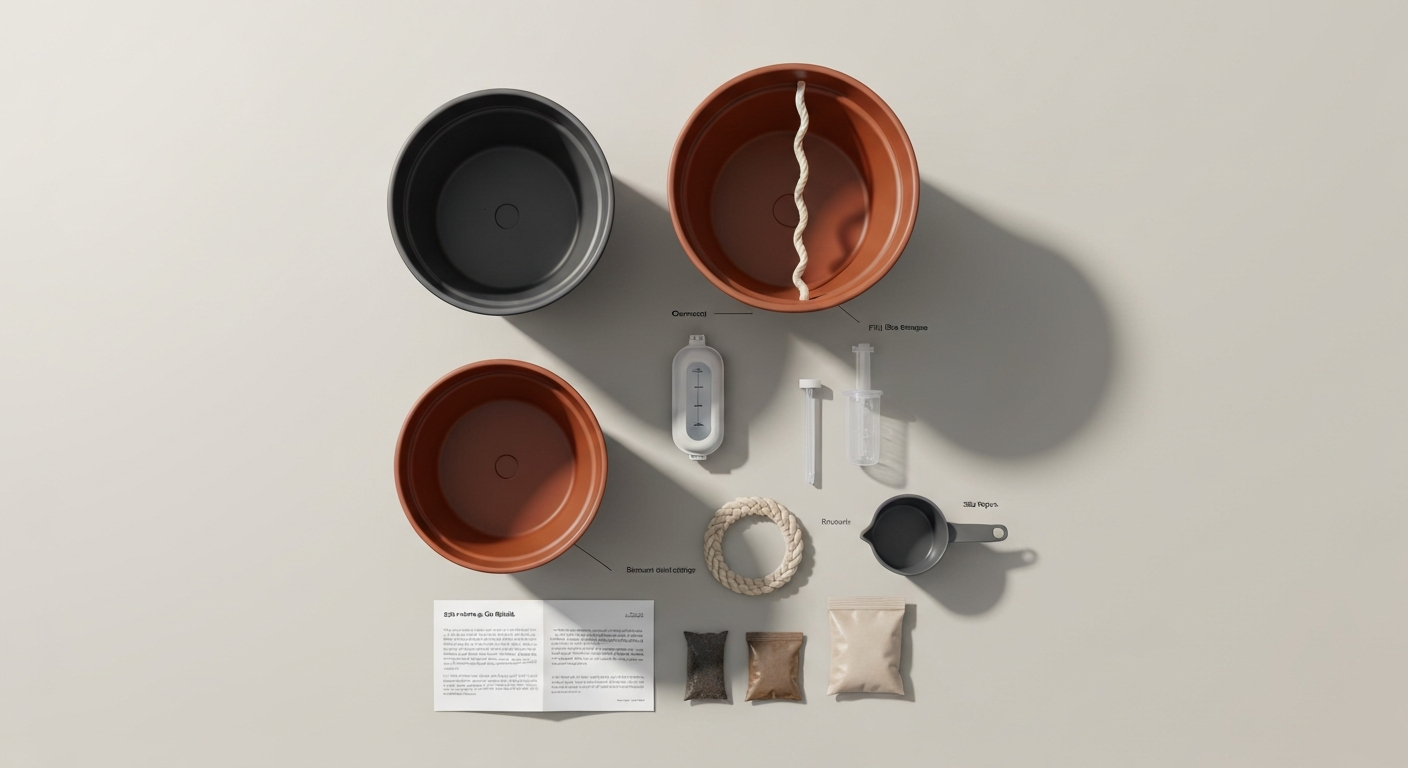
Before you start assembling, do a quick inventory and gather two things you probably already have. This ten-minute prep prevents the most common frustration: getting halfway through setup and realising you are missing a piece or have no water nearby.
What should be in the box
- Outer decorative pot or tray (this is the reservoir shell)
- Inner plant pot or growing tray (sits above the reservoir)
- One or more wicks, usually fabric cord or a snap-in Waterwick piece
- Water-level indicator (a small float, marked window, or dipstick tube)
- Fill tube or fill opening (may be a notched corner, a side port, or just the reservoir lip)
- A bag of potting mix, seed pods, or a coco/peat plug (not every kit includes this — check)
- Seeds or a starter plant (some kits include seeds; others are planter-only)
- Instruction sheet (keep it handy even if you are using this guide)
Tools to grab
- A jug or measuring cup for controlled pouring — reservoir openings are often narrow
- Room-temperature water (cold tap water can shock seedling roots)
- A small spoon or pencil for guiding the wick into drainage holes
- Optional: a spray bottle for wetting potting mix before filling the reservoir
Ten-minute setup plan
- Lay out all parts and confirm nothing is missing (2 min)
- Thread or snap the wick into the inner pot's drainage hole before adding soil (2 min)
- Add potting mix to the inner pot, nestling the wick up through the soil (2 min)
- Set the inner pot onto the reservoir shell and confirm it sits level (30 sec)
- Fill the reservoir to the water-level indicator line, not above it (1 min)
- Top-water the potting mix lightly from above to prime the wick and wet the root zone (1 min)
- Place the kit in its final spot, note the date, and check back in 48 hours (30 sec)
How wick and reservoir systems actually work
The physics behind a self-watering kit is called capillary action, which is the same force that makes a paper towel soak up a spill. Water molecules are attracted to the fibres in the wick and to each other, so water climbs upward through the narrow pores of the wick material without any pump. Research on capillary wick systems shows that the wicking distance a liquid travels tends to scale with time in a predictable pattern, meaning water moves quickly at first and then slows as the soil above reaches equilibrium. Dynamics of hemiwicking, Journal of Fluid Mechanics (Cambridge) provides model-based scaling laws showing macroscopic wicking distance often grows proportional to t^1/2, which explains how wick length, pore scale, and time determine how quickly and how far water travels in planter wicks Dynamics of hemiwicking — Journal of Fluid Mechanics (Cambridge). That is actually useful: it means the system self-regulates. When your plant's roots have pulled enough moisture out of the soil, the slight dryness creates a pull that draws more water up from the reservoir below.
The reservoir sits at the bottom and acts as a buffer. It is not in contact with the roots directly. There is an air gap (called a capillary break zone) between the water surface and the bottom of the soil, which stops roots from drowning. The wick bridges that gap. Studies comparing wick materials have found bonded non-woven cotton performs better than plain cotton or burlap, delivering the highest capillary height (around 20 cm in lab tests) and the best water retention (about 85.8%), which is why most modern consumer kits use a fabric braid or cord rather than a loose string. Nylon and polyester wicks are also common and resist biofilm buildup better over time.
Parts and terminology you need to know
| Term | What it is | Why it matters |
|---|---|---|
| Wick | A fabric cord, braid, or snap-in strip that carries water from the reservoir to the soil | The heart of the system — if this fails, the plant dries out even with a full reservoir |
| Reservoir | The lower chamber or outer pot that holds the water supply | Larger reservoirs mean longer gaps between refilling (a 6-inch pot holds roughly 33 fl oz; a 4-inch holds about 11 fl oz) |
| Fill tube / fill port | An opening or tube used to add water to the reservoir without disturbing the plant | Keeps roots undisturbed during refilling; some kits use a notched corner instead |
| Water-level indicator | A small window, float, or dipstick that shows current reservoir level | Prevents overfilling (which causes root rot) and catches low water before the wick dries out |
| Overflow hole | A small hole near the top of the reservoir that prevents overfilling | Acts as a safety valve — water drains out before it floods the soil from below |
| Growing medium | The potting mix, coco coir, or other material the roots grow in | Must be light and airy; dense or clay-heavy mixes block capillary action through the soil |
| Capillary zone | The lower portion of the soil that stays slightly moist from wick contact | Roots grow down into this zone to access water; the upper soil can stay drier |
Step-by-step setup from unboxing to first fill
Step 1: Unbox and inspect every piece
Take everything out and check for cracks in the reservoir shell, a missing wick, or a broken water-level indicator. It is much easier to swap out a broken part now than after you have planted. For Wick & Grow pots specifically, look for the Waterwick: it is a small blue-and-white fabric piece that snaps into one of the drainage holes at the base of the inner pot. If yours is loose or missing, do not proceed until you have a replacement, because the whole system depends on that connection.
Step 2: Attach the wick before adding soil
This is the step most beginner instructions skip: attach or thread the wick first, then add soil. If you fill the pot with soil and then try to push the wick through, you will either miss the drainage hole or pack soil too tightly around the wick, which creates an air gap that blocks water flow. For snap-in wicks like the Costa Farms Waterwick, press it firmly into the drainage hole until you feel it click. For cord-style wicks, thread 1 to 2 inches through the hole so it hangs down into the reservoir and leave 2 to 3 inches coiled inside the pot at the base of the soil layer.
Step 3: Fill the inner pot with potting mix
Use a light, well-draining potting mix. If yours feels dense or contains a lot of bark and peat, mixing in about 20 to 30 percent perlite helps water move through the soil by capillary action without pooling. WSU Extension specifically recommends adding perlite to self-watering pot mixes to avoid waterlogging. Washington State University Extension (PNW Gardener’s Handbook) recommends adding perlite to self‑watering potting mixes to avoid waterlogging and advises filling the reservoir so only the lower portion of the inner pot becomes wet to reduce root‑oxygen stress; it also notes algae growth in reservoirs is common and suggests cleaning if undesired Chapter 14: Houseplants — Washington State University Extension (PNW Gardener’s Handbook). Fill to about 1 inch below the rim, leaving room for seeds or plants and for top-watering during the priming stage. Do not pack the mix tightly. Loose is better for capillary action.
Step 4: Place the inner pot on the reservoir
Lower the inner pot into the outer reservoir shell. It should sit level and stable, not tilted. The wick should hang freely down into the reservoir space below, check by peering through the fill port or indicator window. A tilted or pinched wick will not draw water evenly. Some kits have guide rails or a notched ledge; if yours does, make sure the inner pot clicks into position on those guides.
Step 5: Fill the reservoir and prime the wick
Pour room-temperature water slowly through the fill tube or into the reservoir opening until the indicator shows 'full' or the water reaches the marked window. For Costa Farms Wick & Grow pots, that means filling to the top of the little window on the indicator. Do not overfill above that mark. Now do something the instruction manual often forgets to mention: top-water the soil lightly from above using a watering can or spray bottle. This wets the potting mix enough for the wick to make contact with moisture in the soil, which is what activates capillary pull. Without this priming step, the wick may stay dry for days waiting for the soil to draw moisture down to it. Texas A&M AgriLife Extension specifically calls this out as a critical first step in getting reservoir systems started.
Step 6: Position the kit and monitor for 48 hours
Place the kit in its intended spot, then check the water-level indicator and the top inch of soil after 48 hours. If the indicator shows the water level has dropped slightly and the soil feels evenly moist, your system is working. If the reservoir level has not changed at all and the soil is bone dry, the wick needs to be re-primed (see the troubleshooting section below). A small drop in reservoir level is a good sign, it means the wick is pulling.
Model and brand-specific notes: Wick & Grow and Costa Farms variants
The Wick & Grow name is a registered trademark owned by Costa Farms, LLC, so if you see it on a plant at a garden centre, a big-box store, or online, it is a Costa Farms product. That matters because it means the Waterwick design and the fill-to-window instructions are standardised across that product line. However, there are still differences between individual pot sizes and retail variants that can trip you up.
Costa Farms Wick & Grow: what to check by pot size
- 4-inch pots: the reservoir is small (roughly 11 fl oz), so you will refill every 3 to 7 days in warm, bright conditions — do not assume a full reservoir will last a week in summer
- 6-inch pots: the reservoir holds around 33 fl oz, giving a much longer buffer; typical refill interval is 7 to 14 days for most houseplants
- The Waterwick on 6-inch pots snaps into one drainage hole — confirm which hole it belongs in (the instruction sheet shows this, and it matters because some 6-inch pots have two holes)
- The water-level indicator window is on the side of the outer pot near the base; clean it with a damp cloth if mineral deposits obscure the marking
- The outer pot is decorative and does not have drainage of its own, so the overflow hole near the reservoir top is your only spill protection — do not ignore it
Generic Wick & Grow-style kits (non-Costa Farms)
Many retailers sell self-watering planters labelled 'wick and grow' as a descriptive term (not the trademark). These often use a simple fabric cord wick rather than the snap-in Waterwick design. The setup is similar, but you need to verify wick length manually. The cord should reach from the bottom of the soil layer to at least an inch into the reservoir when full. If the wick is too short, it will not touch the water once the reservoir drops below halfway. This is one of the most common reasons these kits seem to 'stop working' after the first fill.
Wick-style vs reservoir-style kits: what is actually different
The terms 'wick-style' and 'reservoir-style' are often used interchangeably, but there are real design differences that affect how you set up and maintain each type. Knowing which you have changes a few key decisions.
| Feature | Wick-style kits | Reservoir-style (sub-irrigation) kits |
|---|---|---|
| Water delivery | Fabric or cord wick draws water from reservoir to soil | Soil sits directly above a water table in the reservoir; no separate wick cord |
| Wick length | Critical — must span from reservoir water level to root zone; typically 3–6 inches | Not applicable; contact is direct |
| Wick material | Cotton braid, bonded non-woven fabric, nylon, or polyester cord | No wick; perforated tray or soil pillar contacts the water |
| Water-level indicator | Usually a simple float or marked window on the side | Often a dipstick tube inserted through the tray; some use a visible gauge |
| Tray depth | Shallower trays common (1–2 inches); wick compensates for distance | Deeper trays (2–4 inches) to hold more volume with direct contact |
| Algae risk | Moderate — reservoir is enclosed but indicator window can transmit light | Higher — larger water surface area exposed in some designs |
| Best for | Compact houseplants, herbs, small decorative pots | Larger vegetable planters, raised-bed inserts, outdoor containers |
| Common failure | Wick dries out, clogged, or too short to reach falling water level | Root rot if overflow hole is blocked or drainage is poor |
If your kit has a separate fabric wick that you thread or snap in, it is a wick-style system. If the inner pot sits directly over a standing water tray with perforated contact, it is a sub-irrigation (reservoir-style) system. The Costa Farms Wick & Grow range uses the wick-style approach with the Waterwick cord. Many wick-and-grow planter systems covered in related guides on this site fall into the wick-style category and share most of the setup steps described here.
Planting seeds, seedlings, and established plants
The self-watering system does not change the basics of planting, but the timing of when you activate the reservoir does change depending on what you are planting.
Starting from seeds
Do not fill the reservoir for the first few weeks after sowing seeds. Young seedlings need the surface of the soil to stay moist, and a fully active reservoir can keep the lower soil too wet, which rots germinating seeds and encourages damping off (a fungal collapse of seedling stems). Instead, top-water lightly every 1 to 2 days until seedlings develop their first true leaves (the second set of leaves, after the initial seed leaves). At that point, you can begin filling the reservoir at a low level (half full) and let the seedlings gradually transition to wick-fed watering over 7 to 10 days.
Transplanting seedlings
When moving a seedling from a seed tray into a wick-style pot, handle the root ball gently and position the wick so it runs alongside (not through) the root ball. Pushing the wick directly through roots can cause damage and create an air pocket around the wick, reducing capillary contact. Set the seedling into the pot, fill around it with potting mix, and water from above on day one. Fill the reservoir to half on day two, then to the full line by day five once you can see the plant is settling in and drawing moisture.
Transplanting established plants
If you are moving an established plant from a conventional pot into a self-watering kit, it will adjust faster than a seedling because its root system is already developed. Fill the reservoir to the full line on setup day and top-water once to prime the wick. Watch the plant for signs of stress (wilting, yellowing) over the first week, which can happen if the old potting mix it came in is dense and blocks capillary flow. If you notice the soil surface staying bone dry while the reservoir empties (an early sign of capillary mismatch), gently loosen the top inch of potting mix and top-water once more to reset the moisture contact.
Feeding your plants through the reservoir: nutrients and dosing
You can add liquid fertiliser directly to the reservoir to feed plants through the wick, which is convenient but requires some care. The main risk in wick-fed systems is salt buildup. Because water evaporates from the soil surface and through the leaves, but fertiliser salts stay behind in the potting mix, salts concentrate over time. This is called nutrient lock-up, and it prevents roots from absorbing water even when the reservoir is full.
How to mix and dose fertiliser for a wick system
- Use a balanced liquid fertiliser diluted to half the label rate as your starting point for houseplants and herbs
- For seedlings and young transplants, use quarter strength or less — extension guidance recommends keeping nitrogen levels around 50 to 100 ppm N for seedlings to avoid salt stress
- For established plants, target an electrical conductivity (EC) in the reservoir below 1.0 mS/cm if you have a meter, or simply stick to half-strength dilution as a practical proxy
- Feed through the reservoir every second or third refill, not every refill — alternating with plain water dilutes accumulated salts
- Never add undiluted liquid fertiliser to the reservoir; concentrated fertiliser will wick up and burn roots even faster than top-applied fertiliser would
Flushing salts before they become a problem
Every 4 to 6 weeks, empty the reservoir completely and top-water the potting mix with plain water until it drains from the bottom. This flushes accumulated salts downward and out through the drainage hole. Do this more often (every 2 to 3 weeks) if you notice white crusty deposits forming on the soil surface or around the drainage hole, which are visible signs of salt accumulation. After flushing, let the soil drain for a few hours before refilling the reservoir and resuming normal feeding.
Routine reservoir care and refilling
Once the system is running, your main job is monitoring the water-level indicator and refilling before the reservoir empties completely. A completely empty reservoir dries out the wick, and a dry wick loses its capillary contact with the soil, which means it does not automatically restart when you refill. You would need to prime it again from above. To avoid this reset, try to refill when the indicator shows about one-quarter full rather than waiting for empty.
Typical refill intervals for a 6-inch wick pot range from 7 to 14 days for most indoor houseplants, while a 4-inch pot may need refilling every 3 to 7 days. These are wide ranges because plant size, light level, temperature, and humidity all affect how fast roots pull water. Track your own kit for the first month to establish its actual pattern, then refill on a schedule rather than guessing.
Troubleshooting: when things go wrong
The wick is not drawing water
This is the most common issue and the easiest to fix. First, confirm the reservoir has water in it. Then check that the wick is long enough to reach the current water level, if the reservoir is half full and the wick only reaches the bottom quarter, it is dangling in air. If the wick is too short, you can top-water from above as a workaround until you replace the wick. If the wick reaches the water but still is not drawing, it may have dried out completely and lost capillary continuity. Remove the inner pot, submerge the wick in water for 30 seconds to re-saturate it, then re-seat the pot and top-water the soil once to reconnect the moisture chain.
Root rot: soil stays too wet
If your plant's lower leaves are yellowing and the soil feels soggy even days after refilling, the reservoir may be overfilled or the overflow hole may be blocked. Check that the water level is at the indicator mark and not above it. Check the overflow hole (usually a small notch or hole near the top edge of the reservoir) for mineral scale or debris. Clear it with a toothpick if needed. If the potting mix is very dense or compacted, it can hold too much water relative to what the plant needs, mixing in perlite at repotting time solves this permanently.
Algae in the reservoir
Green or brown film in a clear reservoir is algae growing on light exposure. It is not immediately harmful to the plant, but heavy algae can clog the wick over time. The fix is to reduce light reaching the reservoir. Cover the indicator window with a small strip of tape or foil, or move the kit out of direct sun if the outer pot is translucent. To clean an existing algae problem: empty the reservoir, rinse it with a dilute solution of white vinegar and water (1 part vinegar to 10 parts water), rinse again with plain water, and refill.
Fungus gnats at the soil surface
Fungus gnats lay eggs in moist organic surface soil. Because the self-watering system keeps the lower soil moist, the surface can also stay damp if ventilation is poor. Let the top 1 to 2 inches of soil dry out between top-waterings during the priming phase. Adding a thin layer of coarse sand or perlite over the soil surface creates a dry zone that deters egg-laying without affecting the wick system below.
The non-destructive reset sequence
If you cannot identify the specific problem, Texas A&M AgriLife Extension and other sources recommend this step-by-step reset before you repot or replace anything: lift the inner pot out of the reservoir; empty the reservoir completely; flush the potting mix from above with clean water until it runs clear from the drainage hole; clean the reservoir and wick with plain water; replace the inner pot; refill the reservoir to only half full; observe the system for 3 to 5 days. Most minor wick and salt problems resolve after this reset without any repotting.
Cleaning, replacing parts, and simple DIY fixes
Self-watering kits last for years if you clean them between plants or seasonally. When a pot season ends or a plant dies, remove all soil, rinse the inner pot and reservoir with warm water, and scrub mineral deposits with a soft brush. White scale (calcium carbonate from hard tap water) dissolves in a 1:10 vinegar-water soak for 15 minutes. Rinse thoroughly before reusing.
Wicks are the most common part to replace and the cheapest. Cotton braid wicks sold for oil lamps work as a low-cost substitute for most cord-style wicks, cut to length and thread through the drainage hole. For snap-in Waterwick-style wicks specific to Costa Farms pots, contact Costa Farms customer support or check garden centre replacement parts. A wick showing discolouration, a stiff texture, or mineral crust should be replaced rather than cleaned; once clogged, a wick rarely recovers to full flow rate.
Which plants do well in self-watering kits
Most moisture-tolerant houseplants thrive in wick-based self-watering kits. Drought-tolerant plants like succulents and cacti generally do poorly because the system keeps the lower soil moister than these plants prefer, and the risk of root rot is high. The table below gives a quick compatibility reference.
| Plant type | Self-watering kit suitability | Notes |
|---|---|---|
| Herbs (basil, mint, parsley) | Excellent | High water demand; benefit greatly from consistent reservoir supply |
| Leafy vegetables (lettuce, spinach) | Excellent | Fast-growing; may need refills every 3–5 days in warm conditions |
| Pothos, philodendron, peace lily | Excellent | Classic houseplants for wick systems; forgiving of occasional dry wick |
| African violets | Very good | Prefer bottom watering; wick system mimics ideal conditions |
| Tomatoes, peppers (small varieties) | Good | Use a deeper reservoir pot; water demand is high |
| Ferns, calathea | Good | Appreciate consistent moisture; keep reservoir topped regularly |
| Orchids | Poor | Need true dry-out periods between waterings; wick system is too consistent |
| Succulents and cacti | Poor | Require dry root zones; self-watering kits cause root rot in most cases |
When it is time to move beyond the kit
Consumer grow kits are great starting points, but there are clear signals that you have outgrown yours. If you are refilling the reservoir daily in summer, the kit is undersized for your plant and a larger container with a deeper reservoir will save you time. If your plant is rootbound (roots circling the bottom of the inner pot or poking out of the drainage hole in quantity), it is time to pot up into a larger wick system. And if you find yourself adding nutrients, adjusting EC, and managing multiple kits at once, you are already thinking like someone who would benefit from a modular sub-irrigation system or a small hydroponic setup. Those are different tools, but the principles you have learned here, wick behaviour, reservoir management, capillary action, translate directly.
Next steps and model-specific walkthroughs
If you are working with a specific Wick & Grow system, there are dedicated step-by-step guides that go deeper on individual kit models. The Costa Farms Wick & Grow instructions walkthrough covers the exact fill sequence, indicator positions, and plant recommendations for that product line. See the Costa Farms Wick & Grow instructions for the official model-specific fill sequence and indicator positions (resource ID 285d3aeb-6adb-4fca-a29e-2be0a185a3ce). For wick-and-grow planter setups that use cord wicks rather than the snap-in Waterwick, the wick and grow self-watering system instructions guide walks through wick-length troubleshooting and media choices in more detail. If you picked up a wick and grow planter from a garden centre and the included sheet was not helpful, the how to use wick and grow planter guide covers the general planter format step by step. For detailed, model-specific steps and troubleshooting, see the how to use wick and grow self watering system guide. These resources are built to work alongside this overview so you can switch between a general understanding and a model-specific fix whenever you need it. For another relevant comparison, see how to use wick and grow planter. For unrelated device setup needs, see grow west vape pen instructions for a concise, device-specific walkthrough.
FAQ
Quick-start checklist — what do I need and the one-page setup summary for a wick-based or reservoir self-watering grow kit?
Unpack and inspect kit (outer reservoir, inner pot/insert, wick/Waterwick, tray, water-level window/indicator). Gather potting mix (light, free‑draining; add perlite 10–30%), plants/seedlings, diluted starter fertilizer (low ppm: ~50–100 ppm N for seedlings), clean water, scissors, and a clean container to prime the wick. Quick steps: 1) Prime wick: soak wick fully in water until saturated. 2) Install wick: snap or thread wick into the drainage/wick port per model (Costa Farms Waterwick snaps into the hole). 3) Place inner pot/insert into outer reservoir. 4) Add potting mix and plant, or place seedling plug into media; firm lightly. 5) Fill reservoir to the water-level indicator (or to recommended mark). 6) Top-water lightly once to settle soil. 7) Monitor water window for first 48–72 hours to confirm capillary uptake; adjust if no uptake (re-prime wick/contact).
How do wick and reservoir self-watering systems work — simple explanation and zones to understand?
Principle: capillary action draws water from a bottom reservoir up through a wick into the potting mix where roots can access moisture. Key zones: reservoir (stores water and nutrients), wick attachment/port (capillary path), capillary/transition zone (where media is kept moist), root/plant zone (upper media where roots grow). The system equalizes so plants take only what they need (manufacturer claim for Wick & Grow). Wick performance depends on material, length, and contact with wet reservoir and media; bonded non‑woven cotton and similar CNW wicks give reliable capillarity.
Model-specific notes — what is unique about Wick & Grow and Costa Farms Wick & Grow systems?
Costa Farms Wick & Grow: two-part planter with proprietary blue‑and‑white Waterwick that snaps into a drainage hole; reservoir has a small water‑level window — they instruct filling to the top of the little window. The Waterwick is designed to deliver consistent moisture for retail plants; replacement wicks and the snap‑in design differ from kits with threaded or looped wicks. Check that your specific Wick & Grow pot size (e.g., 6") uses the snap‑in wick orientation shown in the product PDF; avoid forcing a wick into a non‑designed hole. Brand notes: Costa's system aims to let plants draw 'only what they need'—still follow monitoring guidance and don't over‑fertilise.
Step-by-step illustrated setup tips — how to prime, place, and verify the wick and reservoir contact?
Prime: submerge wick fully in water until saturated (a few minutes to fully soak). Install: snap or route the wick through the designated port; ensure the wick tail hangs into the reservoir and the upper section contacts the media from beneath (not just hanging free). Media/plant: fill inner pot leaving 1–2" headspace; place plant and firm media around roots so the lower media contacts the wick. Fill reservoir: add water to the water-level mark/window. Verify: after 30–60 minutes, press soil 1" down near wick — it should feel noticeably more moist than the top. If not, re-prime and check wick seating; for initial days you can top-water lightly to help media fully wet and establish capillary continuity.
Planting, feeding, and transplanting — seedlings vs established plants: specific steps and fertilizer guidance
Seedlings/plug stage: use light potting mix with good porosity; keep fertigation low—~50–100 ppm N (many extension programs recommend low ppm for seedlings). Prime wick and avoid saturating seed surface; use a spray or gentle top-water until roots contact wick. Established plants: use standard potting mix with perlite; feed with balanced water‑soluble fertilizer at maintenance rates—monitor EC/salt buildup and follow label. Transplanting into kit: gently remove plant, ensure wick placement before seating plant; avoid burying wick tip completely under dense soil—good contact is essential. If moving a large plant from a conventional pot, choose a bigger reservoir kit or expect more frequent refilling. Flush media (top-water) occasionally to leach salts—especially if leaf tip burn or slowed growth appears.
Routine care and reservoir management — how often to refill, dose nutrients, and use water-level indicators
Refill cadence depends on reservoir volume, plant demand, and environment—typical consumer intervals: 3–14 days for many houseplants, up to 4 weeks for low‑use conditions. Use the water-level window: refill to the recommended mark (Costa: to the top of the little window). Fertilizer dosing: seedlings 50–100 ppm N; small/houseplants maintenance often 100–200 ppm N depending on crop—follow product label and reduce concentration if salts accumulate. Schedule: check water-level every 2–3 days for first week, then set a routine refill check (e.g., every 5–10 days). When refilling, top off rather than emptying unless salt or algae are suspected—periodically (monthly or when buildup occurs) empty and flush reservoir and lightly leach media from above.