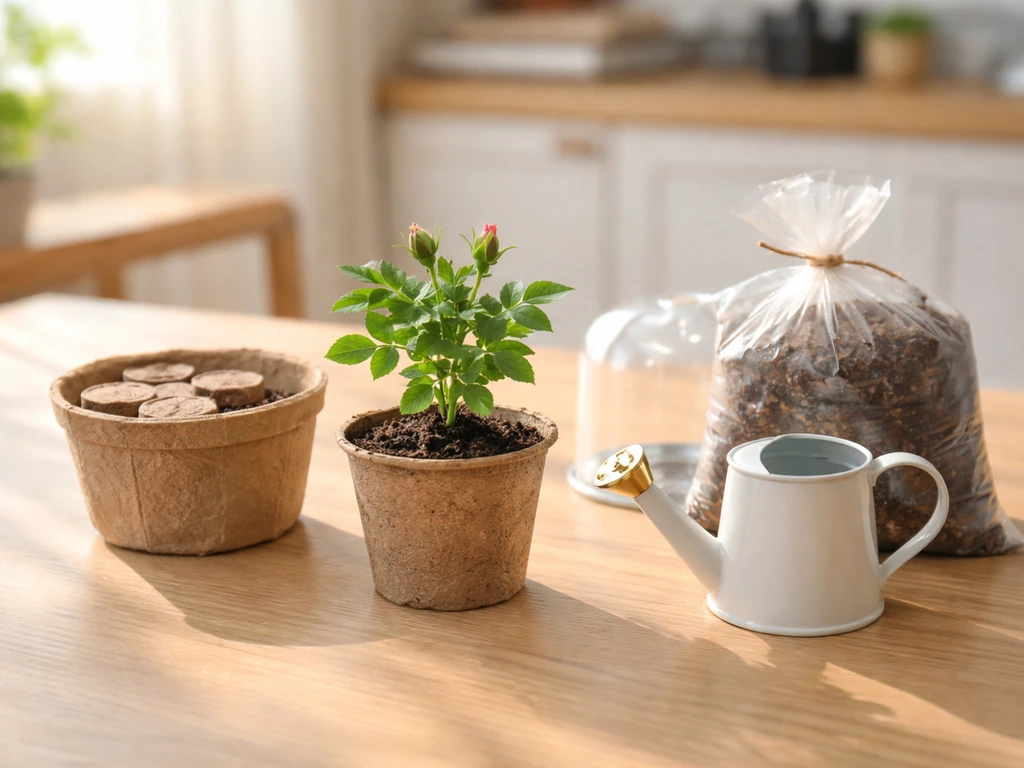
Most mini rose grow kits include a container, some form of growing media (either pre-mixed soil, a compressed peat pellet, or a coir disc that expands when wet), a seedling start or rooted cutting, a small plant stake, and a fertilizer packet or tablet. Your first job is to identify which version you have, because the setup sequence is different depending on whether you're expanding a dry media pellet, transplanting a rooted cutting into pre-filled soil, or potting up a bare-root seedling. Once you know what you're working with, the rest is pretty straightforward. If you need to follow trowel and sprout organic grow kit instructions for soil setup and watering, use your kit card to guide each step in order.
Mini Rose Grow Kit Instructions: Setup to Healthy Growth

Marcus Thornfield
13 Jun 2026
What's actually in your mini rose grow kit
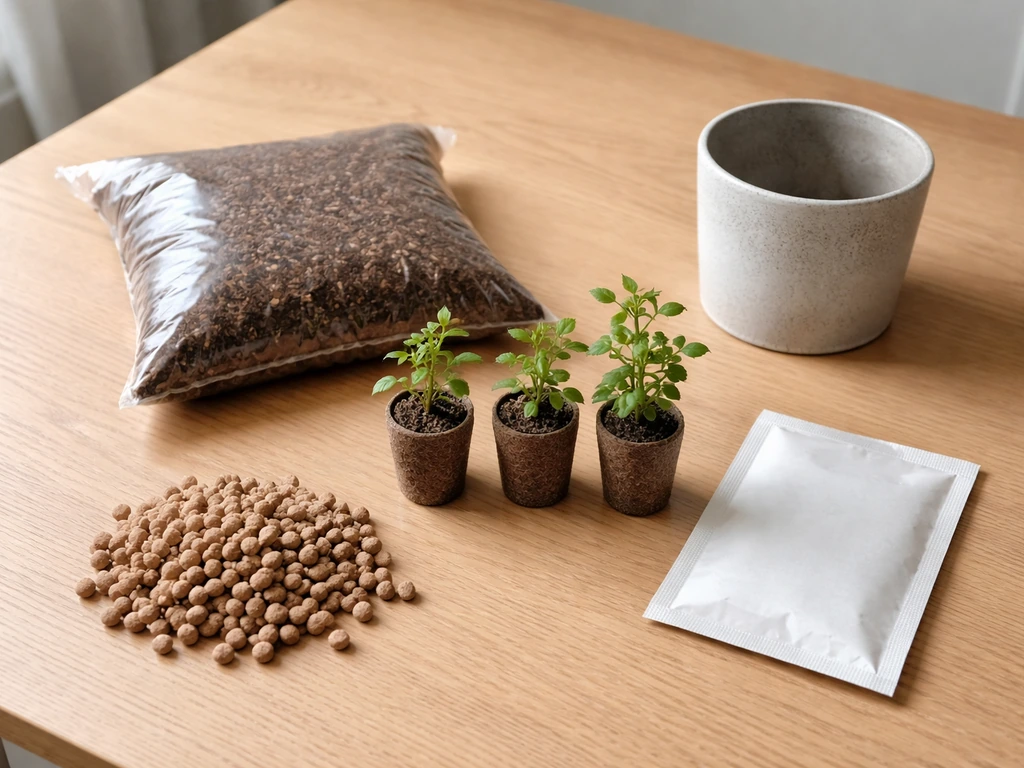
Before you do anything else, lay everything out on a table and take stock. Mini rose kits vary more than you'd expect, and the instructions that come in the box are often vague about which version you have. Here are the most common configurations you'll run into.
| Kit Type | Growing Media | Plant Start | Drainage Setup | Fertilizer Included |
|---|---|---|---|---|
| Peat pellet kit | Compressed pellet (expands with water) | Seed or seedling | Usually none — pellet sits in a small tray | Often a single slow-release tablet |
| Coir disc kit | Compressed coconut coir disc | Seed or seedling | Small plastic tray with drainage holes | Liquid concentrate or tablet |
| Pre-filled soil pot kit | Bagged potting mix already in the container | Rooted cutting or small plant | Drainage holes in the container base | Granular fertilizer sachet |
| Hydro/wicking kit | No soil — water reservoir with wick | Rooted cutting in rockwool or foam plug | Self-contained reservoir | Liquid nutrient solution included |
| Bare-root kit | No media — roots are dormant/dry | Dormant bare-root plant | You supply the pot and soil | Usually a fertilizer sachet |
The pellet and coir disc types are the most common in gift-style grow kits (the kind you find at garden centers or in gift shops around Valentine's Day). If your kit has a small puck or disc that looks bone dry, that's your cue, it needs to be soaked before anything else happens. The Buzzy Seeds style of kit is a classic example of this: the pellet expands as it absorbs water, essentially building the growing medium right in front of you. Hydroponic or wicking kits are less common for roses specifically, but they do exist, especially in novelty or science-kit formats.
Also check whether your kit came with a plant stake or trellis insert, a humidity dome or plastic cover, pH test strips, or any care card with a QR code. Some kits include all of these; others include only the bare minimum. Whatever your kit includes, set the care card aside for reference but plan to cross-check it with what you learn here, kit instructions are frequently oversimplified.
Setup step by step: from unboxing to first growth
Follow these steps in order regardless of which kit type you have, adapting the media prep step to your specific setup. If you follow the target grow kit instructions step by step, you can avoid common setup mistakes and get to healthy first growth faster. Rushing or skipping steps here is the main reason people end up with wilted or stunted starts in the first week.
- Unbox everything and check the plant start's condition. If it's a rooted cutting, the stems should look green and slightly flexible. If it looks dry, shriveled, or mushy, contact the retailer before proceeding — the plant may have been damaged in transit.
- Prepare your growing media. For pellet or coir disc kits: place the pellet or disc in its tray, pour room-temperature water slowly over it, and wait 5 to 10 minutes for it to fully expand. It should roughly triple in height. Drain off any standing water that wasn't absorbed — you want moist but not waterlogged media.
- For pre-filled soil or bare-root kits: if the soil is bone dry, pre-moisten it before adding your plant. Pour water through the soil slowly until it just begins to drip from the drainage holes, then let it drain for 5 minutes before placing your plant.
- Plant the start. For pellet/coir kits with seeds: make a small depression about 1/4 inch deep in the center and drop in 1 to 2 seeds, then lightly cover. For rooted cuttings: create a small hole, nestle the roots in without bending them, and gently firm the media around the base. The crown (where stem meets roots) should sit just at the soil surface, not buried.
- Add the plant stake if included, positioning it next to the stem without piercing the roots. Tie loosely with the clip or twist tie provided.
- If your kit includes a humidity dome or plastic cover, place it over the setup now. This helps maintain moisture and warmth during germination or early root establishment. Leave small vents open or crack the lid slightly so air can circulate.
- Move the kit to its first location — a warm spot (65 to 75°F) away from direct sun for the first 48 to 72 hours. This gives seedlings or cuttings a short adjustment period before you introduce them to full light.
- Check for first signs of life. Seeds typically sprout within 10 to 21 days. Rooted cuttings usually show new leaf unfurling within 5 to 10 days if they're happy. Any wilting in the first 24 hours with a rooted cutting is normal; if it persists beyond 48 hours, jump to the troubleshooting section below.
Light, water, and temperature: the three things that make or break mini roses
Light

Mini roses are genuinely light-hungry plants. The American Rose Society is pretty blunt about this: you can grow them indoors successfully only if you can approximate the light they'd get outdoors. That means a south- or west-facing window with at least 6 hours of direct sun daily is your minimum indoor target. A windowsill that gets afternoon shade most of the day won't cut it long-term, and that's where most kit roses start to struggle after the first few weeks. If your best window only delivers 4 hours of direct sun, add a grow light positioned 6 to 12 inches above the plant for another 4 to 6 hours. LED grow lights work well here and won't overheat the foliage the way older bulbs did.
During the first few days after setup, as mentioned in the steps above, keep your rose out of intense direct sun while it adjusts. After that adjustment window, move it into the brightest spot you have. Don't be afraid to rotate the pot a quarter turn every few days so all sides of the plant get even exposure.
Watering
Iowa State University Extension's guidance on miniature roses is exactly what I'd tell anyone: water when the soil surface becomes dry to the touch, and then water thoroughly until it flows freely out the drainage holes. That's it. The most common mistake with kit roses is either watering on a fixed schedule (ignoring whether the plant actually needs it) or not watering deeply enough (just wetting the top inch, which leaves the roots dry). Both kill plants.
How often you water will genuinely vary based on your container size, your indoor humidity, and the season. A small kit container in a warm, dry room in winter might need water every 2 to 3 days. The same container in a humid summer kitchen might need water every 4 to 5 days. Your finger is a better tool than a calendar here, press it about an inch into the soil, and if it feels dry, it's time to water. If it still feels cool and moist, give it another day.
Temperature and humidity
Mini roses prefer temperatures between 60 and 75°F during the day and don't love dropping below 55°F at night. Keep them away from cold drafts (near single-pane windows in winter, air conditioning vents, or exterior doors). Indoor air tends to be dry, especially with central heating running, and mini roses can suffer in low humidity, you might notice leaf tips browning or petals dropping quickly. A simple fix is to place the pot on a shallow tray filled with pebbles and water (the pot sits above the water line, not in it), which creates a small humidity buffer around the plant.
Soil prep and when to transplant
Most kit containers are on the small side, that's by design, since the kits are meant to get you started, not house a full-grown plant forever. If your kit came with a peat pellet or coir disc, that media is great for germination but will run out of nutrients and space quickly. Once your seedling or cutting has been in the kit container for 4 to 6 weeks and you can see roots starting to circle the bottom of the pellet or poke out of the drainage holes, it's time to pot up.
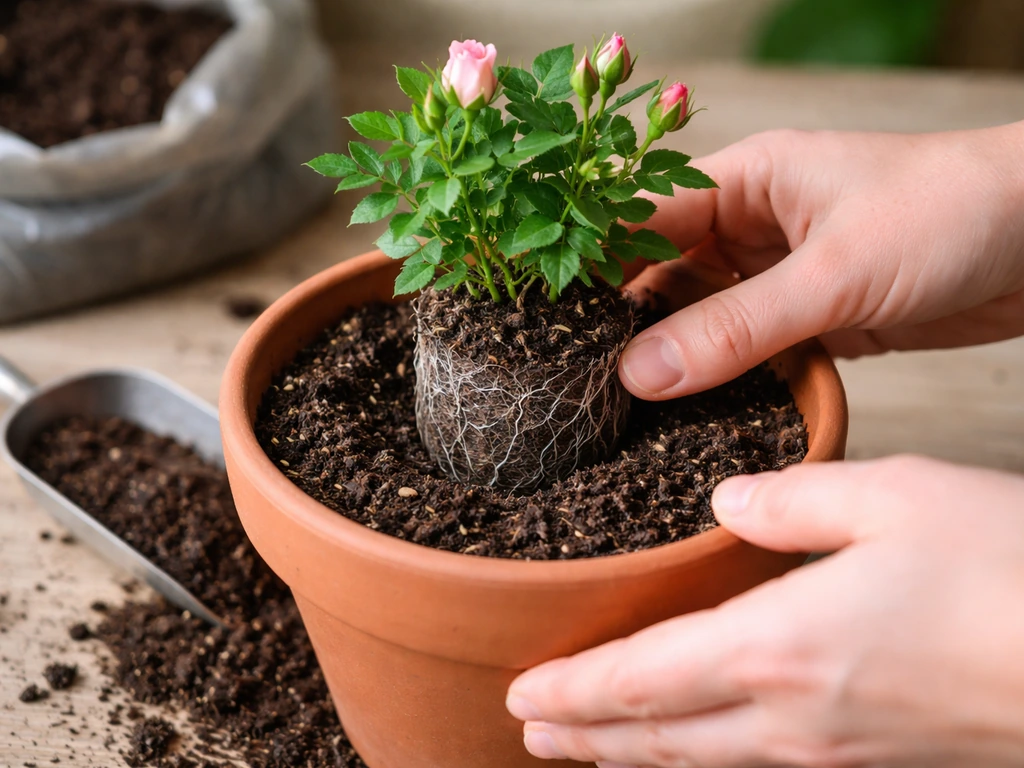
Choose a container that's 4 to 6 inches in diameter (one size up from the kit container) with solid drainage holes. Mini roses don't tolerate soggy roots, so drainage isn't optional. Use a well-draining potting mix, either a commercial rose potting mix or a standard potting mix amended with about 20% perlite to improve drainage. Avoid heavy garden soil or straight topsoil, which compacts in containers and suffocates roots.
When you transplant, water the plant thoroughly the night before so the root ball stays together during the move. Gently remove the plant, disturbing the roots as little as possible, and set it into the new container at the same depth it was sitting before. Water it in well immediately after, and hold off on fertilizing for about two weeks to let the roots settle without the added stress of nutrient uptake.
If your kit was designed to be a longer-term container (some pre-filled soil kits come in a 6-inch or larger decorative pot), you may not need to transplant at all for the first growing season. Watch the drainage holes and root behavior as your cue rather than going by the calendar.
Feeding your mini rose: schedule and deficiency signs
Mini roses in containers need more regular feeding than roses planted in the ground, simply because watering flushes nutrients out of the pot over time. For a kit rose that's just getting established (first 4 to 6 weeks), hold off on extra fertilizer if your kit already included a starter tablet or granules, adding more on top of that can burn young roots. After that initial period, start a routine feeding schedule.
Buzzy Seeds' kit instructions recommend starting fertilizer when seedlings have their second set of true leaves, using a balanced fertilizer at half strength about once a month. Iowa State University Extension suggests once or twice a month with a dilute fertilizer solution, which I think is the sweet spot for a container rose in active growth. Jackson and Perkins recommends a complete liquid fertilizer at half strength every four weeks during the growing and flowering season (late spring through late fall). Any of these approaches works, just pick one and stay consistent rather than eyeballing it.
Use a balanced fertilizer (look for roughly equal NPK numbers, like 10-10-10 or 5-5-5) or a formula specifically made for roses. Liquid fertilizers are easiest to control with container plants. During winter or when the plant isn't actively growing, cut feeding back to once every 6 to 8 weeks or stop entirely if the plant is dormant.
How to spot nutrient deficiencies
Yellowing leaves are the most common complaint with kit roses, and the pattern of yellowing tells you a lot about what's actually wrong. Here's how to read the signs.
| Symptom | Likely Deficiency | What to Do |
|---|---|---|
| Uniform yellowing starting from the oldest, lowest leaves | Nitrogen (N) | Start or increase balanced liquid fertilizer; ensure you're not underfeeding |
| Yellow leaves with green veins, starting on the newest growth at the top | Iron (Fe) | Check soil pH (iron locks out above pH 6.5); try chelated iron supplement |
| Yellowing between the veins on older leaves | Magnesium (Mg) | Apply Epsom salt solution (1 tsp per gallon of water) as a soil drench once a month |
| Overall pale green/light color across the whole plant | Nitrogen or general underfeeding | Step up feeding frequency; check that roots aren't waterlogged (which blocks nutrient uptake) |
| Brown leaf tips with otherwise green leaves | Low humidity or salt buildup | Increase humidity; flush the soil thoroughly with plain water to clear fertilizer salts |
Iron deficiency is a sneaky one because it's often not actually about iron levels in the soil, it's about soil pH making the iron unavailable to the plant. Iowa State University Extension notes that iron deficiency often shows up as interveinal chlorosis on the newest leaves, where tissue turns yellow but veins stay green, and it can be confused with other nutrient problems interveinal chlorosis on the newest leaves where tissue turns yellow but veins remain green. If your soil pH is above 6.5, the plant can't absorb iron even if it's present. A cheap pH test kit from any garden center can confirm this. For most container rose mixes, you're targeting a pH between 6.0 and 6.5.
Pruning, pests, and fixing common problems
Basic pruning for kit roses
Pruning a mini rose sounds intimidating but it's really just tidying and encouraging. Deadhead spent blooms as soon as the petals start to drop, cut the stem back to just above the first set of 5-leaflet leaves below the flower. This redirects the plant's energy into making new buds instead of forming seeds. Every 4 to 6 weeks during the growing season, take a look at the overall shape and cut back any crossed, crowded, or very thin stems to keep air moving through the center of the plant.
If your rose gets leggy (long, stretched stems with few leaves), it's almost always a light issue. Cut the leggy stems back by about one-third and move the plant to a brighter spot. It will bounce back with denser, bushier growth once it has the light it needs.
Pests and diseases to watch for
Mini roses are attractive to a handful of common pests, and catching them early makes a huge difference. Here's what to look for and how to respond.
- Aphids: Soft, pear-shaped green or black insects clustered on new growth and buds. Knock them off with a strong stream of water or apply insecticidal soap spray (follow label rates). Repeat every 3 to 5 days until gone.
- Spider mites: Tiny dots on the undersides of leaves, often with fine webbing. They thrive in hot, dry conditions. Increase humidity, spray the undersides of leaves with water daily, and use a miticide or neem oil spray if the infestation is heavy.
- Fungus gnats: Small flies hovering around the soil. The larvae damage roots. Let the top inch of soil dry out completely between waterings to break their life cycle. Sticky yellow traps catch the adults.
- Powdery mildew: White, powdery coating on leaves. This is a fungal issue worsened by poor air circulation and inconsistent watering. Prune congested growth, improve airflow, and apply a dilute baking soda spray (1 tsp per quart of water) or a sulfur-based fungicide.
- Black spot: Dark circular spots on leaves, eventually causing them to drop. Remove affected leaves immediately, avoid wetting the foliage when watering, and apply a copper-based fungicide if it persists.
Troubleshooting the most common kit failures
Most kit roses fail for one of a small number of reasons. Here's a direct rundown of what to check when things go wrong.
| Problem | Most Likely Cause | Fix |
|---|---|---|
| No germination after 3+ weeks | Old or dried-out seeds, or soil too cold/too wet | Check soil temp (needs 65–70°F minimum); reduce watering if media is soggy; contact retailer if seeds are old |
| Wilting right after setup | Transplant shock or root damage during packaging | Keep out of direct sun, water gently, and wait 48–72 hours; most cuttings recover with patience |
| Wilting after watering | Overwatering or poor drainage — roots are suffocating | Let soil dry out, check drainage holes aren't blocked, and don't water again until the top inch is dry |
| Mold on soil surface | Too much moisture with too little airflow | Scrape off white mold, let soil dry slightly, increase air circulation, reduce watering frequency |
| Drooping leaves with yellow lower leaves | Overwatering combined with low light | Pull back on watering, move to brighter spot, check roots for rot (mushy, dark roots = root rot) |
| No new buds forming | Insufficient light or underfeeding | Ensure 6+ hours of bright light daily; confirm you're on a regular fertilizer schedule |
| Leaves dropping suddenly | Cold draft, temperature shock, or severe underwatering | Check for drafts from windows or vents; water more consistently; keep temps above 60°F at night |
What to realistically expect and how to keep it going
If you're starting from seed, set your expectations accordingly: germination takes 10 to 21 days, and you won't see your first bloom until roughly 10 to 16 weeks after sprouting. That's just how roses work from seed, they're not like fast-growing herbs. If you're starting with a rooted cutting or small plant that came pre-grown in the kit, you could see blooms within 3 to 6 weeks if conditions are right.
Once your mini rose is established and blooming, it can stay in active growth for months. Jackson and Perkins notes that miniature roses are often moved outside once the indoor bloom display finishes and after the risk of frost has passed. If you want to take your kit rose outdoors for the summer, acclimate it gradually: start with a shaded spot outdoors for a few hours a day, then increase outdoor time and sun exposure over the course of one to two weeks. Going straight from a windowsill to full afternoon sun will scorch the leaves.
Long-term, mini roses can live for years with proper care. After each bloom cycle, deadhead consistently, feed on schedule, and give it a light pruning to keep the shape tidy. In late fall, if you're keeping it indoors, you can let it rest by reducing water and stopping fertilizer for 6 to 8 weeks, this mimics a natural dormancy period and often results in a stronger, more floriferous plant the following spring.
If you enjoyed working through this kit and want to try similar projects, the setup process here shares a lot of common ground with other compact grow kits like mini sunflower grow kits and cherry blossom grow kits, both involve small containers, careful watering, and similar decisions around when to pot up. For mini sunflower grow kit instructions, the same general approach applies: prep the medium, then follow the kit's watering and light guidance for seedlings and early growth mini sunflower grow kits. Cherry blossom grow kit instructions follow a similar workflow, so you can use the same kind of attention to watering and timing as you scale up Cherry blossom grow kits. If you’re using a back to the roots lavender grow kit, the instructions can help you apply the same step-by-step setup mindset to a different plant setup process here. You can apply the same careful setup habits to lavender, so review the specific lavender grow kit instructions that came with your kit before planting. The main difference with roses is how light-hungry they are and the ongoing fertilizing commitment, which the other flower kits don't always require as strictly.
The bottom line: mini roses in grow kits aren't a set-it-and-forget-it project, but they're also not difficult once you understand what they actually need. If you’re using a strawberry kit instead, follow the target strawberry grow kit instructions for media prep, watering, and timing to get the best germination and growth. Bright light, careful watering, consistent feeding, and early action on pests or disease are the four habits that separate a thriving kit rose from a struggling one. If you’re following modern sprout lavender grow kit instructions, focus on bright light, careful watering, and consistent care the same way you would with other compact grow kits. Get those right and this little plant will reward you with blooms for a long time.
FAQ
My mini rose kit came with a dry pellet or coir disc, how do I know when it’s fully soaked and ready to use?
Wait until the pellet or disc stops increasing in size and feels uniformly damp throughout, not just on the outer edge. If it still feels firm in the center, soak a bit longer, then squeeze or pour off excess water before planting so the container isn’t waterlogged.
Can I use tap water straight from the faucet, or should I treat it first?
If your tap water is very hard or heavily treated, it can contribute to nutrient uptake problems and tip browning over time. A simple check is to use one watering method consistently (tap vs filtered) for a couple of weeks, then compare leaf color and growth, if you see new yellowing or stalling, switch to filtered water and retest pH.
How do I tell the difference between underwatering and overwatering in a kit rose?
Underwatering usually shows dry, lighter soil and droopy leaves that perk up after thorough watering. Overwatering tends to keep soil cool and wet longer, and you may notice yellowing plus a musty smell or soft stems, if the soil stays wet more than a day, reduce watering and check drainage.
What should I do if my mini rose starts wilting right after I set it up, even though I followed the steps?
Wilting immediately after potting often points to root disturbance or too much direct sun too soon. Give it bright, indirect light for a day or two, water deeply only if the surface dries, and avoid fertilizing for about two weeks to reduce additional stress.
My kit rose looks leggy and thin, but I already have it near a sunny window. Is it the light or something else?
Light is the most common cause, but temperature swings can also stretch growth. Confirm the plant gets at least several hours of direct sun, keep night temps above about 55°F, and if it’s still leggy, use a grow light at 6 to 12 inches and rotate the pot.
Can I keep a mini rose in the same kit container longer than 4 to 6 weeks?
You can, but only if drainage remains excellent and roots aren’t circling tightly. Lift the plant carefully and check whether roots are packed or poking out of drainage holes, if yes, pot up promptly into a container with proper drainage holes.
How much fertilizer is “half strength” for the kit rose, and what’s the safest way to start?
Half strength means mixing the fertilizer at 50% of the label’s recommended rate in water. Start with half strength once during active growth, then observe for new leaf color and growth over 7 to 14 days, if you see browning edges or sudden yellowing, flush the soil with water and pause feeding.
Should I fertilize immediately after I transplant from the kit into a new pot?
It’s usually better to wait about two weeks after transplanting. This reduces the chance of burning young roots during recovery, and it also helps you avoid confusing transplant stress with fertilizer issues.
How often should I rotate the pot, and does rotating really matter?
Rotating about a quarter turn every few days helps keep growth even, especially under lights or windows. If you use a grow light, rotate less often (for example weekly) since the light is more uniform, but still rotate if one side consistently lags.
My leaves are turning yellow. How can I figure out if it’s iron deficiency, overwatering, or lack of light?
Iron-related issues often pair with a general yellowing pattern while veins may stay greener, and it’s more likely if pH is above about 6.5. Overwatering tends to cause yellowing plus persistently wet soil, and low light often comes with slower growth and a pale, thin look, the quickest decision aid is to check soil dryness, then confirm pH if yellowing persists.
What humidity trick should I avoid, and what’s the safer one for kit roses?
Avoid letting the pot sit directly in a water-filled saucer, root health depends on oxygen and soggy bottoms can trigger rot. The safer approach is a pebble tray where the pot bottom stays above the water line, topped up as it evaporates.
Do I need to prune in the first month, or should I wait until it’s established?
You can do light pruning early, mainly removing dead or damaged stems and deadheading spent blooms. If the plant is still small or newly transplanted, avoid heavy shaping until it shows steady new growth, then do structural pruning every 4 to 6 weeks during the growing season.
How do I handle pests like aphids or spider mites that show up in a closed kit setup?
Act quickly at the first sign of curled leaves, sticky residue, or fine webbing. Isolate the plant if possible, rinse leaves thoroughly, then treat with an appropriate insecticidal soap or horticultural spray, and repeat as directed because eggs often survive the first application.
When should I move my kit mini rose outdoors, and how do I prevent leaf scorch?
Move it outdoors only after frost risk passes and temperatures are reliably warm. Acclimate over 1 to 2 weeks, start with a shaded spot for a few hours daily, then gradually add sun and longer exposure, going straight to strong afternoon sun can scorch leaves fast.