The Klutz Grow Your Own Crystal Jewelry kit walks you through a two-solution process: you mix a seeding solution, dip your shaped pipe cleaners into it, let them sit for at least a few hours, then move them into the crystal growing solution where the real magic happens overnight. Once your crystals have formed and dried, you use the included hardware (jump rings, clasps, earring wires, ring blanks, cord) to turn them into actual wearable pieces. The 48-page book guides every stage, including what to do when things go sideways.
Klutz Grow Your Own Crystal Jewelry Instructions Step by Step

Marcus Thornfield
12 Jun 2026
What's inside the Klutz crystal jewelry kit
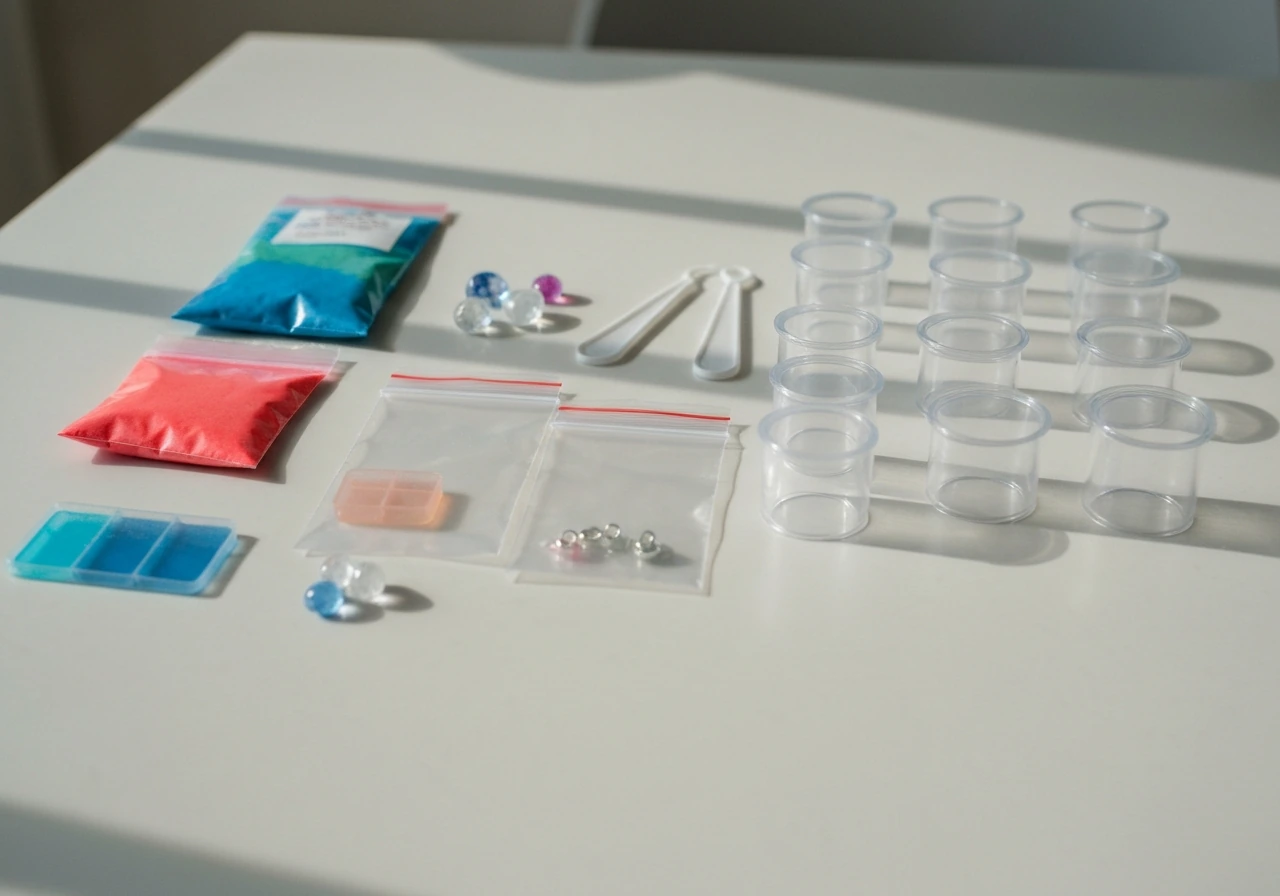
When you open the box, you'll find everything you need to run the chemistry and assemble the jewelry. The crystal-growing side includes 210g of crystal growing powder, four dye tablets, and crystal glaze for sealing finished pieces. The jewelry hardware side includes necklace cord, nylon thread, six cord ends, three clasps, 20 jump rings, a pair of earring wires, two ring blanks, gold craft wire, craft sticks, and gold glitter. You also get eight to ten pipe cleaners (counts vary slightly across kit editions) for shaping your crystal forms. The 48-page book ties it all together with illustrated step-by-step instructions and troubleshooting guidance.
A few things are not included and you'll need to grab them before you start. You'll need heat-resistant glass jars (wide-mouth mason jars work great), distilled water, tape, markers for labeling, and nail polish is handy for finishing edges. The kit calls out adult supervision and includes a choking hazard warning for small parts, so keep that in mind if younger kids are involved.
Get your workspace ready before anything else
Crystal growing is satisfying but it is also a bit messy and requires patience. Set up on a surface that can handle a spill, like a kitchen counter covered with newspaper or a silicone mat. You want a spot that stays undisturbed for at least 24 hours because movement during crystal formation is one of the most common reasons projects fail. Keep the workspace away from drafts, vents, and direct sunlight, since temperature swings interfere with crystal growth.
- Use distilled water, not tap water. Tap water contains minerals that compete with your crystal solution and produce cloudy, weak results.
- Label your jars clearly with tape and a marker so you don't mix up the seeding solution and the growing solution.
- Use heat-resistant glass jars. The powder dissolves best in warm water, and plastic containers can warp or retain odors.
- Have paper towels ready. The crystal solution will drip when you pull pieces out, and it stains fabric.
- Adults should handle the hot water and initial mixing. Kids can do the shaping, dunking, and jewelry assembly.
Step-by-step: growing crystals for your jewelry
The process has three main stages. Here's how to work through each one without getting stuck.
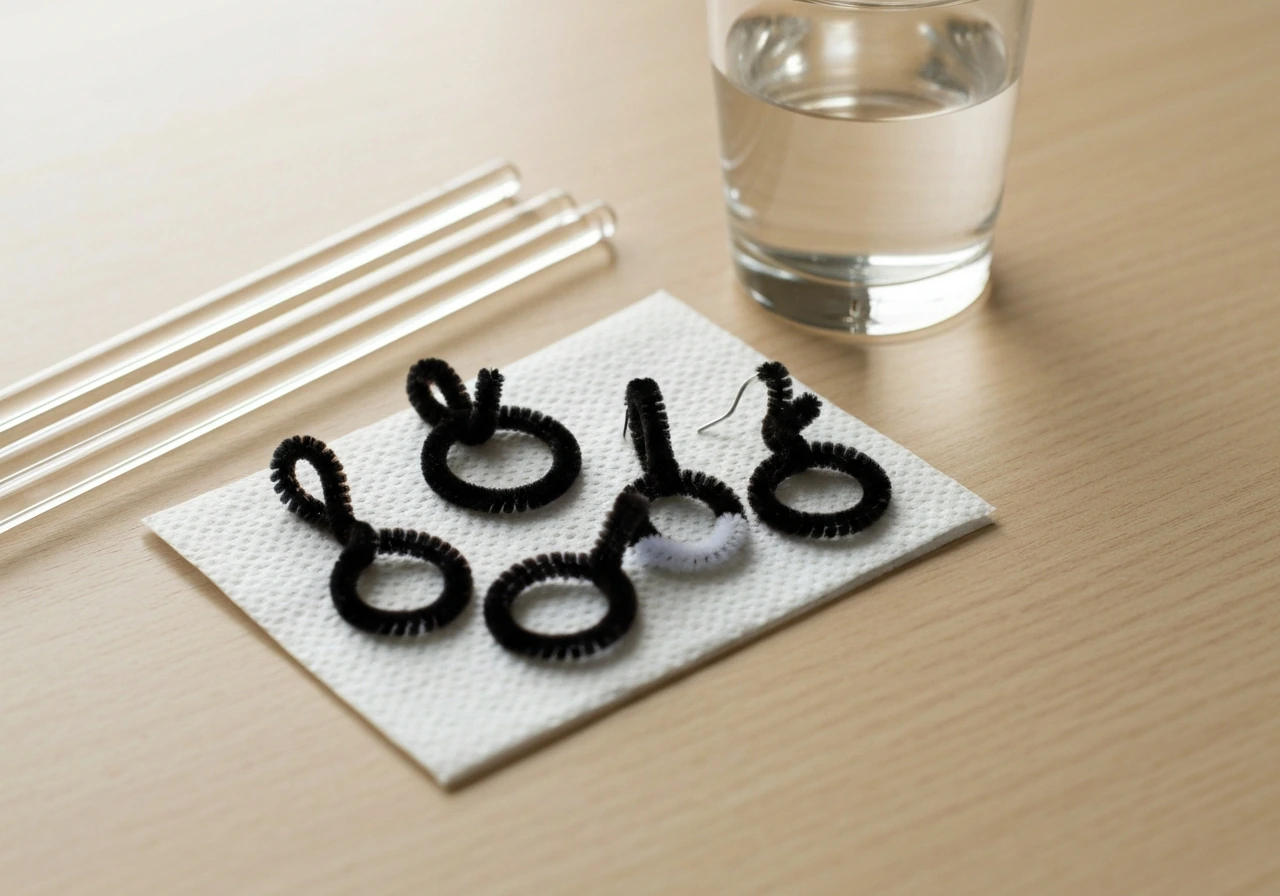
Stage 1: Shape your pipe cleaner forms
Before you touch any solution, shape your pipe cleaners into the forms that will become your jewelry pieces. The book shows several designs, including pendants, rings, and earring shapes. Keep your forms simple and compact. Thin, delicate loops grow crystals well. Very thick bundles of pipe cleaner can end up with uneven coverage. Once shaped, attach a piece of nylon thread so you can hang the form in the jar without it touching the sides or bottom.
Stage 2: Make the seeding solution and dip your forms
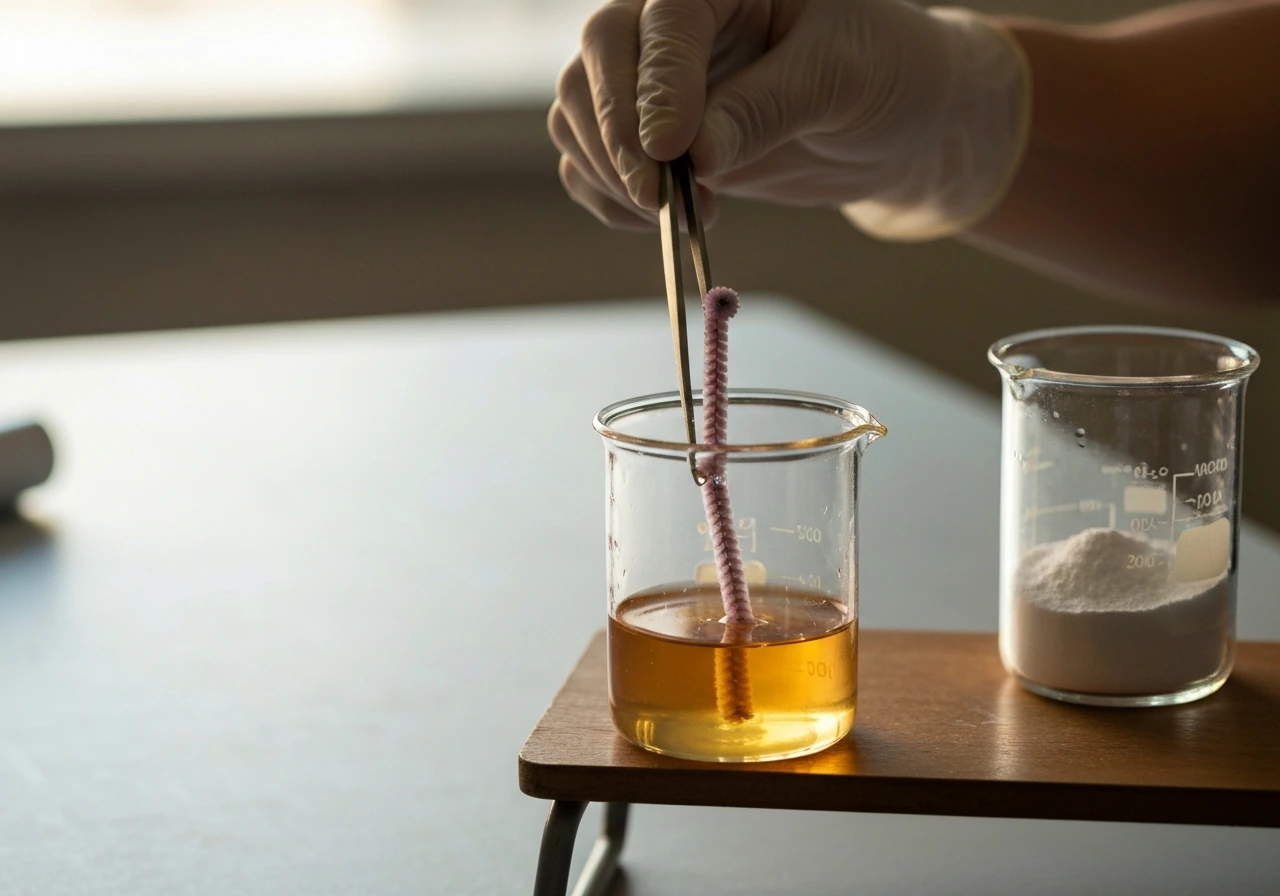
Follow the book's measurements to mix the seeding solution using the crystal growing powder and warm distilled water. Reviewer notes Klutz’s instructions explain the rationale for using distilled water for seeding solutions instead of tap water blank" rel="noopener noreferrer">using the crystal growing powder and warm distilled water. If you want a quick overview of the full process, this guide on how to grow crystals with crystal growing kit walks you through the same key steps. Stir until the powder is completely dissolved, which usually takes a minute or two. Add a dye tablet if you want colored crystals and stir until the color is even. Dip your shaped pipe cleaner forms into this solution and coat them thoroughly, then pull them out and let them dry completely. This seeding stage is what gives the crystals a surface to grip onto. If you want to succeed on your first try, use the crystal grow kit instructions in the book for timing and water purity too seeding stage. The pipe cleaners need to sit for at least a few hours, and letting them dry overnight gives you the best coverage.
Stage 3: Mix the growing solution and submerge your forms
Mix your crystal growing solution using the powder ratios in the book. This is a more concentrated solution than the seeding solution. Once it's fully dissolved and slightly cooled (warm, not boiling), suspend your seeded pipe cleaner forms in the jar using a craft stick laid across the top with the nylon thread tied around it. The form should hang freely in the solution without touching the walls or bottom. Cover loosely with a piece of paper or a light cloth to keep dust out, then leave it completely undisturbed. Check back after 12 to 24 hours. Larger, denser crystals take closer to 24 hours.
Stage 4: Remove, dry, and seal your crystals
Use tweezers or gloved hands to carefully lift your crystal piece out of the solution. Hold it over the jar for a moment to let excess solution drip off, then set it on a paper towel or a rack to dry. Don't shake or tap it. Crystals are fragile at this stage and can break off easily. Once fully dry (give it a few hours), apply the included crystal glaze over the surface. The glaze locks the crystals in place so they won't crumble when you wear the piece. Let the glaze dry completely before moving to jewelry assembly.
Troubleshooting: when crystals won't form or look wrong
This is where a lot of people hit a wall, and it's almost always fixable once you know what to look for.
| Problem | Likely cause | Fix |
|---|---|---|
| No crystals after 24 hours | Solution too dilute, or room too cold | Dissolve more powder in fresh warm distilled water and try again. Move jars to a warmer spot above 65°F. |
| Tiny, sparse crystals | Seeding coat too thin or dried too fast | Dip the pipe cleaner again, let it dry slowly in a cool, still area before re-submerging. |
| Cloudy or dull crystals | Tap water used, or solution contaminated | Always use distilled water. Discard the solution and mix fresh. |
| Crystals only on part of the form | Form touched the jar wall or bottom | Re-hang the form so it's fully suspended and not touching anything. |
| Crystals fell off after removal | Removed too early or dried too fast | Leave in solution longer. Dry on a flat surface away from airflow. |
| Wrong color or muddy color | Dye tablets mixed unevenly | Stir thoroughly until the solution is a uniform color before dipping. |
| Crystals won't stick to the pipe cleaner | Seeding solution not fully dissolved | Heat the water more and stir longer before dipping. Residue or grit = not dissolved. |
If you've had a total failure (nothing grew at all), the most common culprit is movement. Even nudging the jar to check on it can disrupt crystal formation mid-process. Set the jar somewhere it genuinely won't be touched and resist the urge to peek. The book's troubleshooting section covers most of these scenarios with the same advice: patience and water purity fix the majority of problems.
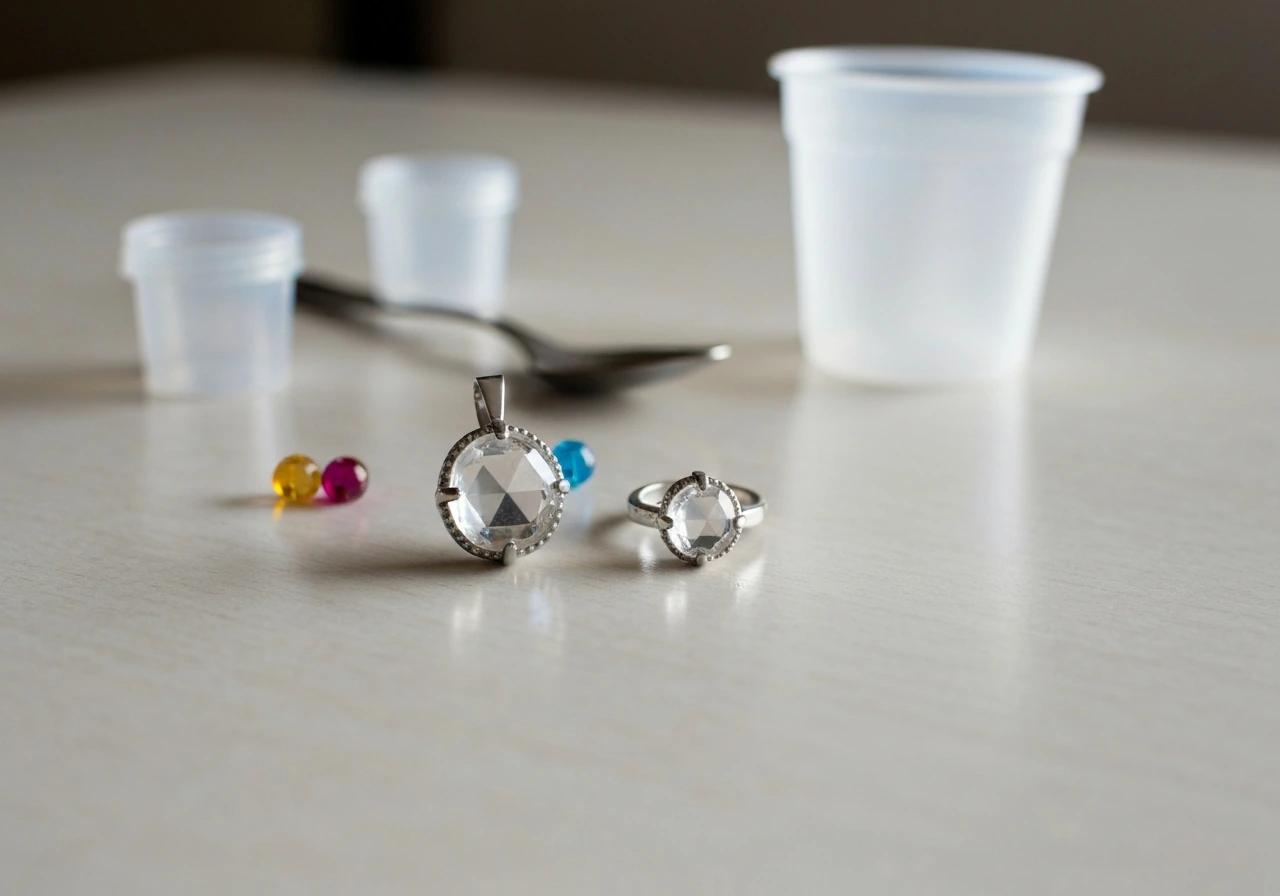
How to turn your crystals into finished jewelry
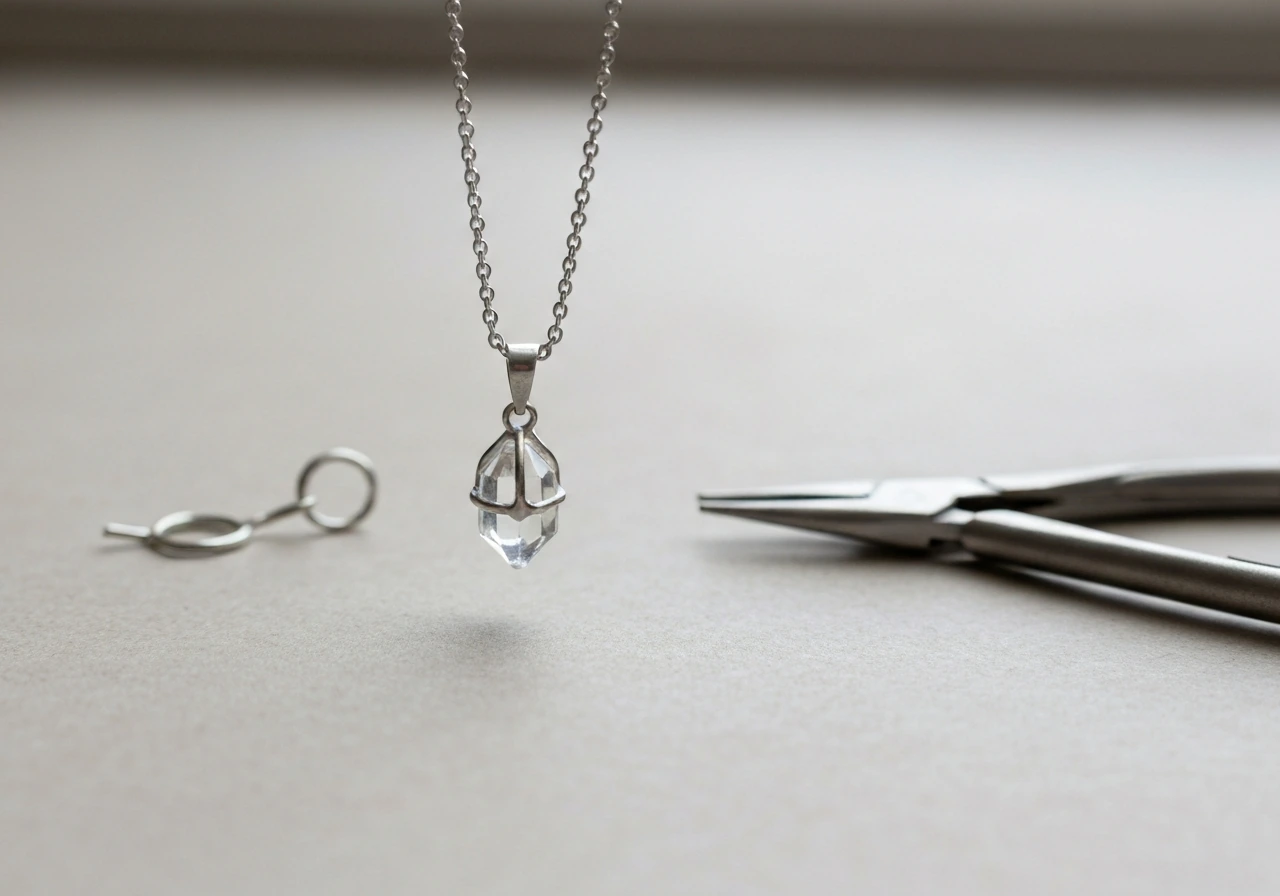
Once your glazed crystals are fully dry and solid, you're ready to assemble the actual jewelry. If you want project MC2 grow your own crystal jewelry instructions, the assembly steps are the same idea: let the crystals dry fully, then attach the included hardware to turn them into wearable pieces finished jewelry. The hardware in the kit is well thought out and covers the most popular piece types.
Making a pendant necklace
Open a jump ring using two pairs of pliers (or your fingers if the ring is large enough) by twisting it sideways, not pulling it apart. Thread it through the top loop of your crystal pipe cleaner form, then close it back. Thread the necklace cord through the jump ring and use the cord ends and clasp from the kit to finish the ends. The book shows exactly how to crimp and attach cord ends, and it's easier than it sounds.
Making earrings
Attach a jump ring to the top of each crystal form and then connect it to the earring wire loop included in the kit. Keep earring forms small and lightweight since crystals do add some mass. Heavier earrings pull at the ear wire and can cause the crystals to chip at the attachment point.
Making rings
The kit includes two ring blanks with a flat pad on top. Apply a small amount of crystal glaze or a craft adhesive to the pad, then press your crystal form gently onto it and hold for 30 seconds. Let it cure fully before wearing. Keep ring crystals small since they take a lot of physical contact and are more prone to chipping in daily wear.
Adding glitter and finishing touches
The included gold glitter can be sprinkled onto a wet glaze coat for extra sparkle before it dries. Apply the glaze, sprinkle glitter, tap off the excess, and let it dry completely. Gold craft wire from the kit is great for wrapping around the base of a crystal piece for a more finished, decorative look before attaching your hardware.
What people actually think of this kit (and who it's really for)
The Klutz Grow Your Own Crystal Jewelry kit lands really well with kids roughly ages 8 to 13 who are interested in crafts, science, or both. The combination of actual chemistry and wearable output is genuinely cool, and the 48-page book feels like a proper guide rather than a folded pamphlet. Reviewers consistently praise the clear instructions and the fact that the troubleshooting section is built into the book, not treated as an afterthought.
That said, it's worth managing expectations a little. The crystals you grow at home are not going to look like faceted gemstones. They'll have a natural, sparkly, rough texture, which is part of the charm. Results vary based on how carefully you follow the water purity and timing steps. Rushed attempts (skipping the seeding dry time, using tap water, or bumping the jar) tend to produce disappointing results, and that's where most negative reviews come from. When you follow the process carefully, the results are genuinely impressive for a kids' kit.
Adults who enjoy crafting will also find this satisfying. The jewelry components are nicer than you'd expect for an activity kit, and the finished pieces are actually wearable. It's a good gift for a curious kid who likes science projects or jewelry making, and it works well as a weekend project done together. If you're comparing this to other crystal kits aimed at slightly older audiences, similar kits like the Project Mc2 grow your own crystal jewelry kit and various science squad crystal grow sets offer different balances of science depth versus craft output. The Klutz version leans more toward the craft and wearability side, which is exactly right for its audience.
One honest caveat: the 210g of powder is enough for several projects, but if you experiment a lot or have mishaps early on, you can run low. The crystal glaze is the other supply that tends to run out first. Both can be sourced separately if you want to keep going after the kit is done. The kit was first published in July 2016 and has remained consistent in its core contents across catalog editions, so if you have a used copy or a slightly older version, the instructions should still be fully applicable.
FAQ
Can I use tap water instead of distilled water for klutz grow your own crystal jewelry instructions?
It usually increases failed or sparse growth and can create cloudy crystals. If you only have tap water, do a test batch with smaller forms first, and expect more variability, especially on the seeding and first overnight growth steps.
How do I prevent my crystal pieces from cracking when I remove them from the jar?
Avoid jostling the jar and lift slowly with tweezers or gloved hands. Let the piece drip over the jar for a few seconds, place it on a stable, flat drying surface, and don’t handle it again until it is fully dry (not just surface dry).
What’s the best way to keep the pipe cleaner form from touching the jar bottom or sides?
Tie the nylon thread so the form hangs freely, then lay the craft stick across the jar opening only to support the suspension. If the form is still sagging, shorten the thread or reshape the pipe cleaner into a tighter loop so it centers in the liquid.
My crystals are tiny, what should I check first?
Start with water purity and the wait times. If crystals are small, confirm you let the seeding forms dry thoroughly and that you left the jar undisturbed for the full overnight window (closer to 24 hours for denser growth).
What causes uneven crystal coverage on the same piece?
Uneven coverage often comes from thick or loosely formed pipe cleaner bundles, or from incomplete coating during the seeding dip. Re-make simpler, compact shapes and ensure the seeding stage bath coats all surfaces consistently.
Can I dye the crystals, and will dye affect how they grow?
Yes, dye tablets are included for colored crystals, and you should mix until the color is fully even before dipping. Very uneven stirring can lead to patchy color, but it should still grow if the timing and water purity steps are followed.
How do I tell when the crystal glaze is dry enough before assembling the jewelry?
Let it dry completely, not just to a matte look. If the surface still feels slightly tacky, wait longer, because installing hardware too early can chip or loosen crystals at the attachment point.
Can I attach the jump ring before glazing?
It’s not recommended. Glazing helps lock the crystals in place, and adding hardware before sealing increases the chance of breaking crystals when you manipulate the piece. Wait until the glazed piece is fully cured.
What tools do I need to open and close jump rings without damaging them?
Two pairs of pliers are safest because you can twist sideways rather than pulling the ring apart. If you use your fingers, only do it for larger rings where you can control the force without bending the wire out of shape.
Why do my earrings chip near the ear wire attachment?
Crystals add weight, and heavier earrings can stress the connection. Keep earrings lightweight by using smaller crystal forms, and handle them gently during assembly so the attachment spot is not stressed before the glaze fully cures.
How much space should I allow between the crystal jar and where kids can reach it?
Place the jar on a surface that cannot be bumped, ideally on a high, out-of-the-way area for supervision. The kit warns about small parts and also the chemistry process, so keep the workspace blocked off during the overnight growth period.
What if I run out of powder or glaze mid-project?
If powder runs low, your solution ratios may drift and growth may be weaker. For best results, mix a fresh portion using the book’s measurements exactly. Glaze runs out first, so plan to use only thin, even coats to stretch the remaining amount.