To grow crystals with the Project MC2 Grow Your Own Crystal Jewelry kit, you heat or mix the provided growing solution with sugar to make a supersaturated liquid, pour it into the jars, add a seed stone or string, and leave it undisturbed overnight. The crystals form as the solution cools and water slowly evaporates, depositing sugar molecules layer by layer onto the surface inside the jar. Once they're ready, you dry them, clean them up gently, and mount them into the included jewelry findings. That's the whole process, and this guide walks you through each stage in detail.
Project MC2 Grow Your Own Crystal Jewelry Instructions

Marcus Thornfield
10 Jun 2026
What's in the kit and what you actually need to start
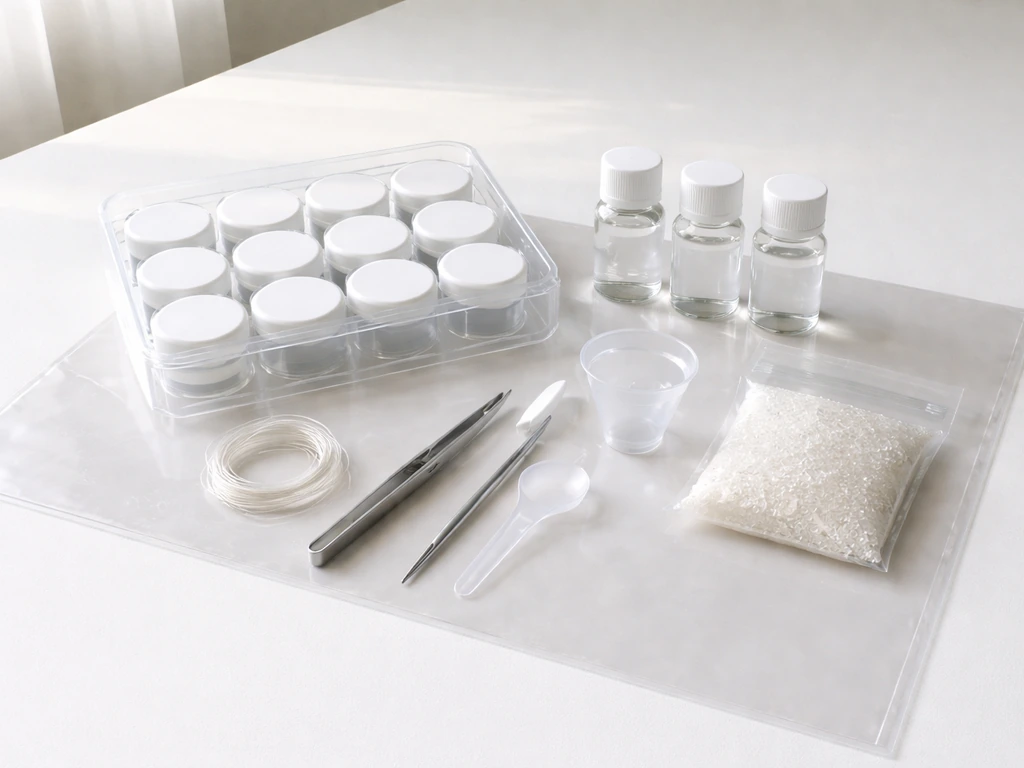
The Project MC2 crystal jewelry kit comes in a couple of different versions depending on where you bought it, so your exact contents may vary slightly. The most common version includes five small crystal-growing jars, a funnel, a magnifying glass, two bottles of growing solution, colored dyes, and a booklet of instructions.
Some versions sold under the Horizon Group USA label also include aluminum powder, craft glue, a metal chain, wax cotton cord, a paintbrush, a bezel ring, and necklace bezels. [The Rock Sugar Jewelry variant (another Project MC2 release) includes one jar with a lid, metallic cord, snap-lock connectors, rope string, and jewelry findings: two rings, one necklace pendant with cord, and one bracelet with capsules for displaying the finished crystals. ](https://www. storkz.
com/projectmc2-529286. html) Dreamland’s product description for the “Project Mc2 Rock Sugar Jewelry” confirms the included items: two rings, one pendant with cord, and one bracelet with capsules, along with the beaker and string Rock Sugar Jewelry variant.
Before you open anything, check your kit against this list and set aside a clean, flat workspace that can stay undisturbed for at least 12 to 24 hours. You'll also want a few things from around the house that the kit doesn't include.
- A kettle or small saucepan for heating water (if your version requires a heated solution)
- Measuring cups or a kitchen scale for getting the sugar-to-water ratio right
- A wooden spoon or stirring stick
- Paper towels and a flat drying surface (a plate or wax paper works well)
- Optional: a magnifying glass if yours is missing, food coloring to tint crystals, and tweezers for handling small pieces
An adult should supervise or assist whenever heating is involved, especially with younger users. The kit is recommended for ages 12 and up, and that age guideline exists for a reason: hot sugar solution is stickier and more dangerous than plain boiling water.
Step-by-step: how to grow your crystal jewelry
The exact steps below cover the most common Project MC2 setup. If your kit uses a pre-mixed growing solution rather than a heat-and-cool method, skip the heating steps and follow the bottle directions for mixing ratios instead. If you are using crystal grow kit instructions from a different brand, still prioritize the same mixing and timing steps for best results. The core principle is the same either way.
- Set up your workspace on a flat, stable surface away from direct sunlight, air vents, and anything that might bump the jars. Vibration during growth is a common reason crystals come out small or lumpy.
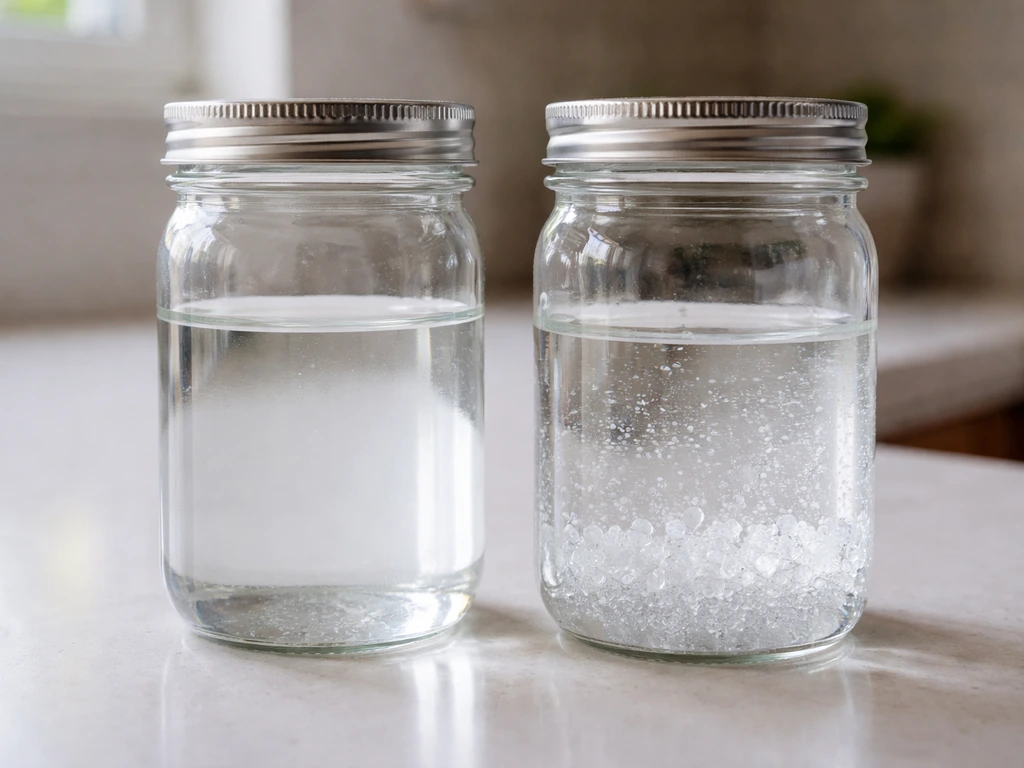
- If your kit requires heating: bring a measured amount of water to a gentle boil, then add the sugar (or follow the provided solution instructions) and stir slowly until fully dissolved. You're creating a supersaturated solution, meaning you've dissolved more sugar than the water would normally hold at room temperature.
- Add any dye from the kit at this stage if you want colored crystals. Stir it in while the solution is still hot.
- Let the solution cool for about 5 to 10 minutes before pouring. Pouring it too hot can crack the plastic jars and cause uneven crystal growth.
- Use the included funnel to pour the solution into each jar, filling them about three-quarters full. Don't overfill.
- Drop in one gemstone or seed piece per jar (or suspend a string or cord into the solution if your version uses string-based growing). The stone or string acts as a seed surface for crystals to start forming.
- Place the lids loosely on the jars or cover with a paper towel secured with a rubber band. You want some airflow so moisture can slowly evaporate, but not so much that dust or debris falls in.
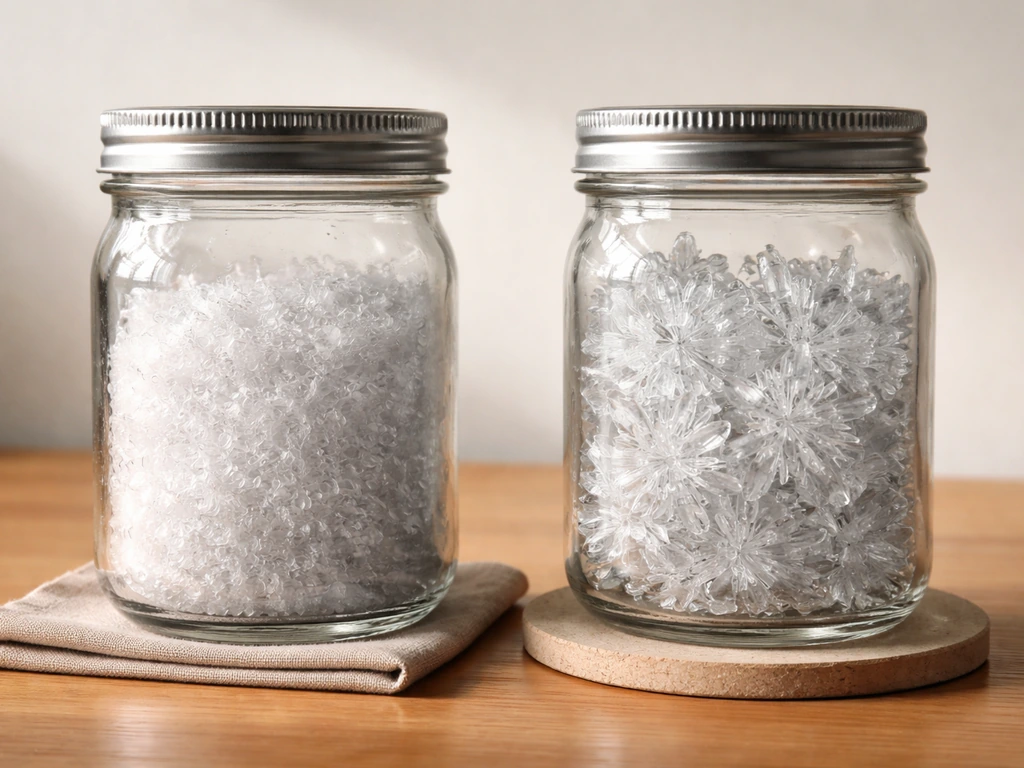
- Leave the jars completely undisturbed in a room-temperature spot for at least overnight (around 12 hours minimum). Many kits produce better results at 24 hours or slightly longer. Resist the urge to check by picking them up.
- After the wait time, gently lift one jar and look without moving it. You should see crystal formations on the seed stone or along the string. If growth looks thin, leave it another 12 hours.
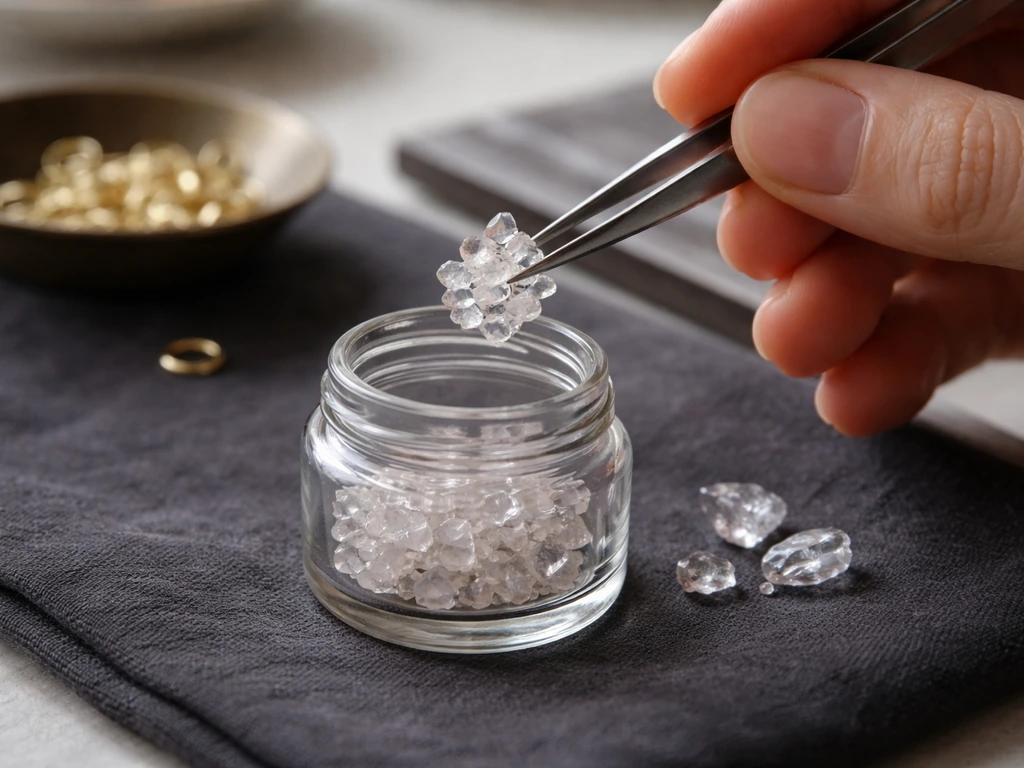
- Once you're happy with the crystal size, carefully remove the stone or string from the jar using tweezers. Shake off excess liquid gently and transfer to a paper towel to dry.
The chemistry behind it (so you know why the steps actually matter)
You don't need a chemistry degree to follow this kit, but understanding what's happening makes troubleshooting a lot easier. The whole process depends on a concept called supersaturation. When you heat water, it can dissolve far more sugar than it could at room temperature. As the solution cools back down, it holds onto more sugar than it normally would, creating an unstable, supersaturated state. Sugar molecules are essentially looking for somewhere to land and settle into a stable structure.
When you drop in a seed stone or string, you give those molecules a surface to attach to. They start depositing themselves molecule by molecule in an organized pattern, which is what a crystal actually is: a repeating, structured arrangement of molecules. As time passes and water evaporates, the remaining solution becomes even more concentrated, which drives more crystal growth. That's why leaving the jars longer usually means bigger, more defined crystals.
Temperature consistency matters a lot here. If the room temperature fluctuates significantly overnight, the rate of crystallization changes, which can produce uneven or hollow-looking formations. A steady room temperature around 68 to 72 degrees Fahrenheit tends to give the most consistent results. Avoid putting jars in the fridge to speed things up unless the instructions specifically tell you to, since rapid cooling usually produces many tiny crystals instead of fewer large ones.
When things go wrong: fixing the most common problems
No crystals formed at all
This is almost always a supersaturation issue. Either not enough sugar was dissolved, the solution wasn't hot enough to start, or the ratio was off. Try again with a fresh batch and add about 10 to 15 percent more sugar than the instructions call for. Also check that the solution was fully clear before pouring, meaning no undissolved grains sitting at the bottom.
Crystals are tiny or look fuzzy instead of defined
Fuzzy or very small crystals usually mean the solution cooled too quickly, or there was too much vibration during the growth period. Move the jars somewhere more stable and let them grow longer. You can also try gently reheating the solution, adding a bit more sugar, and starting over with the same seed stone.
Crystals won't grow on the stone or string
The seed surface needs to be slightly rough for molecules to grip onto. If your stone or string came out of the kit very smooth, try lightly roughing up the surface with a piece of sandpaper before submerging it. You can also dip the seed piece in a small amount of the solution, let it partially dry to leave a thin coating of sugar residue, then place it in the jar. That thin coating gives crystals a head start.
Cloudy or discolored crystals
Cloudiness is usually caused by dissolved impurities in the water, air bubbles trapped during cooling, or stirring too vigorously. Use filtered or bottled water if your tap water is heavily mineralized. Stir slowly and steadily rather than fast, and let the solution sit for a minute after stirring before pouring so bubbles can escape.
The solution evaporated too fast
This happens in warm rooms or if the lid was left completely off. The cover on the jar should allow a small amount of airflow, not full exposure. A loosely placed lid or a paper towel cover lets moisture escape at the right pace. In very dry or warm environments, check the jars at the 12-hour mark: if the liquid level has dropped dramatically, you may need to add a small amount of fresh solution to keep the crystals submerged during growth.
Crystals grew on the jar walls instead of the stone
This is a common frustration and it usually means the jar walls were slightly wet before pouring, giving crystals a competing surface to grow on. Make sure jars are completely dry before you start. If crystals have already formed on the walls, you can carefully scrape them off without disturbing the main growth, as long as you don't jostle the jar.
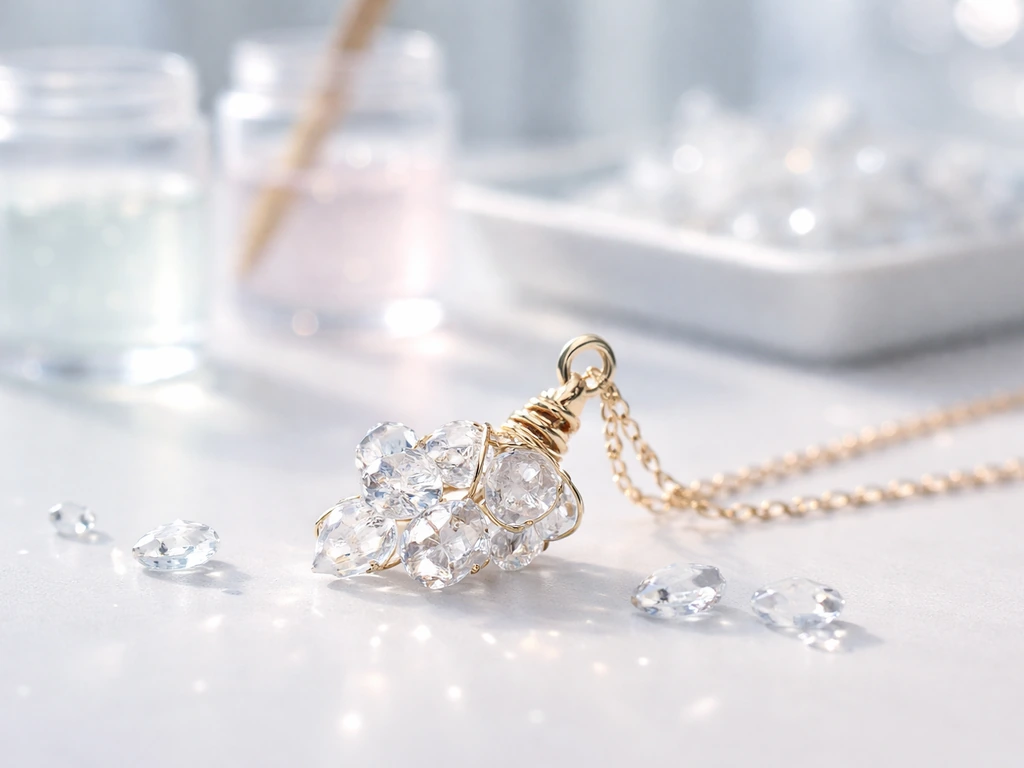
Finishing your crystals and turning them into jewelry
Once your crystals have reached a size you're happy with, the finishing process matters as much as the growing. Rushing this part is how most people end up with broken or cloudy finished pieces.
- Remove the crystal-covered stone or string from the jar using tweezers. Handle it from the base or sides and avoid touching the crystal formations directly.
- Hold it briefly over the jar to let excess liquid drip off, then place it on a paper towel or piece of wax paper on a flat surface.
- Let it air dry completely at room temperature. Don't use a hair dryer or place it near a heat source: rapid drying can cause crystals to crack or turn white and opaque. Depending on the size, drying takes 1 to 3 hours.
- Once dry, inspect the crystals under the magnifying glass included in the kit. If there's a white powdery film (dried solution residue), you can very gently brush it away with a dry, soft paintbrush.
- If your kit includes aluminum powder or glitter, apply a small amount with the included paintbrush over the surface of the crystal formations for a metallic shimmer effect. Let that dry fully before assembly.
- To mount into the jewelry findings: use a small dot of the included craft glue to secure the crystal piece into the bezel ring or necklace bezel setting. Press gently and hold for 30 to 60 seconds.
- Leave the glued piece flat to cure for at least an hour before wearing. Attach the chain, cord, or bracelet findings according to the snap-lock or clasp system included in your kit.
Sugar-based crystals are food-safe but fragile. Avoid submerging your finished jewelry in water, which will dissolve the crystals over time. Also avoid very humid environments for long-term storage.
Safety, storage, and cleanup
This kit uses sugar-based chemistry rather than harsh lab chemicals, which makes it one of the safer crystal kits on the market. That said, a few common-sense precautions make the experience smoother and safer for everyone.
- Always have an adult present when heating the solution. Hot sugar syrup sticks to skin and causes worse burns than plain water.
- Wash hands before and after the project, especially before touching your face.
- Don't eat the crystal solution or the finished crystals, even though they're sugar-based. The kit may include dyes, aluminum powder, or craft glue residue that makes them unsuitable for eating.
- Work in a well-ventilated area when using the aluminum powder or craft glue, and avoid inhaling any powder.
- Keep the growing solution away from eyes. If contact occurs, rinse thoroughly with water.
- Dispose of leftover growing solution by pouring it down the sink with running water. It's dilute sugar solution and fully water-soluble.
- Rinse jars and the funnel immediately after use before the solution dries and hardens inside.
- Store completed crystal jewelry in a dry, cool place, ideally in a small box or zip-lock bag, to prevent humidity from degrading the crystals over time.
If your kit version includes non-food-grade chemicals rather than sugar solution (some Project MC2 kits do use different chemistry), follow the specific safety sheet included in the box and treat disposal more carefully. When in doubt, check the ingredient list on the box before starting.
If your first attempt didn't work out
First attempts with crystal kits fail more often than the box suggests, and that's completely normal. The most common reasons are the supersaturation ratio being slightly off, the room being too warm, or the jars being disturbed during growth. Go back to the troubleshooting section above, identify which symptom matches what you saw, and adjust for round two. Most kits include enough solution for at least two attempts.
If you've used up the included solution, you can make your own by dissolving sugar into hot water at roughly a 2:1 ratio by weight (two parts sugar to one part water) and adding a few drops of food coloring. This works well as a substitute for the standard sugar-crystal version of the kit. For the kits that use a different growing chemical, you'll need to order replacement solution from the manufacturer or look for a crystal growing refill kit.
The Project MC2 kit is a great starting point for crystal jewelry making, but it shares a lot in common with other grow-your-own crystal kits on the market. If you're a klutz, or new to crafting, this Klutz Grow Your Own Crystal Jewelry instructions approach can help you get unstuck and succeed faster Klutz Grow Your Own Crystal Jewelry kit.
If you want to compare approaches or try a different kit style, the Klutz Grow Your Own Crystal Jewelry kit and the Science Squad Grow and Create Crystals kit both follow similar supersaturation principles with slight variations in the growing medium and jewelry assembly. If you want a similar approach with the Science Squad Grow and Create Crystals kit, follow the included steps and mixing guidance for supersaturation, then give the jars time to settle undisturbed.
The core troubleshooting advice in this guide applies across all of them.
FAQ
How long should I leave the jars undisturbed for Project MC2 grow your own crystal jewelry instructions?
Most kits produce usable crystals overnight, but for larger, clearer pieces, plan on checking at around 12 hours and then again at 18 to 24 hours. If you see lots of tiny grains early, do not move the jars, instead leave them longer to see whether the structure consolidates. Moving or shaking the jar restarts nucleation and usually reduces clarity.
What exact room conditions should I aim for overnight to get the biggest crystals?
Aim for steady indoor temperature, roughly 68 to 72°F, and avoid drafts from vents, fans, or open windows. Even if the average temperature looks right, repeated swings overnight can create uneven growth. Also keep humidity moderate, very humid rooms slow drying during finishing.
Can I reuse the leftover supersaturated sugar solution from a previous attempt?
It usually does not work reliably. Once crystals start forming, the concentration and “seed” situation changes, so a reused solution commonly produces fuzzy growth or only small grains. If you want a second attempt, the guide’s more reliable approach is starting fresh with a properly clear solution and the adjusted ratio.
My crystals formed, but they look cloudy and rough. Is that always from impurities or could it be storage moisture?
Cloudiness can start during growth from impurities, bubbles, or stirring, but storage can worsen it. After drying and cleaning, keep finished pieces away from humid air and avoid touching wet surfaces, water and moisture can partially dissolve and re-crystallize the sugar. If they get sticky or tacky, moisture is the likely cause.
Should I keep the jar fully closed, or should it breathe while crystals grow?
It should not be fully sealed airtight, it should allow controlled evaporation. Use the kit’s jar cover as intended, or use the loose lid or paper towel approach if your kit allows it. If you seal too tightly, evaporation slows and growth can stall or become uneven.
Why do I get lots of tiny crystals instead of fewer larger ones?
The most common causes are rapid cooling, significant temperature fluctuation, or disturbance during the growth window. Avoid putting the jar in the fridge unless your kit instructions explicitly say to, and place it on a stable surface where you will not bump it. You can also improve consistency by using the adjusted sugar amount and fully clear solution so supersaturation is correct from the start.
My seed stone or string barely grows crystals. What should I check first?
Check that the seed surface is slightly rough and not too smooth, because molecules need a grip point to start organizing. Also confirm the seed is positioned so it is not pressing against the jar wall, and ensure it is fully submerged during the initial growth stage. A thin sugar residue coating on the seed can also help kick-start attachment.
How do I prevent crystals from sticking to the jar walls?
Start with completely dry jars, even small moisture patches invite growth on the wall. If you already see early wall crystals, do not scrape aggressively because jostling the jar can redirect growth and create a mess. Gentle scraping is only worth trying when the main growth line is not disturbed.
Is it safe to wear the finished Project MC2 sugar crystals, and can they get wet?
They are food-safe but fragile. Avoid submerging them in water, rinsing under a faucet, or wearing them during activities where they will soak or sweat heavily. For long-term wear, keep them away from very humid environments and wipe gently with a dry cloth if needed.
What should I do if my kit uses a pre-mixed growing solution instead of heating sugar water?
Skip the heating and use the mixing ratios and timing on the bottle directions. The key still matters, correct concentration and giving the jar stable conditions overnight. If crystals are still not forming as expected, troubleshoot supersaturation symptoms by comparing ratios and making sure the solution is clear before pouring.
If I made my own replacement solution, how do I make sure the concentration is right?
Use the roughly 2:1 by weight sugar-to-water approach and dissolve fully so the solution is clear before pouring. Add a few drops of food coloring only after the sugar dissolves. If you see undissolved grains, strain or remix, cloudy mixtures often lead to trapped particles that create fuzzy or cloudy crystals.