
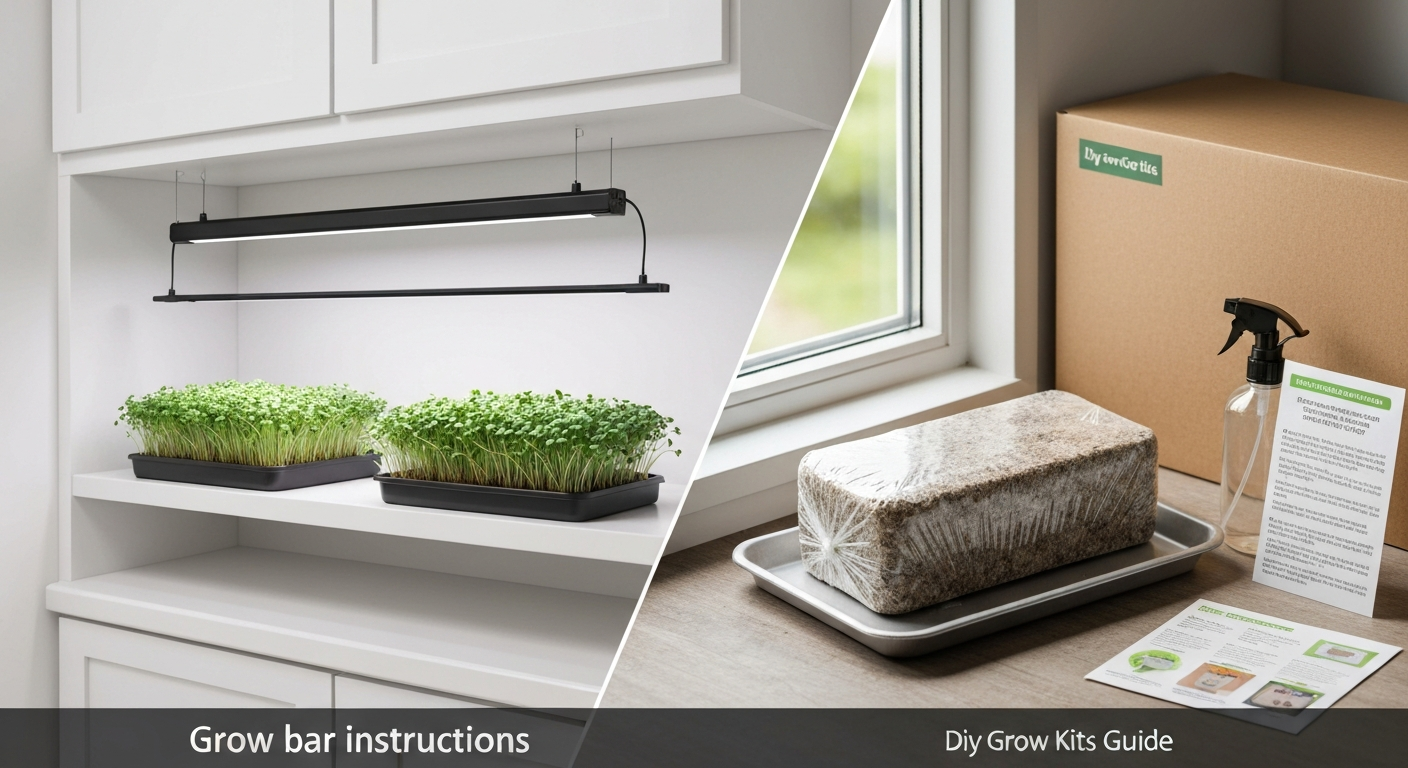
A 'grow bar' can mean two different things depending on what you just bought: it is either a linear LED light fixture designed to sit above a tray of microgreens or seedlings, or it is a slang term some sellers use for a boxed or bar-shaped mushroom grow kit. Both are consumer products, both are beginner-friendly, and both follow a pretty simple setup process once you know which one you are actually dealing with. This guide covers both meanings, then walks through setup for every closely related format you might encounter: grow bottles, jars, bags, buckets, and novelty creature kits.
Grow Bar Instructions: Setup, Care, Troubleshooting & Safety

Marcus Thornfield
5 Aug 2026
What 'grow bar' actually means (and what it might not mean)
In horticulture, a grow bar is a long, narrow LED light fixture built for propagation shelves, microgreen racks, and vertical growing setups. Manufacturers publish technical specs like PPF (photosynthetic photon flux), PPFD (the intensity hitting your plants), recommended mounting heights, and daisy-chain limits. If you bought something that came with a power cord, mounting brackets, and no substrate or seeds, this is what you have.
The second meaning shows up when smaller kit brands and online sellers describe a block- or bar-shaped mushroom growing kit as a 'grow bar.' These kits typically ship as a rectangular block of pre-inoculated substrate (the growing medium), a small spray bottle, and a printed quick-start card. Brands like Back to the Roots and North Spore make versions of this format. If your package contained a squishy block wrapped in plastic with a spray bottle, you have a mushroom grow kit, not a light fixture.
There is a third, smaller category worth mentioning: novelty 'grow creature' kits that use a water-absorbent polymer figure as the growing medium for small plants or moss. These show up under similar search terms. If your kit has a ceramic or foam animal that is supposed to grow grass hair, check the grow creature instructions format for your specific model.
Who this guide is for, a quick safety note, and decisions to make first
This guide is written for beginners and hobbyists setting up any consumer grow kit at home for the first time. You do not need prior gardening or cultivation experience. The walkthroughs below assume you have your kit in front of you and want clear, plain-English steps.
Safety first: if your kit involves a pre-inoculated substrate (mushroom kits especially), wash your hands thoroughly before handling the substrate. For more detail, consult the kit manual or the manufacturer's grow safe instructions for step-by-step handling and contamination prevention. Contamination is the number-one reason kits fail, and most of that contamination comes from handling with unwashed hands or opening the package near dusty or moldy areas. If you have a known mold allergy, wear a light dust mask when working with mushroom substrate. For LED grow bar fixtures, check the power rating on your outlet against the daisy-chain limits in your product PDF before plugging in multiple fixtures.
Before you start, answer these three questions: First, do you have the right spot? Grow bars (lights) need to be within 8 to 12 inches of your canopy. Mushroom kits need indirect light, high humidity, and good airflow, not a sunny windowsill. Second, do you have a spray bottle with clean water? Most mushroom kits come with one, but it is often tiny. A standard 500 ml spray bottle works better. Third, do you know your kit's expected timeline? Most consumer mushroom kits produce first pins in 7 to 14 days. Microgreens under a grow bar light are typically ready to harvest in 7 to 14 days as well. Knowing this upfront stops a lot of early panic.
Your one-page quick-start checklist for days 0 to 14
Use this as a scanning reference while you set up and check in during the first two weeks. Tick each step as you go.
- Day 0: Unbox everything and read the included quick-start card before throwing it away.
- Day 0: Wash hands thoroughly. Prepare your workspace (clean, low-dust surface, away from direct sun).
- Day 0: If you have a mushroom kit, locate the designated cutting or fruiting area marked on the packaging.
- Day 0: If you have an LED grow bar, confirm mounting height (8 to 12 inches above canopy) and check outlet capacity before plugging in.
- Day 0: Complete your first activation step: cut the 'X' or open the flap on a mushroom kit, or mount and power up the grow bar.
- Day 0: Record the date and take a photo. This is your baseline.
- Days 1 to 3: Mist mushroom kit surfaces 2 to 4 times daily. Set grow bar photoperiod timer to 14 to 16 hours on, 8 to 10 hours off.
- Days 1 to 3: Check for any standing water at the base of the kit. Drain it immediately.
- Days 3 to 7: Look for pinning (tiny mushroom buds) or the first seed sprouts. Do not be alarmed by a small amount of white fuzz on mushroom substrate — that is normal mycelium. Green, black, or pink patches are contamination.
- Days 7 to 10: First harvest window opens for many mushroom kits. Harvest before caps flatten fully and release spores.
- Days 10 to 14: After first harvest, clean the fruiting surface gently and begin second-flush misting cycle.
- Day 14: Assess your kit. Most kits give 2 to 3 flushes. Note what worked and what did not for next time.
Tools, supplies, and setting up your workspace
Most consumer grow kits are designed to need very little, but having the right basics on hand makes the difference between a smooth setup and a frustrating one. Here is what I recommend having ready before you open the box.
- A spray bottle (500 ml or larger, clean and filled with room-temperature tap water or filtered water)
- A sharp, clean knife or box cutter for cutting substrate bags or plastic film
- A tray or plate to catch drips under your kit
- A kitchen or probe thermometer to confirm room temperature is in range
- An inexpensive digital hygrometer (humidity meter) if you are in a dry climate — mushroom kits need 80 to 95% relative humidity at the fruiting surface
- A timer for your grow bar light if it does not have a built-in scheduler
- Paper towels and isopropyl alcohol (70%) for wiping down surfaces before you start
- The original instruction card or a downloaded PDF from the manufacturer's website
For workspace setup, choose a spot that gets no direct sun (mushroom kits prefer bright indirect light), has decent airflow but is not in a drafty hallway, and stays between about 18 and 24 degrees Celsius (65 to 75 degrees Fahrenheit) for most common kit species. A kitchen counter or bathroom shelf often works well because humidity tends to be a bit higher there. Avoid garages, basements with poor airflow, or anywhere near HVAC vents that blow dry air directly at the kit.
Universal setup principles that apply across all grow kit formats
No matter which container format your kit uses (bar, bag, bottle, jar, or bucket), three variables control everything: humidity, temperature, and fresh air exchange. Get these right and most kits will perform close to what the packaging promises.
Sterility matters most at the start. Wipe down your work surface with 70% isopropyl alcohol. Wash your hands. Try not to cough or sneeze directly over open substrate. You are not trying to run a laboratory here, but a little care at setup pays off for the entire grow cycle.
Airflow is more important than most beginners expect. Mushroom kits especially need fresh air exchange. Pins (the tiny baby mushrooms) form partly because CO2 drops when fresh air moves through. A stuffy cupboard with the door always shut will give you leggy, poor-quality fruits. Fanning the fruiting surface manually a couple of times a day, or just leaving the kit in a room with normal air circulation, is usually enough.
Orientation matters for some kits. Bar-shaped mushroom kits typically have a designated fruiting face, usually marked on the packaging. Bottles and jars have a lid or filtered top that should face up. Bags have a designated cut point. Always check the instruction card for the correct orientation before you make any cuts.
First-fill water for any kit that requires soaking should be clean, room-temperature water. Some kits instruct you to submerge the whole block in water for a set time (usually 4 to 12 hours) before starting. This is called a cold-water soak and it helps kick off pinning. Follow the timing on your specific card: over-soaking can waterlog the substrate and cause bacterial contamination.
Step-by-step: setting up a standard grow bar or boxed grow kit
Unpacking and activating
Take everything out of the box and lay it flat. You should have: the substrate block (wrapped in plastic), a small spray bottle, and a quick-start card. Read the card fully before doing anything else. Some kits have a tab or tear line on the plastic that tells you exactly where to cut. Using a clean, sharp knife, make your cut or 'X' only at the designated spot. If you cut elsewhere you risk exposing unprotected substrate to contamination before the mycelium has a chance to form a protective skin.
After cutting, slide the block back into the box with the cut face pointing outward through the box's open side or window. The box acts as a humidity tent and a simple fruiting chamber. This is by design. Do not skip this step or your kit will dry out too quickly.
Placement and first-week care
Set the kit on a tray or plate to catch any moisture. Place it in a spot with bright, indirect light, like a few feet from a window or under normal room lighting. Avoid direct sun, which overheats the substrate and dries it out fast. Mist the exposed surface 2 to 4 times daily using the spray bottle. You want the surface to look visibly damp but not have water pooling at the base. If you see puddles, back off on misting.
Within 3 to 7 days you should start seeing pins. They look like tiny white or grey bumps, sometimes described as looking like little pin-heads pushing through the surface. Once pins appear, keep the misting going. They are fragile at this stage and any significant drying out will cause them to abort. First harvest on most box kits happens around day 7 to 12.
For LED grow bar light fixtures: after mounting at 8 to 12 inches above your tray, plug the fixture in and set your timer. Virginia Tech Extension guidance on microgreens recommends a photoperiod of 14 to 16 hours per day for most crops, targeting a PPFD around 130 to 250 micromoles per square meter per second at canopy level. Virginia Tech Extension's 'Introduction to Microgreen Production in Indoor Vertical Farms and Greenhouses (PDF), Virginia Tech Extension' recommends 14–16 hour photoperiods and gives propagation examples using about 250 µmol·m⁻²·s⁻¹ PPFD (≈16.2 mol·m⁻²·d⁻¹ DLI) blank" rel="noopener noreferrer">Virginia Tech Extension's 'Introduction to Microgreen Production in Indoor Vertical Farms and Greenhouses (PDF) — Virginia Tech Extension' recommends 14–16 hour photoperiods and gives propagation examples using about 250 µmol·m⁻²·s⁻¹ PPFD (≈16.2 mol·m⁻²·d⁻¹ DLI).. Check the manufacturer spec sheet for your specific fixture to confirm the recommended mounting height for your target PPFD. Do not exceed the daisy-chain limit listed in the product PDF, as this can overload the circuit or degrade fixture performance.
Step-by-step: grow bottle instructions
Preparing and activating a bottle kit
Bottle-format kits typically come as a clear or semi-opaque container pre-packed with substrate, with a filtered or foam-plugged lid. Some commercial species like enoki (Flammulina velutipes) are traditionally grown in bottles, which is why you see this format from specialty suppliers. The bottle keeps the substrate contained while letting the mushrooms emerge from the top. For detailed grow bottle instructions, see the step-by-step bottle section in this guide.
Start by not opening the lid until your instruction card says to. The filter in the lid (or the foam plug) is there for a reason: it lets gas exchange happen while blocking contaminants. When the card instructs you to open, do so with clean hands. If there is a scratch or score mark on the substrate surface inside the bottle, use a clean utensil to lightly scratch that surface. This encourages pinning by creating micro-damage that signals the mycelium to fruit.
Venting and mounting
Bottle kits need to be stored upright at all times. A common beginner mistake is laying the bottle on its side, which shifts the substrate away from the fruiting opening and can cause moisture to pool on the wrong surface. Keep the bottle standing on a tray. Some bottle kit instructions ask you to remove the lid entirely once fruiting starts and tent the top loosely with a humidity dome or plastic wrap with holes poked in it. This maintains humidity while allowing air exchange.
Mist the inside top of the bottle (the space above the substrate surface, not the substrate itself) or the surrounding air to raise humidity without soaking the substrate. Enoki and similar cool-temperature species perform best at lower temperatures, sometimes 4 to 12 degrees Celsius in commercial settings, but home kits are typically strain-selected to work at normal room temperature. Check your manual: some bottle kits actively require a cooler environment than your standard living room.
Common bottle-specific gotchas
- Condensation on the inside of the bottle is normal and actually a good sign of humidity. Only worry if water is pooling in the bottom of the bottle.
- If the substrate is pulling away from the bottle wall, it has dried out. Do a short soak by submerging the closed bottle in cool water for 1 to 2 hours if your instructions allow it.
- Mushrooms growing along the bottle wall instead of the top indicate the bottle is being stored at an angle. Straighten it immediately.
- Never microwave or heat a bottle kit to speed up the process. Heat kills mycelium.
Step-by-step: grow jar instructions
Lid modifications and filter patches
Jar-based kits come in two flavors: sprouting jars (for seeds like alfalfa, broccoli, or lentils) and mushroom fruiting jars (substrate-filled Mason-style jars). For detailed grow jar instructions, consult the grow jar instructions guide for step‑by‑step lid modification, hydration, and fruiting procedures. The setup differs significantly between these two, so confirm which you have before proceeding.
Mushroom jar kits often arrive with a modified lid: a ring with a piece of polyfill fiber or a self-healing injection port already in place. These are your filter patches. Do not replace them with a standard solid lid. The filter is what allows gas exchange while keeping contaminants out. If your kit comes with a standard lid and asks you to drill or punch a hole, use a clean drill bit and fit the provided filter patch or a small piece of polyfill before reassembling.
Hydration and staging for sprouting jars
For sprouting jars (the non-mushroom variety), the process is simpler. Rinse the seeds under cool running water, drain them through the mesh lid, and let them sit tilted at a 45-degree angle in a bowl or jar rack so excess water drains continuously. The main risk here is anaerobic spoilage: seeds sitting in standing water will rot within 24 hours. For detailed rinsing schedules and airflow tips, see Grow Jar Instructions: Setup, Care, and Troubleshooting, DIYGrowKitsGuide Grow Jar Instructions: Setup, Care, and Troubleshooting — DIYGrowKitsGuide. Rinse 2 to 3 times per day and drain completely each time. Room temperature of 18 to 22 degrees Celsius works well for most sprouting seeds. Most sprouts are ready in 3 to 6 days.
Mushroom jar hydration and care
Once the jar substrate is fully colonized (solid white or off-white throughout, no green or black patches), it is time to move it to the fruiting stage. Remove the jar from any dark colonization spot and place it in indirect light. If your instructions call for a cold-water soak, submerge the sealed jar (with filter lid) in cool water for the specified time, then drain and let it recover for a few hours before expecting pins.
| Jar Kit Type | Lid Setup | Water Method | Daily Care | Harvest Window |
|---|---|---|---|---|
| Sprouting jar (seeds) | Mesh screen lid, no filter patch needed | Rinse and drain 2 to 3 times daily | Tilt jar 45 degrees to drain; keep out of direct sun | 3 to 6 days |
| Mushroom fruiting jar | Filter patch or polyfill modified lid | Mist air space above substrate; optional cold soak before fruiting | Mist twice daily; fan briefly for air exchange | 7 to 14 days after pinning |
Daily care targets for all kit types
Regardless of what container format you are using, these are the environmental targets that most consumer kits are optimized for. Bookmark this section for daily reference.
| Variable | Mushroom Kits | Microgreens / Grow Bar Light Kits | Sprouting Jars |
|---|---|---|---|
| Temperature | 18 to 24°C (65 to 75°F) for most species; some cooler at 15°C | 18 to 24°C (65 to 75°F) | 18 to 22°C (65 to 72°F) |
| Humidity (RH) | 80 to 95% at fruiting surface | 40 to 60% ambient is fine; mist trays as needed | Keep seeds wet during rinse; drain fully between |
| Light | Bright indirect light; no direct sun | 14 to 16 hours/day at 130 to 250 µmol/m²/s PPFD | Indirect light; direct sun can overheat |
| Watering / Misting | 2 to 4 times daily on fruiting surface | Bottom-water trays or mist lightly once daily | Rinse 2 to 3 times daily, drain fully each time |
| Air Exchange | Fan or open room air twice daily | Adequate ventilation prevents damping-off | Drain position ensures passive airflow through seeds |
Troubleshooting common problems
Most problems with consumer grow kits fall into four categories: contamination, poor or no growth, leaks and waterlogging, and blockages in bottle or jar setups. Here is how to read the signs and fix them quickly.
| Problem | Most Likely Cause | Fix |
|---|---|---|
| Green, black, or pink patches on substrate | Mold or bacterial contamination from handling or poor air quality | Isolate the kit immediately to prevent spreading spores. If contamination covers more than 20% of the surface, the kit may be unrecoverable. Bin it and sanitize your workspace. |
| No pins or sprouts after 10 days | Too dry, too warm, or insufficient fresh-air exchange | Increase misting frequency, check room temperature, and actively fan the surface. For mushroom kits, try a cold-water soak if not yet done. |
| Leggy, thin mushroom stems | Too much CO2, not enough fresh air | Increase ventilation. Open windows or fan the kit more frequently. Do not grow in a sealed container. |
| Water pooling at the base of the kit | Over-misting or poor drainage | Tip the kit slightly to drain, then reduce misting. Use a tray with drainage holes or elevate the kit on a rack. |
| Blocked filter patch on jar or bag | Polyfill compressed or wet-clogged | Replace with a small fresh piece of polyfill or a new filter patch. Never seal the opening completely. |
| Sprouts smelling sour or slimy | Anaerobic conditions from standing water | Rinse seeds thoroughly under running water and drain at a steeper angle. Increase rinse frequency to 3 times per day. |
| Grow bar light flickering or not turning on | Loose connection or exceeded daisy-chain limit | Check all connections. Count connected fixtures against the max daisy-chain number in your product PDF. Reduce load if over limit. |
| Microgreens yellowing under grow bar | Insufficient light intensity or too-short photoperiod | Lower the fixture toward the 8-inch end of the mounting range. Extend the photoperiod up to 16 hours per day. |
Safety, cleaning, and getting more than one use out of your kit
Consumer mushroom kits can typically produce 2 to 3 flushes (harvest cycles) before the substrate is exhausted. Between flushes, clean the exposed surface of any old stem stumps using clean hands or a clean cloth. This removes the old fruiting tissue that can harbor bacteria. Then resume misting on the standard schedule.
After the final flush, the spent substrate is not waste. You can crumble it into your compost bin or garden beds. It adds beneficial organic matter and sometimes produces a surprise final flush outdoors in the right season, though this is not guaranteed and depends heavily on your local climate.
For LED grow bar fixtures, wipe the fixture body with a dry cloth monthly. Never spray cleaning solutions directly on the fixture. Check the IP (ingress protection) rating on your product PDF: most consumer-grade grow bars are not waterproof and should not be misted directly. Inspect power cables for any fraying before each growing cycle.
Here is a quick safety and cleaning checklist to run through at the end of each grow cycle.
- Wash all trays, spray bottles, and reusable containers with hot soapy water, then rinse with a diluted bleach solution (1 teaspoon bleach per litre of water) and air dry.
- Wipe down the grow surface and surrounding area with 70% isopropyl alcohol.
- For sprouting jars and mesh lids, run through a dishwasher cycle or boil for 10 minutes between uses.
- Check LED grow bar cables, plugs, and mounting hardware for wear or damage before the next cycle.
- Dispose of contaminated substrate in a sealed bag before composting to avoid spreading mold spores in your workspace.
- Store any unused portion of a kit (for example, a second grow block in a multi-kit bundle) in a cool, dark spot until needed. Most pre-inoculated substrate has a limited shelf life, typically listed on the packaging.
How to find your kit's specific manual or model page
The single biggest mistake I see beginners make is throwing away the quick-start card from the box. That card is usually the most accurate, model-specific guide you will find. If yours is already gone, here is how to track down the right instructions. For model-specific grow kit instructions, search the manufacturer's manual or support page using your kit's model number.
- Look for a brand name, product name, or lot number printed on the packaging or the substrate bag itself. Even a partial name helps.
- Go to the brand's official website and look for a 'Resources,' 'Support,' or 'Instructions' section. Major brands like Back to the Roots and North Spore host downloadable PDF instruction sheets directly on their product pages.
- Search the brand name plus 'grow kit instructions PDF' or 'fruiting instructions' in a search engine. Many vendors like Iberian Mycology and Out-Grow publish downloadable quick-start PDFs that are publicly accessible.
- If your kit is a grow bar LED fixture, find the product PDF using the model number printed on the fixture body or power adapter. Manufacturer spec sheets typically include mounting height, daisy-chain limits, and safe operating temperature.
- For kits sold through large retailers without strong brand documentation, search for the retailer's product page and look in the product description or Q&A section. Customers and sellers often post setup instructions there.
- If you still cannot find documentation, reach out to the seller directly via email or the retailer's messaging system. Most small-batch grow kit brands respond quickly and are genuinely happy to help.
One last note on format variety: if you realize you have a different container type than you expected (a bag kit instead of a bar kit, for example), the steps are more similar than different. For step-by-step grow kit in a bag instructions, see the dedicated bag-kit walkthrough for cutting, hydration, and airflow tips. The same core principles of sterility, humidity, temperature, and airflow run through all of them. The grow kit in a bag format and grow bucket format both follow the same logic with small container-specific tweaks, just as the jar and bottle formats do. Whatever you are working with, the fundamentals in this guide will get you started confidently.
FAQ
What is meant by “grow bar” and how should alternate meanings be disambiguated in the article?
Define primary meaning: a linear LED grow light fixture used for seedlings, microgreens and vertical racks; include manufacturer specs readers need to check (PPF/PPFD, recommended mounting height, daisy‑chain limits, IP rating, max ambient temp). Note alternate consumer meanings and related product families: 'grow kit' (ready‑to‑fruit mushroom kits), bottle/bucket/jar/grow‑in‑a‑bag formats, and novelty 'grow creature' kits. Explicitly state scope: this article covers consumer grow‑kit formats and LED grow bars as lighting hardware for plant/microgreen setups, but does not advise on commercial-scale sterile culture beyond kit use.
What universal quick‑start checklist should be included for all consumer grow‑kits?
Provide a one‑page quick checklist/timeline: 1) Unpack and read manufacturer card/manual. 2) Wash hands and clean workspace. 3) Identify kit type and follow kit‑specific prep (hydrate dried blocks or leave pre‑inoculated blocks intact). 4) Prepare container (drainage, fruiting ports, filter patch alignment). 5) Place in recommended environment (indirect light for mushrooms; light schedule/PPFD for microgreens). 6) Set humidity/temperature targets and schedule misting or watering. 7) Log daily checks (moisture, contamination signs, growth progress). 8) Harvest when ready and follow reuse/cleanup steps. 9) Keep manufacturer contact/manual link handy.
What detailed, container‑specific setup steps are required for boxed/block kits?
Step‑by‑step: 1) Open box and remove inserts/manual. 2) Identify the fruiting window marked on the bag/block. 3) If instructed, hydrate: dunk/soak per card, then drain to field capacity. 4) Cut or scrape the bag at the indicated area (X, slit, or remove flap) as directed. 5) Reposition block/bag in the box or a shallow tray to collect run‑off. 6) Place in indirect light, maintain high humidity (see targets), and mist exposed surface 2–4× daily. 7) Monitor for pins and harvest when caps open. Highlight common variations and emphasize following the vendor PDF if provided.
What are the setup steps for filter‑patch spawn bags and grow‑in‑a‑bag formats?
1) Confirm bag is from a reputable vendor and read supplied PDF. 2) If supplied as a hydrated block, drain excess water to field capacity; if dried, follow rehydration instructions. 3) Make the prescribed opening (small slits, X cut, or open a flap) at the filter‑patch location. 4) Position bag so opening faces upward or per vendor guidance to avoid pooling. 5) Maintain near‑saturation humidity (80–95% for most mushrooms), provide indirect light and increased fresh air exchange once pins form, mist moderately 2–4× daily. 6) Avoid over‑watering — soggy substrate risks bacterial contamination.
What are practical steps for bottle, jar, and bucket kit formats?
Bottle/jar: 1) Follow species‑specific temps (e.g., enoki cooler temps for enoki). 2) For jar sprout/microgreen systems, ensure periodic rinsing/aeration as per kit. 3) For mushroom bottles, cut the cap or open the top per instructions, maintain humidity and provide appropriate light/temperature. Bucket: 1) Use food‑grade bucket, drill fruiting ports as directed and install grommets if recommended. 2) Pack substrate per vendor or kit card, avoid waterlogging, and arrange for drainage if needed. 3) Place bucket in appropriate environment and monitor humidity and fresh air exchange. Emphasize safe materials and avoiding non–food‑grade plastics.
What daily care and environmental target ranges should the article include?
Provide practical targets: Microgreens/seedlings under grow bars: photoperiod 14–18 hours/day; PPFD examples from extension: propagation ~130–250 µmol·m⁻²·s⁻¹, many small‑scale operations use ~250 µmol·m⁻²·s⁻¹ with 14–18 h → DLI ~12–16 mol·m⁻²·d⁻¹. Mushrooms: relative humidity ~80–95% RH, species‑specific temperature ranges (example: oyster ~15–24 °C / 59–75 °F depending on strain), maintain fresh‑air exchange at pinning/fruiting to reduce CO₂ buildup. LED grow bar placement: typical recommended mounting heights ~20–30 cm (8–12 in) above canopy (check manufacturer). Include guidance to verify vendor‑specific numbers in manuals.