The setup routine for your grow jar depends entirely on which type of grow jar kit you have. A sprouting jar (used for edible sprouts like alfalfa or broccoli) needs nothing but water, seeds, and good drainage. A mushroom grow jar needs a specific substrate and humidity control. A terrarium-style or seed-starting jar kit follows its own light and soil rules. Once you know which one you're working with, the instructions are actually pretty simple. If you want a quick start, use these grow kit instructions to match your kit type to the right setup steps. Here's how to figure that out and get growing today.
Grow Jar Instructions: Setup, Care, and Troubleshooting

Marcus Thornfield
27 Jun 2026

Picking the right grow jar kit for what you want to grow
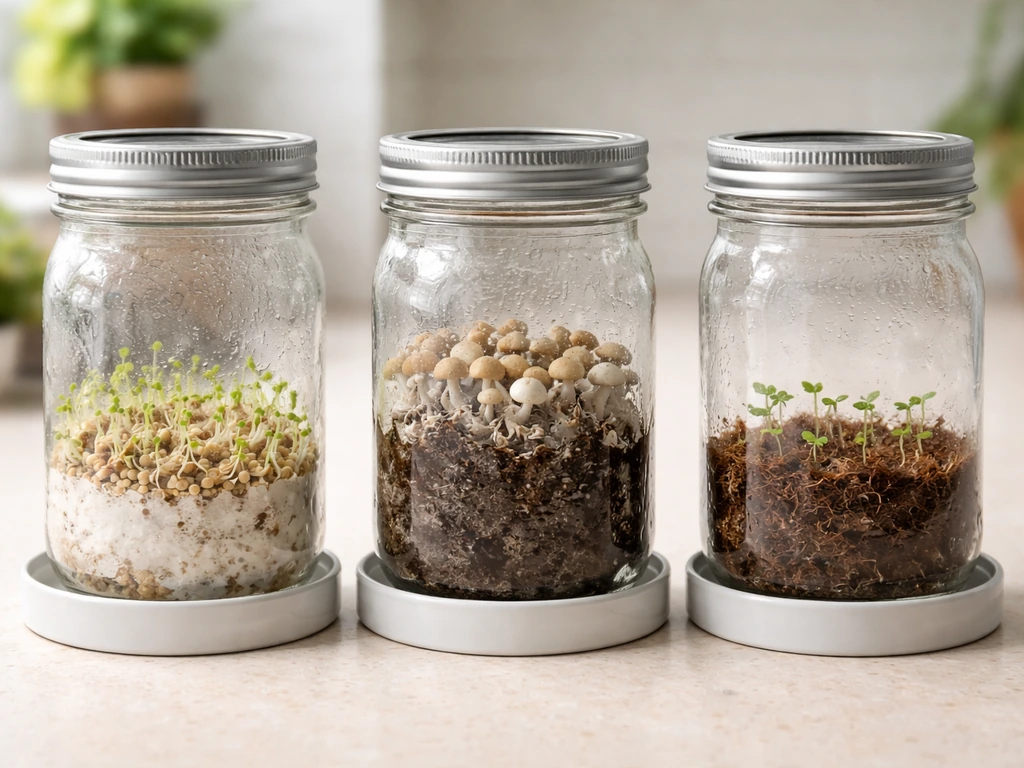
Before anything else, identify what your jar is designed to do. Most consumer grow jar kits fall into one of three categories, and the care routines are completely different for each.
| Grow Jar Type | What It Grows | Key Setup Need | Best For |
|---|---|---|---|
| Sprouting jar | Edible sprouts (alfalfa, broccoli, lentils, radish) | Mesh/screen lid, no soil, water rinse routine | Quick, no-fuss edible crops in 3-7 days |
| Mushroom grow jar | Oyster, shiitake, or other gourmet mushrooms | Pre-inoculated substrate, humidity tent, indirect light | Hobbyists who want a hands-off fruiting setup |
| Terrarium/seed-starting jar | Herbs, microgreens, or decorative plants in a jar format | Soil or coco mat, drainage, light source | Windowsill herb kits or novelty plant kits |
If you bought a kit with a wide-mouth mason jar and a mesh screw-on lid, you have a sprouting jar. If your kit came with a substrate-filled jar and a foil or filter top, it's almost certainly a mushroom kit. If there's soil, a grow medium disk, or a coco mat included, you're likely working with a seed-starting or microgreens-style jar. This article covers all three in the relevant sections below. The sprouting jar gets the most detail here because it's by far the most common consumer kit sold under the "grow jar" label.
Worth noting: if your kit came in a bucket, bag, or bottle format instead of a glass jar, the setup process is a bit different. There are specific walkthroughs for grow buckets, grow bottles, and grow bags that address those container types directly. If you’re switching from jars to a grow bucket, the steps are similar, but pay extra attention to drainage and airflow grow buckets.
What's actually in the box
Open everything up and lay it out before you start. Knowing what each piece does saves a lot of confusion mid-setup.
Sprouting jar kit
- A wide-mouth glass jar (usually quart-sized, around 32 oz)
- A mesh or screen sprouting lid (screws on like a standard mason jar ring)
- One or more seed packets (alfalfa, broccoli, lentils, radish, or a blend)
- An instruction card or guide
- Sometimes: a stand or tray to hold the jar at an angle for draining
Mushroom grow jar kit
- A glass jar already filled with substrate (grain, sawdust, or a grain/sawdust blend)
- A foil, filter, or polyfill top that allows gas exchange while keeping contaminants out
- A humidity tent or bag (plastic bag or dome) to drape over the jar during fruiting
- Sometimes: a misting bottle for humidity management
- An instruction sheet and species label
Seed-starting or terrarium jar kit
- A glass jar (often sealed or with a cork/glass lid)
- Seed packets or a pre-seeded grow medium
- A soil disk, coco mat, or loose growing medium
- Sometimes: a small grow light or instructions to position near a window
- Possibly a tiny spray bottle for misting
If something looks broken or missing, check the brand's website before you start. Most kit manufacturers have replacement part pages, and it's better to find out now than after you've soaked your seeds.
Step-by-step setup for each grow jar type
Setting up a sprouting jar
This is a water-based system with zero soil involved. The entire process runs on a rinse-and-drain cycle. Here's how to start: If you want a detailed walkthrough, use the grow kit in a bag instructions that match your jar type.
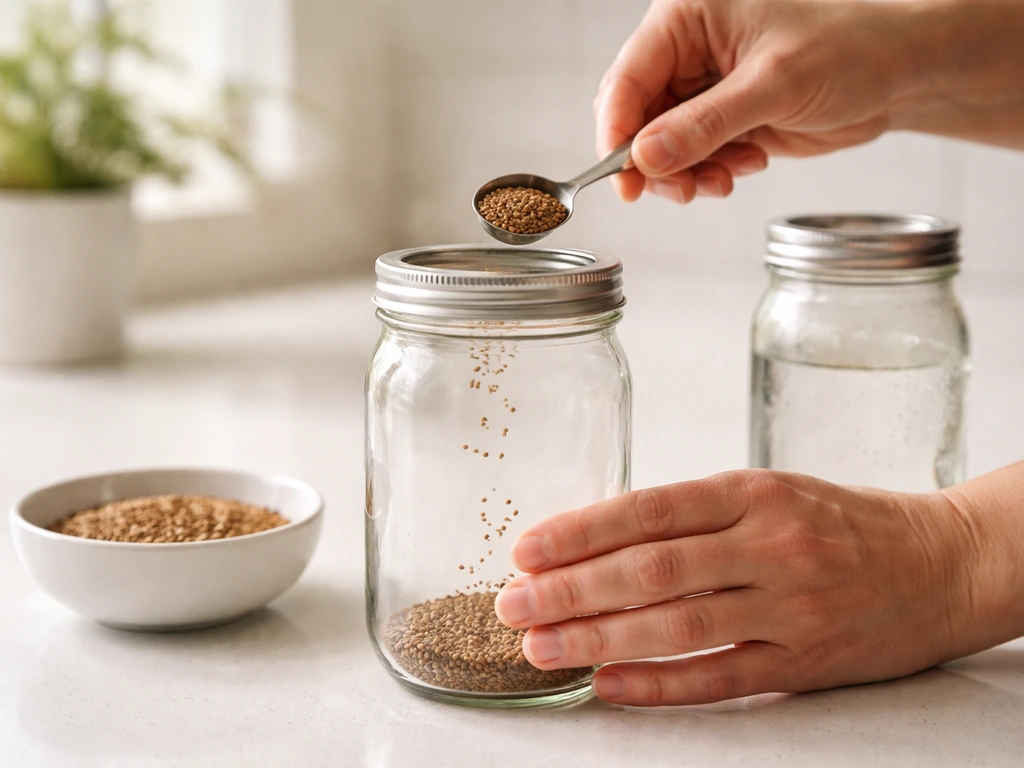
- Measure your seeds. For a quart-sized jar, start with about 1.5 tablespoons of seeds. More than that and the jar gets crowded fast as seeds expand and sprout.
- Add the seeds to the jar and screw the mesh lid on. Fill the jar with warm (not hot) water until the seeds are fully submerged, and let them soak according to the seed packet's time recommendation. Most small seeds like alfalfa need 4-8 hours; larger seeds like lentils often need 8-12 hours.
- After soaking, drain the water out through the mesh lid by turning the jar upside down. Shake gently to get excess water out. The seeds should be damp but not sitting in water.
- Place the jar on its draining stand or prop it upside-down at a 45-degree angle (lid-side down) in a bowl. This lets remaining water drip out and allows airflow. This step is critical. Seeds left in standing water will smell and fail.
- Keep the jar out of direct sunlight for the first couple of days. A countertop or cabinet works fine. Sprouts don't need light to germinate.
- Rinse and drain twice per day, every day. Run cool water through the mesh lid, swirl gently to rinse all seeds, drain completely, and return the jar to its draining position.
- After 3-7 days (depending on seed type), you'll have fully grown sprouts. Move the jar to indirect light for the last 12-24 hours before harvest if you want the sprouts to green up slightly.
Setting up a mushroom grow jar
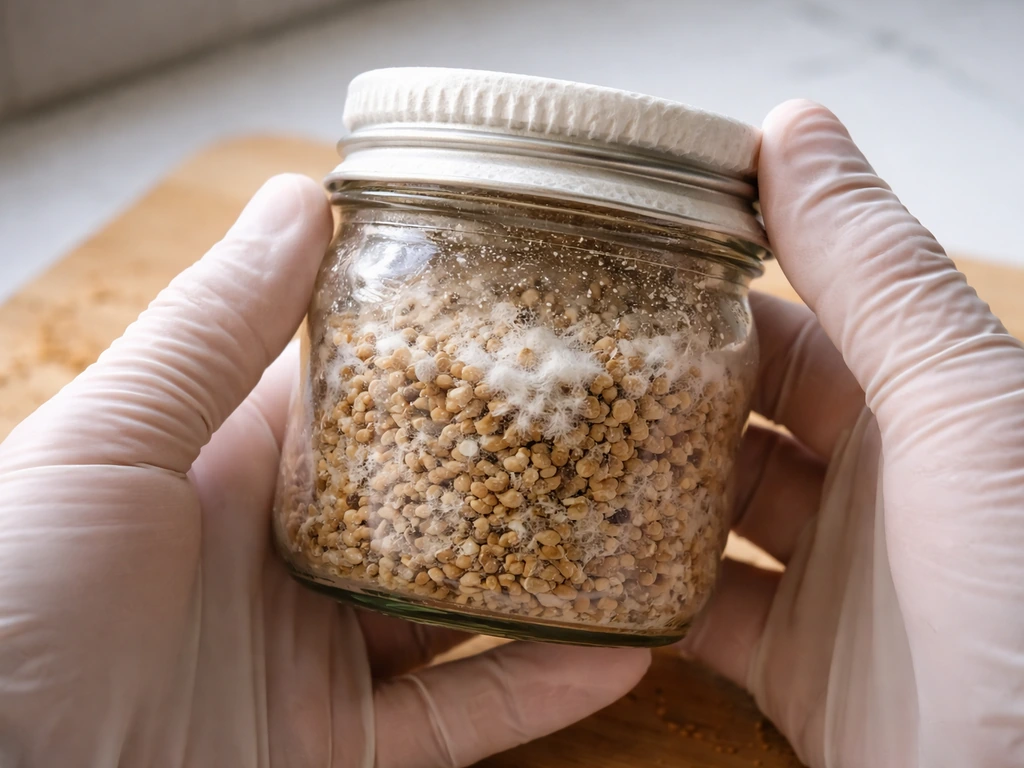
- Keep the jar sealed until you're ready to start. Most mushroom grow jars contain grain or sawdust substrate that's already been inoculated with mushroom mycelium (the white, thread-like growth). Your job is to create the right environment for it to fruit.
- When the substrate inside the jar looks fully colonized (solid white and fuzzy throughout), it's ready for fruiting. If it still has patchy areas, give it more time in a warm, dark spot (around 70-75°F).
- Introduce fresh air and humidity by removing the foil or filter cap and misting the inside lightly with clean water. Replace the cap loosely or use the humidity tent.
- Place the jar near indirect light, not in direct sun. Mushrooms use light as a directional cue, not as a food source.
- Mist the inside walls of the jar (not directly onto the substrate) twice a day to maintain humidity. The goal is to keep things damp without letting water pool at the bottom.
- Fan the jar briefly once or twice a day by removing the lid and waving your hand over the opening. This fresh air exchange (called FAE) prevents CO2 buildup, which stunts growth.
- Pins (tiny mushroom buds) should appear within 5-14 days of starting the fruiting process.
Setting up a seed-starting or terrarium jar
- Hydrate any compressed grow medium (coco disk, peat pellet, or soil block) by adding the amount of water specified in your instructions. Let it expand fully before adding seeds.
- Place the grow medium in the bottom of the jar and create small indentations for seeds if the instructions call for that. Otherwise, surface-sow by pressing seeds gently into the medium.
- Mist the surface until it's evenly moist but not waterlogged. You shouldn't see standing water pooling on top.
- For the first few days, cover the jar or keep the lid on to hold humidity and warmth during germination. This mimics a blackout/dome setup and helps seeds sprout faster.
- Once seeds sprout (usually 2-5 days for herbs, 1-3 days for microgreens), remove the cover and move the jar to your light source. Microgreens and herbs need at least 12 hours of light per day. A south-facing window or a small grow light works well.
- Water by misting the surface rather than pouring, which can dislodge small seedlings.
Crop-specific tips: seeds, sprouts, and mushrooms
Different crops inside a grow jar have different rhythms, and knowing what to expect takes the guesswork out of whether things are going right.
Sprouting seeds
Smaller seeds like alfalfa, clover, and broccoli sprout quickly (3-5 days) and produce thin, delicate shoots. Larger seeds like lentils, chickpeas, and mung beans take a bit longer (5-7 days) but produce thicker, more substantial sprouts. If you're growing a blend, expect uneven timing. That's normal. The blend is designed so most of the seeds finish around the same window.
Microgreens in a jar
Microgreens grow fast. Most varieties go from seed to harvest in 7-14 days. The first 2-3 days in the dark (blackout period) are about germination. Once you see sprouts pushing up, move them into 12+ hours of light per day. They'll grow toward the light, so rotate the jar every day or two for even growth. Mist the soil surface rather than watering heavily to avoid damping off (a fungal condition that collapses seedling stems at soil level). Purdue Extension FoodLink also provides food-safety tips for microgreens, including guidance for handling.
Mushrooms
Mushrooms in a grow jar go through two distinct phases: colonization and fruiting. During colonization, the substrate should look increasingly white and fuzzy. Don't open the jar or disturb it during this phase. Once fully colonized and you've introduced fruiting conditions, you'll see small pins form, then caps develop and open. A single jar can often produce two or three flushes (rounds of fruiting) if you rehydrate the substrate properly between rounds.
Ongoing care: the daily and weekly routine
Here's the practical care schedule broken down by kit type. A simple way to keep track of grow bar instructions is to follow the same schedule every day and adjust only for temperature and moisture. The key with any grow jar is consistency. Missing a rinse or letting humidity drop for a day usually won't kill your crop, but it does slow things down.
| Task | Sprouting Jar | Mushroom Grow Jar | Seed-Starting/Microgreens Jar |
|---|---|---|---|
| Watering/Rinsing | Rinse and drain twice daily | Mist jar walls twice daily | Mist soil surface once or twice daily |
| Light | None during germination; indirect light last day before harvest | Indirect light only, 6-8 hrs | 12+ hours bright light or grow light after sprout emergence |
| Temperature | 60-75°F (room temperature is fine) | 65-75°F for fruiting; 70-75°F for colonization | 65-75°F |
| Humidity | Not critical; good drainage matters more | High: 80-90% ideal; mist frequently | Moderate: cover during germination, open once sprouted |
| Air exchange/Venting | Mesh lid handles this naturally | Fan jar once or twice daily when fruiting | Uncover fully once seedlings emerge |
| Feeding/Nutrients | Not needed; seeds carry their own nutrients | Not needed; substrate has nutrients built in | Optional: very diluted liquid fertilizer after 7-10 days |
Temperature is worth paying attention to even if you think your house is stable. A spot near a heating vent, a cold windowsill in winter, or direct afternoon sun through glass can all push temperatures outside the ideal range and stall or damage your crop. Aim for steady room temperature and your results will be much more predictable.
When things go wrong: common grow jar problems and fixes
No germination or visible growth after several days
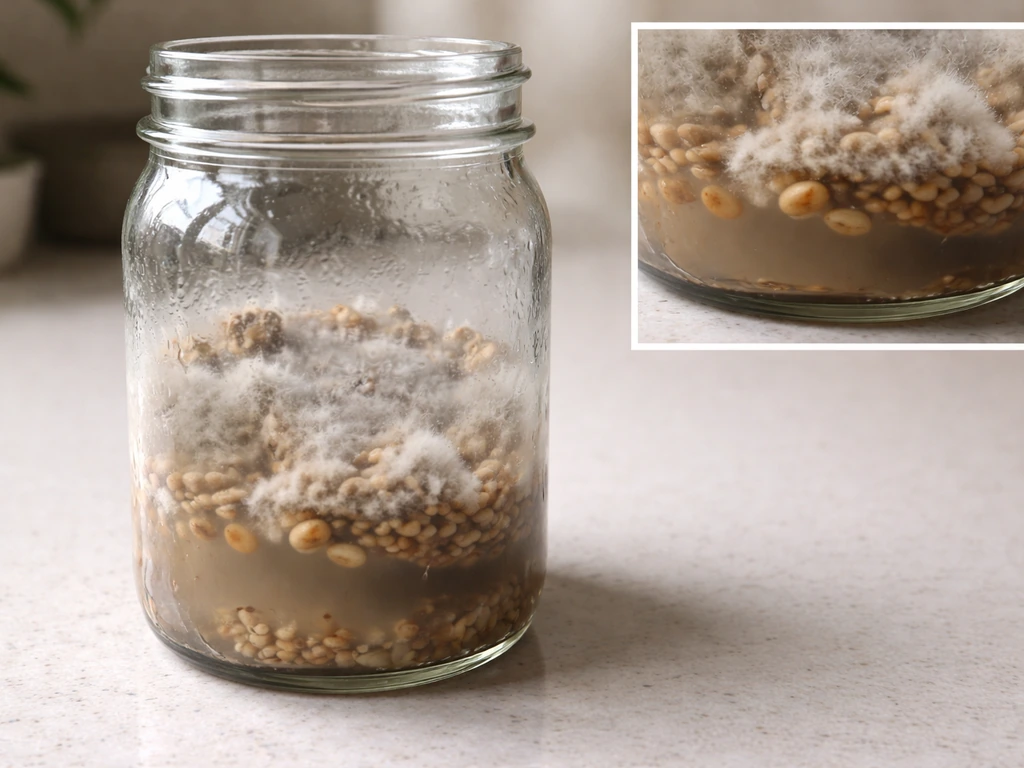
For sprouting jars, if seeds haven't shown any sign of tails after 4-5 days, the most likely culprit is old seed stock (low germination rate) or standing water drowning the seeds. For sprouting jars, if seeds haven't shown any sign of tails after 4-5 days, the most likely culprit is old seed stock (low germination rate) or standing water drowning the seeds grow creature instructions. Check your draining position and make sure water is actually dripping out after each rinse. If seeds are getting sufficient drainage and still not sprouting, try a fresh batch of seeds. For mushroom jars, a lack of visible mycelium growth after 1-2 weeks often means the temperature is too low or the jar was contaminated at inoculation. If there's no white fuzz at all and you see green, black, or pink patches, the jar has been contaminated (see below).
Mold or fuzzy growth on seeds or medium
In a sprouting jar, mold almost always traces back to poor drainage. Seeds sitting in a warm, wet environment with no airflow are a mold magnet. Increase your rinse frequency to three times a day, ensure the jar is draining fully, and make sure there's some air circulation around your setup. Note: white fuzz on sprouting seeds is sometimes root hairs, which look similar to mold but are totally fine. Root hairs are attached to the seed and spread out evenly. Actual mold looks patchy, sits on the surface, and usually has a distinct smell. In a mushroom jar, green, black, or pink patches are contamination (trichoderma or other competing molds) and unfortunately that jar should be sealed and discarded. Don't open it to investigate, as you'll release spores into your space.
Slimy or smelly seeds/medium
A sour or sulfurous smell from a sprouting jar is almost always a sign of bacterial buildup from insufficient drainage. The fix is straightforward: rinse more thoroughly, drain more completely, and if the smell persists, discard that batch, sanitize the jar with a diluted white vinegar rinse, and start fresh. This is also where food safety matters. Bacteria can grow quickly on sprouting seeds even under clean conditions, so if your sprouts smell off or look slimy, don't eat them. The FDA notes that harmful bacteria can be present in or on seeds and can grow to high levels during sprouting, even under clean conditions, so hygiene and food-safety precautions matter Bacteria can grow quickly on sprouting seeds even under clean conditions. Toss the batch.
Fungus gnats
Fungus gnats are small flies that lay eggs in moist soil. If you're seeing tiny flies hovering around your seed-starting jar, the top layer of your grow medium is likely staying too wet. Let the surface dry out slightly between waterings (just the top, not all the way through), and consider covering the soil surface with a thin layer of sand or perlite to discourage egg-laying. Sticky yellow traps placed nearby catch adults and help break the cycle.
Algae growth (green or slimy film on the jar)
Algae grows when moisture and light combine. If you're seeing a green film on the inside of your glass jar, move it away from direct light. For sprouting jars, this is purely cosmetic and not harmful, but it's worth washing the jar between batches. For seed-starting jars, persistent algae can compete with your seedlings and signal that the setup is too wet.
Seedlings collapsing at the base (damping off)
This is a fungal condition that causes seedlings to pinch off and fall over at the soil line. It happens when the grow medium stays too wet for too long. Improve airflow by removing any cover you have on the jar, reduce watering frequency, and make sure there's no standing water in the bottom. Once damping off starts in a container, it tends to spread quickly, so harvest whatever looks healthy and start a fresh batch.
Harvesting, storing, and what to do when the jar is done
Harvesting sprouts
Harvest sprouts when they've reached the length you like, typically when the first tiny leaves (cotyledons) have opened. Give the sprouts a final thorough rinse under cool running water through the mesh lid, then drain well. Transfer to a container with a paper towel at the bottom and refrigerate. Most sprouts stay fresh in the fridge for 3-5 days. Eat them within that window, and do a quick visual check before eating: they should smell fresh and look crisp, not slimy or discolored.
Harvesting microgreens
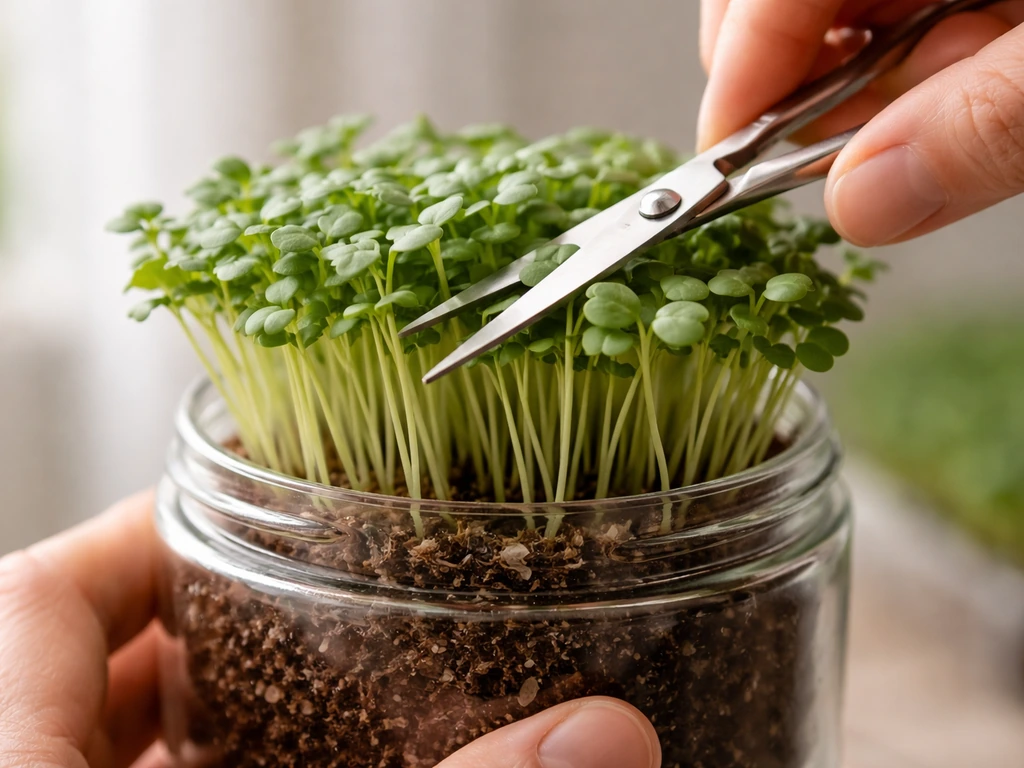
Cut microgreens just above the soil line with clean scissors when the first true leaves appear, usually 7-14 days in. Don't wash them until just before eating; moisture shortens their fridge life. Store unwashed microgreens in a sealed container in the fridge for up to a week.
Harvesting mushrooms
Harvest mushrooms just before the caps fully flatten out and before the edges start to curl upward. Twist and pull from the base rather than cutting, which leaves less substrate material behind for bacteria to colonize. After your first harvest (first flush), scrape off any remaining mushroom stumps, mist the surface of the substrate generously, and resume your care routine. A second flush often comes within 1-2 weeks.
Reusing or disposing of your grow jar
For sprouting jars, the glass jar and mesh lid can be reused indefinitely. Wash with hot soapy water between batches, do a rinse with diluted white vinegar to knock back any lingering bacteria, and let it air dry completely before your next round. For mushroom grow jars, once the substrate stops producing (usually after 2-3 flushes), it's spent. The spent substrate is actually good for compost since it's rich in organic material. The glass jar can be cleaned and reused for a new inoculated substrate if you're getting into the DIY mushroom cultivation hobby. For seed-starting jars, spent grow medium can go into compost or your garden. Rinse the jar well before reusing it for another round.
If your mushroom jar showed signs of contamination (colored mold patches), don't compost it. Seal it in a plastic bag and put it in the regular trash to avoid spreading competitive mold spores to your garden or other grow setups.
What's next after your first grow jar
Once you've run a successful grow jar, you'll have a solid feel for what your specific seeds, mushroom species, or herbs need. Many people find the jar format a satisfying entry point and then want to scale up or try different container types. The workflows for grow buckets, grow bottles, and grow bags follow the same core principles as a jar but with some different drainage and airflow considerations worth looking into when you're ready to expand.
FAQ
How do I know if my grow jar is getting enough airflow without drying it out?
For sprouting and seed-starting jars, aim for a rinse-and-drain setup where water does not pool at the bottom and the medium surface is not constantly wet. If you see long-lasting condensation inside the jar or the soil stays glossy, increase draining time and reduce how long wet media is exposed between rinses. Avoid overt “fan blasting,” which can overdry microgreens before they establish.
Can I reuse seeds from a failed sprouting run?
Usually no. If your batch failed due to low germination, the seed itself is the problem and reusing will just repeat the outcome. If you suspect bacteria or mold rather than viability, do not try to rinse and retry the same seed lot, because contamination can be carried over. Start a new seed batch and use the same drainage checks before you soak.
What’s the safest way to sanitize a sprouting jar before the next batch?
After washing with hot soapy water, do a diluted white vinegar rinse and then let everything air dry completely. The key is fully dry storage before adding seeds again, because leftover moisture can restart bacterial growth. Don’t rely on a quick rinse only, especially if you previously had sour smell or visible sliminess.
Should I keep microgreens in the dark the entire first week?
No. The blackout phase is typically only the first 2 to 3 days for germination. After you see sprouts pushing up, switch to 12+ hours of light daily, otherwise growth stays weak and leggy. If you miss the transition and they stay dark too long, increase light gradually over a day rather than flipping to intense light all at once.
Do algae and root hairs mean something is wrong for sprouting jars?
Algae on the glass is mostly a light exposure issue, not a direct sign of harm for sprouts, but persistent algae can indicate the jar is too wet or too bright for seed-starting setups. Root hairs can look like white fuzz, but they spread evenly and remain attached to the seed. Mold tends to look patchy, sit on the surface, and often smells off.
What should I do if mushroom colonization stalls and the jar stays mostly tan without fuzz?
First, verify temperature consistency, because colonization slows sharply when it drops below the species’ preferred range. Next, check that inoculation was done cleanly, since poor handling can prevent mycelium from establishing. If you see absolutely no white growth and no signs of progress after 1 to 2 weeks, assume a low-temperature or contamination scenario and do not open the jar to inspect.
How can I tell the difference between contamination and just normal mushroom growth?
Normal colonization becomes increasingly white and fuzzy. Contamination usually appears as distinct green, black, or pink patches. If you see colored patches, treat the jar as contaminated and discard it sealed, do not open it for confirmation, because that increases spore spread.
Is it okay to keep eating sprouts if they look mostly fine but smell unusual?
No. If the sprouts smell sour, sulfurous, or otherwise off, bacterial buildup may be present even if appearance seems acceptable. The article’s guidance applies here: stop, discard the batch, and sanitize for the next run. When in doubt, a smell test is more reliable than color alone.
When should I harvest microgreens if they’re uneven across the jar?
Harvest based on the area that reaches the first true leaves, even if other sections lag. If your jar gets uneven growth, rotate daily or every day or two, and harvest in a couple of passes rather than waiting for the slowest section. Keep the uncut portions under light and avoid adding extra water right before harvest.
What storage should I use for sprouts and microgreens to avoid spoilage?
Sprouts should be refrigerated after a final cool rinse and well drained, stored in a container with a paper towel at the bottom to absorb excess moisture. Microgreens should generally be stored unwashed in a sealed container to reduce shelf-life-killing wetness. If you notice condensation inside the container, increase airflow by changing the paper towel (sprouts) or let the greens dry briefly before resealing (microgreens).
Can I switch from jar growing to a bucket or bottle without changing my whole routine?
Yes, the core principles are similar, but you must re-check drainage and airflow because larger containers hold water longer. Do a quick “drain test” before you start a real crop, confirm that no standing water remains at the bottom, and adjust watering frequency based on how quickly the medium dries at the surface.
How do I prevent damping off from starting in the first place?
The best prevention is keeping the grow medium consistently not soggy, using enough airflow around the jar, and minimizing standing water. If you see the surface staying wet for long periods, reduce watering frequency and remove any unnecessary covers. Once seedlings start pinching at the soil line, it typically spreads, so harvest healthy pieces and restart rather than trying to salvage the whole jar.