Fill the included terra cotta pot with your hydrated growing medium, sow the forget-me-not seeds about 1/8 inch deep, lightly cover them, and set the pot somewhere warm and bright with good airflow. That's the core of it. Seeds should sprout in 7 to 14 days if conditions are right. Everything below is the detailed walkthrough so you can nail each step and troubleshoot anything that goes sideways.
Buzzy Forget-Me-Not Grow Kit Instructions: Setup to Care

Marcus Thornfield
6 Jun 2026

What's in the Buzzy Forget-Me-Not kit (and how to confirm your version)
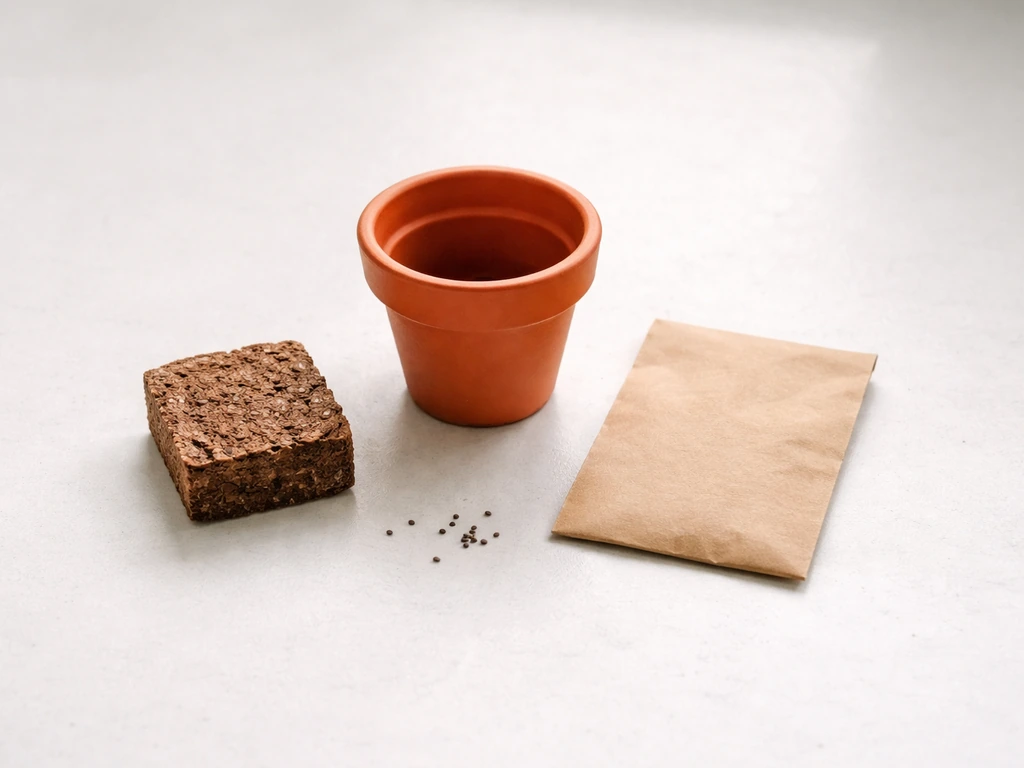
Most Buzzy Forget-Me-Not kits follow the same basic formula: a mini terra cotta pot (usually 5cm), a packet of forget-me-not seeds (typically the Chinese variety), a compressed growing medium, and a printed instruction card. If you bought the Daydream Mini Terracotta Pot version, that growing medium is coconut husk (coir). If you picked up item number 97387 from a retailer like Walmart, you should have exactly those four components. That's the version this guide is written for.
There is at least one other format floating around, sold by brands like Nutscene, that uses seed balls and a coir disc instead of a loose seed packet. If you open your kit and find small round balls rather than a seed packet, you have a different product and the planting depth instructions here won't apply directly. The rest of the care guidance (watering, light, temperature) still holds up, so keep reading.
Quick version check: count your components. Seed packet, compressed growing medium, terra cotta pot, and instructions card means you have the standard Buzzy kit and you're in the right place. If anything is missing, the seed packet is the most commonly overlooked piece because it can slip inside the folded instruction card. Check there first.
Step-by-step setup: prep, activation, and planting
The compressed growing medium needs to be hydrated before you plant anything. For a buzzy tomato grow kit, follow the kit-specific instructions for activation, planting depth, and the recommended watering schedule so your seeds get the right start buzzy tomato grow kit instructions. Don't skip this step or rush it. A dry or partially expanded medium will cause uneven germination and can suffocate seeds before they even get started.
- Place the compressed growing medium in a separate bowl, not directly in the terra cotta pot. Add warm (not boiling) water gradually. The pellet or disc will expand as it absorbs the water, sometimes doubling or tripling in size. Wait until it stops expanding and the whole thing is evenly moist.
- Once fully hydrated, gently fluff the medium with a fork. This is a key Buzzy step that most people skip. Fluffing breaks up any compacted clumps and creates the light, airy texture that forget-me-not roots love. It takes about 30 seconds and it genuinely makes a difference.
- Spoon the hydrated, fluffed medium into your terra cotta pot. Fill it to about 1/2 inch below the rim so you have room to work without seeds spilling over the edge.
- Open the seed packet and distribute the seeds across the surface of the medium. Forget-me-not seeds are tiny, so go slowly. You want reasonable coverage without dumping the whole packet in one spot.
- Press the seeds gently into the surface and cover them with a thin layer of medium, about 1/8 inch deep. That's roughly the thickness of two stacked pennies. Don't bury them deeper than that or germination rates will drop.
- Mist the surface lightly with water. You're not watering heavily here, just making sure the top layer is moist so seeds make contact with damp medium immediately.
- Place the pot in its growing spot (see the care section below) and leave it alone for at least 24 hours before touching it again.
Daily care routine: light, water, temperature, and airflow
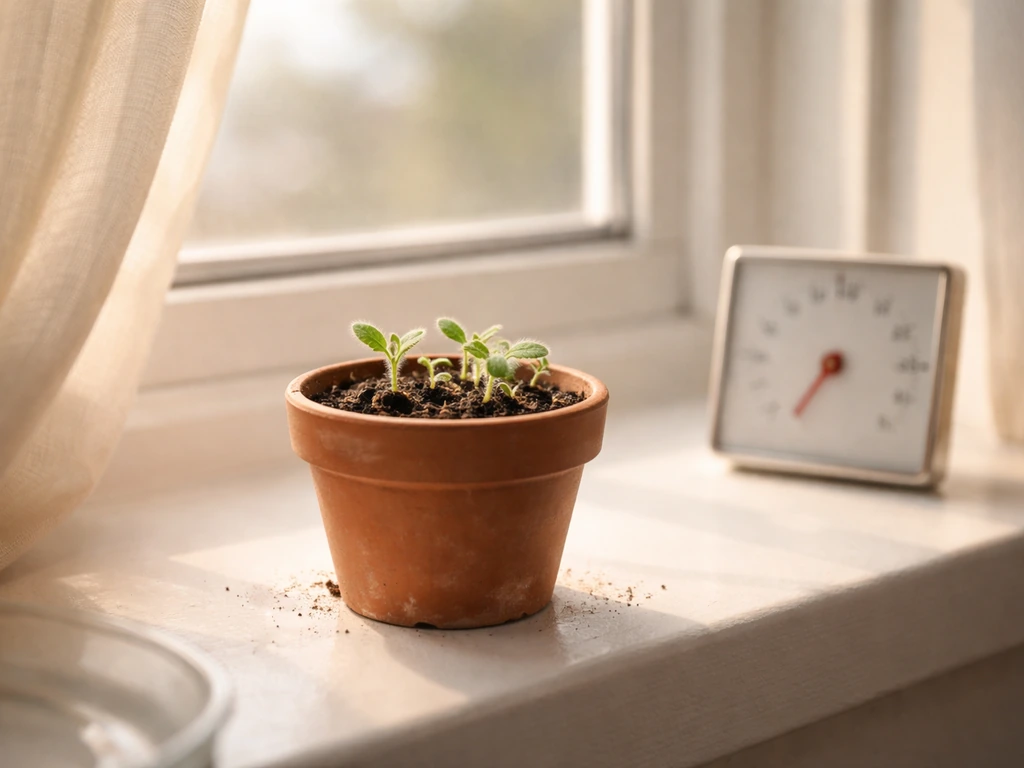
Forget-me-nots need a warm, bright spot to germinate well. Aim for a temperature between 65°F and 75°F. A windowsill that gets several hours of indirect or gentle direct light each day is ideal. Avoid spots directly above a heat vent or drafty window, since forget-me-nots want stable warmth, not swings between hot and cold.
Watering
Check the surface of the growing medium every single day. The goal is consistently moist, like a wrung-out sponge or washcloth, never soggy, never bone dry. When the surface starts to feel dry to the touch, water lightly. Use a gentle spray bottle or a small watering can with a fine rose head so you don't disturb seeds or tiny roots. Watering in the morning is better than at night because it gives the medium a chance to shed excess moisture during the day, which helps prevent mold.
Airflow
This is the one thing most people don't think about until there's already a mold problem. Good airflow is critical with small kits like this because the moisture stays concentrated in a tiny volume of medium. A slightly open window nearby or a small fan set to low pointed in the general direction (not blasting directly at the seedlings) is enough. If you're growing in a closed room with no ventilation, expect mold issues within the first two weeks.
Fertilizing
Don't fertilize during germination. Once your seedlings have developed their second set of leaves (the first "true" leaves, not the initial tiny seed leaves), you can start feeding with a balanced liquid fertilizer diluted to half the recommended strength. The growing medium provides enough nutrition for the early stages, and overfeeding young seedlings causes more harm than good.
Sprout-to-seedling timeline: what to expect and when
Here's a realistic breakdown of what you should see and when. Variations happen based on temperature and light, but this is the typical range for Buzzy's Chinese forget-me-not seeds.
| Timeframe | What's happening | What you should do |
|---|---|---|
| Days 1–3 | Nothing visible yet; seeds are absorbing moisture | Keep medium moist, don't disturb surface |
| Days 4–7 | Tiny sprouts may begin breaking the surface | Continue daily moisture checks, no fertilizer |
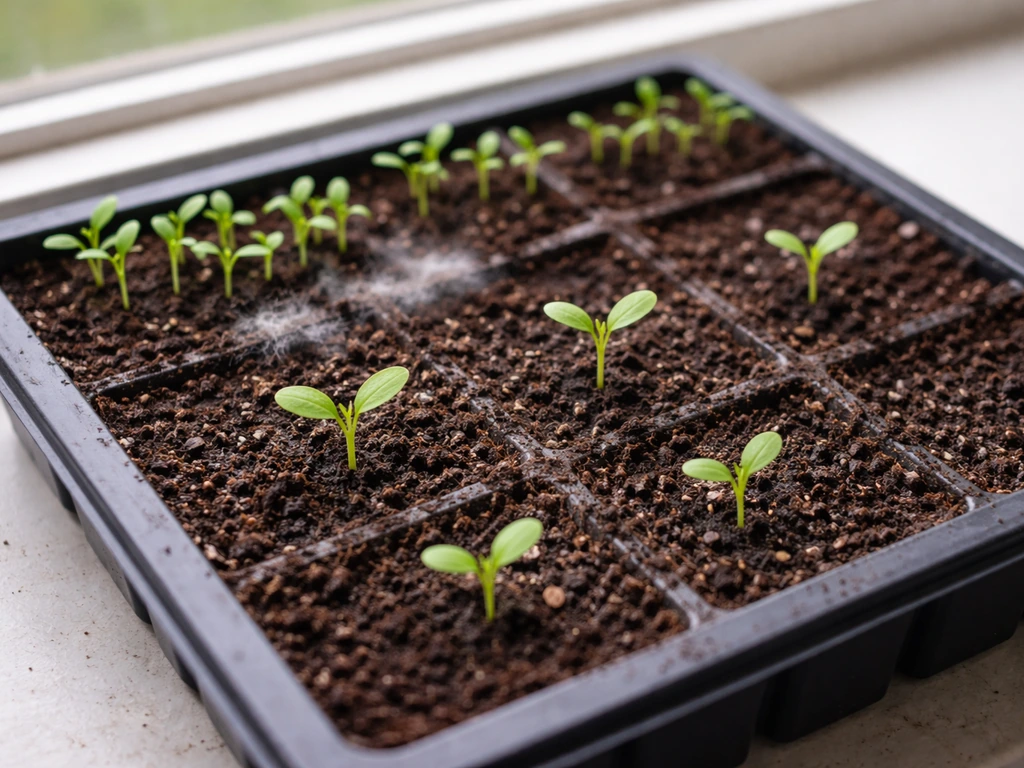
| Days 7–14 | Most seeds should have sprouted by now | Ensure good light; thin if crowding is obvious |
| Weeks 2–3 | First true leaves (second set) appearing | Begin half-strength fertilizer at next watering |
| Weeks 3–5 | Seedlings are established and growing steadily | Consider thinning or transplanting soon |
If you hit day 14 and see nothing at all, don't panic immediately. Jump to the troubleshooting section below. If you see healthy sprouts within the first week, that's a great sign and worth celebrating. Small wins matter when you're starting out.
Troubleshooting common problems
No germination after 14 days
First, check temperature. If the pot has been sitting somewhere below 65°F, seeds may just be stalled rather than dead. Move the pot somewhere warmer and give it another 5 to 7 days. Next, check moisture: if the surface dried out for even a day or two during the critical germination window, seeds may have desiccated. Re-moisten gently and wait. Finally, check planting depth. Seeds buried deeper than 1/8 inch often struggle to push through. If you're past the 21-day mark with nothing showing, it's likely time to start fresh with a new seed packet.
Mold on the surface
White fuzzy mold on the top of the growing medium almost always means too much moisture combined with poor airflow. Scrape off the visible mold, let the surface dry slightly more than usual before the next watering, and improve ventilation immediately. A small fan on low can make a huge difference overnight. Switch to morning-only watering so the medium has all day to breathe. If mold comes back aggressively within a few days, the medium may be too saturated and you may need to repot into fresh hydrated coir.
Damping off: seedlings suddenly collapsing
Damping off is a fungal condition that kills young seedlings at the stem base. It looks like a soft, water-soaked spot right where the stem meets the medium, followed by the seedling going limp and toppling over. It's caused by overly wet, cool, low-airflow conditions. The hard truth here: once damping off hits a seedling, it can't be saved. You need to remove the affected seedlings, dispose of the growing medium entirely, soak the terra cotta pot in a 10% bleach solution (about 1 part bleach to 9 parts water) for 30 minutes, rinse it thoroughly, and start over. This sounds dramatic but the bleach soak actually works and prevents the fungus from infecting your next batch.
Leggy or weak seedlings
Leggy means the seedlings are growing tall and spindly instead of compact and sturdy. This is almost always a light problem. The seedlings are reaching for more light than they're getting. Move the pot to a brighter location, ideally one with a few hours of direct morning sun or strong indirect light throughout the day. If you're growing indoors without a good window, a basic grow light placed 4 to 6 inches above the seedlings for 12 to 14 hours a day will fix this quickly. Leggy seedlings can recover if you catch it early.
What to do once it's growing: thinning and transplanting
Thinning
Once your seedlings have their first set of true leaves (that's the second set of leaves to appear, after the initial tiny seed leaves), it's time to thin them if they're crowded. In a small 5cm terra cotta pot, you really only want one strong seedling, or two at most. To thin, don't pull the extras out because that disturbs nearby roots. Instead, snip or pinch the weaker seedlings off at soil level. It feels wasteful but it gives the remaining plant room to develop properly. A crowded pot produces multiple weak plants instead of one healthy one.
Transplanting
The mini terra cotta pot is a starter home, not a permanent one. When your seedling looks healthy and its roots are starting to fill the pot (you might see roots peeking from the drainage hole, or the plant starts drying out faster than usual), it's ready to move up.
Loosen the medium gently around the roots with a fork or small tool, lift the seedling while supporting both the roots and stem, and transfer it into a larger pot or prepared garden bed. Water thoroughly after transplanting. If you're moving it outdoors, harden it off first: put it outside for a few hours each day over 7 to 10 days, gradually increasing the time before leaving it out permanently. This prevents transplant shock from the sudden change in conditions.
Forget-me-nots work beautifully in borders, cottage-style garden beds, and containers. Once established outdoors, they're quite low-maintenance and will often self-seed for you, coming back year after year with almost no effort on your part.
Quick notes on safety, mess control, and starting over
Forget-me-nots are generally considered non-toxic to humans, but if you have pets, it's worth keeping the pot out of reach during the seedling stage since curious cats and dogs can disturb the medium and accidentally ingest soil or seeds. The kit is very mess-friendly if you hydrate the growing medium in a bowl before transferring it to the pot, which is what the instructions recommend anyway. Doing it in the pot directly tends to leave waterlogged overflow on your counter.
If things go wrong and you want to start over, the kit is easy to reset. If you want to follow the buzzy succulent grow kit instructions, the same step-by-step approach to setup and watering helps you avoid common mistakes.
Clean the terra cotta pot with the bleach solution described in the damping-off section above, pick up a new seed packet (Buzzy sells replacement seeds separately), grab a fresh coir disc or pellet, and start the activation process from step one. A failed first attempt is genuinely useful information about your specific growing spot: you'll know if it needs more light, better airflow, or more careful watering the second time around.
If you decide to try again, the same buzzy cactus grow kit instructions style troubleshooting checklist (light, airflow, and moisture checks) can help you avoid repeat setbacks starting over.
If you enjoy the Buzzy kit format, the same brand makes grow kits for lavender, cactus, bonsai, tomatoes, and succulents, each with their own quirks and care requirements. Forget-me-nots are among the more beginner-friendly options in the lineup, so if this one goes well, branching out to something like lavender or bonsai is a natural next step. If you're looking for a different project, buzzy bonsai grow kit instructions can help you set up and care for a bonsai kit with similar starter-step clarity.
FAQ
Can I reuse the same hydrated growing medium and seed-starting pot if germination fails?
If you only had a few seeds fail, you can lightly re-spritz and wait a bit longer, but if nothing appears by about day 21 or you had mold on the surface, reuse usually creates repeat problems. For best results, use fresh hydrated coir (or fresh seed-starting medium) and disinfect the terra cotta pot before restarting.
What should I do if the medium looks moist but the seeds still won’t sprout?
Check temperature and depth together. Even if the surface feels damp, seeds can stall if the setup is cooler than about 65°F or if they were buried deeper than roughly 1/8 inch. Also confirm the medium was fully rehydrated when you planted, because partially expanded coir can dry unevenly inside.
Is it okay to cover the pot with plastic to keep humidity up?
Avoid sealing it tightly. Forget-me-nots need consistently moist medium, but they also need airflow to prevent mold and damping off. If you must use a humidity cover, keep it loose (vented) and remove or loosen it daily so moisture can dissipate.
How do I prevent overwatering when the pot is small?
Use the “washcloth” rule, water lightly, then stop. In a 5 cm pot, it’s easy to oversaturate, which increases mold risk. Water in the morning, and only when the surface surface dries to the touch, not when it looks slightly darker.
Should I soak the seeds before planting?
Usually no. The kit’s instructions assume sowing directly at about 1/8 inch deep into a properly hydrated medium. Soaking can make tiny seeds clump, and it can increase the chance of seed damage or uneven germination if drainage and airflow are not perfect.
When can I switch from seedling-only care to routine care like fertilizing and transplanting?
Fertilizer starts after the true leaves appear, not during germination. Transplant when roots begin to fill the pot or when watering frequency suddenly increases. If you see mold or damp-off symptoms, delay transplanting and fix the environment first, because moving infected seedlings spreads problems.
My seedlings are emerging but some are weak and collapsing, is that always damping off?
Collapsing at the stem base with a water-soaked look is classic damping off, and those seedlings cannot be saved. If seedlings are just smaller or pale but still upright, it can be light or inconsistent moisture. A practical check is to separate the issue: adjust airflow and watering first, then remove any visibly affected plants if damping off seems likely.
How do I know if my kit is the seed-ball version and not the loose seed packet version?
Open the kit and look for format. Loose seeds usually come in a small paper packet, while the other format includes seed balls (small round pieces) plus a coir disc. If you have seed balls, treat them according to the seed-ball instructions you received, because planting depth and coverage can differ.
Can I grow forget-me-nots outdoors immediately after germination?
Not right away in most climates. If you want to move them outdoors, harden them off gradually over about 7 to 10 days, starting with a few hours outside each day. Sudden full sun or cold nights after indoor germination can cause shock and slow recovery.
What’s the safest way to keep pets from disturbing the pot during germination?
Keep the pot at an elevated, closed location (a shelf with a baby gate or a closed cabinet works). The seedlings are small and the medium is tempting, so even brief pawing can knock seeds loose or create muddy mess. If you have to leave it out, use a simple barrier like a clear lidded container with vent holes.