Sow your tomato seeds about ¼ inch deep into moistened growing medium, keep the kit somewhere warm and bright, and expect to see sprouts within 7 to 14 days. That's the core of it. But the steps between opening the box and actually harvesting tomatoes are where most people get tripped up, so let's walk through the whole thing from parts check to final harvest.
Buzzy Tomato Grow Kit Instructions: Step-by-Step Guide

Marcus Thornfield
5 Jun 2026
First: figure out which Buzzy Tomato kit you actually have
Buzzy makes more than one tomato grow kit, and the instructions do differ depending on the version you picked up. Getting this sorted before you start saves a lot of confusion later.
| Kit Version | Model / Item | Key Included Components | Format |
|---|---|---|---|
| Buzzy Tomato Grow Kit (Menards) | Model 95530 | 4" plastic pot, tomato seed packet, growing medium (coir), instructions | Basic windowsill starter kit |
| Buzzy Tomato Grow Kit (Walmart) | Item 97719 | 4" plastic pot, dehydrated coconut husk growing medium, seed packet, instructions | Basic windowsill starter kit |
| Buzzy Kids My First Garden (Tomato & Marigold) | Windowsill kit | Planter, tomato + marigold seeds, growing medium, instructions | Kids-focused dual-seed windowsill kit |
| Buzzy Tomato Grower | Grower pot format | Self-watering reservoir pot, growing medium, seeds, instructions | Outdoor/patio self-watering grower |
The most common versions sold at big-box retailers are the Model 95530 and Item 97719, which are nearly identical basic starter kits. The Kids Tomato & Marigold kit adds marigold seeds and uses the same coir-based medium. The Tomato Grower is a different beast entirely, with a built-in water reservoir designed for patio use. Check your box, look for a model number on the back or bottom, and match it to the table above before moving on.
Parts check before you start
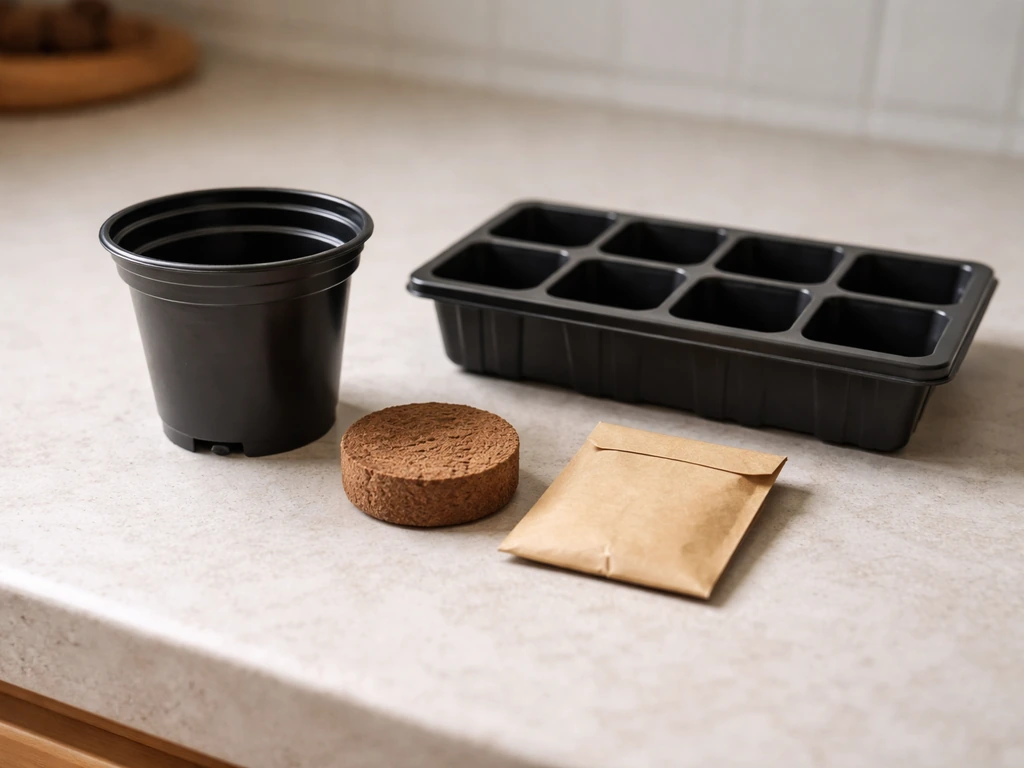
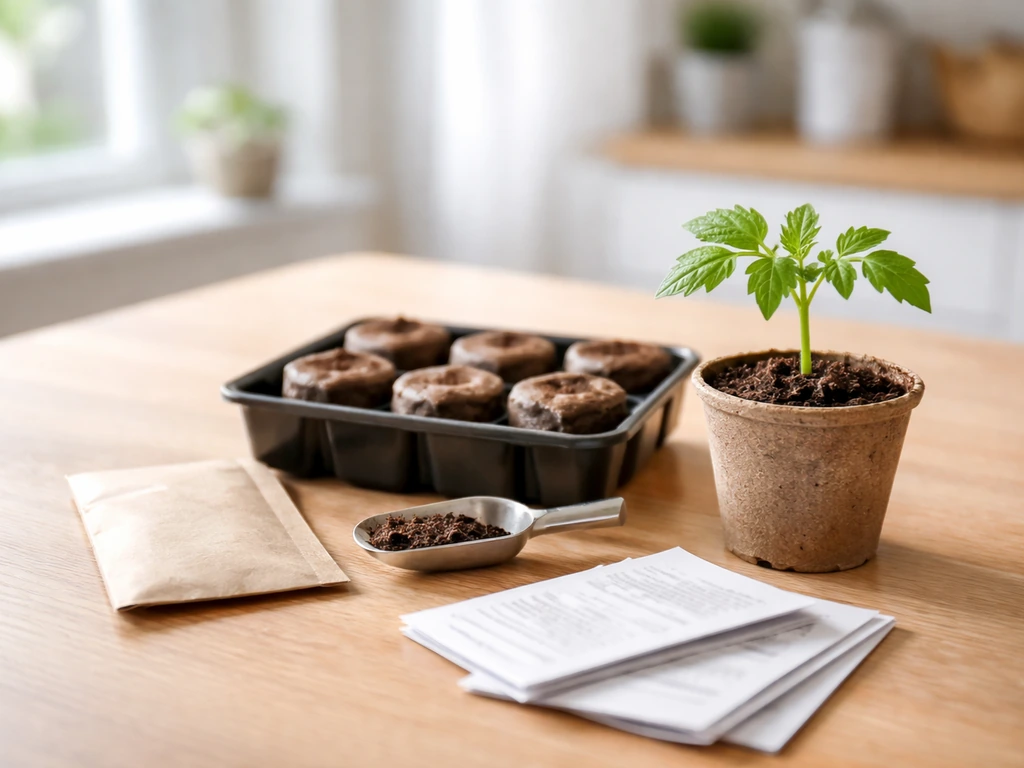
Lay everything out on a table. For the standard Buzzy Tomato kit (95530 or 97719), you should have four things: a small 4-inch plastic pot, a compressed growing medium disc or block (dehydrated coconut husk/coir), a tomato seed packet, and a printed instruction sheet. That's it. There is no humidity dome, no self-watering reservoir, and no fertilizer included in these basic kits. If something is missing, most retailers will exchange the kit, or you can substitute: a clear plastic bag loosely draped over the pot works as a humidity tent, and any all-purpose starter fertilizer works later in the grow.
Setting up the kit: materials, assembly, and location
The setup is genuinely simple, but the coir expansion step catches a lot of people off guard. If you’re looking for buzz y succulent grow kit instructions, the same basic approach to expanding the medium, keeping conditions steady, and avoiding overwatering will help setup. Here's how to do it right the first time.
- Gather your supplies: the kit components, 2¼ cups of room-temperature water, a fork, and optionally a shallow tray to catch drainage.
- Place the compressed coir disc into the pot (or a bowl if it's too large for the pot at first). Pour all 2¼ cups of water over it slowly and let it absorb for a few minutes.
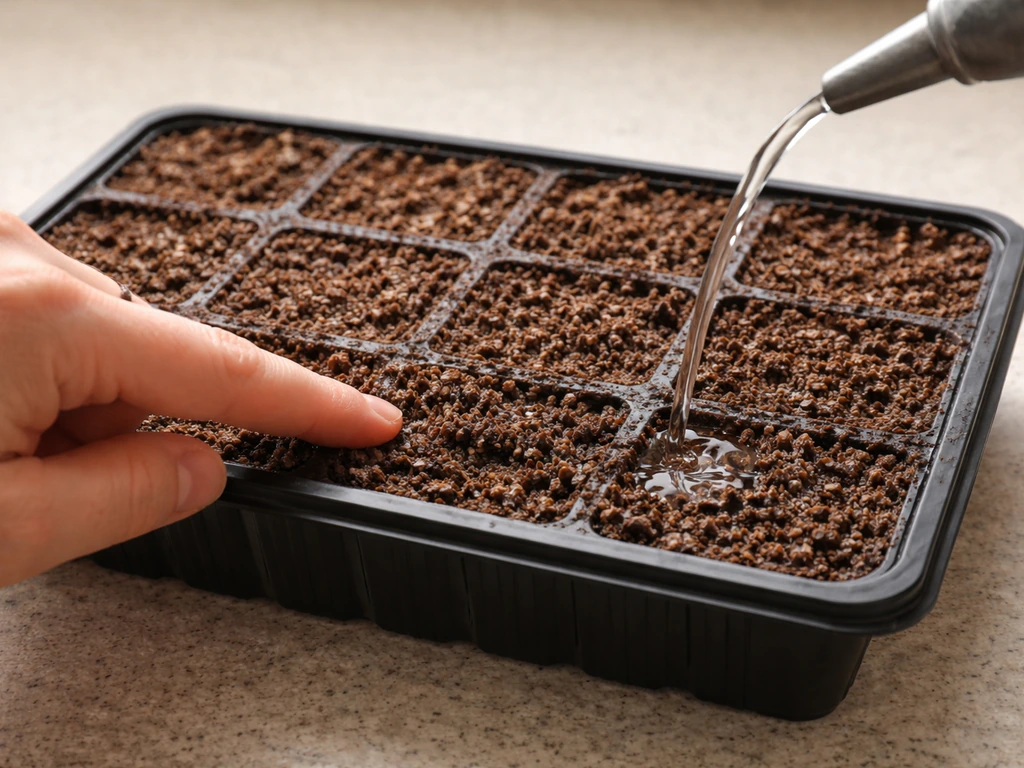
- Once the coir has expanded, fluff it thoroughly with a fork to break up any clumps. It should feel light and fluffy, not dense or compacted. The texture should look like loose potting soil.
- Transfer the fluffed medium into your 4-inch pot if it isn't already there. Fill to about ½ inch below the pot rim to leave room for watering.
- Place the filled pot somewhere warm (ideally 65 to 75°F) and bright, with good air circulation. A south or west-facing windowsill is ideal. Avoid spots right next to a cold drafty window or directly on a heating vent.
- If you have the Kids Tomato & Marigold kit, set up a second small container or section for the marigold seeds, or sow both in the same planter in separate areas, as the instructions suggest.
One thing worth saying plainly: the 4-inch pot that comes with these starter kits is only a starting home. Tomato plants grow fast and will outgrow it within a few weeks. Think of this pot as your germination station, not your final container. More on transplanting below.
Planting your seeds and what to expect during germination
Tomato seeds are forgiving but they do have preferences. Get these basics right and you'll almost certainly see sprouts within two weeks.
How to sow
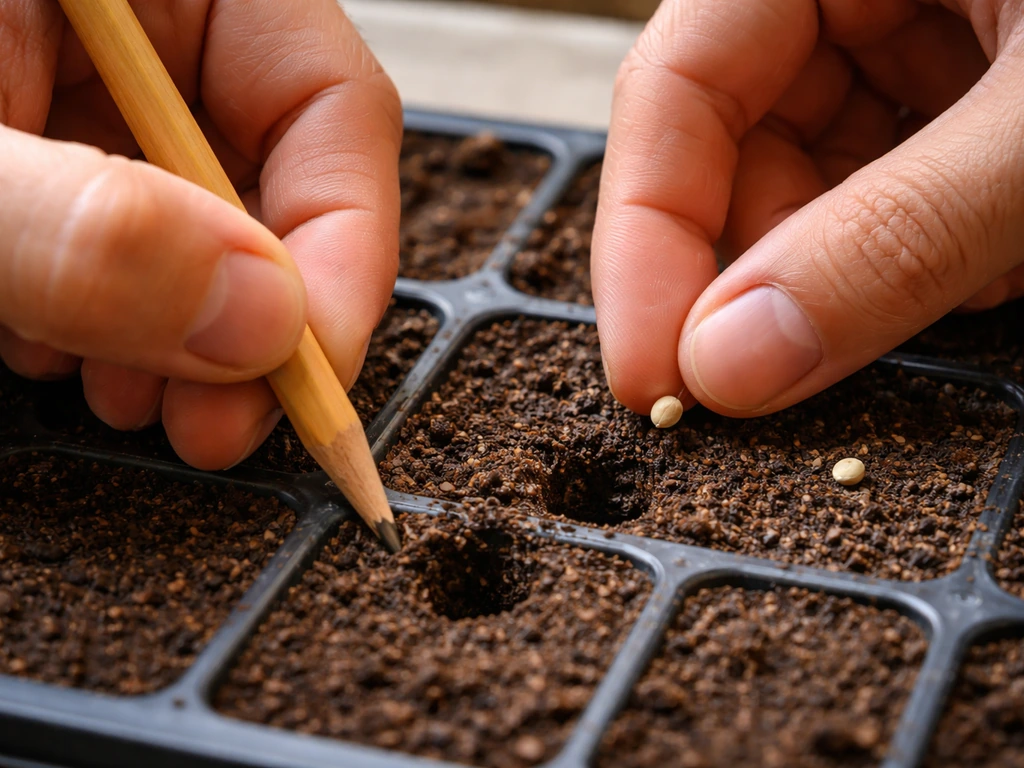
- Use a pencil, chopstick, or your finger to make a small indentation about ¼ inch deep in the moistened coir. Do this in two or three spots if you want to hedge your bets.
- Drop one or two seeds into each indentation.
- Lightly pinch or sprinkle coir over the seeds to cover them. Don't pack it down hard. A gentle pat is all you need.
- Mist the surface with a spray bottle or use a very gentle pour of water to settle the covering without displacing the seeds.
- If you want to speed germination, drape a loose clear plastic bag over the pot to create a mini greenhouse. This traps warmth and moisture. Remove it once you see the first sprout poking through.
What normal germination looks like
Expect germination in 7 to 14 days. The first thing you'll see is a tiny curved stem pushing up through the medium, followed by two small seed leaves (called cotyledons) that look nothing like mature tomato leaves. That's totally normal. The real tomato-shaped leaves come next, and those are called true leaves. You want to wait until you see that second set of true leaves before you do anything significant, like fertilizing or thinning.
Temperature matters a lot here. Below 60°F and germination slows dramatically or stalls. Above 85°F and you can stress the seeds. The sweet spot is 65 to 75°F. If your kitchen windowsill gets cold at night, move the pot to a warmer spot after sunset, like the top of the fridge or near (but not on) a heat register.
Watering and feeding without overdoing it
Overwatering is the number one killer of seedlings in small starter kits. The coir medium holds moisture well, which is great, but it also means you don't need to water as often as you might think.
Watering basics
Check the medium daily by pressing your finger about half an inch into the surface. If it feels damp, wait. If it feels dry, add water slowly until you see just a little come out the bottom drainage hole. Empty any standing water from the tray within 30 minutes so the roots don't sit wet. In most homes, watering every 2 to 3 days is about right during germination. In warmer or sunnier spots, you may need to water daily. In cooler or shadier spots, every 3 to 4 days.
When and how to start fertilizing
Don't feed your seedlings right away. The coir has no nutrients to speak of, but young seedlings survive on what's stored in the seed itself until their second set of true leaves appears. Once you see that second set of leaves, start watering with a balanced liquid fertilizer mixed to half the strength shown on the label. Full-strength fertilizer at this stage will burn the roots. For the Buzzy Tomato Grower format (the patio version with the reservoir), switch to a water-soluble fertilizer specifically formulated for tomatoes once plants are established, following that product's instructions.
As the plant gets bigger and starts flowering, switch from a balanced fertilizer to one higher in phosphorus and potassium (the second and third numbers on the fertilizer label). This supports flower and fruit development rather than just leafy growth.
Transplanting and growing your tomato plant on
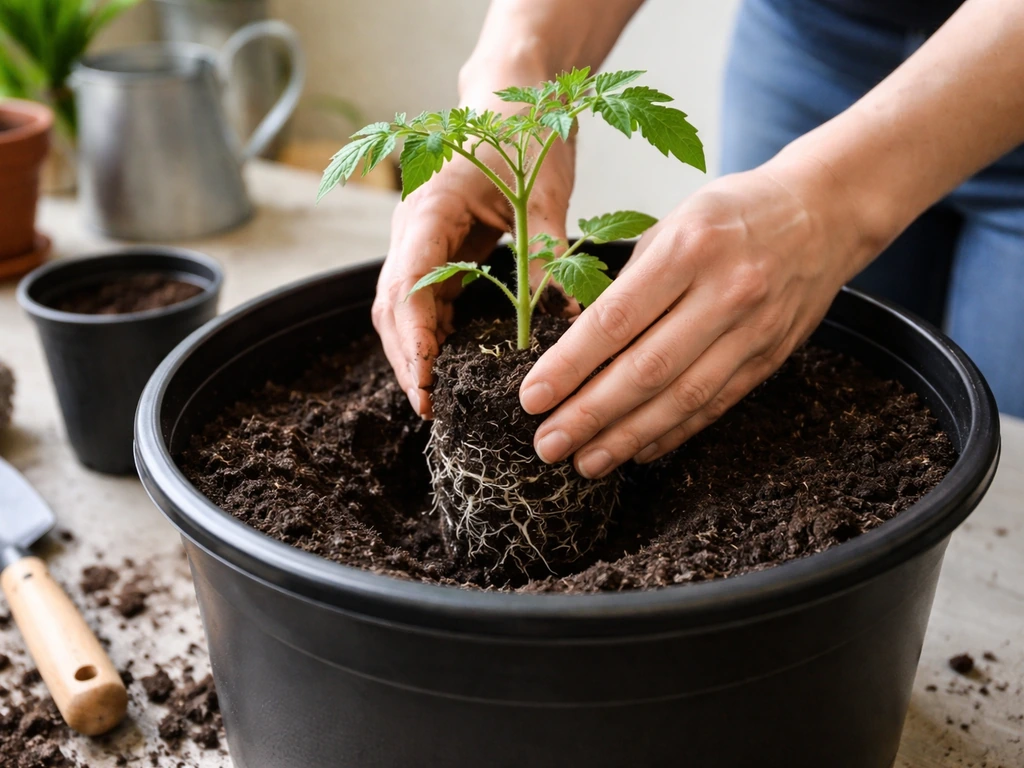
The 4-inch starter pot will become too small quickly. Once your seedling is 3 to 5 inches tall or its roots start peeking out the drainage hole, it's time to move up.
Thinning first
If multiple seeds sprouted, thin down to one plant per pot. Pick the strongest-looking seedling and snip the others at soil level with scissors. Don't pull them out, as pulling disturbs the roots of the one you're keeping. I know it feels brutal to cut a healthy seedling, but crowded plants compete for water and nutrients and you'll end up with weaker results from all of them.
Moving to a larger container
Transplant into at least a 5-gallon container for a single tomato plant, or directly into the ground if you're gardening outdoors. Tomatoes can be buried deep, right up to the lowest leaves, because they grow roots along their buried stem. This makes for a stronger, more stable plant. Use good quality potting mix in the new container.
Hardening off if going outside
If you started your kit indoors and want to move the plant outside, harden it off first. Buzzy’s Instructions page defines hardening off as the gradual acclimation of indoor seedlings to outdoor conditions before transplanting hardening it off first. That means gradually introducing it to outdoor conditions over 7 to 10 days. Start with an hour outside in a shaded, sheltered spot, then increase the time and sun exposure each day. Skipping this step often results in sunscald (white or bleached patches on leaves) and serious wilting, even on otherwise healthy plants.
Support, spacing, and pruning
Tomatoes need support as they grow. Put a stake or small tomato cage in place early, before the plant gets large enough that you risk damaging roots by pushing one in later. Tie the main stem loosely to the stake every 6 to 8 inches as it grows. If your tomato variety is indeterminate (keeps growing all season), prune out the suckers, which are the small shoots that sprout from the junction between the stem and a branch. Removing them keeps the plant focused on fruit rather than foliage. Determinate varieties (which grow to a fixed size and fruit all at once) don't need as much pruning. Check the seed packet to see which type you have.
Troubleshooting common problems
Most issues with Buzzy Tomato kits come down to water, light, or temperature. Here's a quick guide to diagnosing what's going wrong.
| Symptom | Most Likely Cause | Fix |
|---|---|---|
| Seeds haven't sprouted after 14 days | Too cold, too dry, or seeds planted too deep | Move to a warmer spot (65–75°F), check that medium stays moist, re-sow if needed at ¼" depth |
| Seedling stems are thin and falling over (leggy) | Not enough light | Move to a brighter windowsill or add a grow light 2–4" above the seedlings for 14–16 hours/day |
| Leaves turning yellow | Overwatering, or nitrogen deficiency after second set of leaves | Let medium dry slightly between waterings; start half-strength fertilizer if leaves have appeared |
| Wilting despite moist soil | Overwatering causing root rot, or a sudden temperature drop | Check drainage holes aren't blocked; let medium dry out more between waterings; check for cold drafts |
| White fuzzy mold on soil surface | Too much moisture and not enough airflow | Reduce watering frequency, improve air circulation (a small fan helps), and remove the plastic bag/dome |
| Green algae on pot or medium surface | Wet medium exposed to light | Normal and harmless, but reduce overwatering and wipe the pot exterior; add a thin layer of dry coir on top |
| Leaves curling inward | Heat stress or underwatering | Move away from direct afternoon sun; increase watering frequency |
| Leaves with spots or holes | Fungal disease or pest damage (aphids, whitefly) | Inspect under leaves for insects; treat with insecticidal soap; improve airflow and avoid wetting foliage |
Mold on the soil surface is one of the most alarming things to see, but it usually isn't a death sentence. It's almost always caused by too much moisture combined with poor airflow. Remove the plastic bag if you're using one, ease up on watering, and set the pot somewhere with a light breeze. The mold typically clears up within a few days.
Harvesting your tomatoes and wrapping up the season
When and how to harvest
Tomatoes are ready to pick when they've reached their full color (red, orange, yellow, or whatever variety you're growing) and give just slightly when gently squeezed. Don't wait for them to be perfectly soft. Picking when they're just turning color and letting them ripen on the countertop is perfectly fine, especially if cooler outdoor temps or pests are a concern. Twist gently or snip with scissors at the stem to avoid damaging the plant.
Realistic yield expectations
Be honest with yourself here: a 4-inch starter kit is not going to grow a tomato plant to full production size on its own. The kit gets you to a healthy transplant-ready seedling. Once you've moved your plant to a proper container or garden bed and given it a full growing season, a single healthy tomato plant can produce anywhere from a few dozen small fruits to several pounds of larger tomatoes, depending on variety and conditions. Don't judge the kit on the 4-inch pot phase; judge it on the seedling it hands off to you.
Re-using the kit components
The 4-inch plastic pot is reusable. Wash it with warm soapy water between uses and it'll last for many seasons. The coir growing medium is also reusable for a second round of seed starting, though it will be more nutrient-depleted each time, so mixing it with fresh potting soil or refreshing it with fertilizer helps. The seed packet is obviously one-time use, but Buzzy sells seeds separately if you want to run another batch. If you started the Kids Tomato & Marigold kit and have leftover marigold seeds, those are worth sowing again since marigolds are natural pest deterrents and great companions for tomatoes in a garden bed.
If you enjoyed working through this kit, Buzzy's other grow kits follow a similar setup process. Their lavender, bonsai, forget-me-not, succulent, and cactus kits all use the same general coir-expand-and-sow method, though each has its own specific germination timelines and care needs worth reading up on separately. If you’re using a Buzzy buzzy bonsai grow kit, the assembly and coir-based expand-and-sow steps work much the same, so follow the included instructions and adjust watering and temperature as needed buzzy bonsai grow kit instructions. If you're using the cactus kit, follow the specific Buzzy cactus grow kit instructions for its timing and care so you get the best germination and growth. For the exact lavender schedule and care steps, follow the Buzzy lavender grow kit instructions.
FAQ
My coir disc won’t fully expand or stays clumpy. What should I do before sowing?
If the compressed coir disc does not expand to a usable, evenly loosened medium, use the disc as written but add water in small increments (a little at a time) until it breaks up and looks fluffy. Avoid soaking so long that it turns muddy, because that increases the odds of fungus and seedling damping-off.
How can I tell if I’m overwatering, and what’s the fastest fix?
Waterlogged coir often looks darker and stays wet to the touch longer than expected, and seedlings may develop a soft stem at the soil line. Let the surface dry slightly between waterings, improve airflow (especially if you used a humidity bag), and only water from the bottom tray until a little drains through, then empty the tray promptly.
My seedlings are getting leggy. Is that a watering issue or a light issue?
The kit works best with bright light close to the plants. If you see tall, leaning seedlings or wide gaps between leaves, increase light intensity or move the pot nearer to the brightest window. Rotating the pot every day helps even growth, and if night temperatures drop, move it to a warmer spot after sunset as needed.
When should I thin multiple sprouts, and what’s the safest way to do it?
You can thin as soon as you see multiple seedlings competently rooted, but do not wait for them to become crowded. Snip the weaker ones at soil level rather than pulling, and thin down to one strongest seedling per pot so the remaining plant can take up water and nutrients without competition.
When exactly should I transplant from the 4-inch pot, and what’s a common mistake?
The best timing is after you see the second set of true leaves, then once the seedling is large enough for the next container size. If you transplant too early into a larger pot, the extra soil can stay wet too long. Use a container large enough to support growth, and keep the soil evenly moist, not saturated.
I lost the model label. How do I tell which Buzzy Tomato kit version I have?
If you cannot find the model number, rely on the presence or absence of a water reservoir and fertilizer in the box. The basic starter kits lack a self-watering reservoir and typically do not include fertilizer, while the patio “Grower” format is reservoir-based. Match your care plan to that feature, especially for watering frequency and feeding.
Can I leave the plastic bag/humidity tent on the whole time to prevent drying out?
A humidity bag can help during germination, but it often causes mold if it stays sealed too long or the air is still. Use it loosely and only until sprouting is established, then remove it or vent it gradually. Pair that with gentle airflow and not overwatering.
Can I start the kit indoors on a windowsill, or should I use grow lights?
Yes, but watch for heat spikes and cold drafts. Place the pot where it gets consistent warmth but avoid direct afternoon sun through glass, which can overheat seedlings. If your indoor lights are weak, a grow light set up above the seedlings can outperform a distant windowsill and reduce leggy growth.
What should I troubleshoot if my seeds take longer than 14 days to sprout?
If your seeds sit longer than two weeks, first check temperature (aim for 65 to 75°F), then check moisture by finger test at about half an inch deep. Too-cold stalls germination, while consistently wet coir can prevent oxygen reaching the seed. If conditions match and nothing happens, re-check sow depth and medium texture, then start a fresh batch rather than repeatedly rewatering.
How do I adjust fertilizer if my seedlings look pale but still early in growth?
Yes. After you begin fertilizing, choose half-strength balanced liquid first, then shift to a higher phosphorus and potassium fertilizer once flowering starts. Do not “correct” by using full strength early, and keep fertilizing consistent with the label’s schedule to avoid salt buildup and burned roots.
What does it mean if I see sprouts but they stop growing?
If the first true leaves never form and growth stays stalled, the cause is usually temperature extremes, persistent overwatering, or insufficient light. Bring conditions back into the sweet range, reduce watering frequency, and ensure steady bright light. If you used a humidity tent, remove it once sprouts appear to improve airflow.
I skipped hardening off and now leaves look bleached. What can I do now?
Sunscald shows up as pale or bleached patches, usually after a sudden increase in sun. The fix is prevention through hardening off, then once you see damage, move the plant back to partial shade temporarily and avoid increasing sun exposure quickly again.
Any tips for moving to a bigger pot without shocking the plant or damaging roots?
For container planting, use a quality potting mix, and size up early to reduce drying swings. Water thoroughly until excess drains, then allow the top inch to dry slightly before watering again. A tomato cage or stake installed early helps you avoid root disturbance later.