
Setting up a Click & Grow Smart Garden takes about five minutes: drop in your plant pods, add water to the fill line, plug in the light arm, and you're done. The first sprouts usually peek through within 3 to 7 days for herbs like basil, and leafy greens like lettuce are ready to harvest in around 3 to 4 weeks. No pumps, no nutrient mixing, no timers to program on day one. The garden runs itself through a wick-based watering system and a built-in 16-hour light cycle that starts the moment you plug it in.
Click and Grow Smart Garden Instructions: Setup & Care Guide

Marcus Thornfield
13 Aug 2026
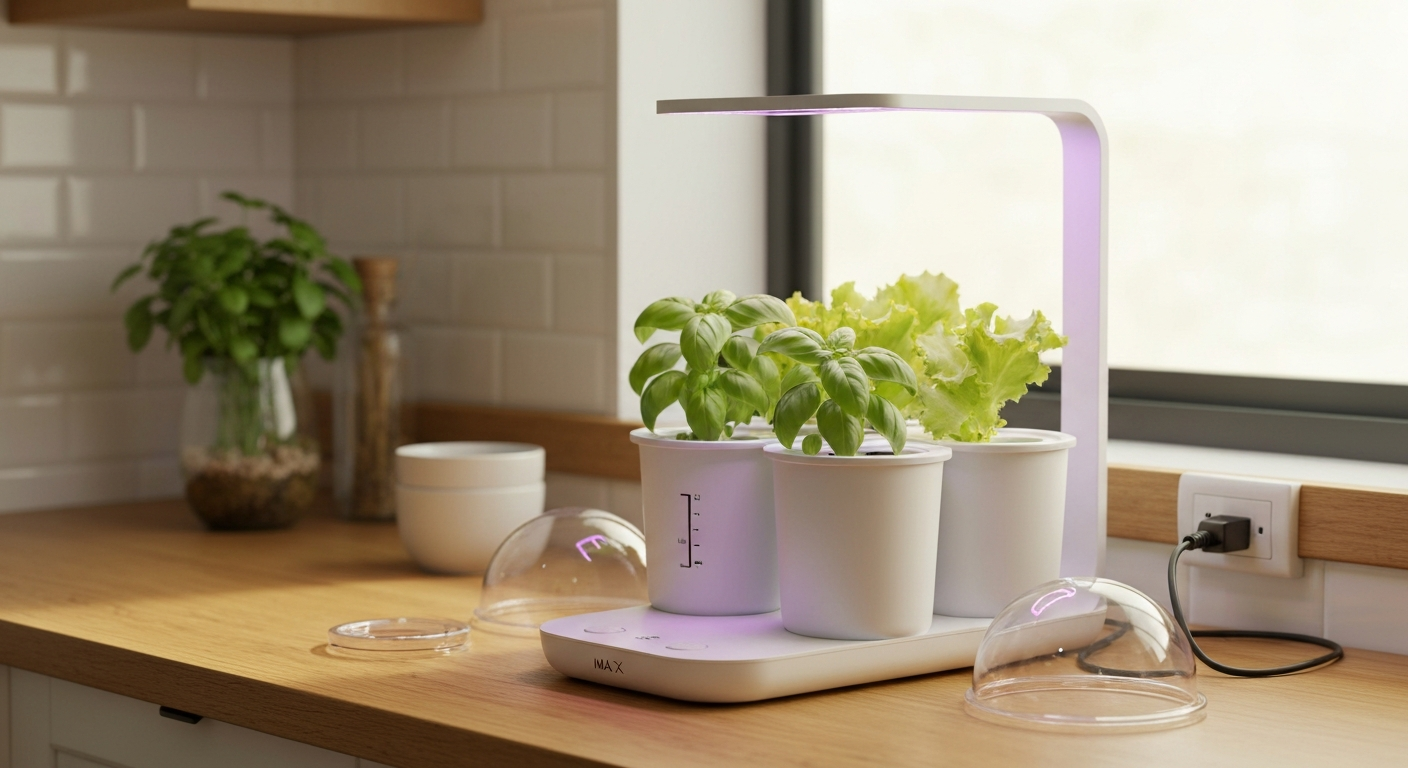
Your 5-minute setup and what happens in week one
If you want to get growing immediately, here's the fastest path to your first sprout. This works for both the Smart Garden 3 and Smart Garden 9.
- Unbox everything and locate your pods, dome lids, and the light arm.
- Place the garden base on a flat surface near an outlet. Keep it away from direct sunlight.
- Insert your plant pods into the pod slots (no need to remove the foil on branded Click & Grow pods).
- Place a clear dome lid over each pod slot to trap humidity and speed up germination.
- Fill the water tank using the fill hole or by lifting the tray. Stop at the MAX line.
- Attach the light arm. For the Smart Garden 9, use the included extension arms right away. For the Smart Garden 3, skip extensions until plants grow taller.
- Plug in the power cord. The light turns on immediately and runs on a 16-hours-on, 8-hours-off cycle automatically.
- Check the water level after 2 to 3 days and top it up if the indicator dips below the two-thirds mark.
In the first week, expect to see tiny green shoots breaking the soil surface between days 3 and 7 for most herbs. Some seeds like chili peppers or tomatoes take closer to 10 to 14 days, which is completely normal. Once you see sprouts, remove the dome lids so the seedlings get full airflow. If nothing has appeared after 14 days, Click & Grow offers a pod replacement policy for non-sprouting pods, so hold onto your packaging.
Unboxing checklist: Smart Garden 3 vs Smart Garden 9
Both gardens come well-packaged, but the contents differ by model. Before you do anything else, lay everything out on a table and match it against this checklist so you're not hunting for a missing piece mid-assembly.
| Item | Smart Garden 3 | Smart Garden 9 |
|---|---|---|
| Garden base with water tank | Yes (1.2–1.5 L tank) | Yes (4 L / ~135 fl oz tank) |
| Light arm | 1 arm, no extensions needed at first | 1 arm with 1 pair of extension arms (included, use from day one) |
| Plant pods (starter set) | 3 pods (variety depends on kit) | 9 pods (variety depends on kit) |
| Clear dome lids | 3 domes | 9 domes |
| Power cord/adapter | Yes (8 W) | Yes (13 W) |
| Quickstart guide / manual | Yes (printed + PDF available) | Yes (printed + PDF available) |
| Bluetooth lamp module | No (standard lamp) | Yes, on 9 PRO model only |
One note on the SG3 water tank: the product page lists 1.2 L, but a March 2024 Click & Grow support article cites 1. An official Click & Grow support article (updated March 25, 2024) lists the Smart Garden 3 water tank at 1.5 L (50.7 fl oz), a value that differs slightly from some product pages so consult the PDF manual for your specific unit blank" rel="noopener noreferrer">An official Click & Grow support article (updated March 25, 2024) lists the Smart Garden 3 water tank at 1.5 L (50.7 fl oz).. 5 L. The physical capacity can vary slightly by production batch. Trust the fill line marked on your actual unit, and download the PDF manual from the blank" rel="noopener noreferrer">Click & Grow manuals page to confirm the spec for your exact version.
A quick tour of the parts
If the manual's diagram feels confusing, here's a plain-language breakdown of what each component actually does. I'll refer to these names throughout the rest of the walkthrough.
Base and water tank
The base is a single molded plastic unit. The water tank sits inside the base and is accessed either through a fill hole on the side or by lifting the plant tray insert. The water level indicator is a small float or window on the side of the base. There is no pump in a Click & Grow garden. It runs entirely on capillary action, meaning water travels upward through a wick inside each plant cup. That's why you'll see the word 'precision capillary irrigation' in Click & Grow's materials.
Pod slots
The pod slots are the circular openings in the plant tray. Each slot holds one plant pod (the cup containing Smart Soil and a seed). The slots sit directly above the water reservoir, so the wick at the bottom of each pod hangs down into the water.
LED grow light and arm
The light arm clips onto the back edge of the base and arches over the plants. It contains LED strips combining white and red spectrums, which is why the light looks pinkish-purple when it's on. There is no separate on/off switch for the light; it activates as soon as the garden is plugged in and cycles automatically. On the Smart Garden 9 PRO, the lamp module has Bluetooth built in and can be controlled via the app.
Dome lids
Clear plastic domes slot over each pod opening. They create a warm, humid microclimate that speeds up germination. You only need them for the first week or two. Once seedlings are visibly sprouting, remove the domes to prevent damping off (a fungal issue that kills seedlings at the soil line when moisture is trapped too long).
Wicks
Each plant cup includes a wick, a thin fabric or fiber cord that draws water upward from the reservoir into the Smart Soil through capillary action. Click & Grow sells replacement wicks separately. If a plant seems dry despite a full tank, a displaced or dry wick is often the cause.
Smart Garden 3 vs Smart Garden 9: which model do you have?
Before diving into setup, it helps to know exactly which model you're working with, because the two gardens have meaningful differences beyond just the number of pods. If you have a 9-pod unit and want a dedicated deep-dive on the SG9, the Click and Grow Smart Garden 9 instructions guide on this site covers that model in full detail. For an alternative step-by-step guide, see the snap and grow greenhouse instructions. For full step-by-step assembly and model-specific tips, see the Click and Grow Smart Garden 9 instructions on this site.
| Feature | Smart Garden 3 | Smart Garden 9 / 9 PRO |
|---|---|---|
| Pod capacity | 3 pods | 9 pods |
| Water tank | ~1.2–1.5 L | 4 L (~135 fl oz) |
| Power draw | 8 W | 13 W |
| Light PPFD (approx.) | ~85 µmol/m²/s at center | ~120 µmol/m²/s at center |
| Light arm extensions | None needed at start | 1 pair included, use from day one |
| Bluetooth / app support | No | Yes (9 PRO model only) |
| LED lifetime | ~7 years | ~7 years |
| Best for | Small kitchens, beginners | Larger harvests, herb variety, app users |
The PPFD figures above come from independent testing: the SG9 delivers roughly 120 µmol/m²/s at the center of the plant tray, while the SG3 delivers around 85 µmol/m²/s. Both are sufficient for herbs and leafy greens, which typically need 50 to 200 µmol/m²/s to grow well. The SG9's higher output is an advantage if you want to grow slightly more light-hungry plants like cherry tomatoes or peppers. The SG3 is quieter on the counter and cheaper to run. One important note on lamp extensions for the SG9: use the single included extension pair from the start. Running two pairs of extensions causes light density to drop too low and results in leggy, stretched plants.
Step-by-step setup walkthrough
Assembly
Start by placing the base on a stable, flat surface. It doesn't need to be near a window; the LED provides all the light these plants need. In fact, placing it in direct sunlight can cause the water to warm up and algae to form in the tank. A kitchen counter, desk, or shelving unit away from windows is ideal.
For the Smart Garden 9, attach the extension arms to the main light arm before clipping the whole assembly onto the back of the base. The extensions have a single connection point and click into place. For the Smart Garden 3, attach the light arm directly without any extensions. You'll add extensions later only when your plants grow tall enough to crowd the lamp.
Power and placement
Plug the power cable into the base first, then into the wall. The light will come on immediately. There is no power button. If the light does not turn on at all, check that the cable is fully seated in the base port; it can feel almost fully connected but still be slightly out. The Smart Garden 3 draws 8 W and the Smart Garden 9 draws 13 W, so running either all day costs a few cents per day at typical electricity rates.
Placement tip: try to set up your garden at a consistent time of day so the light cycle aligns with your schedule. The garden starts its 16-hour cycle from whenever it's first plugged in. If you plug it in at midnight, the light will be on from midnight to 4 p.m. and off in the evening, which is fine for the plants but potentially annoying in your bedroom. Plug it in at a time when you want the lights on.
Filling the water tank and staying on top of refills
Water management is the most important ongoing task with a Click & Grow. The good news is it's simple. The goal is to keep roughly two-thirds of each wick submerged in water at all times, which the fill indicator on the side of the unit makes easy to judge. Let the water drop to the MIN mark before refilling; don't let it go dry, but don't constantly top it up to MAX either, as overfilling can lead to root rot in some plants.
What type of water to use
Click & Grow recommends tap water for most users. If your tap water is very hard (high in calcium and magnesium), you may see white mineral deposits form on the base or tray over time. This is cosmetic but can also affect wick performance. Switching to filtered or lightly softened water helps. Avoid distilled water exclusively, since the Smart Soil already contains nutrients but the plants can benefit from trace minerals in regular tap water. Do not add liquid fertilizers or plant food to the water tank; the Smart Soil is formulated to provide the right nutrient balance on its own.
Refill routine by model
The SG3's smaller tank (around 1.2 to 1.5 L) will need refilling every 3 to 5 days depending on how vigorously your plants are growing and the ambient temperature in your home. The SG9's 4 L tank lasts much longer, often 7 to 14 days in a normal home environment. Hot, dry rooms make plants drink faster. Check the water indicator every couple of days at first to get a feel for your garden's pace.
Installing plant pods: official, replacement, and DIY options
Using official Click & Grow pods
Official Click & Grow pods come pre-seeded in Smart Soil (a patented blend of natural coco-coir, peat, and added macro- and micro-nutrients including nitrogen, phosphorus, potassium, magnesium, calcium, and trace elements). Each pod has a foil cover with a pre-cut slit for the seedling to emerge. You do not remove the foil. Just drop the pod into the slot with the foil facing up, place a dome lid on top, and you're set. There are over 75 plant varieties available, including herbs, lettuces, tomatoes, flowers, and microgreens.
Pro Plant Cups and DIY seed pods
Click & Grow sells Pro Plant Cups as an accessory. These are perforated cups that give roots more space and allow plants to access water more directly. They work well for larger plants or when you want to use your own seeds and growing medium. The trade-off is that Pro Cups require closer monitoring of water levels (roots can sit in water more directly, risking rot if you overwater) and need more thorough cleaning between grows.
For a DIY pod, you can fill an empty or Pro Cup with a suitable growing medium (many growers use a small amount of coco-coir), add your own seeds, and use it in any pod slot. The key is making sure your wick is correctly positioned: about two-thirds of it should reach down into the water reservoir. Click & Grow sells replacement wicks if yours is damaged or missing. DIY pods won't come with the nutrient-balanced Smart Soil, so you may need to add a diluted, water-soluble fertilizer occasionally, though keep it light to avoid salt buildup.
App pairing and LED light controls
Does your model have the app?
Only the Smart Garden 9 PRO has Bluetooth and app support. The standard Smart Garden 3 and standard Smart Garden 9 do not connect to a phone; their lights run automatically on the 16-on/8-off cycle with no manual override. If you have an SG9 PRO, the lamp module has a small Bluetooth chip built in.
Pairing the SG9 PRO Bluetooth lamp
- Download the Click & Grow app on iOS or Android.
- Enable Bluetooth and Location permissions on your phone (Location is required for Bluetooth to work on Android).
- Open the app and tap 'Add a new Smart Garden 9.'
- When asked if your lamp is a Bluetooth lamp, tap Yes.
- On the garden itself, hold the touch sensor on the lamp module for about 3 seconds until it flashes.
- Follow the on-screen pairing prompts in the app.
- Once paired, you can set custom light schedules, toggle the lamp manually, and get low-water reminders.
Understanding the LED light modes
| Light behavior | What it means | What to do |
|---|---|---|
| Steady pink/purple glow | Normal operation, 16-hour cycle is running | Nothing, this is correct |
| Light is off | Either in the 8-hour off cycle, or unplugged | Check time of day; plug in if off-cycle |
| Light flashes on SG9 PRO lamp | Bluetooth pairing mode is active | Open the app and complete pairing |
| Light stays off after plugging in | Cable not fully seated or lamp arm not clicked in | Re-seat the cable and arm connections |
| Light seems dim or uneven | Lamp arm not fully extended, or two extension pairs used on SG9 | Remove one extension pair; use only one on SG9 |
On non-PRO models, the only real control you have over the light is when you plug the garden in. If you want the light to be on during your morning and off at night, plug it in first thing in the morning. The 16-hour cycle runs from that starting point each day.
Routine care week by week
Once the garden is running, the weekly routine is minimal. Here's a realistic maintenance schedule based on growing herbs and leafy greens.
| Task | Frequency | Notes |
|---|---|---|
| Check water level | Every 2–3 days | More often in warm/dry rooms |
| Top up water | When indicator approaches MIN | Do not overfill past MAX |
| Remove dome lids | Once sprouts are visible (usually days 3–7) | Leaving them too long causes mold |
| Trim/harvest outer leaves | From week 3–4 onward for herbs/lettuce | Harvesting encourages regrowth |
| Check for pests or mold | Weekly | Act early; see troubleshooting section below |
| Clean the water tank | Every pod cycle (6–10 weeks) | Flush with clean water; mild soap if algae present |
| Replace pods | When plants are spent or harvested out | Clean pod slot and wick before inserting new pod |
Troubleshooting common problems
Most Click & Grow problems have simple fixes. Here's a symptom-by-symptom guide to the issues I see come up most often.
| Symptom | Likely cause | Fix |
|---|---|---|
| Seeds haven't sprouted after 14+ days | Old/defective pod, dome removed too early, or tank ran dry | Check water level; replace dome if removed; contact Click & Grow for pod replacement |
| Seedlings are tall and spindly (leggy) | Light too far from plants, or two extension pairs on SG9 | Lower light arm; remove extra extensions; check 16-hr cycle is running |
| White fluffy mold on soil surface | Dome left on too long, poor airflow | Remove dome immediately; increase airflow; let surface dry slightly |
| Green or brown algae in water tank | Tank exposed to light | Move away from direct sunlight; flush and clean tank; cover fill hole |
| Yellowing lower leaves | Normal aging on older leaves, or overwatering | Remove yellow leaves; let water drop to MIN before refilling |
| Leaves have sticky residue or tiny insects | Aphids, fungus gnats, or spider mites | Wipe leaves with damp cloth; treat with diluted food-safe soap spray; remove badly infested pods |
| Wick is dry even with water in tank | Wick displaced or clogged | Remove pod; reposition wick so 2/3 is submerged; replace wick if damaged |
| Light won't turn on | Cable not fully connected or arm not clicked in | Re-seat all connections; try a different outlet |
| App won't pair (SG9 PRO) | Bluetooth or Location not enabled on phone | Enable both in phone settings; restart app; try pairing again |
| Plants dying after transplanting from pods | Shock from removing Smart Soil roots | Grow plants entirely in pods; Click & Grow isn't designed for transplanting |
Cleaning and storage
At the end of a growing cycle, empty the water tank completely and rinse it out with clean water. If you see algae (green or brown staining), a mild dish soap solution works well; rinse thoroughly afterward. For the pod slots and plant tray, scrub under running water with a soft brush. If you've dealt with a pest problem, Click & Grow recommends disinfecting the cavities with a diluted food-safe antiseptic, white vinegar, or food-grade alcohol. Avoid bleach inside the tank as residue can harm future plants. To store the garden long-term, empty the tank, clean all components, let everything dry fully, and store in a dry location. The LED arm should be stored in a horizontal position if possible to avoid stress on the connection points.
How Click & Grow compares to other consumer grow boxes
Click & Grow's biggest strengths are simplicity and silence. There's no pump, so there's no noise. Setup takes minutes rather than an hour. The Smart Soil system means you don't measure nutrients. The trade-off is that you're locked into Click & Grow's pod ecosystem unless you go the DIY cup route, and the fixed lamp height can't be raised as high as some competitors. For a raised-bed, lower-tech alternative, see the Keter Easy Grow elevated garden bed instructions for assembly and setup tips. If you've been considering other grow boxes, here's a quick honest comparison.
| Kit | Watering method | Pod system | Light | Best for |
|---|---|---|---|---|
| Click & Grow SG3 / SG9 | Wick/capillary, no pump | Proprietary Smart Soil pods (or DIY cups) | Fixed LED arm, 16h/8h auto cycle | Beginners, herbs, small kitchens, silent operation |
| Garden Patch Grow Box | Passive soil-based | Open, use any seeds | No built-in light | Outdoor or windowsill growing |
| Start Pickin Grow Box | Passive/soil | Open seed system | No built-in light | Simple starter seed kits |
| Keter Easy Grow Elevated Bed | Manual watering | Open soil bed | No built-in light | Patio/outdoor raised bed growing |
| Patio Pickers Grow Box | Manual/passive | Open soil | No built-in light | Container gardening outdoors |
| Snap & Grow Greenhouse | Manual watering | Open seed trays | Relies on natural light | Seed starting under a greenhouse cover |
The kits from Garden Patch, Start Pickin, Keter Easy Grow, Patio Pickers, and Snap & Grow are all designed around outdoor or natural-light growing, which is a fundamentally different use case from Click & Grow's indoor LED-powered system. For step-by-step setup for similar outdoor kits, see the Garden Patch grow box instructions guide. If you want to grow year-round regardless of season or window access, Click & Grow is in a different category. If you have a sunny patio or south-facing window and want something lower-tech, those alternatives cover the rest of the site's grow kit guides in detail. For step-by-step instructions on lower-tech outdoor options, see the Patio Pickers grow box instructions. For a simpler, lower-tech option, see the Keter Easy Grow instructions for setup and care guidance. The Click & Grow SG9 also has meaningfully more light output than the SG3 (around 120 vs. 85 µmol/m²/s measured at the center), which matters if you want to move beyond herbs into fruiting plants like cherry tomatoes.
Getting the most out of your Smart Garden long-term
A few habits will dramatically improve your results over time. First, harvest often. With herbs like basil and mint, regularly snipping the top leaves encourages the plant to bush out and produce more. Letting herbs flower signals the plant to stop producing flavorful leaves, so pinch off any flower buds as soon as you see them. Second, stagger your pods. Instead of planting all nine slots at once on the SG9, plant three pods every two weeks. That way you have a continuous harvest rather than a glut followed by a gap. Third, watch the light cycle timing. University research on leafy greens (lettuce, spinach) confirms they do well on 16-hour photoperiods, which is exactly what Click & Grow runs. Herbs and microgreens are similarly suited to this cycle, so you're in good hands with the default settings.
The Click & Grow ecosystem rewards a little patience more than any special skill. Once you nail the water level routine and the wick positioning, most of the work is just deciding what to grow next. The Smart Soil handles feeding, the LED handles light, and the wick handles watering. Your job is to refill the tank every few days and enjoy the harvest.
FAQ
What primary authoritative sources should I use to make a model‑aware Click & Grow Smart Garden walkthrough?
Use official Click & Grow product pages, support articles, and downloadable PDF manuals for SG3 and SG9 (specs, tank sizes, lamp instructions, wick guidance, Pro Cups, app pairing). Supplement with Click & Grow blog posts on watering and Smart Soil composition. These ensure accuracy for model differences, parts lists, and official troubleshooting/cleaning guidance.
Which independent and empirical sources are necessary to validate performance claims (light, reservoir, growth timelines)?
Include hands‑on reviews and PPFD measurements (e.g., MistCulture, IndoorFoodGrower), tech roundups (Wired) and university extension resources (Penn State, Virginia Tech) for germination and photoperiod norms. Use these to provide real PPFD numbers, practical growth timelines for herbs/lettuce/microgreens, and to compare empirical lamp output between SG3 and SG9.
What user‑tested content and community inputs should be included?
Gather common user fixes and workflows from support forums, product review comment sections, and user guides: wick positioning checks, typical water‑top frequency, pod seating tips, common LED/connection issues, and DIY pod experiences. Prioritize fixes repeatedly validated by multiple users and those documented by Click & Grow support.
What model‑specific differences must the walkthrough clearly highlight?
List capacities and lamp/reservoir differences: SG3 (3 pods, ~1.2–1.5 L tank, ~8–9 W lamp, compact PPFD) vs SG9/SG9 PRO (9 pods, ~4 L tank, ~13 W lamp, higher PPFD and red/white spectrum, Bluetooth lamp and app control, comes with extension arms). Note reservoir spec discrepancy across pages and advise checking shipped unit manual.
What annotated images/diagrams and visual assets are essential for publication readiness?
Provide labeled unboxing photos (box contents), exploded parts diagram (lid, domes, pod cups, wick, water tank, lamp/arms, drip tray), step‑by‑step setup photos (inserting pod, wick placement, filling water to 2/3 wick depth), water‑level markings, PPFD map overlay (empirical), and app pairing UI screenshots. Include alt text and brief captions for SEO and accessibility.
What step‑by‑step Quick‑Start checklist should be included at the top of the article?
Checklist: 1) Unbox and verify parts against manual. 2) Wash inlet parts if dusty. 3) Insert pods and domes. 4) Ensure wick sits ~2/3 submerged. 5) Fill reservoir to recommended mark. 6) Plug in and start default light cycle. 7) Pair Bluetooth lamp via app (SG9 PRO). 8) Note weekly water check and pod observations. Provide a printable one‑page checklist.