The My First Crayola Grow-With-Me Easel (also written as Grow With Me or Grow-With-Me) is made by Grow'n Up Limited and designed for kids aged 2 and up. Assembly is tool-free, the easel folds flat when you're done, and the height adjusts as your child gets taller. If you just pulled this out of the box and want to get it standing safely in the next 15 minutes, here is exactly how to do it.
My First Crayola Grow-With-Me Easel Instructions Guide

Marcus Thornfield
3 Jun 2026
Make sure you have the right easel
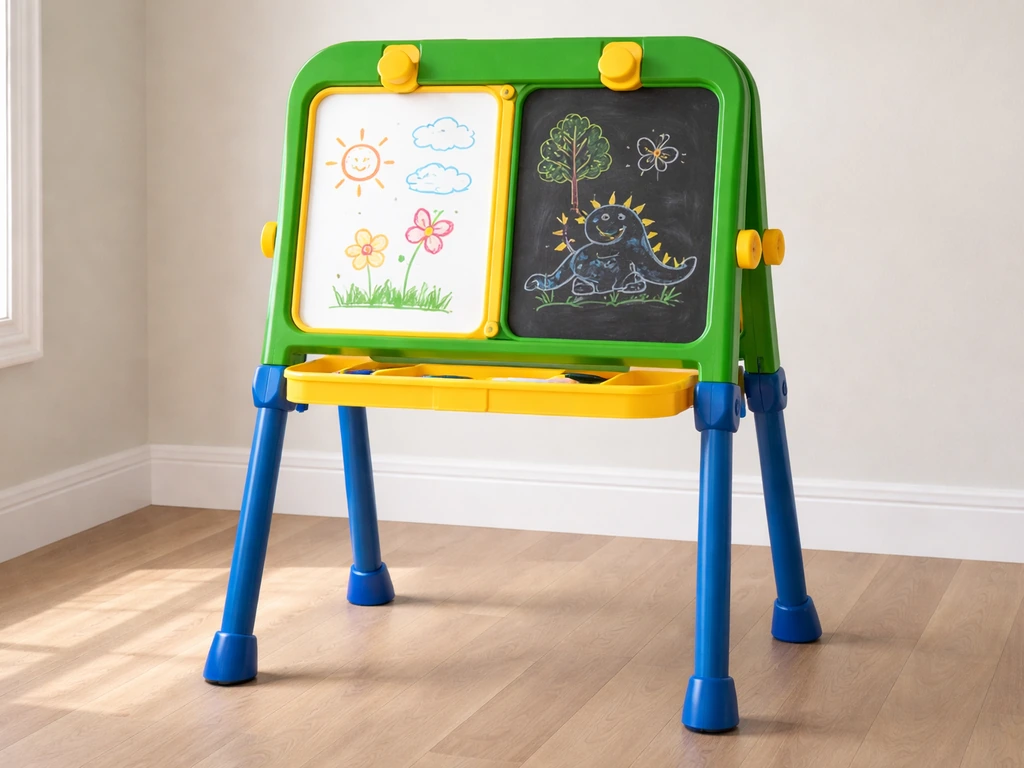
There are several Crayola-branded easels on the market, so it's worth a 30-second check before you start. The one this guide covers is officially called 'Crayola My First Grow-With-Me Doodle Easel, Stage 2' (Item No. 5050 from Grow'n Up Limited). Look at your box: it should say 'Stage 2,' show the Crayola and Grow'n Up branding together, and list the age range as 2+. The maximum standing height is 28.9 inches, and the collapsed tabletop height is listed as 18.9 inches. If your box says something like 'Double Easel,' 'Magnetic Art Center,' or 'Tripod Easel,' you have a different product and these steps won't match exactly. The Stage 2 'Grow-With-Me' is specifically the one with adjustable legs, a dual-sided board (dry erase on one side, chalkboard on the other), built-in paper clips, and a supply tray.
What's in the box and what to do before you build
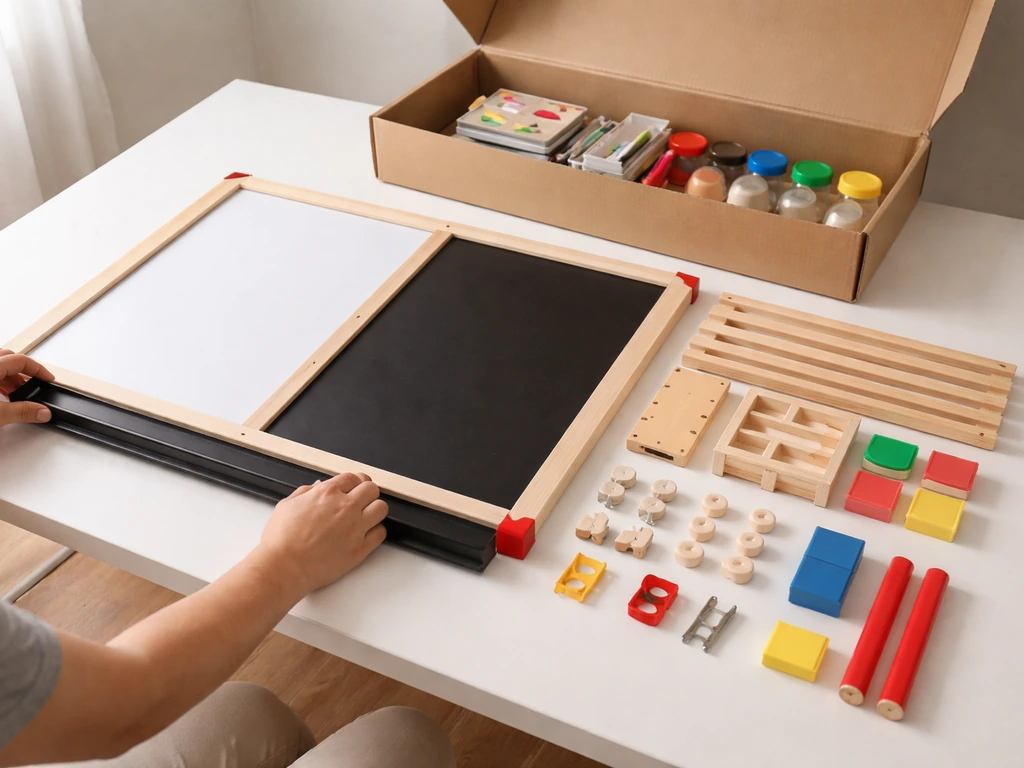
Before you snap anything together, pull every piece out of the box and lay it on a flat surface. This easel is designed to assemble without tools, but a quick inventory saves a lot of backtracking if something looks off later.
You should find the main dual-sided board (dry erase white on one face, chalkboard black on the other), two A-frame legs or side panels, a front supply tray or ledge, a carry handle component, and any included accessories like paper roll clips, chalk, or markers. Some versions include a small paper roll or sticker sheet as a starter pack.
Check each piece for obvious shipping damage: cracks in the plastic legs, a warped tray, or a board surface that's been scratched through the protective film. Peel any protective film off the dry erase surface now, before assembly, because it's much harder to reach once the tray is clipped on. Also check that the leg height adjustment slots are clean and free of plastic flash (thin leftover material from the mold) that could stop the locking tabs from seating properly.
Step-by-step assembly
This easel is genuinely tool-free, so resist the urge to force anything. If a piece isn't clicking in, you're either at the wrong angle or it's not quite aligned yet. Here's the order that works.
- Stand the main board upright on a flat floor. The dry erase (white) side should face the direction your child will draw from most often. You can always flip it later.
- Attach the left leg panel to the left side of the board. The leg should have a slot or tab at the top that hooks into a corresponding receiver on the board frame. Press it in from the outside edge and push inward until you hear or feel a click. The leg should not wiggle when locked in.
- Repeat for the right leg panel. Once both legs are attached, the easel should stand on its own in an A-frame shape. If it wants to tip, keep a hand on it until the tray is added.
- Clip or snap the supply tray onto the front lower edge of the board. The tray slots into two receiver points on the board's bottom rail. Press both ends in evenly at the same time rather than one side first, which can cause it to seat at an angle.
- Attach the carry handle if it's a separate piece. On most versions it clips onto the top edge of the board. This also serves as a reinforcement bar that stiffens the frame, so don't skip it even if you don't plan to carry the easel around.
- Set the leg height to the lowest position for now. You'll adjust this once the child is standing next to it. The height adjustment slots are usually on the inner face of each leg, with a locking tab or button you press to release and reposition.
The whole process should take about 10 minutes. If you're finding that the legs seem too short or too tall straight out of the box, don't adjust yet. Get it fully assembled first, then adjust height with the child standing next to it.
Setting it up for first use
Once the frame is standing, there are a few quick things to do before handing it over to your child.
Paper clips and the drawing surface
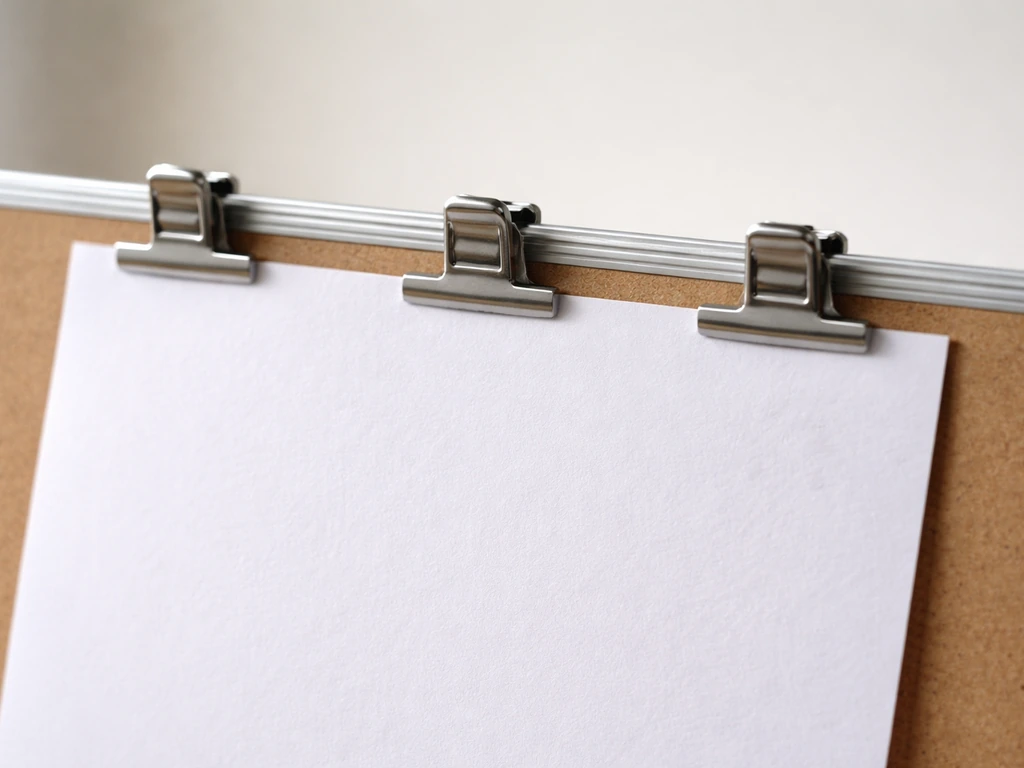
The built-in paper clips sit at the top edge of the board. To use them, slide a sheet of paper (or a few sheets) up behind the clips and let the spring tension hold it in place. Standard letter-size or A4 paper works fine. If your kit included a paper roll, thread it through the top clip bar before clipping it down. Some parents skip the paper entirely and just use the dry erase surface directly, which works great for toddlers who like to erase and start over. If your child quickly gets bored with just dry erase and start-over sessions, you might also like grow your own unicorn instructions for another hands-on idea.
Loading the supply tray
The tray is designed to hold chunky toddler markers, chalk sticks, a small eraser, and a sponge or damp cloth. Keep the tray load light for younger kids. A fully loaded tray on a two-year-old's easel is a tipping hazard if the child grabs it.
Stability and safety check
Before your child touches it, do a quick stability test yourself. Push gently on the top of the board from the front, then from each side. The easel should flex slightly but not tip. If it tips easily with light pressure, the legs are not locked in fully. Check each leg connection point again. Also make sure the easel is on a flat, non-slippery floor. Avoid thick carpet for the first use, since the leg tips can sink in and make the frame less stable.
Fixing the most common setup problems
Most assembly frustrations with this easel come down to a handful of repeating issues. Here's how to handle each one.
| Problem | Likely cause | Fix |
|---|---|---|
| Easel wobbles side to side | One or both leg tabs not fully seated | Detach both legs and reattach, pressing firmly until the click is clear on both sides simultaneously |
| Tray droops or won't clip flush | Tray inserted one side at a time | Remove tray, align both receiver points at once, press evenly with both hands |
| Leg height won't lock at chosen position | Adjustment tab not fully pressed before repositioning | Press and hold the tab in, slide the leg to the new slot, then release the tab and pull slightly outward to confirm it's seated |
| Board feels loose between the legs | Carry handle/top bar not attached | Snap on the carry handle/top bar, which braces the board and removes most of the flex |
| Paper clips won't hold paper | Shipping protector still on clip spring | Check for any film or cardboard insert under the clip and remove it |
| Parts don't seem to match the box photo | Possible Stage 1 vs Stage 2 mix-up at retail | Check item number 5050 on the packaging and confirm 'Stage 2' label; Stage 1 is a simpler tabletop-only version |
If a piece is genuinely missing or cracked, don't try to improvise. If you are also looking for grow-a yeti instructions, check the same kind of brand support resources to confirm the right steps for your exact model Grow'n Up has customer support. Grow'n Up has customer support you can reach through the contact info on the packaging or their website. If you need Dino World Mega Grow instructions for your specific model, double-check the product label or follow the included setup sheet dino world megga grow instructions. Keep your receipt and the box, since the item number (5050) makes it easy to get the right replacement part quickly.
Growing with it: height adjustments, care, and storage
Adjusting the height as your child grows
The 'Grow-With-Me' feature is the adjustable leg height, which lets you raise the board as your child gets taller. A good rule of thumb: the top of the drawing surface should sit at roughly eye level or just below when your child is standing comfortably. For most two-year-olds, the lowest or second-lowest setting works well. By age four or five, you'll probably be at the highest setting (up to about 28.9 inches total height). To adjust, press the locking tab on each leg, slide to the new slot, and confirm the lock clicks in before letting go. Always adjust both legs to the same slot so the board stays level.
Cleaning the surfaces
The dry erase side wipes clean with a dry eraser or a barely damp cloth. For stubborn marker residue that a dry eraser won't shift, a small amount of isopropyl alcohol on a cloth works well. Avoid abrasive scrubbers, which will scratch and ghost the surface over time. The chalkboard side cleans with a damp sponge or a slightly wet cloth. Let it dry fully before drawing on it again, or you'll get a muddy gray layer rather than crisp lines.
Folding and storing
The EZ Foldaway design means you can fold the easel flat for storage without disassembling it. Release the leg locks, fold the legs in toward the board, and carry it by the handle. It stores well leaning against a wall or sliding under a bed. If you're storing it for more than a few weeks, remove any chalk dust or marker residue first since it can transfer and stain surfaces it rests against.
One last thing worth knowing: because this is a water-resistant plastic frame with no absorbent materials, it's a very forgiving kit. If you are looking for grow unicorn in water instructions, use an appropriate age-safe setup and follow the product guidance for the right timing and water conditions. For water-safe play, use the water-resistant design as intended and follow grow toys in water instructions to keep the surfaces and parts from getting damaged. Unlike the water-expanding grow toys (the kind you drop in water and watch expand over a few days, similar to grow-a-dinosaur or grow-a-unicorn kits), there's nothing here that can be permanently ruined by a little moisture or a spilled paint cup. Wipe it down, let it dry, and it's ready for the next session.
FAQ
What if the dry erase surface still looks cloudy after I peel the protective film, or the marker won’t come off?
First confirm you fully removed any protective film from both the white face and the tray area. If residue remains, wipe with a dry eraser, then use a cloth lightly dampened with isopropyl alcohol (avoid soaking the board). Let it dry completely before the next session to prevent marker smearing.
Can I use regular permanent markers or kids’ paint pens on the easel?
Stick to dry erase markers for the white side. Permanent markers, craft paint, or thick pen inks can “ghost” into the finish and are much harder to remove without damage. For art that needs permanence, use paper clipped to the board.
How do I tell if my child’s easel is the Stage 2 model that these instructions match?
Check the box labeling for “Stage 2” and confirm the board is dual-sided (dry erase on one face, chalkboard on the other) with built-in paper clips at the top edge. If your package mentions a different easel type, like magnetic or tripod, the leg and board connections may differ.
Why won’t the leg locking tabs click, even when I’m assembling carefully?
Most often it’s alignment or leftover plastic flash blocking the slot. Re-check that the legs are seated straight, then inspect the adjustment slots for thin mold flash. Remove only the flash (gently), and don’t force parts that feel misaligned.
Is it safe to use the paper clips with heavier paper, like construction paper or cardstock?
Yes, but keep it moderate. Use paper that can slide behind the clips without bending. Very thick cardstock can strain the clip bar or reduce grip from the spring tension, so start with standard letter or A4 thickness.
What should I do if the easel wobbles when my child touches the board?
Do the front and side stability push test again, then re-check every leg connection point and confirm both legs are set to the same height slot. Also move it to a flatter, less grippy-free surface, since thick carpet can let the leg tips sink and reduce stability.
How much weight is too much for the supply tray?
For younger kids, keep the tray light and avoid letting a child grab or swing it while holding it. A good rule is to use a few chunky items only (markers or chalk sticks), and skip extra accessories that make the tray heavy enough to tip when pulled.
Can I store the easel folded for weeks without cleaning first?
It’s better to clean first. Remove chalk dust and wipe marker residue so it doesn’t transfer to walls, beds, or other surfaces during storage. After cleaning, let both board sides dry fully before folding.
What’s the best way to clean chalk from the chalkboard side without making a mess?
Use a lightly damp sponge or cloth to lift residue, then wipe again with a slightly drier cloth. Let it air dry fully before drawing so you avoid muddy gray smears. If you remove chalk often, do it over a surface you can wipe easily.
Does the dry erase cleaner matter, and can I use water instead of alcohol?
Plain water can help for light marks, but it often leaves streaks or spreads residue. For stubborn marker residue, a small amount of isopropyl alcohol on a cloth is more reliable. Avoid abrasive scrubbers that can scratch and cause lingering ghosting.
How should I adjust the height if my child is between two settings?
Start with the setting that places the drawing surface at about eye level or slightly below for comfortable standing. If the top feels too high or low during a short test, adjust after full assembly, but always change both legs to the same slot to keep the board level.