Mondo grow kits are mushroom cultivation kits designed to take you from unboxing to harvest without needing any lab equipment or prior growing experience. Setup varies depending on which of the three main Mondo kit types you have (the Substrate Grow Kit, the Mondotub, or the Fully Inoculated Grow Bag), so the single most important thing you can do before anything else is confirm your exact kit. Once you know what you have, the process is genuinely straightforward: soak or prep the substrate, keep it warm and humid, give it the right light schedule, and stay hands-off except for daily fresh air exchange. Most failures happen because someone followed the wrong instructions for their kit version, or skipped the hygiene steps, so this guide covers all three variants with their own checklists.
Mondo Grow Kit Instructions: Setup, Planting, and Troubleshooting

Identify your exact Mondo kit before you do anything else
Mondo makes at least three distinct grow kit products, and each has its own manual with different steps. Using the wrong instructions is one of the most common reasons first-time growers run into problems. Check your packaging, the sticker on the substrate container, or the instruction booklet inside the box to match yourself to one of these:
| Kit Name | What's Inside | Key Difference |
|---|---|---|
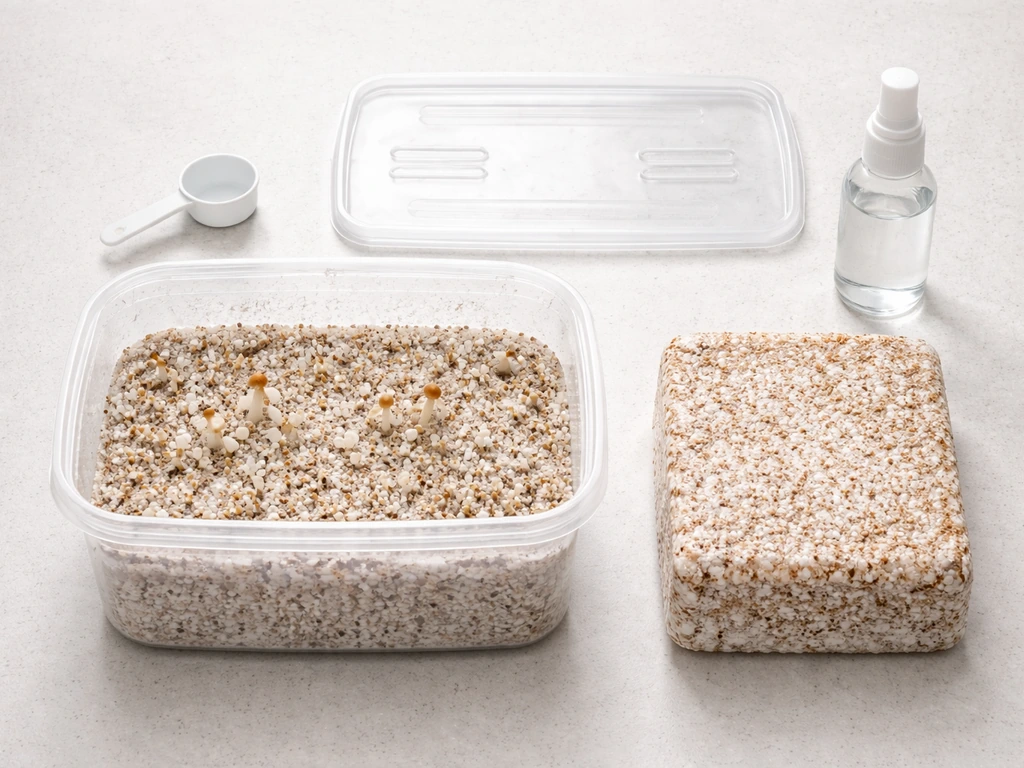
| Substrate Grow Kit | Substrate growkit container + filter bag with sealing sticker | Requires a cold-water soak before activation; uses a filter bag for fruiting |
| Mondotub | Monotub + filter patches + heat mat + heat guard + grow light + thermometer strip + isopropyl spray + mist bottle | All-in-one system; substrate goes inside the tub; more equipment to set up |
| Fully Inoculated Grow Bag | Pre-colonized inoculated substrate bag + sealing sticker | No inoculation or incubation phase needed; fastest to get started |
If you're not sure which one you have, the easiest tell is the packaging. blank" rel="noopener noreferrer">The Substrate Grow Kit comes in a lidded container with a separate filter bag. The Mondotub ships with a lot of hardware including a heat mat and grow light. The Inoculated Grow Bag is just a bag, already colonized, ready to fruit. If you're still unsure, the Mondo website (mondogrowkits.com) has downloadable manuals for each one. Do not proceed until you've matched your kit to the right manual, because the soaking step, temperature guidance, and humidity management are all different between variants.
Unboxing and what each part actually does
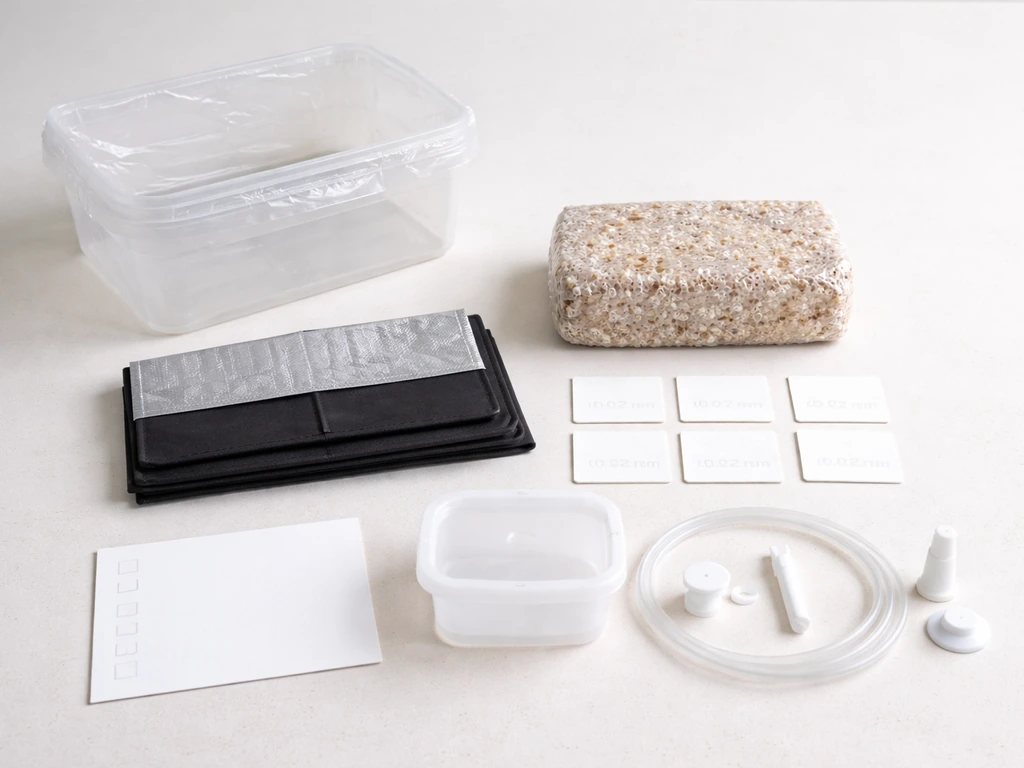
Once you've confirmed your kit, do a full parts check before you touch anything else. Lay everything out on a clean surface and compare it to the checklist in your manual. For the Substrate Grow Kit, you should have the substrate container and a filter bag with a sealing sticker. For the Mondotub, check off: the monotub itself, a sheet of 0.
In the Mondo Mondotub manual, the monotub accessory is documented separately from the substrate grow kit and is intended to create optimal growing conditions the Mondotub itself.
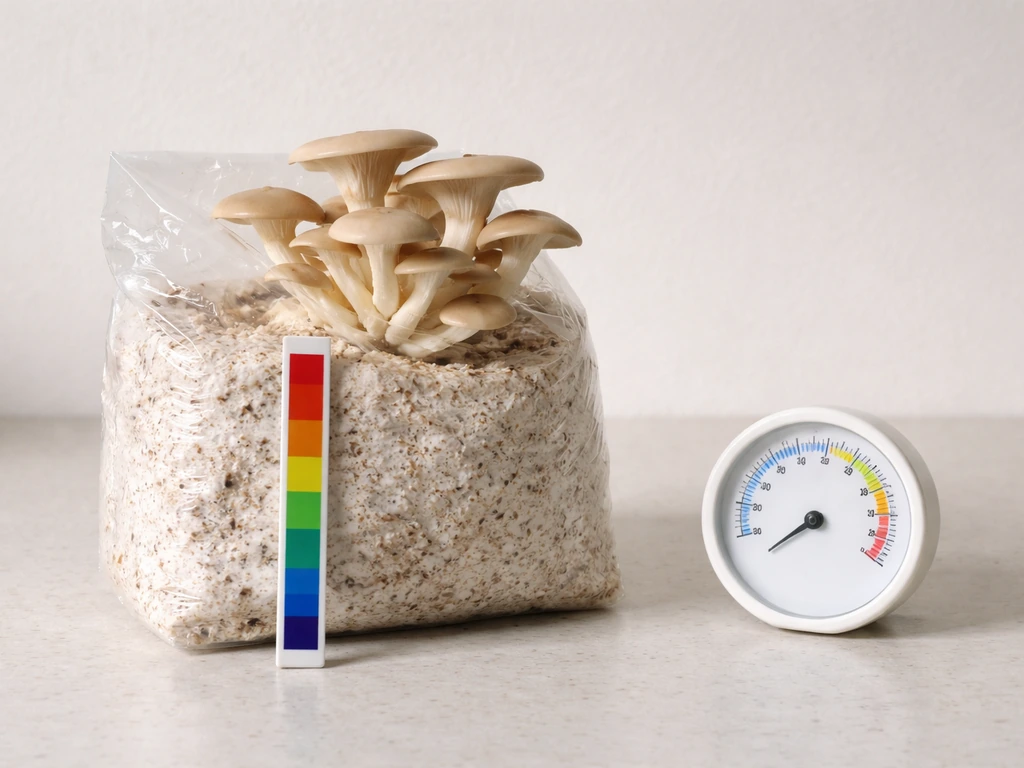
02 µm filter patches (there are 24 of them), a heat mat, a heat guard (a small plastic or foam layer that sits between the mat and your tub), a grow light, a thermometer strip, a bottle of isopropyl disinfectant mist, and a water mist bottle. The Inoculated Grow Bag should include just the bag and a sealing sticker.
Here's what the less obvious Mondotub parts are for: the 0.02 µm filter patches cover the pre-drilled holes in the tub and allow fresh air in while blocking contaminants. The heat guard sits in the water reservoir at the bottom of the tub and protects the substrate from direct heat. The thermometer strip sticks to the outside of the tub so you can monitor temperature without opening it. These aren't optional extras; they're all part of making the system work.
Cleaning and preparation before setup
Contamination is the number one killer of mushroom grows, and it almost always happens at the prep stage. Before you do anything with your substrate, clean your workspace and yourself. Do morel grow kits work well, but the results depend on consistent sanitation and the right temperature and humidity. Wash your hands and forearms with antibacterial soap and then spray with disinfectant. Work in a low-draft, clean environment, meaning no open windows with a breeze, no fans blowing nearby, and no pets or people moving around. Optional but genuinely helpful: nitrile gloves and a face mask.
For the Mondotub specifically, you need to disinfect the inside of the monotub thoroughly with the included isopropyl spray before putting anything in it. Spray every interior surface, let it air dry completely, then apply the 0.02 µm filter patches over each pre-drilled hole. This step is non-negotiable. A tub with an open unfiltered hole is an open invitation for contamination.
Before activating the Substrate Grow Kit, open the container and inspect the mycelium (the white, thread-like material covering the substrate). White or yellowish-white is healthy and normal. If you see any green, black, red, or pink patches, that's contamination. Do not activate a contaminated kit; discard it and contact the supplier. This is one of the most common first-time panics, and it's worth knowing: white fuzzy growth is almost always fine. It's the other colors you need to worry about.
Step-by-step setup for each kit type
Substrate Grow Kit setup
- After inspecting for contamination, fill the substrate container with clean drinkable tap water (not distilled, not mineral water). Close the lid and place the entire container in the fridge for 9 to 24 hours. This cold-soak activates the mycelium and hydrates the substrate. In a warm home, use the full 24 hours.
- After soaking, remove the container from the fridge and drain all excess water.
- Open the filter bag and place the substrate growkit inside it. Pour approximately 150 ml of fresh drinkable water directly into the bag (not onto the substrate block, but into the base of the bag).
- Fold the top of the filter bag over twice and seal it with the provided sticker.
- Place the bag in a bright spot with indirect sunlight. Avoid direct sun, which can overheat the substrate. Maintain a room temperature of 23 to 27°C. Never let it exceed 27°C.
Mondotub setup
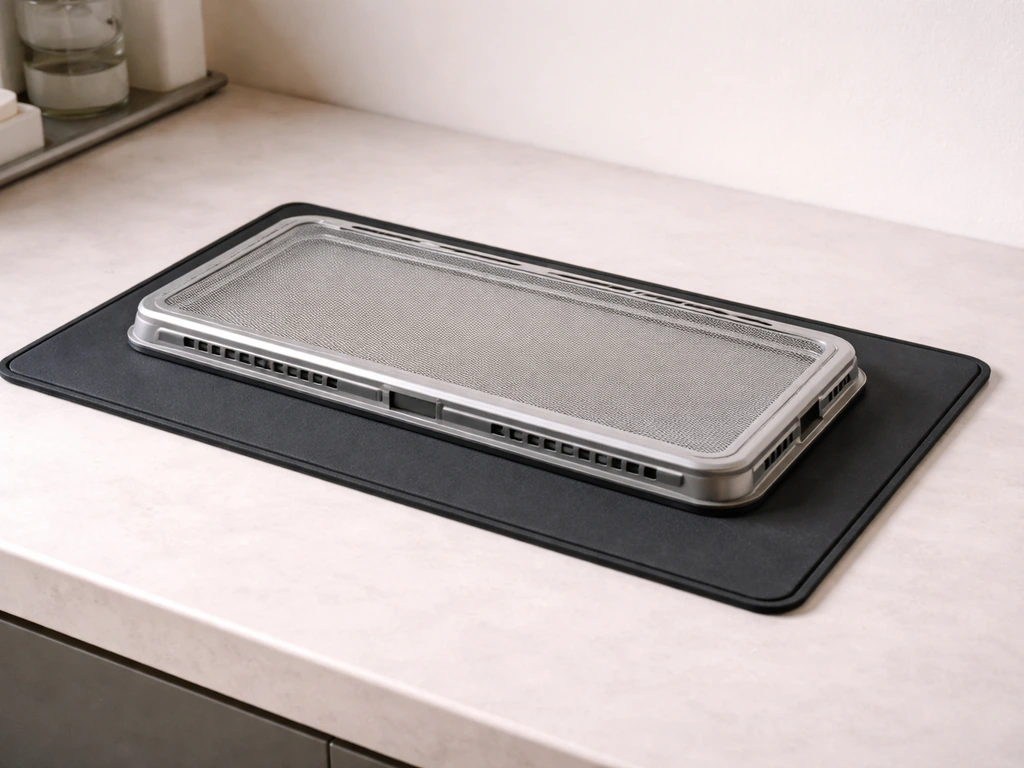
- After disinfecting and drying the tub interior and applying all filter patches, place the heat mat flat on your chosen surface. Put the heat guard on top of the mat.
- Pour clean drinking water into the bottom of the tub so there is a shallow reservoir. Place the tub on top of the heat guard.
- Position the grow light so its head is 15 to 30 cm above the top of the tub. Connect it to a timer. Set the timer based on your room's natural light: 3 hours if there's good natural light; 9 hours if natural light is limited; 12 hours if the space has no windows or is consistently dark.
- Stick the thermometer strip to the outside of the tub.
- Choose a stable spot away from direct sunlight and drafts. Only turn the heat mat on if your room temperature is consistently below 22°C. If the thermometer strip reads above 27°C at any point, turn the heat mat off or adjust it. A warm mat in a warm room will dry out the substrate and stop growth entirely.
Fully Inoculated Grow Bag setup
This is the simplest of the three. The substrate is already colonized, so there is no soaking or incubation phase. Open the bag carefully, inspect for contamination using the same color guide (white/yellowish-white is fine; green/black/red/pink is not), and then fold the top of the bag and seal it with the included sticker. Place it in the same conditions as the Substrate Grow Kit: indirect light, 23 to 27°C, and low draft. You are essentially starting at the fruiting stage immediately.
The first days: what to expect and how to manage humidity
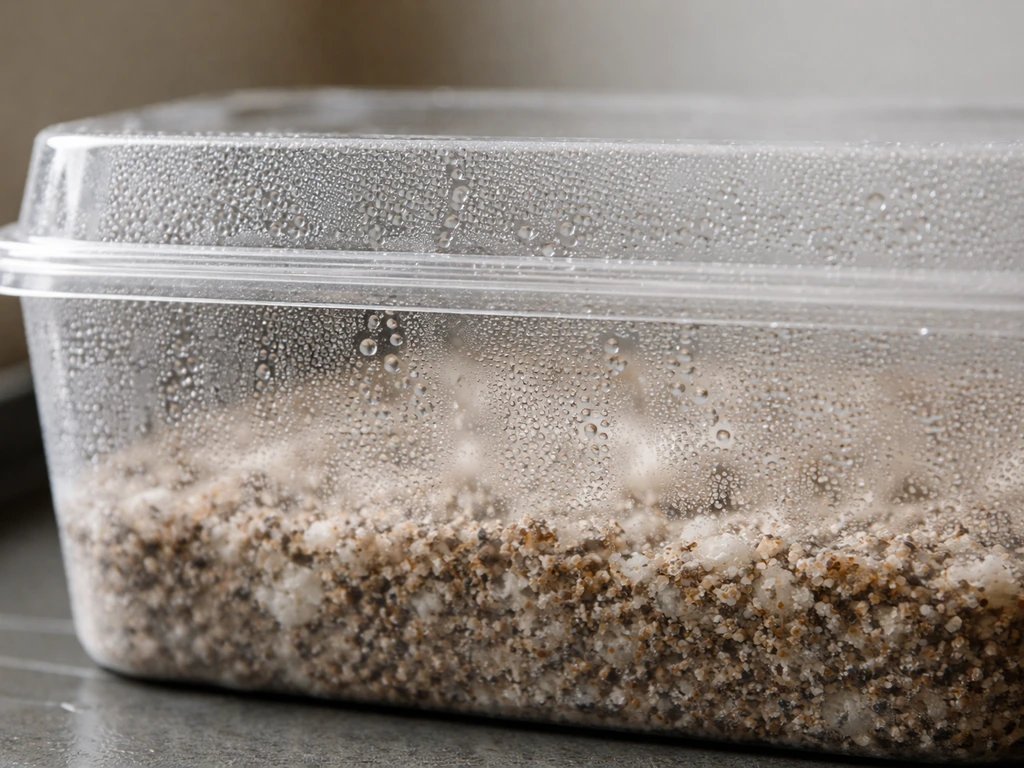
For the Substrate Grow Kit and Inoculated Grow Bag, the inside of the bag should start showing condensation (water droplets on the inner walls) within the first 24 to 48 hours. That condensation is your humidity indicator. If you see it forming, things are on track. If the bag looks dry with no moisture on the walls, open it and spray clean water on the inside walls (not directly on the substrate block), then re-seal it. Repeat this check daily until you see the first pin formation.
For the Mondotub, you should see condensation forming on the inside walls of the tub within a similar timeframe. If you don't see it, use the mist bottle to lightly mist the interior walls, then close the tub. Once you start seeing mushroom pins (tiny button-like bumps) forming on the substrate surface, stop misting entirely. Overwatering at this stage can stall or damage pin development. Also, once fruiting begins in the Mondotub, do not move or shake the tub. The passive fresh-air exchange through the filter patches handles ventilation; you do not need to open the tub at all during fruiting.
Pins should start appearing within 10 to 14 days in the Mondotub. The Substrate Grow Kit and Inoculated Grow Bag can vary depending on room conditions, but a similar window is typical. If nothing has happened by day 14 to 16, check temperature first: too cold (below 23°C) or too warm (above 27°C) are the two most common culprits.
Daily care from pins to harvest
Once you see the first pins in your Substrate Grow Kit or Grow Bag, your care routine changes. Stop spraying water inside the bag. Switch to daily fresh-air exchange: open the bag, gently squeeze out the old CO₂-rich air, allow fresh oxygen to flow in, then re-seal it. Do this one to three times per day. This step matters a lot: mushrooms need fresh air to develop properly, and without it you'll get deformed or stalled growth.
For the Mondotub, no action is needed during this phase. The filtered holes do the ventilation work automatically. If you're using an automated monotub style kit, the same filtered fresh-air setup applies, so keep the system closed during fruiting and follow the manual for timing beginner automated boomr bin cvg monotub mushroom grow kit. Your only job is to keep temperature in range, ensure the grow light timer is running correctly, and leave it alone.
Common problems and how to fix them
No growth or very slow growth after 2 weeks
Temperature is almost always the issue. Check your thermometer strip or room thermometer. The target range is 23 to 27°C. Below 23°C, mycelium activity slows dramatically. Above 27°C, the substrate can dry out and growth stops. For the Mondotub, also check whether the heat mat is running in a room that's already warm enough: a mat running in a 24°C room can push the substrate above the safe limit. Turn the mat off and monitor for 24 hours. Also verify humidity: if the bag or tub looks dry inside, mist the walls (not the substrate directly) and reseal.
Mold or unusual colors on the substrate
Green, black, red, or pink patches on the substrate surface are contamination, not mycelium. For more detail on mycelium grow kit instructions and how to keep your grow conditions stable, follow the steps that match your exact kit type mold or unusual colors. If you see these colors, do not try to save the kit. Remove it from your growing area immediately, seal it in a bag, and discard it. Disinfect your entire workspace before starting again. White mycelium can sometimes look alarming if you've never seen it before, especially if it's a bit fuzzy or yellowish, but that is normal and healthy. The rule is simple: white and fuzzy is fine; any other color is not.
Condensation is gone and the substrate looks dry
This means humidity has dropped. For the Substrate Grow Kit or Grow Bag, open the bag, mist the interior walls lightly with clean water (not the substrate block itself), reseal, and check again the next day. For the Mondotub, mist the interior walls with the included mist bottle and close the tub. In either case, if dryness keeps recurring, check room temperature and whether the heat mat (if you're using one) is running too warm.
Pins are forming but not maturing
This is almost always an air exchange or temperature issue. For bag-based kits, increase your fresh-air exchanges to three times daily, squeezing out CO₂ more thoroughly each time. Also verify your room temperature hasn't dropped below 23°C overnight. Check that your grow light timer is running on the correct schedule for your ambient light conditions. Pins need both fresh air and light to develop into mature mushrooms.
Deformed or leggy mushrooms
Long, thin, stem-heavy mushrooms with tiny caps are a sign of insufficient air exchange or too much CO₂. Open the bag more frequently and squeeze out the stale air more aggressively. For the Mondotub, double-check that all filter patches are properly applied and none have been blocked or peeled. Also confirm the grow light is at the correct height (15 to 30 cm above the kit) and running for enough hours per day.
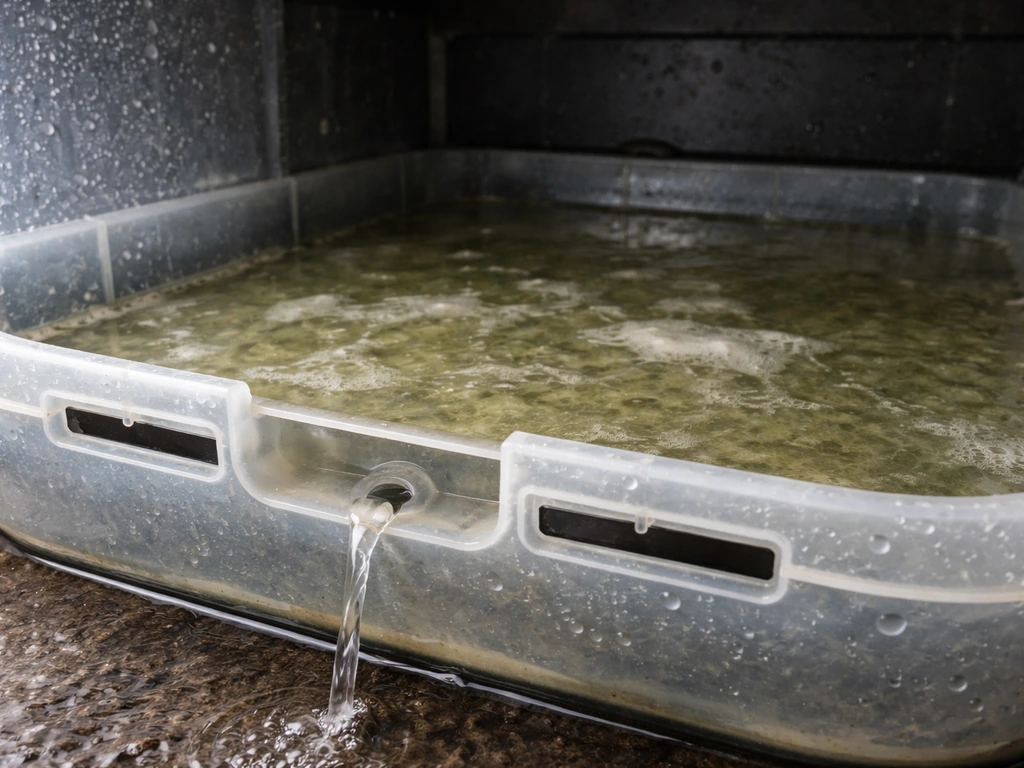
Water in the reservoir looks cloudy or slimy (Mondotub)
The small water reservoir in the Mondotub bottom should stay fairly clean. If it starts looking cloudy or develops a slimy film, carefully remove the heat guard and tub, drain the old water, rinse the base with clean water, refill with fresh drinking water, and reassemble. This is a hygiene issue and addressing it quickly prevents it from affecting the substrate. Avoid using tap water that's heavily chlorinated if you can, though standard drinkable tap water is generally fine per the manual.
Harvesting, hygiene, and what to do after the first flush
Harvest your mushrooms before the caps fully open. If you want a Lion’s Mane grow kit setup, look for a best lion's mane grow kit that matches the same hygiene, temperature, and fresh-air principles you’re already using here. You'll see the edges of the cap start to turn upward as they near full maturity. That's your window. Once caps open completely, spores release inside the bag or tub, creating a dark dusting of spore powder that can inhibit future growth and make a mess. To harvest, grip the mushroom at the base and gently twist and pull. Do not cut them, as leaving stubs behind can increase the risk of contamination at the harvest site.
After your first flush (harvest), you can run a second flush using the Substrate Grow Kit. Repeat the process from Step 2 onwards: drain, re-soak, reseal, and restart the humidity and air exchange cycle. Mondo's own manual recommends stopping after the second flush for safety reasons. Do not push for a third flush. Before resealing the kit for the second flush, wipe down the lid with disinfectant and let it dry.
For the Mondotub, after harvest clean the tub manually with warm water and a mild detergent. Do not put it in a dishwasher. The filter patches can be reused up to three times if they are clean and haven't been saturated with spores. If patches look clogged or spore-dusted, replace them before the next flush. Store the hardware components (heat mat, grow light, mist bottle) in a clean, dry place between uses.
A quick reference checklist for your first grow
- Confirm your exact kit model before reading instructions (Substrate Grow Kit, Mondotub, or Inoculated Grow Bag).
- Check all parts against the manual's component list before you start.
- Clean hands, forearms, and workspace with antibacterial soap and disinfectant spray.
- Inspect substrate for contamination: white/yellowish-white is fine; green/black/red/pink means discard.
- For Substrate Grow Kit: cold-soak in fridge for 9 to 24 hours, drain, add 150 ml fresh water to bag, seal.
- For Mondotub: disinfect tub interior, apply all filter patches, add water to base, set heat mat only if room is below 22°C, set grow light to correct timer schedule (3, 9, or 12 hours).
- For Inoculated Grow Bag: inspect and seal immediately; no soaking needed.
- Place all kits at 23 to 27°C, in indirect light, in a low-draft area.
- Check daily for condensation; mist inner walls (not substrate) if dry.
- Once pins appear: for bag kits, switch to daily fresh-air exchanges (1 to 3x per day), stop misting. For Mondotub, leave it alone.
- Harvest before caps fully open using a gentle twist-and-pull.
- Run a second flush if desired; stop after two flushes per Mondo's guidance.
- Clean all reusable components after each flush.
One final thing worth knowing: a lot of first-time Mondo growers report uncertainty online about whether they're following the right steps or whether what they're seeing is normal. That uncertainty is common and understandable, especially if you've never seen healthy mycelium before. If you've matched your kit to the right manual, kept things clean, and stayed within the temperature and humidity ranges, you're almost certainly on track.
Trust the process for at least 10 to 14 days before concluding something is wrong. If you're working through other kits or exploring mushroom cultivation further, the approach here shares a lot of overlap with other substrate-based systems, though each brand has its own quirks worth understanding separately. If you want a simple starting point, consider a beginner grow kit like the Mondo options and follow the matched manual step by step mushroom cultivation further.
FAQ
How often should I check my kit during incubation or early fruiting without causing problems?
Check less frequently than you think. During incubation, confirm color and condensation on the schedule your manual suggests (typically daily) and avoid repeatedly opening the bag or tub. Once pins appear, reduce interventions for all kits, for Mondotub keep it closed, for bag kits focus on fresh-air exchange rather than frequent inspections.
What should I do if I accidentally opened the Mondotub during fruiting?
If it was briefly opened, close it promptly and keep it undisturbed after. Verify the heat mat and light timer are still within range, and do not add extra mist after pins start. If pins stall for several days, recheck temperature first before changing humidity routines.
My thermometer strip shows a range, and the room thermometer disagrees. Which reading should I trust?
Use the strip reading as your primary reference for the Mondotub since it measures the tub’s outside temperature. For bag-based kits, room temperature is usually the better indicator, but place the room thermometer away from direct sunlight and drafts. If the two consistently differ, calibrate by comparing both sensors against each other in the same spot for a few hours.
Can I speed up growth by increasing humidity or misting more?
Usually no. Higher moisture is helpful early, but once you start seeing pins, excess misting can stall or damage development, especially in the Mondotub where ventilation is handled through filter patches. For bag kits, mist only the interior walls when dryness occurs, then switch to fresh-air exchange as instructed.
What if condensation never appears in my Substrate Grow Kit or Inoculated Grow Bag?
First verify temperature is within 23 to 27°C. Then check that you sealed the bag correctly after any earlier handling. If it still stays dry after your daily check, open it, mist only the interior walls with clean water, reseal, and recheck within 12 to 24 hours rather than repeatedly misting the substrate block.
Is it safe to use tap water for misting and the Mondotub reservoir refill?
In most cases, standard drinkable tap water is acceptable, but avoid highly chlorinated or heavily treated water if you can. If you suspect your local water is very chlorinated, let it sit to off-gas and use it for misting and reservoir top-ups as allowed by your manual.
What do I do if I see white fuzzy growth that also smells strongly unpleasant?
White fuzzy growth is typically healthy, but a sharp foul odor can be a warning sign. If odor is strong and paired with any non-white colored patches, treat it as contamination. Seal the kit away from your workspace, discard it, and disinfect surfaces before starting again.
How do I tell the difference between healthy mycelium and moldy contamination quickly?
Healthy mycelium stays white to yellowish-white and looks like soft thread-like or fuzzy growth. Any green, black, red, or pink coloring on the substrate or near the inner bag surface is contamination. If you are unsure, stop handling, wait a short period for color to stabilize, and compare with the manual’s color guide.
My pins are forming but turning deformed or stalling. What adjustment should I make first?
Start with fresh air and temperature. For bag kits, increase fresh-air exchange to the upper end of the recommended range and make sure you squeeze out CO₂ thoroughly each time. For Mondotub, confirm all filter patches are correctly seated and not blocked, then verify the heat mat is not overshooting.
What light schedule should I follow for the grow light, and what if my room is already bright?
Follow the kit’s manual for timer duration and intensity, but ambient brightness still matters. If your room gets strong indirect daylight, you may still need the kit’s light timer for consistent results. If mushrooms are growing tall with small caps, increase light exposure within the manual’s allowable range rather than adding more mist.
Can I move or rotate the kit to improve lighting or access during harvest prep?
Avoid moving during fruiting in the Mondotub since disturbing the system can disrupt development. For bag kits, minimize openings and handling once pins appear. If you must reposition for convenience, do it briefly and keep temperature and humidity stable afterward.
When I harvest, how do I prevent leftover stubs from causing contamination?
Twist gently at the base and remove the whole mushroom cleanly. Do not leave tall stubs, since they can become a moisture and contamination pocket. After harvesting, keep the kit sealed and follow the flush routine exactly, including disinfecting surfaces before resealing for a second flush.
Are filter patches in the Mondotub reusable between flushes, and what makes them unsafe to reuse?
They can be reused up to about three times if they stay clean and are not clogged or heavily coated with spores. If you see spore dust, smearing, or saturation that makes airflow uneven, replace them before the next flush to avoid cross-contamination and poor fresh-air exchange.
My second flush is weaker than the first. Is that always a problem?
Not always. Weak second flushes can happen due to how well the second flush was re-started and how stable conditions were. Ensure you fully follow the kit’s reseal and sanitation steps, wipe and disinfect the lid surface for bag-based kits, and avoid pushing a third flush if the manual recommends stopping for safety.
What should I do right after disposing of a contaminated kit?
Seal it in a bag, remove it from your growing area, and disinfect the workspace and any tools you used. Also wash your hands and forearms thoroughly before handling other kits. Let surfaces dry completely before starting a new kit to prevent residual spores or contamination from re-seeding.